opencv C++ SGBM/BM立体匹配,视差空洞消除,双目测距
git代码下载地址:GitHub - liuanqi-libra7/stereoVision: stereoVision
原始数据
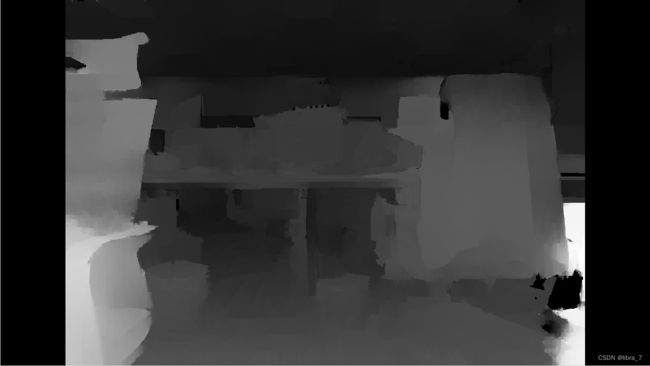
输出优化后的视差结果
核心代码
#include
#include
#include
#include
#include "opencv2/opencv.hpp"
#include "opencv2/ximgproc.hpp"

using namespace cv;
using namespace std;
using namespace ximgproc;

bool get_calib(std::string intrinsic_filename, std::string extrinsic_filename, Size img_size, vector& matrixs) {
	FileStorage fs(intrinsic_filename, FileStorage::READ);
	if (!fs.isOpened())
	{
		printf("Failed to open file %s\n", intrinsic_filename.c_str());
		return false;
	}

	Mat M1, D1, M2, D2;
	fs["M1"] >> M1;
	fs["D1"] >> D1;
	fs["M2"] >> M2;
	fs["D2"] >> D2;

	fs.open(extrinsic_filename, FileStorage::READ);
	if (!fs.isOpened())
	{
		printf("Failed to open file %s\n", extrinsic_filename.c_str());
		return false;
	}

	Mat R, T, R1, P1, R2, P2;
	fs["R"] >> R;
	fs["T"] >> T;

	Rect roi1, roi2;
	Mat Q;

	stereoRectify(M1, D1, M2, D2, img_size, R, T, R1, R2, P1, P2, Q, CALIB_ZERO_DISPARITY, -1, img_size, &roi1, &roi2);

	Mat map11, map12, map21, map22;
	initUndistortRectifyMap(M1, D1, R1, P1, img_size, CV_16SC2, map11, map12);
	initUndistortRectifyMap(M2, D2, R2, P2, img_size, CV_16SC2, map21, map22);
	matrixs.push_back(map11);
	matrixs.push_back(map12);
	matrixs.push_back(map21);
	matrixs.push_back(map22);
	matrixs.push_back(Q);

	return true;
}

int main(int argc, char** argv){

	std::string intrinsic_filename = "1280_720_intrinsics.yml";
	std::string extrinsic_filename = "1280_720_extrinsics.yml";
	Size img_size(1280, 720);

	//读取内外参数
	vector matrixs;
	if (!get_calib(intrinsic_filename, extrinsic_filename, img_size, matrixs)) {
		printf("get_calib fail\n");
		return -1;
	};

	//SGBM/BM参数初始化,依据自己场景做调整
	int window_size = 5;
	int blockSize = 5;
	int minDisparity = 128;
	int numDisparities = 128 * 2;
	int P1 = 8 * 3 * window_size*window_size;
	int P2 = 32 * 3 * window_size*window_size;
	int disp12MaxDiff = 1;
	int preFilterCap = 63;
	int uniquenessRatio = 15;
	int speckleWindowSize = 0;
	int speckleRange = 2;

#if 1 //SGBM
	Ptr left_matcher = StereoSGBM::create();
	//Ptrleft_matcher = StereoBM::create(16, 9);
	left_matcher->setMinDisparity(-minDisparity);
	left_matcher->setNumDisparities(numDisparities);
	left_matcher->setBlockSize(blockSize);
	left_matcher->setP1(P1);
	left_matcher->setP2(P2);
	left_matcher->setDisp12MaxDiff(disp12MaxDiff);
	left_matcher->setPreFilterCap(preFilterCap);
	left_matcher->setUniquenessRatio(uniquenessRatio);
	left_matcher->setSpeckleWindowSize(speckleWindowSize);
	left_matcher->setSpeckleRange(speckleRange);
	left_matcher->setMode(StereoSGBM::MODE_SGBM_3WAY);
#else //BM
	Ptrleft_matcher = StereoBM::create(16, 9);
	left_matcher->setMinDisparity(-minDisparity);
	left_matcher->setNumDisparities(numDisparities);
	left_matcher->setBlockSize(blockSize);
	left_matcher->setDisp12MaxDiff(disp12MaxDiff);
	left_matcher->setPreFilterCap(preFilterCap);
	left_matcher->setUniquenessRatio(uniquenessRatio);
	left_matcher->setSpeckleWindowSize(speckleWindowSize);
	left_matcher->setSpeckleRange(speckleRange);
#endif

	//RightMatcher 初始化
	int lmbda = 8000;
	int sigma = 1.5;
	Ptr right_matcher = cv::ximgproc::createRightMatcher(left_matcher);
	auto wls_filter = cv::ximgproc::createDisparityWLSFilter(left_matcher);
	wls_filter->setLambda(lmbda);
	wls_filter->setSigmaColor(sigma);

	Mat img_full, left_img, right_img, left_img_remap, right_img_remap;
	Mat disp_left, disp_right, disp_end, disp_show;
	Mat threeD3;

	img_full = imread("20220804154537.jpg");
	if (img_full.empty()) {
		cout << "No img Data" << endl;
		return -1;
	}
	left_img  = img_full(Rect(0, 0, 1280, 720));
	right_img = img_full(Rect(1280, 0, 1280, 720));

	cvtColor(left_img,  left_img,  CV_BGR2GRAY);
	cvtColor(right_img, right_img, CV_BGR2GRAY);
	remap(left_img,   left_img_remap, matrixs[0], matrixs[1], INTER_LINEAR);
	remap(right_img, right_img_remap, matrixs[2], matrixs[3], INTER_LINEAR);

#if 1 //显示极线矫正后的结果
	Mat remap_full(Size(2560, 720), CV_8UC1);
	left_img_remap.copyTo(remap_full(Rect(0, 0, 1280, 720)));// = left_img_remap.clone();
	right_img_remap.copyTo(remap_full(Rect(1280, 0, 1280, 720)));// = right_img_remap.clone();

	for (int kk = 0; kk < 720; kk+=50){
		line(remap_full, Point(0, kk), Point(2560, kk), Scalar(255), 2);
	}

#endif
	left_matcher->compute(left_img_remap, right_img_remap, disp_left);
	right_matcher->compute(right_img_remap, left_img_remap, disp_right);
	wls_filter->filter(disp_left, left_img, disp_end, disp_right);

	disp_end.setTo(0, disp_end < 0);
	cv::normalize(disp_end, disp_show, 0, 255, CV_MINMAX, CV_8U);
	reprojectImageTo3D(disp_end, threeD3, matrixs[4], true);
	threeD3 *= 16;
	threeD3 /= 1000.; //以米为单位
	vector split_vec;
	split(threeD3, split_vec);
	auto x = split_vec[0].clone();
	auto y = split_vec[1].clone();
	auto z = split_vec[2].clone();
	cv::imshow("left_img", left_img);
	cv::imshow("disp_show", disp_show);
	cv::waitKey();
}
极线矫正结果图
右视差效果图
视差空洞填充后效果图
(ximgproc::createRightMatcher依据左右视差,类似双边滤波操作)
该工程用到了opencv contrib中的ximgproc模块,所以需要对opencv进行重编译,把Contrib库编译进去,编译步骤如下:
Opencv Contrib 库安装
系统要求:ubuntu18.04
软件要求:vscode, opencv 3.4.9, opencv_contrib 3.4.9, mingw-w64, cmake-gui工具
opencv下载地址:https://github.com/opencv/opencv/archive/3.4.9.zip
contrib 下载地址: https://github.com/opencv/opencv_contrib/releases/tag/3.4.9
下载cmake-gui工具和mingw-w64,运行以下命令即可
$ sudo apt install cmake-qt-gui
$ sudo apt install mingw-w64
安装opencv依赖
$ sudo apt install cmake
$ sudo apt install build-essential libgtk2.0-dev libavcodec-dev libavformat-dev libjpeg.dev libtiff4.dev libswscale-dev libjasper-dev
编译安装opencv
打开cmake-gui,设置opencv源文件路径,以及Build的路径
CmakeSetup窗口默认选择,随后点击Configure按钮
1. 在搜索栏搜索EXTRA,将OPENCV_EXTRA_MODULE_PATH的值改成/path/to/opencv_contrib-3.4.9/modules。
2. 修改install的路径,以防和其他opencv版本冲突
然后再点击Configure --> Generate。
Cmake过程中遇到问题解决
Q:fatal error: boostdesc_bgm.i无法下载
A:执行以下脚本,下载好放到指定目录opencv_contrib-3.4.9/modules/xfeatures2d/cmake/cache
#!/bin/bash
cd ./cache/xfeatures2d/
cd boostdesc

curl https://raw.githubusercontent.com/opencv/opencv_3rdparty/34e4206aef44d50e6bbcd0ab06354b52e7466d26/boostdesc_lbgm.i > 0ae0675534aa318d9668f2a179c2a052-boostdesc_lbgm.i
curl https://raw.githubusercontent.com/opencv/opencv_3rdparty/34e4206aef44d50e6bbcd0ab06354b52e7466d26/boostdesc_binboost_256.i > e6dcfa9f647779eb1ce446a8d759b6ea-boostdesc_binboost_256.i
curl https://raw.githubusercontent.com/opencv/opencv_3rdparty/34e4206aef44d50e6bbcd0ab06354b52e7466d26/boostdesc_binboost_128.i > 98ea99d399965c03d555cef3ea502a0b-boostdesc_binboost_128.i
curl https://raw.githubusercontent.com/opencv/opencv_3rdparty/34e4206aef44d50e6bbcd0ab06354b52e7466d26/boostdesc_binboost_064.i > 202e1b3e9fec871b04da31f7f016679f-boostdesc_binboost_064.i
curl https://raw.githubusercontent.com/opencv/opencv_3rdparty/34e4206aef44d50e6bbcd0ab06354b52e7466d26/boostdesc_bgm_hd.i > 324426a24fa56ad9c5b8e3e0b3e5303e-boostdesc_bgm_hd.i
curl https://raw.githubusercontent.com/opencv/opencv_3rdparty/34e4206aef44d50e6bbcd0ab06354b52e7466d26/boostdesc_bgm_bi.i > 232c966b13651bd0e46a1497b0852191-boostdesc_bgm_bi.i
curl https://raw.githubusercontent.com/opencv/opencv_3rdparty/34e4206aef44d50e6bbcd0ab06354b52e7466d26/boostdesc_bgm.i > 0ea90e7a8f3f7876d450e4149c97c74f-boostdesc_bgm.i
cd ../vgg
curl https://raw.githubusercontent.com/opencv/opencv_3rdparty/fccf7cd6a4b12079f73bbfb21745f9babcd4eb1d/vgg_generated_120.i > 151805e03568c9f490a5e3a872777b75-vgg_generated_120.i
curl https://raw.githubusercontent.com/opencv/opencv_3rdparty/fccf7cd6a4b12079f73bbfb21745f9babcd4eb1d/vgg_generated_64.i > 7126a5d9a8884ebca5aea5d63d677225-vgg_generated_64.i
curl https://raw.githubusercontent.com/opencv/opencv_3rdparty/fccf7cd6a4b12079f73bbfb21745f9babcd4eb1d/vgg_generated_48.i > e8d0dcd54d1bcfdc29203d011a797179-vgg_generated_48.i
curl https://raw.githubusercontent.com/opencv/opencv_3rdparty/fccf7cd6a4b12079f73bbfb21745f9babcd4eb1d/vgg_generated_80.i > 7cd47228edec52b6d82f46511af325c5-vgg_generated_80.i
Q:face_landmark_model.dat无法下载
A:按照下方链接下载好放到指定目录,并修改对应face模块makefile,修改方式如下图
下载地址https://raw.githubusercontent.com/opencv/opencv_3rdparty/8afa57abc8229d611c4937165d20e2a2d9fc5a12/face_landmark_model.dat
$ cd /cmake时候你指定的opencv build path/
$ sudo make -j32
$ sudo make install 


