数字图像处理(入门篇)六 图像数据预处理之坐标变化

目录
1 平移
2 镜像
3 旋转
4 缩放
图像的坐标变换又称为图像的几何计算,常见的基本变换包括:平移、旋转、镜像和缩放等等。
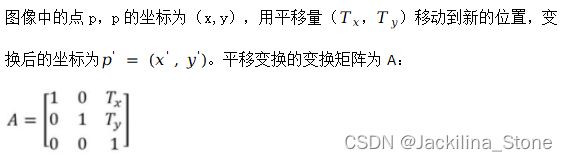
1 平移
(1)代码
使用OpenCV仿射变换函数(cv2.warpAffine)实现平移操作。
import numpy as np
import matplotlib.pyplot as plt
import cv2
def translation(img, x, y):
    (h, w) = img.shape[:2]
    M = np.float32([[1, 0, x], [0, 1, y]])# 定义平移矩阵
    translation_img = cv2.warpAffine(img, M, (w, h))
    return translation_img
def run(img_path):
    img = cv2.imread(img_path)
    shifted_1 = translation(img, 0, 50)# 下移50像素
    shifted_2 = translation(img, 100, 50)# 右移100,下移50像素
    shifted_3 = translation(img, -50, 0)# 左移50像素
    cv2.imwrite("result.jpg", shifted_3)
    titles = ["img", "(0,50)", "(100,50)", "(-50,0)"]
    images = [img, shifted_1, shifted_2, shifted_3]
    for i in range(4):
        plt.subplot(2, 2, i + 1), plt.imshow(images[i], 'gray')
        plt.title(titles[i])
        plt.xticks([]), plt.yticks([])
    plt.show()
if __name__ == '__main__':
    run("test_rgb.jpg")
    pass
(2)结果图

2 镜像

(1)代码
import matplotlib.pyplot as plt
import cv2
def run(img_path):
    img = cv2.imread(img_path)
    flip_0 = cv2.flip(img, 0)# 垂直镜像
    flip_1 = cv2.flip(img, 1)# 水平镜像
    titles = ["img", "vertical", "horizontal"]
    images = [img, flip_0, flip_1]
    for i in range(3):
        plt.subplot(1, 3, i + 1), plt.imshow(images[i], 'gray')
        plt.title(titles[i])
        plt.xticks([]), plt.yticks([])
    plt.show()
if __name__ == '__main__':
    run("test_rgb.jpg")
    pass
(2)结果图

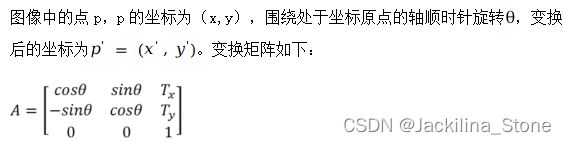
3 旋转
(1)代码
使用 OpenCV 仿射变换函数(cv2.warpAffine)实现旋转操作。
import numpy as np
import matplotlib.pyplot as plt
import cv2
def rotateImg(img, angle, center=None, scale=1.0):
    (h, w) = img.shape[:2]
    if center is None:
        center = (w / 2, h / 2)# 旋转中心的缺失值为图像中心
    M = cv2.getRotationMatrix2D(center, angle, scale)# 调用计算旋转矩阵函数
    rotated_img = cv2.warpAffine(img, M, (w, h))
    return rotated_img
def run(img_path):
    img = cv2.imread(img_path)
    rotated_1 = rotateImg(img, 45)# 逆时针45度
    rotated_2 = rotateImg(img, -60)# 顺时针60度
    rotated_3 = rotateImg(img, 90)# 逆时针90度
    titles = ["img", "45", "-60", "90"]
    images = [img, rotated_1, rotated_2, rotated_3]
    for i in range(4):
        plt.subplot(2, 2, i + 1), plt.imshow(images[i], 'gray')
        plt.title(titles[i])
        plt.xticks([]), plt.yticks([])
    plt.show()
if __name__ == '__main__':
    run("test_rgb.jpg")
    pass
(2)结果图

4 缩放
(1)缩放

(2)插值

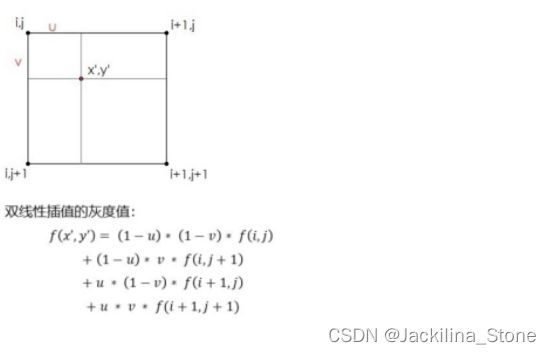
优点:放大后图像质量高,不会出现像素值不连续的情况。
(3)代码
import cv2
def run(img_path):
    img = cv2.imread(img_path)
    (h, w) = img.shape[:2]
    # 最邻近插值
    resized_1 = cv2.resize(img, (10, 10), interpolation=cv2.INTER_NEAREST)
    # 双线性插值
    resized_2 = cv2.resize(img, (600, 700), interpolation=cv2.INTER_LINEAR)
    cv2.namedWindow('(10, 10)', cv2.WINDOW_NORMAL)
    cv2.imshow("(10, 10)", resized_1)
    cv2.waitKey(0)
    cv2.destroyAllWindows()
if __name__ == '__main__':
    run("test.jpg")
    pass
(4)结果图
