Android Application Programming with OpenCV——识别与跟踪图片
这篇文章按照之前文章的约定,给大家简单解读一下《Android Application Programming with OpenCV》这本书第四章的内容。
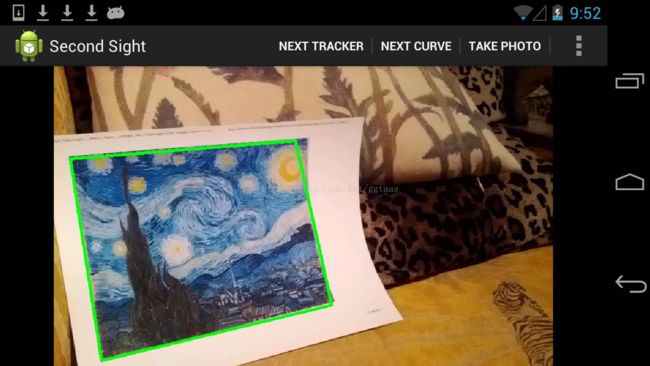
这一章主要介绍OpenCV中图像检测算法的应用,通过图像检测、描述和匹配算法,获取最优的匹配对,再计算出单应性矩阵,从而可以准确定位到标志图片在获取的视频帧中的位置,并使用线框将其框选出来,如下图所示:

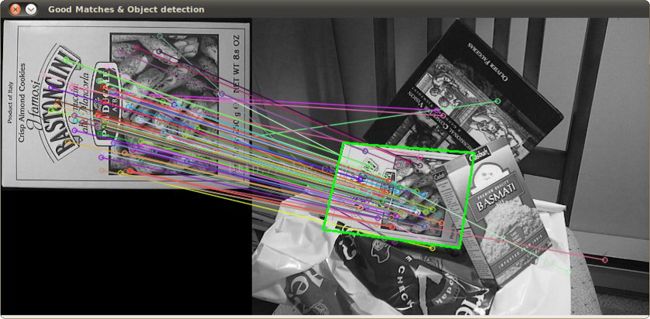
下面这个图是在opencv官方教程feature 2d module中的sample,和本书所讲的内容很相似。一个是在Android系统环境下实现,一个是使用C++实现,但是其中的算法思想是一致。我之前写得方法是使用NDK编程,可以参考官方教程编写C++程序,然后使用NDK编译出动态链接库so文件,再使用JNI在java层对其调用,实现算法。而本书有个特点就是,在Android系统下实现的该算法并没有使用NDK编程,完全利用OpenCV4Android提供函数库进行编写(纯java),这个也是吸引我学习这本书的地方之一吧。

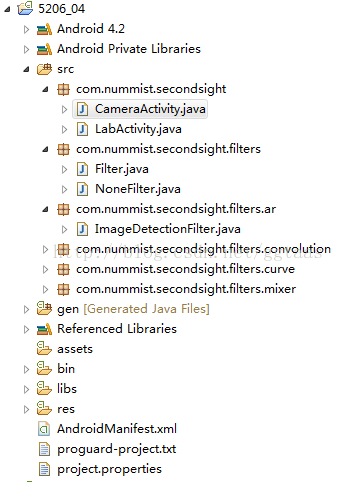
主要看我展开的包中的内容,第一个包是程序的入口,第二包是Filter的接口类,实现这个接口需要复写apply方法。第三个包是实现AR的filter的配置和实现。
其中CameraActivity为程序主类,有OpenCV4Android的接口的标准化调用方法,Filter的实例化。

privateBaseLoaderCallbackmLoaderCallback =

        new BaseLoaderCallback(this) {

        @Override

        publicvoid onManagerConnected(finalint status) {

            switch (status) {

                case LoaderCallbackInterface.SUCCESS:

                    Log.d(TAG,"OpenCV loaded successfully");

                    mCameraView.enableView();

                    mBgr =new Mat();

                   final Filter starryNight;

                    try {

                      //设定过滤器以及模版图片

                        starryNight =new ImageDetectionFilter(

                                CameraActivity.this,

R.drawable.starry_night);

                    } catch (IOException e) {

                        Log.e(TAG,"Failed to load drawable: " +

                                "starry_night");

                        e.printStackTrace();

                        break;

                    }

……(省略其他filter的实例化)

}

}

};需要实现这个接口,CvCameraViewListener2,并且需要复写接口方法,如下图所示:
这个可以参看OpenCV4Android的api介绍
http://docs.opencv.org/java/2.4.4/
最主要就是onCameraFrame这个方法了:
@Override

   publicMat onCameraFrame(final CvCameraViewFrame inputFrame) {

        final Mat rgba = inputFrame.rgba();


        // Apply the active filters.

        //主要看target检测效果,其他过滤效果可以不用看

        if (mImageDetectionFilters !=null){

mImageDetectionFilters[mImageDetectionFilterIndex].apply(

                    rgba, rgba);

        }

        if (mCurveFilters !=null){

mCurveFilters[mCurveFilterIndex].apply(rgba,rgba);

        }

        if (mMixerFilters !=null){

mMixerFilters[mMixerFilterIndex].apply(rgba,rgba);

        }

        if (mConvolutionFilters !=null){

mConvolutionFilters[mConvolutionFilterIndex].apply(

                    rgba, rgba);

        }

        if (mIsPhotoPending) {

            mIsPhotoPending =false;

            takePhoto(rgba);

        }

        if (mIsCameraFrontFacing) {

            // Mirror (horizontally flip) the preview.

            Core.flip(rgba, rgba, 1);

        }

        return rgba;

}看到这个主要需要研究其中aplly方法的实现。好的,再去看看包下的这个类。
/**
 * 图像检测的类,大概思路如下所示
 * 1、对参考图片和实时获取的视频帧数据的处理(特征点的检测描述)
 * 2、对描述的特征点进行匹配运算
 * 3、根据匹配结果判断特征点之间距离,在根据距离拾取最佳的点
 * 4、根据拾取的点计算出单应性矩阵
 * 5、根据单应性矩阵对模版图片进行透视变换,
 * 6、再提取变化之后的角点坐标,使用线框连接四个角点即可
 * @author scy
 *
 */
public class ImageDetectionFilter implements Filter {

	// 参考图片帧
    private final Mat mReferenceImage;
    private final MatOfKeyPoint mReferenceKeypoints =
            new MatOfKeyPoint();
    private final Mat mReferenceDescriptors = new Mat();
    // CVType defines the color depth, number of channels, and
    // channel layout in the image.
    private final Mat mReferenceCorners =
            new Mat(4, 1, CvType.CV_32FC2);

    // 场景图片帧
    private final MatOfKeyPoint mSceneKeypoints =
            new MatOfKeyPoint();
    private final Mat mSceneDescriptors = new Mat();
    private final Mat mCandidateSceneCorners =
            new Mat(4, 1, CvType.CV_32FC2);
    private final Mat mSceneCorners = new Mat(4, 1, CvType.CV_32FC2);
    private final MatOfPoint mIntSceneCorners = new MatOfPoint();

    // 灰度图片
    private final Mat mGraySrc = new Mat();
    // 获取匹配对
    private final MatOfDMatch mMatches = new MatOfDMatch();
    /**
     *
     * 定义检测、描述和匹配相关算法
     * 使用star、freak和汉明距离的强制匹配算法
     */
    private final FeatureDetector mFeatureDetector =
            FeatureDetector.create(FeatureDetector.STAR);
    private final DescriptorExtractor mDescriptorExtractor =
            DescriptorExtractor.create(DescriptorExtractor.FREAK);
    private final DescriptorMatcher mDescriptorMatcher =
            DescriptorMatcher.create(
                    DescriptorMatcher.BRUTEFORCE_HAMMING);
    // 设置line绘制的颜色,绿色
    private final Scalar mLineColor = new Scalar(0, 255, 0);

    /**
     * 构造方法,类的初始化,以及对模板(参考)图片的一些处理
     * @param context
     * @param referenceImageResourceID
     * @throws IOException
     */
    public ImageDetectionFilter(final Context context,
            final int referenceImageResourceID) throws IOException {

    	//加载图片
        mReferenceImage = Utils.loadResource(context,
                referenceImageResourceID,
                Highgui.CV_LOAD_IMAGE_COLOR);
        // 对图片进行格式转换
        final Mat referenceImageGray = new Mat();
        Imgproc.cvtColor(mReferenceImage, referenceImageGray,
                Imgproc.COLOR_BGR2GRAY);
        Imgproc.cvtColor(mReferenceImage, mReferenceImage,
                Imgproc.COLOR_BGR2RGBA);
        // 定义参考图片的上下左右角点,为后面 的仿射变化做准备
        mReferenceCorners.put(0, 0,
                new double[] {0.0, 0.0});
        mReferenceCorners.put(1, 0,
                new double[] {referenceImageGray.cols(), 0.0});
        mReferenceCorners.put(2, 0,
                new double[] {referenceImageGray.cols(),
                        referenceImageGray.rows()});
        mReferenceCorners.put(3, 0,
                new double[] {0.0, referenceImageGray.rows()});
        // 对特征点进行检测和描述
        mFeatureDetector.detect(referenceImageGray,
                mReferenceKeypoints);
        mDescriptorExtractor.compute(referenceImageGray,
                mReferenceKeypoints, mReferenceDescriptors);
    }

    /**
     *
     * 对场景图片帧进行相关处理
     * 其中在这里获取匹配对
     * 然后绘制获取的线框
     */
    @Override
    public void apply(final Mat src, final Mat dst) {
        Imgproc.cvtColor(src, mGraySrc, Imgproc.COLOR_RGBA2GRAY);

        mFeatureDetector.detect(mGraySrc, mSceneKeypoints);
        mDescriptorExtractor.compute(mGraySrc, mSceneKeypoints,
                mSceneDescriptors);
        mDescriptorMatcher.match(mSceneDescriptors,
                mReferenceDescriptors, mMatches);

        findSceneCorners();
        draw(src, dst);
    }

    private void findSceneCorners() {

        List matchesList = mMatches.toList();
        // 匹配对太少
        if (matchesList.size() < 4) {
            // There are too few matches to find the homography.
            return;
        }
        // 将MatOfKeyPoint数据结构存储的特征点数据转换成List,便于后面获取
        List referenceKeypointsList =
                mReferenceKeypoints.toList();
        List sceneKeypointsList =
                mSceneKeypoints.toList();

        // Calculate the max and min distances between keypoints.
        // 计算特征点之间的最大和最小距离
        double maxDist = 0.0;
        double minDist = Double.MAX_VALUE;
        for(DMatch match : matchesList) {
            double dist = match.distance;
            if (dist < minDist) {
                minDist = dist;
            }
            if (dist > maxDist) {
                maxDist = dist;
            }
        }

        // The thresholds for minDist are chosen subjectively
        // based on testing. The unit is not related to pixel
        // distances; it is related to the number of failed tests
        // for similarity between the matched descriptors.
        // 根据距离对角点进行取舍
        if (minDist > 50.0) {
            // The target is completely lost.
            // Discard any previously found corners.
            mSceneCorners.create(0, 0, mSceneCorners.type());
            return;
        } else if (minDist > 25.0) {
            // The target is lost but maybe it is still close.
            // Keep any previously found corners.
            return;
        }

        // Identify "good" keypoints based on match distance.
        ArrayList goodReferencePointsList =
                new ArrayList();
        ArrayList goodScenePointsList =
                new ArrayList();
        // 最佳距离极限为minDist的1.75倍,然后拾取在此范围的点到ArrayList中
        double maxGoodMatchDist = 1.75 * minDist;
        for(DMatch match : matchesList) {
            if (match.distance < maxGoodMatchDist) {
               goodReferencePointsList.add(
                       referenceKeypointsList.get(match.trainIdx).pt);
               goodScenePointsList.add(
                       sceneKeypointsList.get(match.queryIdx).pt);
            }
        }

        // 如果在范围内的(拾取到的)点数小于4,则表示没有发现标志
        if (goodReferencePointsList.size() < 4 ||
                goodScenePointsList.size() < 4) {
            // There are too few good points to find the homography.
            return;
        }

        // 再从ArrayList转换成MatOfPoint2f数据结构(OpenCV中),同样是为了后面的处理
        // 一个是参考图片的点数据,一个是图像帧的点数据
        MatOfPoint2f goodReferencePoints = new MatOfPoint2f();
        goodReferencePoints.fromList(goodReferencePointsList);

        MatOfPoint2f goodScenePoints = new MatOfPoint2f();
        goodScenePoints.fromList(goodScenePointsList);

        // 计算单应性矩阵,根据最佳参考图像和场景图片的特征点(需要描述)
        Mat homography = Calib3d.findHomography(
                goodReferencePoints, goodScenePoints);
        /**
         * 根据单应性矩阵对参考图像帧进行透视变换,将2D场景转换成3D
         * 保存在mCandidateSceneCorners
         */
        Core.perspectiveTransform(mReferenceCorners,
                mCandidateSceneCorners, homography);
        // 对mCandidateSceneCorners进行类型转换
        mCandidateSceneCorners.convertTo(mIntSceneCorners,
                CvType.CV_32S);
        // 输入数据(四边形)必须是凸面
        if (Imgproc.isContourConvex(mIntSceneCorners)) {
            mCandidateSceneCorners.copyTo(mSceneCorners);
        }
    }

    protected void draw(Mat src, Mat dst) {
        if (dst != src) {
            src.copyTo(dst);
        }
        // 如果没有找到标志,在左上角绘制标志图片的缩影
        if (mSceneCorners.height() < 4) {
            // The target has not been found.

            // Draw a thumbnail of the target in the upper-left
            // corner so that the user knows what it is.

            int height = mReferenceImage.height();
            int width = mReferenceImage.width();
            int maxDimension = Math.min(dst.width(),
                    dst.height()) / 2;
            double aspectRatio = width / (double)height;
            if (height > width) {
                height = maxDimension;
                width = (int)(height * aspectRatio);
            } else {
                width = maxDimension;
                height = (int)(width / aspectRatio);
            }
            Mat dstROI = dst.submat(0, height, 0, width);
            Imgproc.resize(mReferenceImage, dstROI, dstROI.size(),
                    0.0, 0.0, Imgproc.INTER_AREA);
            return;
        }

        // 找到标志之后绘制标志边框,参考图片四个角点经过透视变换转换成模版图片中的四个角点
        // 这样就完成了!
        // Outline the found target in green.
        Core.line(dst, new Point(mSceneCorners.get(0, 0)),
                new Point(mSceneCorners.get(1, 0)), mLineColor, 4);
        Core.line(dst, new Point(mSceneCorners.get(1, 0)),
                new Point(mSceneCorners.get(2, 0)), mLineColor, 4);
        Core.line(dst, new Point(mSceneCorners.get(2, 0)),
                new Point(mSceneCorners.get(3, 0)), mLineColor, 4);
        Core.line(dst, new Point(mSceneCorners.get(3,0)),
                new Point(mSceneCorners.get(0, 0)), mLineColor, 4);
    }
}
通过这些就可以得到开始的效果图了。
声明:本人水平有限,如果有什么地方描述欠妥,欢迎指正。同时也欢迎大家有什么疑问可以在文章后面提,谢谢!
AR研发团队招募有梦想的年轻人,有兴趣可以私信我,最好是在深圳。