AI推理卡/tensorRT c++
##我的需求:x86上Nvidia显卡训练好的模型用在AI推理卡上,host端运行C++主程序device端的AI推理卡提供NN算力,进行推理##
AI 推理卡
环境配置
安装ubuntu系统、AI推理卡环境
1,安装ubuntu20.04.4 过程忽略,网上教程很多。
2,ubuntu20.04.4设置root登录,参考 Ubuntu系统设置默认用户为root并自动登录(详解)_偷心的小白的博客-CSDN博客_ubuntu默认root登录
3,ubuntu20.04.4网络配置
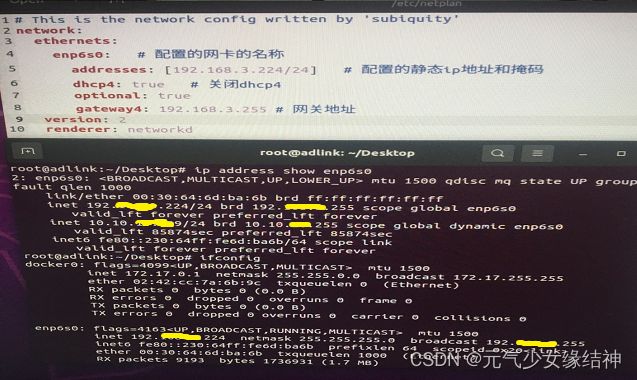
发现可以连接内网,但连接不了外网。通过ifconfig 先查到我的网卡名称,我的是enp6s0。看大家说要编辑/etc/systemd/resolved.conf 文件,增加 DNS=114.114.114.114 以及 DNS=8.8.8.8然而并无作用。我的做法是 修改/etc/netplan/ 下面的 .yaml文件,下图是原本的样子:
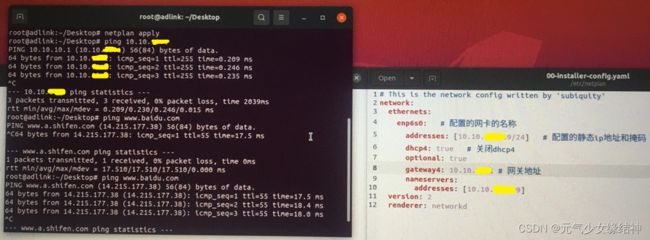
通过上面的命令可以看到这台电脑的内网IP是10.10.XXXXX9/24,于是我将yaml文件修改为下面的样子,即addresses改成这台机器的内网IP,网关大家可以通过 route 命令查看,然后填在下方即可:
改完 netplan apply 一下,不放心再重启一次即可看到 ping 内网以及外网均OK了。
4,设置远程(这步可以不做,我是想通过远程操作这台主机,因为声音太吵了)
我按照Ubuntu20.04桌面共享-爱码网 ubuntu20.10设置桌面共享的三种方式_xingyu97的博客-CSDN博客_ubuntu桌面共享 这些流程操作发现sharing--Screen Sharing的使能按钮打不开,无法打到On状态:
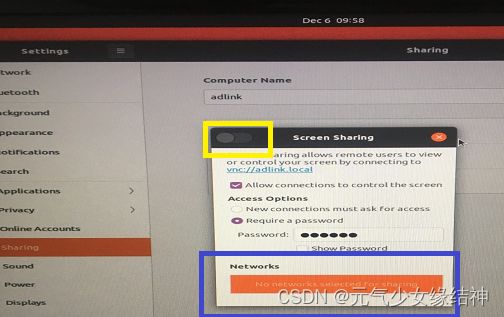 究其原因是蓝色处的网络没正确自动显示,导致使用VNC Viewer连接时显示“The connection was refused by the computer”。查了下按照大家说的将下面设置为自动:
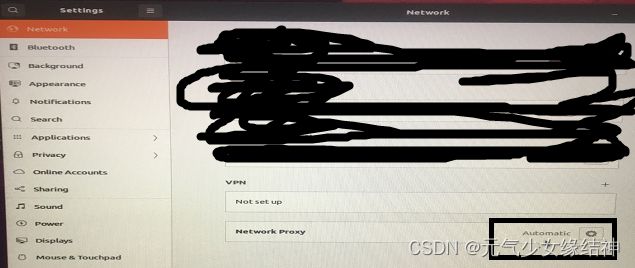 然后并不起作用。后面找了很久xorg - Ubuntu 18.04.1 LTS Can't Enable Screen Sharing - Ask Ubuntu 终于找到这个解决办法:
cd /etc/NetworkManager
save NetworkManager.conf to NetworkManager.orig (as a backup)
sudo vi NetworkManager.conf
Change managed=false to managed=true
sudo service network-manager restart
cd /etc/netplan
sudo vi xxxxxxxxxx.yaml
Change renderer under networt from networkd to NetworkManager like below:
renderer: NetworkManager
save
sudo netplan apply
I had then to restart the computer for this to be effective.Then you can go to Settings » Sharing » Screen Sharing and set it to On 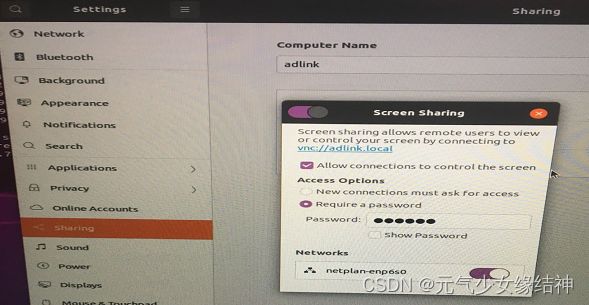 可以看到现在已经可以正常开启。重启后,开机时会出现下图红色的部分failed,不用在意。
 通过VNC Viewer连接大家可以看到已经连接上了这台主机:
5,python安装
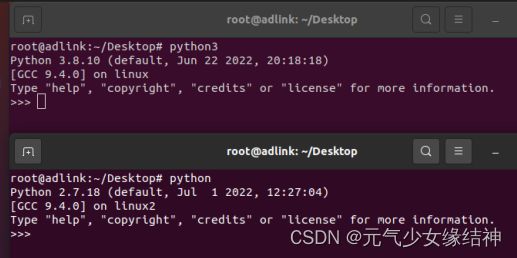
网上教程很多,如下python2和python3都安装了:
6,固件与驱动 的安装大家根据官方文档《NPU驱动和固件安装指南》进行即可,参考网址华为 Atlas 300I Pro 配置手册、产品文档、PDF - 华为即可,大家可以直接将技术文档都下载下来。安装完毕后大家可以 npu-smi info -t board -i NPU ID 命令查询是可以看到的:
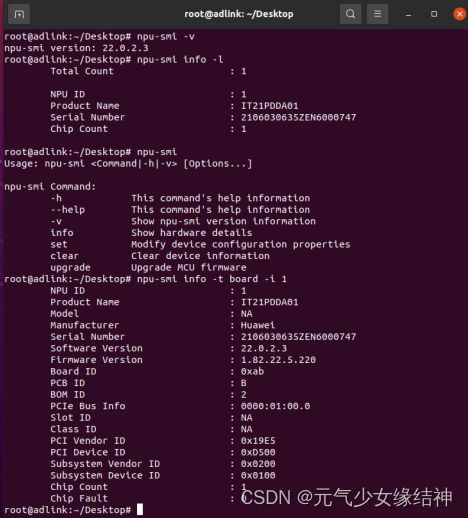
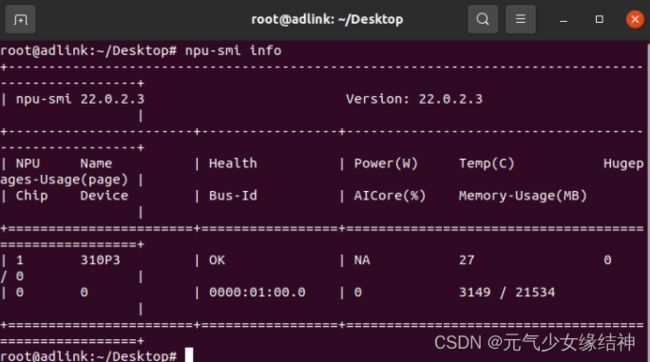 由图可知我安装的驱动是22.0.2.3,固件是1.82.22.5.220,处理器是310P3即710
7,CANN软件包
参考步骤5中给出的链接文档《CANN软件安装指南》安装完毕(我安装的是 昇腾社区-官网丨昇腾万里 让智能无所不及这个版本),如下所示:
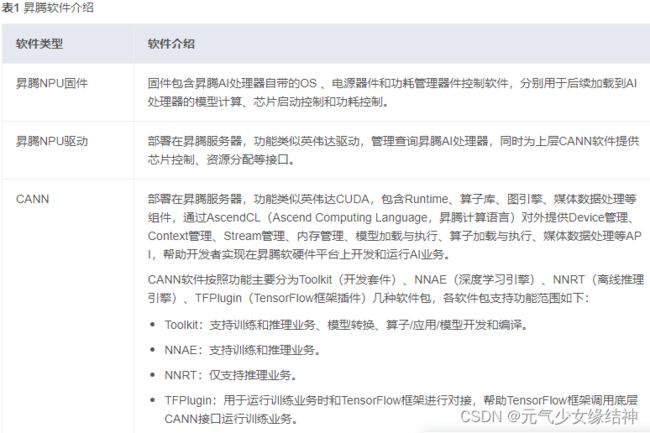
 所以对于我的需求而言,不用另外安装其他CANN相关的软件包。这个set_env.sh里是配置环境变量,所以一定要运行生效哦。不过我的这个版本里面没有配置ATC:
 所以要增加ATC的环境变量如下所示:
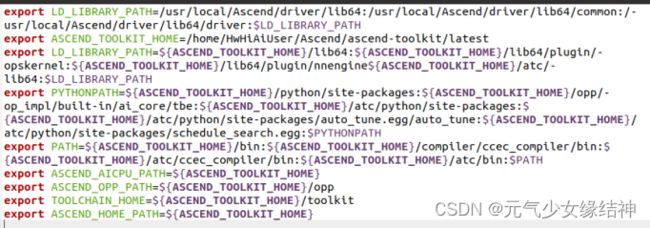 (不好意思,这里我少打了一个冒号 ,nnengine后面,大家记得加上)使其生效,即将source /home/.../set_env.sh 添加到Home/.bashrc的最后一行,再source一下即可。然后在终端输入 atc 就会显示:ATC start working now,please wait for a moment 证明环境生效。
后面我还是决定root重装到标准路径/usr/local下,所以我重新按照这个昇腾社区-官网丨昇腾万里 让智能无所不及装了ascend_cann_toolkit 和nnrt对应版本,流程参考昇腾社区-官网丨昇腾万里 让智能无所不及 这个即可。安装完毕分别会有:

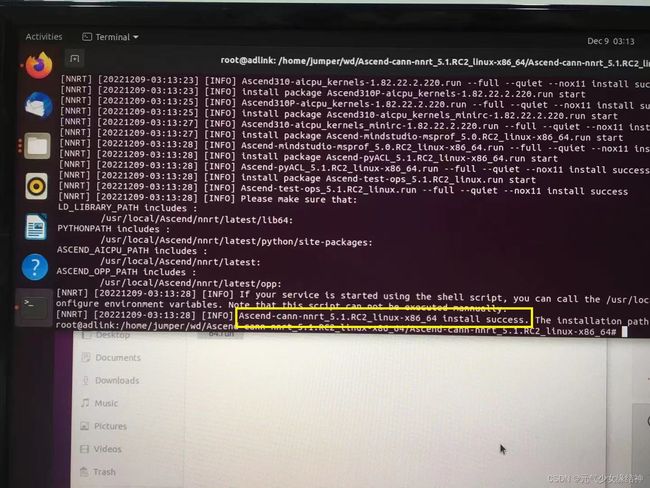 然后atc的环境变量像我上面所述一样修改生效,直到终端输出为下面这样即可:
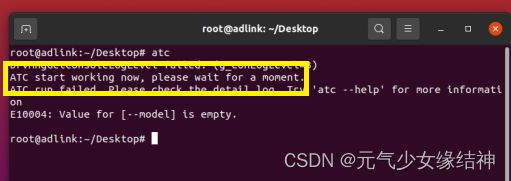 然后输入 npu-smi info 再检查一下输出是否像我开头那样就表示安装正确,如果npu-smi info显示有问题,则是驱动问题,驱动应该卸载掉重装。但固件不用重装,因为固件可以支持很多版本。
8,安装opencv
安装opencv依赖库(可选,也可以先不装)
9,安装tensorflow (可选,也可以先不装)
我是装的2.5.0
 如果后面跑离线模型推理实例需要tf1的时候,大家就在报错的 .py脚本中自己转化一下:将import tensorflow as tf改成:
import tensorflow.compat.v1 as tf
tf.disable_v2_behavior()
离线模型inceptionv4推理
使用的是华为提供的模型,参考网址昇腾社区-官网丨昇腾万里 让智能无所不及 或者按照昇腾社区-官网丨昇腾万里 让智能无所不及 按照这个步骤进行,模型的数据集需要我们自己下载,大家可以在ImageNet Object Localization Challenge | Kaggle kaggle上下载相关的数据集。这个网站要注册,我就直接在 百度网盘 请输入提取码 提取码:ux59 这里下载的Imagenet2012 Jpeg格式数据集ILSVRC2012_img_val和Label文件ILSVRC2012_devkit_t12。下完数据集与标签后,看到 ATC ShuffleNetv1(FP16) :昇腾社区-官网丨昇腾万里 让智能无所不及和 ATC Inceptionv4(FP16)(这个例子最简单,只要python下import numpy成功,就可以运行这个例子,所以建议从这个例子开始吧):昇腾社区-官网丨昇腾万里 让智能无所不及 这两个模型推理都是用的Imagenet2012这个数据集。按照刚刚给的模型链接下的步骤操作后,报拼写错误如下所示:
终于知道原因了,原来刚刚官网下载的模型解压后有空格,所以另外保证总路径没有空格即可:
可以看到模型转换成功了。但下一步build.sh失败,哪怕我将include路径也添加到环境变量中:![]() 所以干脆在cmake文件中将绝对路径加进去:
所以干脆在cmake文件中将绝对路径加进去:
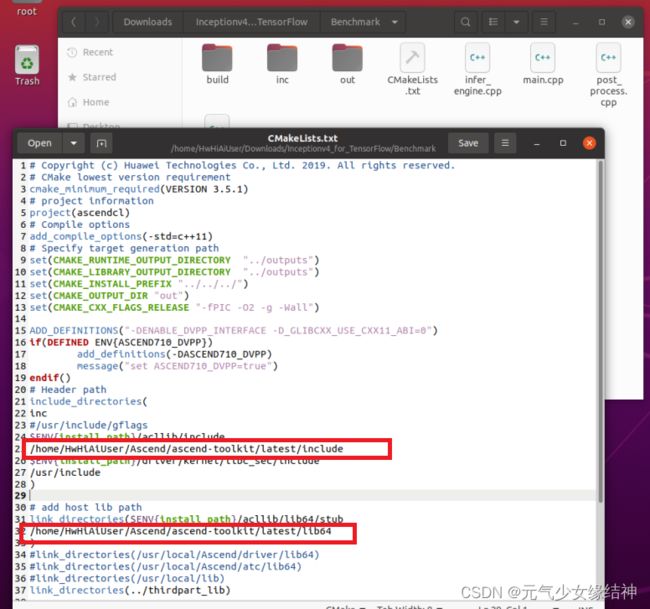
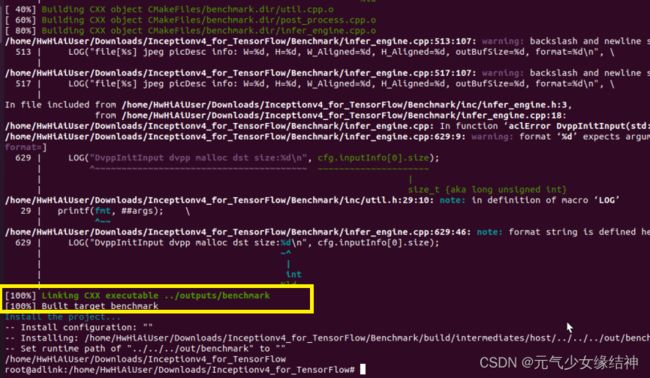 终于build.sh成功。但最后一步推理时还是有问题,我懒得改了。
直接如上面第7步骤所说重新装cann-toolkit和nnrt以及驱动,然后重新去官网下载、运行这个例子,什么都不用修改,发现这次什么错都没有,直接完全按照链接中的步骤来,一路顺风。
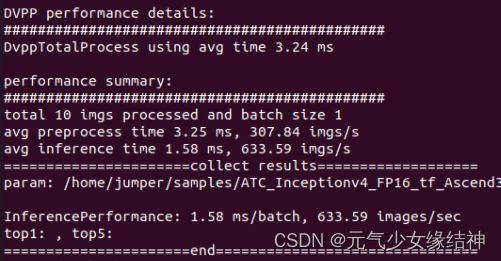 这表示这个模型离线推理完毕。终于成功,诀窍就是环境一定要安装正确。
root@adlink:/home/jumper/samples/ATC_Inceptionv4_FP16_tf_Ascend310/Inceptionv4_for_TensorFlow/scripts# bash benchmark_tf.sh --batchSize=1 --modelType=inceptionv4 --imgType=raw --precision=fp16 --outputType=fp32 --useDvpp=1 --deviceId=0 --modelPath=/home/jumper/samples/ATC_Inceptionv4_FP16_tf_Ascend310/Inceptionv4_for_TensorFlow/inception_v4_tf_aipp.om --dataPath=/home/jumper/samples/ATC_Inceptionv4_FP16_tf_Ascend310/Inceptionv4_for_TensorFlow/scripts/val_imgs --trueValuePath=/home/jumper/samples/ATC_Inceptionv4_FP16_tf_Ascend310/Inceptionv4_for_TensorFlow/scripts/val_lable.txt
======================infer test========================
./benchmark --dataDir /home/jumper/samples/ATC_Inceptionv4_FP16_tf_Ascend310/Inceptionv4_for_TensorFlow/scripts/val_imgs --om /home/jumper/samples/ATC_Inceptionv4_FP16_tf_Ascend310/Inceptionv4_for_TensorFlow/inception_v4_tf_aipp.om --batchSize 1 --modelType inceptionv4 --imgType raw --deviceId 0 --loopNum 1 --useDvpp 1
[INFO]dataDir = /home/jumper/samples/ATC_Inceptionv4_FP16_tf_Ascend310/Inceptionv4_for_TensorFlow/scripts/val_imgs
[INFO]om = /home/jumper/samples/ATC_Inceptionv4_FP16_tf_Ascend310/Inceptionv4_for_TensorFlow/inception_v4_tf_aipp.om
[INFO]batchSize = 1
[INFO]modelType = inceptionv4
[INFO]imgType = raw
[INFO]deviceId = 0
[INFO]loopNum = 1
[INFO]useDvpp = 1
parase params start
dataDir /home/jumper/samples/ATC_Inceptionv4_FP16_tf_Ascend310/Inceptionv4_for_TensorFlow/scripts/val_imgs
output dir ../../results not exists, try to make dir.
outDir ../../results
batchSize 1
modelType inceptionv4
imgType raw
useDvpp is 1
parase params done
context init start
context init done
load model start
binFileBufferData:0x7fcbbaa96010
Load model success. memSize: 6502400, weightSize: 87928832.
load model done
model input num 1
model input[0] size 138624
model input[0] dimCount 4
model input[0] dim[0] info 1
model input[0] dim[1] info 304
model input[0] dim[2] info 304
model input[0] dim[3] info 3
model input[0] format 1 inputType 4
model input[0] name input
model input name input is belone to input 0
model output num 1
model output[0] size 4000
model output[0] dimCount 2
model output[0] dim[0] info 1
model output[0] dim[1] info 1000
model output[0] format 1 outputType 0
model output[0] name InceptionV4/Logits/Logits/BiasAdd:0
model output name InceptionV4/Logits/Logits/BiasAdd:0 is belone to output 0
***********fileNum:10
resizedWidth 304 resizedHeight 304 resizedWidthAligned 304 resizedHeightAligned 304 resizedOutputBufferSize 138624
loopCnt 0, loopNum 1
DvppInitInput dvpp malloc dst size:138624
the format is 6
file[/home/jumper/samples/ATC_Inceptionv4_FP16_tf_Ascend310/Inceptionv4_for_TensorFlow/scripts/val_imgs/ILSVRC2012_val_00000001.JPEG] jpeg picDesc info: W=500, H=375, W_Aligned=512, H_Aligned=384, outBufSize=589824, format=6
w_new=500, h_new=375, format=6
CentralCrop newInputWidth=500 newInputHeight=375 modelInputWidth=447 modelInputHeight=335
the format is 1
inference batch 1 start
ILSVRC2012_val_00000001.JPEG inference time use: 1581 us
inference batch 1 done
save batch 1 start
save batch 1 done
DvppInitInput dvpp malloc dst size:138624
the format is 6
file[/home/jumper/samples/ATC_Inceptionv4_FP16_tf_Ascend310/Inceptionv4_for_TensorFlow/scripts/val_imgs/ILSVRC2012_val_00000005.JPEG] jpeg picDesc info: W=500, H=333, W_Aligned=512, H_Aligned=336, outBufSize=516096, format=6
w_new=500, h_new=333, format=6
CentralCrop newInputWidth=500 newInputHeight=333 modelInputWidth=447 modelInputHeight=298
the format is 1
inference batch 2 start
ILSVRC2012_val_00000005.JPEG inference time use: 1541 us
inference batch 2 done
save batch 2 start
save batch 2 done
DvppInitInput dvpp malloc dst size:138624
the format is 6
file[/home/jumper/samples/ATC_Inceptionv4_FP16_tf_Ascend310/Inceptionv4_for_TensorFlow/scripts/val_imgs/ILSVRC2012_val_00000006.JPEG] jpeg picDesc info: W=500, H=368, W_Aligned=512, H_Aligned=368, outBufSize=565248, format=6
w_new=500, h_new=368, format=6
CentralCrop newInputWidth=500 newInputHeight=368 modelInputWidth=447 modelInputHeight=329
the format is 1
inference batch 3 start
ILSVRC2012_val_00000006.JPEG inference time use: 1607 us
inference batch 3 done
save batch 3 start
save batch 3 done
DvppInitInput dvpp malloc dst size:138624
the format is 6
file[/home/jumper/samples/ATC_Inceptionv4_FP16_tf_Ascend310/Inceptionv4_for_TensorFlow/scripts/val_imgs/ILSVRC2012_val_00000007.JPEG] jpeg picDesc info: W=500, H=334, W_Aligned=512, H_Aligned=336, outBufSize=516096, format=6
w_new=500, h_new=334, format=6
CentralCrop newInputWidth=500 newInputHeight=334 modelInputWidth=447 modelInputHeight=298
the format is 1
inference batch 4 start
ILSVRC2012_val_00000007.JPEG inference time use: 1659 us
inference batch 4 done
save batch 4 start
save batch 4 done
DvppInitInput dvpp malloc dst size:138624
the format is 6
file[/home/jumper/samples/ATC_Inceptionv4_FP16_tf_Ascend310/Inceptionv4_for_TensorFlow/scripts/val_imgs/ILSVRC2012_val_00000008.JPEG] jpeg picDesc info: W=500, H=375, W_Aligned=512, H_Aligned=384, outBufSize=589824, format=6
w_new=500, h_new=375, format=6
CentralCrop newInputWidth=500 newInputHeight=375 modelInputWidth=447 modelInputHeight=335
the format is 1
inference batch 5 start
ILSVRC2012_val_00000008.JPEG inference time use: 1564 us
inference batch 5 done
save batch 5 start
save batch 5 done
DvppInitInput dvpp malloc dst size:138624
the format is 6
file[/home/jumper/samples/ATC_Inceptionv4_FP16_tf_Ascend310/Inceptionv4_for_TensorFlow/scripts/val_imgs/ILSVRC2012_val_00000009.JPEG] jpeg picDesc info: W=375, H=500, W_Aligned=384, H_Aligned=512, outBufSize=589824, format=6
w_new=375, h_new=500, format=6
CentralCrop newInputWidth=375 newInputHeight=500 modelInputWidth=335 modelInputHeight=447
the format is 1
inference batch 6 start
ILSVRC2012_val_00000009.JPEG inference time use: 1540 us
inference batch 6 done
save batch 6 start
save batch 6 done
DvppInitInput dvpp malloc dst size:138624
the format is 6
file[/home/jumper/samples/ATC_Inceptionv4_FP16_tf_Ascend310/Inceptionv4_for_TensorFlow/scripts/val_imgs/ILSVRC2012_val_00000010.JPEG] jpeg picDesc info: W=500, H=375, W_Aligned=512, H_Aligned=384, outBufSize=589824, format=6
w_new=500, h_new=375, format=6
CentralCrop newInputWidth=500 newInputHeight=375 modelInputWidth=447 modelInputHeight=335
the format is 1
inference batch 7 start
ILSVRC2012_val_00000010.JPEG inference time use: 1527 us
inference batch 7 done
save batch 7 start
save batch 7 done
DvppInitInput dvpp malloc dst size:138624
the format is 6
file[/home/jumper/samples/ATC_Inceptionv4_FP16_tf_Ascend310/Inceptionv4_for_TensorFlow/scripts/val_imgs/ILSVRC2012_val_00000011.JPEG] jpeg picDesc info: W=500, H=400, W_Aligned=512, H_Aligned=400, outBufSize=614400, format=6
w_new=500, h_new=400, format=6
CentralCrop newInputWidth=500 newInputHeight=400 modelInputWidth=447 modelInputHeight=358
the format is 1
inference batch 8 start
ILSVRC2012_val_00000011.JPEG inference time use: 1591 us
inference batch 8 done
save batch 8 start
save batch 8 done
DvppInitInput dvpp malloc dst size:138624
the format is 6
file[/home/jumper/samples/ATC_Inceptionv4_FP16_tf_Ascend310/Inceptionv4_for_TensorFlow/scripts/val_imgs/ILSVRC2012_val_00000016.JPEG] jpeg picDesc info: W=500, H=333, W_Aligned=512, H_Aligned=336, outBufSize=516096, format=6
w_new=500, h_new=333, format=6
CentralCrop newInputWidth=500 newInputHeight=333 modelInputWidth=447 modelInputHeight=298
the format is 1
inference batch 9 start
ILSVRC2012_val_00000016.JPEG inference time use: 1611 us
inference batch 9 done
save batch 9 start
save batch 9 done
DvppInitInput dvpp malloc dst size:138624
the format is 6
file[/home/jumper/samples/ATC_Inceptionv4_FP16_tf_Ascend310/Inceptionv4_for_TensorFlow/scripts/val_imgs/ILSVRC2012_val_00000017.JPEG] jpeg picDesc info: W=500, H=375, W_Aligned=512, H_Aligned=384, outBufSize=589824, format=6
w_new=500, h_new=375, format=6
CentralCrop newInputWidth=500 newInputHeight=375 modelInputWidth=447 modelInputHeight=335
the format is 1
inference batch 10 start
ILSVRC2012_val_00000017.JPEG inference time use: 1562 us
inference batch 10 done
save batch 10 start
save batch 10 done
unload model start
unload model done
destory context done
reset device done


DVPP performance details:
#############################################
DvppTotalProcess using avg time 3.24 ms

performance summary:
#############################################
total 10 imgs processed and batch size 1
avg preprocess time 3.25 ms, 307.84 imgs/s
avg inference time 1.58 ms, 633.59 imgs/s
======================collect results===================
param: /home/jumper/samples/ATC_Inceptionv4_FP16_tf_Ascend310/Inceptionv4_for_TensorFlow/scripts/../results/inceptionv4/,fp32

InferencePerformance: 1.58 ms/batch, 633.59 images/sec
top1: , top5:
======================end===============================
root@adlink:/home/jumper/samples/ATC_Inceptionv4_FP16_tf_Ascend310/Inceptionv4_for_TensorFlow/scripts#
大家还可以一边推理,一边开另一个终端输入npu-smi info watch 来查看AI core/AI cpu的占用率。
离线模型shuffleNetv1推理
直接按照官网的来,因为我之前npu-smi info输出处理器是310P,所以我只用将昇腾社区-官网丨昇腾万里 让智能无所不及这里的310改成310P3即可,另外模型以及图片的路径大家尽量不要像官网用相对路径,直接用绝对路径,像我这样:
atc --model=/home/jumper/samples/ShuffleNetv1_for_TensorFlow/shufflenetv1.pb --framework=3 --output=shufflenetv1_tf_96batch --output_type=FP32 --soc_version=Ascend310P3 --input_shape="input:96,224,224,3" --out_nodes="classifier/BiasAdd:0" --log=info这个例子的4b步骤我运行脚本出错,所以直接改用命令运行成功,可以看到官网的步骤中少了一步创建result文件夹以及label写成了label等笔误,像我下面这样创建好后全部用绝对路径::
/home/jumper/samples/ShuffleNetv1_for_TensorFlow/Benchmark/out/benchmark --om=/home/jumper/samples/ShuffleNetv1_for_TensorFlow/shufflenetv1_tf_96batch.om --dataDir=/home/jumper/samples/ShuffleNetv1_for_TensorFlow/scripts/input_bins/ --modelType=shufflenetv1 --outDir=/home/jumper/samples/ShuffleNetv1_for_TensorFlow/results --batchSize=1 --imgType=bin --useDvpp=0 可以看到成功推理了。然后后处理部分我也改用命令运行:
 可以看到也同样成功了。至此我们运行了官网的两个离线推理实例,均成功。
AI推理卡的C++环境
下面我们终于可以开始创建AI推理卡的C++开发环境:
参考网址:GitHub - Ascend/samples samples: CANN Samples - Gitee.com 昇腾社区-官网丨昇腾万里 让智能无所不及 samples: CANN Samples
########################以下是TensorRT###########################
tensorRT
首先阅读了大神的一些文章:
https://blog.csdn.net/weixin_45252450/article/details/123777166

https://zhuanlan.zhihu.com/p/547970261 了解tensorRT
https://zhuanlan.zhihu.com/p/547966550 了解tensorRT
https://zhuanlan.zhihu.com/p/555827562 tensorRT生态链

https://zhuanlan.zhihu.com/p/408220584 tensorRT C++部署
https://zhuanlan.zhihu.com/p/344810135 tensorRT C++部署
https://zhuanlan.zhihu.com/p/555829505 tensorRT runtime c++ API,反序列化引擎进行推理
https://docs.nvidia.com/deeplearning/tensorrt/developer-guide/index.html#perform_inference_c
https://zhuanlan.zhihu.com/p/553367059 tensorRT性能分析与性能优化方法

https://zhuanlan.zhihu.com/p/552537009 在tensorRT中使用DLA(固定层加速引擎)
https://zhuanlan.zhihu.com/p/551268145 tensorRT自定义层
https://zhuanlan.zhihu.com/p/481960581 tensorRT动态batch
https://zhuanlan.zhihu.com/p/407563724 YOLOX网络的序列化 C++

tensorRT不能直接跨平台/显卡/tensorrt版本,如果序列化生成engine的平台/显卡/tensorrt版本与反序列化加载engine并进行推理的平台/显卡/tensorrt相同,则没问题;否则要在后者中重新序列化一次。

https://blog.csdn.net/wq_0708/article/details/121248152
https://blog.csdn.net/u013230291/article/details/119183416
https://blog.csdn.net/weixin_46659749/article/details/119980122

https://blog.csdn.net/qq_42944019/article/details/126857775

https://zhuanlan.zhihu.com/p/358135157 从论文复现网络
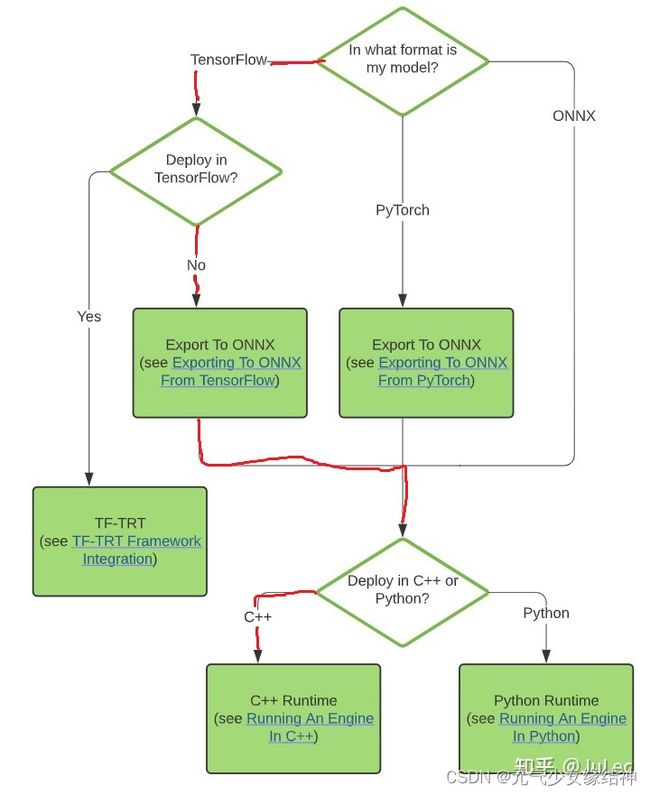
看过上面大神的文章后,知道我要做的就是如下图红色步骤:
然后我可能是在Jetson AGX Xavier服务器上实现,关于这个服务器可以Jetson AGX Xavier - 随笔分类 - 格格_gloria - 博客园 https://blog.csdn.net/huiyuanliyan/category_8689841.html 通过这两个大神的博客了解下。
~~~~~~~~~~~~~~~~~~~~~~ Jetson AGX Xavier安装CUDA~~~~~~~~~~~~~~~~~~~~~
使用JetPack SDK Manager刷机(通过另一台正常的ubuntu系统作为host,给这个Jetson平台刷系统)部分忽略,因为我拿到手时这台机已刷完ubuntu 18.04.6系统了。
然后我原本准备按之前我的记录ubuntu下tensorflow 2.0/2.5 c++动态库编译gpu版本_元气少女缘结神的博客-CSDN博客_ubuntu 查看c++版本给这台机装TF-GPU C++,发现不行,因为装CUDA时需要查看兼容性如下Release Notes :: CUDA Toolkit Documentation :可以看到要与系统内核匹配
而通过命令uname -a 可以看到Jetson平台的kernel并不是x86_64而是 linux ubuntu 4.9.140-tegra,所以就不能按上面的平常的步骤去安装CUDA了。
~~~~~~~~~~~~~~~~~~Jetson AGX Xavier安装TF C++~~~~~~~~~~~~~~~~~~~~~~~~
参考Nvidia Jetson Xavier配置tensorflow1.13.1 C++ API_清~的博客-CSDN博客 来尝试:
