PyTorch(五)神经网络基础
文章目录
-
- Log
- 一、Containers 基本骨架
-
- 1. Module
- 2. Sequential
- 二、 Convolution Layers 卷积层
-
- 1. torch.nn.functional
-
- ① Conv2d
- 2. torch.nn
-
- ① Conv2d
- 三、Pooling layers 池化层
-
- 1. nn.MaxPool2d 下采样(最大池化)
- 四、Non-linear Activations 非线性激活
-
- 1. ReLU
- 2. Sigmod
- 五、Linear Layers 线性层
-
- 1. torch.nn.Linear
- 六、Loss Functions 损失函数
-
- 1. torch.nn.L1Loss
- 2. torch.nn.MSELoss
- 3. torch.nn.CrossEntropyLoss
- 七、Optimizer 优化器
-
- 1. 简介
- 2. 代码示例
- 总结
Log
2022.11.29接着开启新的一章
2022.11.30继续学习
2022.12.01继续学习
2022.12.02继续学习
2022.12.03继续学习
2022.12.04继续学习
2022.12.08继续学习
2022.12.09继续学习
2022.12.11继续学习,结束吧
- 关于神经网络(NN,Neural Network)的工具都在 torch.nn 里面
一、Containers 基本骨架
1. Module
- 对于所有神经网络的一个基本的类,提供一个基本骨架,所有自建的网络都需要继承该类
- 官方文档中的示例模板代码如下:
import torch.nn as nn
import torch.nn.functional as F

class Model(nn.Module):		# 类名可以改成自己的,但是必须要继承 nn.Module 类
    def __init__(self):		# 初始化函数
        super().__init__()	# 这句必须要有,调用父类的初始化函数
        self.conv1 = nn.Conv2d(1, 20, 5)
        self.conv2 = nn.Conv2d(20, 20, 5)

    def forward(self, x):		# 前向传播函数,处理输入数据并返回处理数据部分,应该在每个子类里重写
        x = F.relu(self.conv1(x))
        return F.relu(self.conv2(x))
-
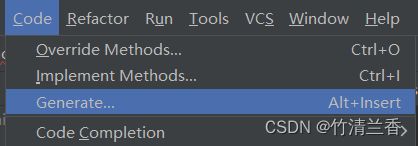
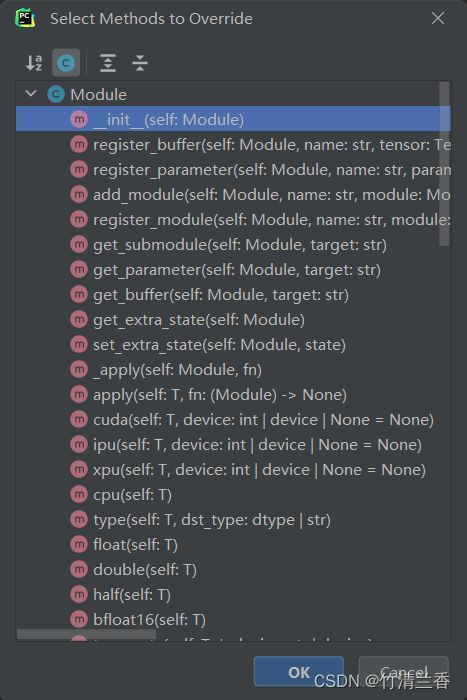
自己重写的时候可以纯手写,也可以通过以下方式来进行快速的实现:
-
改写后的示例:
import torch
from torch import nn


class MyModel(nn.Module):
    def __init__(self):
        super().__init__()

    def forward(self, input):
        output = input + 1
        return output


mo = MyModel()  # 创建一个神经网络
x = torch.tensor(1.0)   # 创建数据
output = mo(x)  # 使用数据
print(output)
2. Sequential
- 使用 Sequential 的好处是使代码变得简洁,如官方文档中的模板:
model = nn.Sequential(
          nn.Conv2d(1,20,5),
          nn.ReLU(),
          nn.Conv2d(20,64,5),
          nn.ReLU()
        )
-
这样就使两次卷积和非线性激活的操作变得比较清晰简洁。
-
示例代码如下(其中的
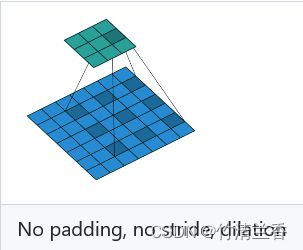
padding、stride等参数可以结合上面的图片并通过官方文档 torch.nn.Conv2d 中的 s h a p e \rm shape shape 部分的公式推算出):
import torch
from torch import nn
from torch.nn import Conv2d, MaxPool2d, Flatten, Linear, Sequential
from torch.utils.tensorboard import SummaryWriter


class MyModel(nn.Module):
    def __init__(self):
        super(MyModel, self).__init__()
        self.model1 = Sequential(
            Conv2d(3, 32, 5, padding=2),
            MaxPool2d(2),
            Conv2d(32, 32, 5, padding=2),
            MaxPool2d(2),
            Conv2d(32, 64, 5, padding=2),
            MaxPool2d(2),
            Flatten(),
            Linear(1024, 64),
            Linear(64, 10)
        )

    def forward(self, x):
        x = self.model1(x)
        return x

mo = MyModel()
print(mo)
input = torch.ones((64, 3, 32, 32))
output = mo(input)
print(output.shape)

writer = SummaryWriter("logs_seq")
writer.add_graph(mo, input)
writer.close()
二、 Convolution Layers 卷积层
1. torch.nn.functional
- torch.nn 是对 torch.nn.functional 的封装,因此 torch.nn.functional 中的内容会更加详细一些。
① Conv2d
- torch.nn.functional.conv2d 常用的参数如下:
input:tensor 数据类型,要求形状的格式为 ( m i n i b a t c h , i n _ c h a n n e l s , i H , i W ) (minibatch,in\_channels,iH,iW) (minibatch,in_channels,iH,iW)weight:权重,即卷积核bias:偏置,缺省值为 Nonestride:步径,缺省值为 1,该参数的输入可为单值,也可为元组 ( s H , s W ) (sH,sW) (sH,sW),横向和纵向padding:缺省值为 0
- 卷积操作的原理这里就不做更多介绍了,下面展示的是如何使用的代码:
import torch
import torch.nn.functional as F

input = torch.tensor([[1, 2, 0, 3, 1],
                      [0, 1, 2, 3, 1],
                      [1, 2, 1, 0, 0],
                      [5, 2, 3, 1, 1],
                      [2, 1, 0, 1, 1]])

kernel = torch.tensor([[1, 2, 1],
                       [0, 1, 0],
                       [2, 1, 0]])

input = torch.reshape(input, (1, 1, 5, 5))  # 1 batch_size, 1 通道, 5×5大小
kernel = torch.reshape(kernel, (1, 1, 3, 3))

print(input.shape)  # 原大小为[5, 5],reshape后大小为[1, 1, 5, 5]
print(kernel.shape)  # 原大小为[3, 3],reshape后大小为[1, 1, 3, 3]

output = F.conv2d(input, kernel, stride=1)      # 步长为 1
print(output)

output2 = F.conv2d(input, kernel, stride=2)      # 步长为 2
print(output2)

output3 = F.conv2d(input, kernel, stride=1, padding=1)      # padding是对图像边缘的填充
print(output3)
2. torch.nn
① Conv2d
- torch.nn.conv2d 常用的参数如下:
in_channels:输入通道数,彩色图像一般为 3out_channels:输出通道数kernel_size:卷积核大小stride:步径,缺省值为 1,该参数的输入可为单值,也可为元组 ( s H , s W ) (sH,sW) (sH,sW),纵向和横向padding:缺省值为 0dilation:卷积核每个对应位的距离,缺省值为 1groups:缺省值为 1 ,一般情况不会用到,只在分组卷积时才会用到bias:偏置,缺省值为 True,即在最后的结果上加减一个常数padding_mode:缺省值为’zero’,padding 填充时会用到,选择 padding 的填充模式
- 对于上面的概念比较模糊,可以看看这个可视化的图像来进一步理解:

- 仍然使用 C I F A R 10 \rm CIFAR10 CIFAR10 数据集,代码示例如下:
import torch
import torchvision
from torch import nn
from torch.nn import Conv2d
from torch.utils.data import DataLoader
from torch.utils.tensorboard import SummaryWriter

dataset = torchvision.datasets.CIFAR10("../dataset/CIFAR10", train=False, transform=torchvision.transforms.ToTensor(),
                                       download=True)
dataloader = DataLoader(dataset, batch_size=64)

class MyModel(nn.Module):
    def __init__(self):
        super(MyModel, self).__init__()
        self.conv1 = Conv2d(in_channels=3, out_channels=6, kernel_size=3, stride=1, padding=0)

    def forward(self, x):
        x = self.conv1(x)
        return x

mo = MyModel()

writer = SummaryWriter("logs")

step = 0
for data in dataloader:
    imgs, targets = data
    output = mo(imgs)
    print(imgs.shape)
    print(output.shape)
    # torch.Size([64, 3, 32, 32])
    writer.add_images("input", imgs, step)
    # torch.Size([64, 6, 30, 30])  -> [xxx, 3, 30, 30]

    output = torch.reshape(output, (-1, 3, 30, 30))
    writer.add_images("output", output, step)

    step = step + 1
三、Pooling layers 池化层
1. nn.MaxPool2d 下采样(最大池化)
- 与之相对应的还有 nn.MaxUnpool2d 上采样。
- torch.nn.MaxPool2d 常用的参数如下:
- 输入和输出的数据都是四维的,示例代码如下:
from torch import nn
from torch.nn import MaxPool2d

class MyModel(nn.Module):
    def __init__(self):
        super(MyModel, self).__init__()
        self.maxpool1 = MaxPool2d(kernel_size=3, ceil_mode=True)

    def forward(self, input):
        output = self.maxpool1(input)
        return output

input = torch.tensor([[1, 2, 0, 3, 1],
                      [0, 1, 2, 3, 1],
                      [1, 2, 1, 0, 0],
                      [5, 2, 3, 1, 1],
                      [2, 1, 0, 1, 1]], dtype=torch.float32)

input = torch.reshape(input, (-1, 1, 5, 5))
print(input.shape)
mo = MyModel()
output = mo(input)
print(output)
- 最大池化的作用就是降低数据的维度,减少数据量,提高网络的训练速度,就相当于看视频从 1080p 到 720p,传达的内容没有受到太大的影响,但是视频文件的大小却大大减少。
- 处理图片的代码示例:
import torch
import torchvision
from torch import nn
from torch.nn import MaxPool2d
from torch.utils.data import DataLoader
from torch.utils.tensorboard import SummaryWriter

class MyModel(nn.Module):
    def __init__(self):
        super(MyModel, self).__init__()
        self.maxpool1 = MaxPool2d(kernel_size=3, ceil_mode=False)

    def forward(self, input):
        output = self.maxpool1(input)
        return output

dataset = torchvision.datasets.CIFAR10("../dataset/CIFAR10", train=False, download=True,
                                       transform=torchvision.transforms.ToTensor())

dataloader = DataLoader(dataset, batch_size=64)
mo = MyModel()
writer = SummaryWriter("logs_maxpool")
step = 0

for data in dataloader:
    imgs, targets = data
    writer.add_images("inputMP", imgs, step)
    output = mo(imgs)
    writer.add_images("outputMP", output, step)
    step = step + 1

writer.close()
四、Non-linear Activations 非线性激活
- 非线性激活是为了为我们的神经网络中引入一些非线性的特质,非线性越多的话就越容易训练出符合各种特征的模型,得到更好的泛化能力。
1. ReLU
- 该类实现功能如下:
R e L U ( x ) = ( x ) + = m a x ( 0 , x ) \rm ReLU(x)=(x)^+=max(0,x) ReLU(x)=(x)+=max(0,x) - 当输入小于 0 时会被截断
- 在定义时有一个参数为
implace,缺省值为 False,作用是是否替换输入,即当该参数为 True 时,输入数据在处理换之后会被处理结果所替代。一般不填此参数,即保留原数据防止信息的丢失。 - 示例代码如下:
import torch
from torch import nn
from torch.nn import ReLU

class MyModel(nn.Module):
    def __init__(self):
        super(MyModel, self).__init__()
        self.relu1 = ReLU()

    def forward(self, input):
        output = self.relu1(input)
        return output

input = torch.tensor([[1, -0.5],
                      [-1, 3]])

input = torch.reshape(input, (-1, 1, 2, 2))
print(input.shape)
mo = MyModel()
output = mo(input)
print(output)
2. Sigmod
- 都懂,原理略
- 示例代码如下:
import torch
import torchvision
from torch import nn
from torch.nn import ReLU, Sigmoid
from torch.utils.data import DataLoader
from torch.utils.tensorboard import SummaryWriter

class MyModel(nn.Module):
    def __init__(self):
        super(MyModel, self).__init__()
        self.relu1 = ReLU()
        self.sigmoid1 = Sigmoid()

    def forward(self, input):
        output = self.sigmoid1(input)
        return output

dataset = torchvision.datasets.CIFAR10("../dataset/CIFAR10", train=False, download=True,
                                       transform=torchvision.transforms.ToTensor())

dataloader = DataLoader(dataset, batch_size=64)

mo = MyModel()

writer = SummaryWriter("logs_sig")
step = 0
for data in dataloader:
    imgs, targets = data
    writer.add_images("inputSig", imgs, global_step=step)
    output = mo(imgs)
    writer.add_images("outputSig", output, step)
    step += 1

writer.close()
五、Linear Layers 线性层
1. torch.nn.Linear
- 对输入应用如下的线性变换:
y = x A T + b y=xA^T+b y=xAT+b - torch.nn.Linear 的参数如下:
in_features:输入特征数out_features:输出特征数bias:偏置,即上面公式中的 b,缺省值为 True
- 示例代码如下:
import torch
import torchvision
from torch import nn
from torch.nn import Linear
from torch.utils.data import DataLoader

dataset = torchvision.datasets.CIFAR10("../dataset/CIFAR10", train=False, transform=torchvision.transforms.ToTensor(),
                                       download=True)

dataloader = DataLoader(dataset, batch_size=64)

class MyModel(nn.Module):
    def __init__(self):
        super(MyModel, self).__init__()
        self.linear1 = Linear(196608, 10)

    def forward(self, input):
        output = self.linear1(input)
        return output

mo = MyModel()

for data in dataloader:
    imgs, targets = data
    print(imgs.shape)
    # flatten 把图像展平的函数,输入的图像为 Tensor 类型
    output = torch.flatten(imgs)
    print(output.shape)
    output = mo(output)
    print(output.shape)
- 其中 flatten 为将图像展平的函数。
六、Loss Functions 损失函数
- 损失函数的作用:
- 计算实际输出和目标之间的差距
- 为我们更新输出提供一定的依据(反向传播)
1. torch.nn.L1Loss
- torch.nn.L1Loss使用的示例代码如下:
import torch
from torch.nn import L1Loss

inputs = torch.tensor([1, 2, 3], dtype=torch.float32)
targets = torch.tensor([1, 2, 5], dtype=torch.float32)

inputs = torch.reshape(inputs, (1, 1, 1, 3))
targets = torch.reshape(targets, (1, 1, 1, 3))
# mean(Defalt): (0+0+2)/3 = 0.667
# sum: 0 + 0 + 2 = 2
loss = L1Loss(reduction='sum')
result = loss(inputs, targets)

print(result)
- 其中参数
reduction的默认值是mean,即求平均,对于代码中的例子,对应位置作差后取平均值得到的结果为 0.667,设置参数值为sum后达到的结果为 2。
2. torch.nn.MSELoss
- 平方差(MSE,mean squared error)损失 torch.nn.MSELoss 的示例代码如下:
import torch
from torch import nn

inputs = torch.tensor([1, 2, 3], dtype=torch.float32)
targets = torch.tensor([1, 2, 5], dtype=torch.float32)

inputs = torch.reshape(inputs, (1, 1, 1, 3))
targets = torch.reshape(targets, (1, 1, 1, 3))
# (0+0+0+2**2)/3 = 1.3333
loss_mse = nn.MSELoss()
result_mse = loss_mse(inputs, targets)

print(result_mse)
3. torch.nn.CrossEntropyLoss
- 交叉熵损失 torch.nn.CrossEntropyLoss (可以到这个官方文档中查看具体的公式以及说明)的示例代码如下:
import torch
from torch import nn

x = torch.tensor([0.1, 0.2, 0.3])
y = torch.tensor([1])
x = torch.reshape(x, (1, 3))
loss_cross = nn.CrossEntropyLoss()
# -0.2+ln(exp(0.1)+exp(0.2)+exp(0.3))
result_cross = loss_cross(x, y)
print(result_cross)
- 在网络中使用该类(复用之前 Sequential 中的网络代码):
import torchvision
from torch import nn
from torch.nn import Sequential, Conv2d, MaxPool2d, Flatten, Linear
from torch.utils.data import DataLoader

dataset = torchvision.datasets.CIFAR10("../dataset/CIFAR10", train=False, transform=torchvision.transforms.ToTensor(),
                                       download=True)

dataloader = DataLoader(dataset, batch_size=1)

class MyModel(nn.Module):
    def __init__(self):
        super(MyModel, self).__init__()
        self.model1 = Sequential(
            Conv2d(3, 32, 5, padding=2),
            MaxPool2d(2),
            Conv2d(32, 32, 5, padding=2),
            MaxPool2d(2),
            Conv2d(32, 64, 5, padding=2),
            MaxPool2d(2),
            Flatten(),
            Linear(1024, 64),
            Linear(64, 10)
        )

    def forward(self, x):
        x = self.model1(x)
        return x


loss = nn.CrossEntropyLoss()
mo = MyModel()
for data in dataloader:
    imgs, targets = data
    outputs = mo(imgs)
    # print(outputs)
    # print(targets)
    result_loss = loss(outputs, targets)
    print(result_loss)
    # 反向传播计算梯度
    result_loss.backward()
七、Optimizer 优化器
- 利用上一个章节中的反向传播计算出的梯度,使用优化器(torch.optim)对参数进行调整,进而实现误差降低的目的。
1. 简介
- 优化器的使用步骤:
- 构造优化器
例如:optimizer = optim.SGD(model.parameters(), lr=0.01, momentum=0.9)
选择一个优化器对应的算法,然后在优化器中放入优化的参数、学习速率(LR)以及不同算法需要的特定的参数。 - 调用
step()方法
利用之前得到的梯度对参数进行更新
- 构造优化器
2. 代码示例
- 使用随机梯度下降算法和上一章节的网络进行的计算,要点都写在代码的注释里了:
import torch
import torchvision
from torch import nn
from torch.nn import Sequential, Conv2d, MaxPool2d, Flatten, Linear
from torch.utils.data import DataLoader

# 使用数据集并转成 tensor 数据类型
dataset = torchvision.datasets.CIFAR10("../dataset/CIFAR10", train=False, transform=torchvision.transforms.ToTensor(),
                                       download=True)
# 使用 DataLoader 加载数据集
dataloader = DataLoader(dataset, batch_size=1)

class MyModel(nn.Module):
    def __init__(self):
        super(MyModel, self).__init__()
        self.model1 = Sequential(
            Conv2d(3, 32, 5, padding=2),
            MaxPool2d(2),
            Conv2d(32, 32, 5, padding=2),
            MaxPool2d(2),
            Conv2d(32, 64, 5, padding=2),
            MaxPool2d(2),
            Flatten(),
            Linear(1024, 64),
            Linear(64, 10)
        )

    def forward(self, x):
        x = self.model1(x)
        return x


loss = nn.CrossEntropyLoss()
mo = MyModel()
# 使用随机梯度下降算法(SGD)
optim = torch.optim.SGD(mo.parameters(), lr=0.01)
# 进行 20 轮循环
for epoch in range(20):
    # 每一轮的整体 loss
    running_loss = 0.0
    for data in dataloader:
        imgs, targets = data
        outputs = mo(imgs)
        result_loss = loss(outputs, targets)
        # 梯度清零,防止对下一轮循环产生影响
        optim.zero_grad()
        # 反向传播得到梯度
        result_loss.backward()
        # 对参数调优
        optim.step()
        print(result_loss)
        running_loss = running_loss + result_loss
    print(running_loss)
总结
- 本篇文章主要介绍了 P y t o r c h \rm Pytorch Pytorch 中
torch.nn有关神经网络的相关内容,包括其中的相关模块的使用方法。 - 在容器(Containers) 中介绍了
torch.nn.Module,它是所有神经网络的一个基本的类,提供一个基本骨架,所有自建的网络都需要继承该类;同时还介绍了torch.nn.Sequential,它的作用是整合不同的操作,使代码变得简洁。 - 在卷积层(Convolution Layers) 中介绍了
torch.nn.functional和torch.nn中的Conv2d类,torch.nn是对torch.nn.functional的封装,因此torch.nn.functional中的内容会更加详细一些。 - 在池化层(Pooling layers) 中介绍了
nn.MaxPool2d下采样(最大池化),它的作用就是降低数据的维度,减少数据量,提高网络的训练速度。 - 在非线性激活(Non-linear Activations) 中介绍了
ReLU以及Sigmod的使用,非线性激活是为了为我们的神经网络中引入一些非线性的特质,非线性越多的话就越容易训练出符合各种特征的模型,得到更好的泛化能力。 - 在线性层(Linear Layers) 中介绍了
torch.nn.Linear,作用是进行线性变换。 - 在损失函数(Loss Functions) 中介绍了
L1Loss、MSELoss、CrossEntropyLoss三种损失函数的使用方法。 - 最后还介绍了优化器(Optimizer),它的作用是利用反向传播计算出的梯度对参数进行调整,进而实现误差降低的目的。


