微信小程序订阅信息之Java实现详解
在微信小程序中进行了某种操作后,推送消息告知用户的操作结果。或者微信端办公流程提交给下一个人审批后,得到审批通过或是驳回修改的命令 - 使用场景具体如下图,可用在签到、提醒、通知、警告、催办等方面:
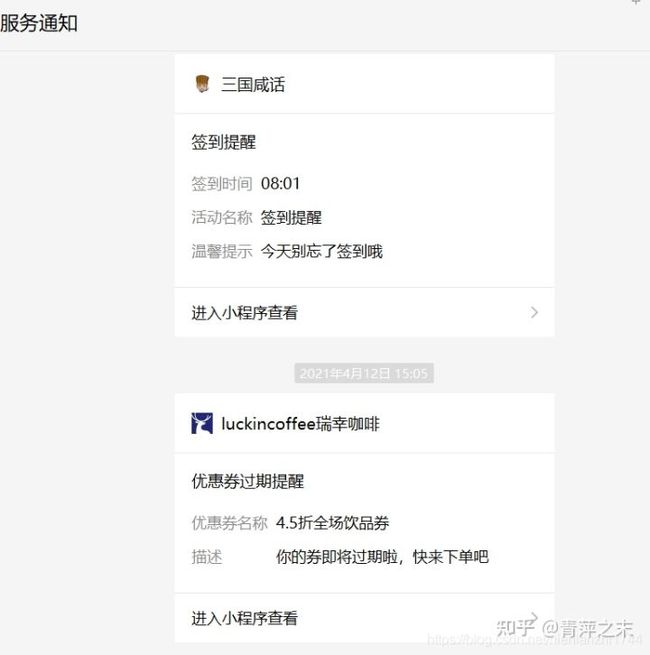

上面的实例图片就是通过后台 给微信推送的订阅消息。那具体的应该怎么实现呢,且看下文分解。
实现步骤
1 微信公众平台的配置
1.1 选用公共模板库中的模板
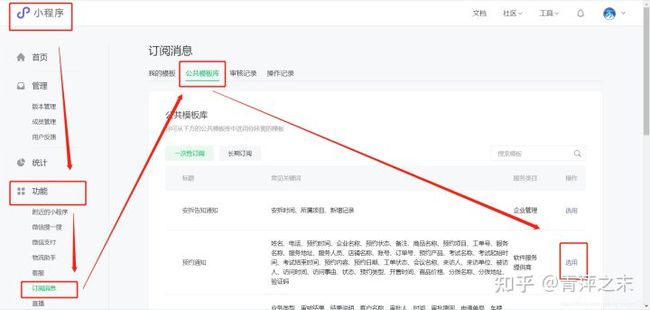
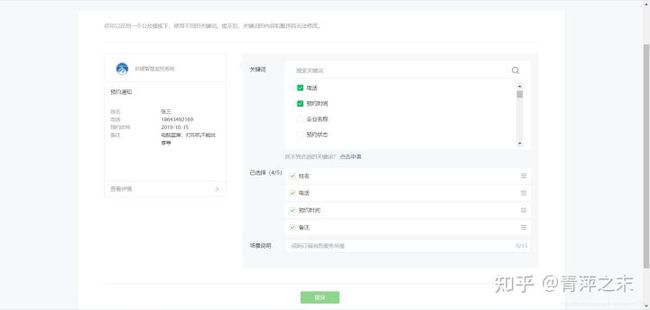
- 登录微信公众平台后台,点击功能》订阅消息(若之前没有使用过,则点击开通) - 点击公共模板库 的title,可以看到 有很多模板,可以点击搜索选取适合自己的模板 - 选到心仪的模板后,点击选用 - 选用之后,可以看到模板有很多关键词,这些关键词可以选择性取用,比如上图我只选择了4个关键词,关键词不够可以申请 - 关键词选用完毕之后,填写场景说明,点击提交,就可以了看到这个模板已经出现在了我的模板库中
1.2 自定义模板
很多时候,公共模板库中的模板还是不能够满足我们的需求,那这个时候我们可以自定义模板,如下
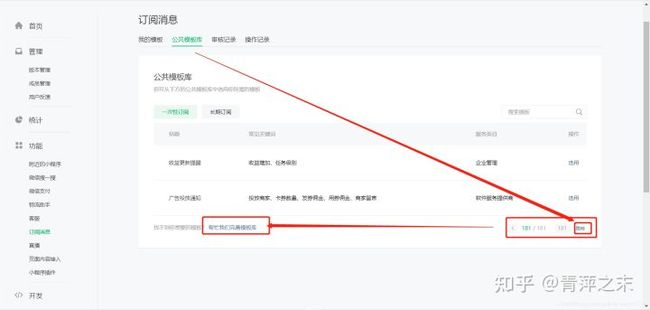

- 在公共模板库中找不心仪的模板后,我们把页面点击跳转到最后一页
- 点击:“帮忙我们完善模板库”,就可以了看到创建模板的页面
- 根据实际需求填写关键词和参数类型。
- 填写完成之后点击提交,一般会审核3-5天,审核完成后就可以
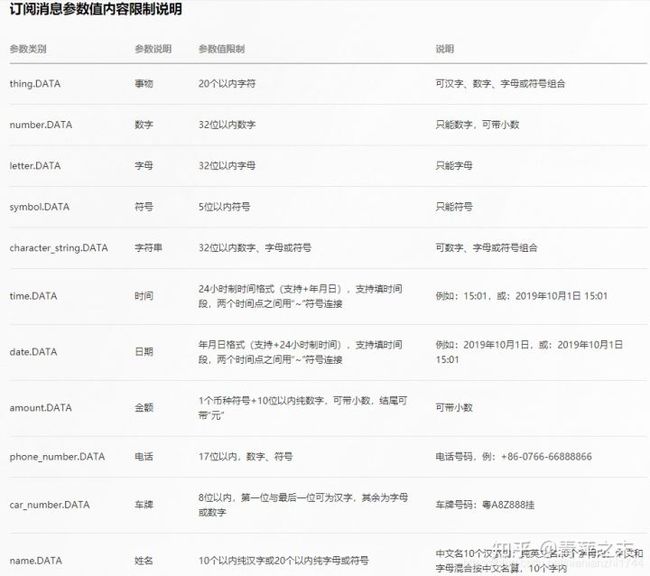
- 这里有一点小小的要注意的,如上图所示,姓名和名称之类关键词的参数类型我们一般选择 “事务”,而不是字符串,具体参数规则如下所示
1.3 我的模板
无论时选用公共模板库中的模板,还是申请自定义模板,模板都会出现在 “我的模板”这个title下,如下图
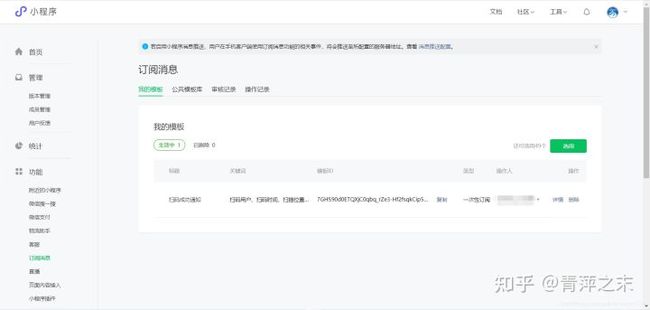

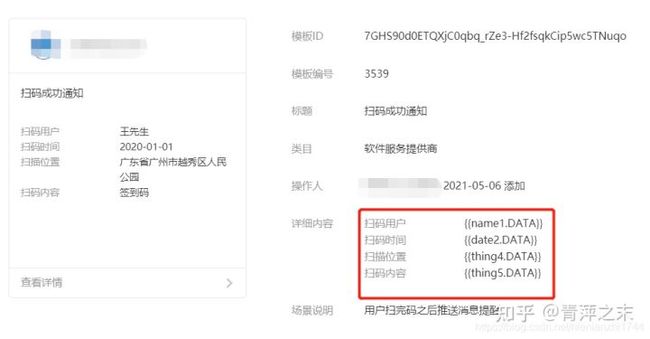
- 我们点击详情,就可以看到模板具体的信息,其中发送消息最重要的参数我们在这个页面可以看到 - 一个是:模板ID。模板id决定了发送消息时选用哪个模板 - 一个是:详细内容。详细内容就是要往模板中要塞哪些参数,比如上面这个模板的参数就有4个,name1、date2、thing4、thing5。这4个参数就相当于实体的属性一样,在下面的文章中我还会介绍到,暂且不表。
到这里为止微信公众平台的配置基本已经完成,下面我们开始Java端的配置。
2 Java端的配置
在这里首先梳理一下Java端要做哪些事及其步骤;
- 定义一个消息模板的参数实体。并往里面塞值
- 定义一个消息配置实体。这个实体包含了一些重要的属性,主要如下 2.1:touser:接收者(用户)的 openid 2.2:template_id:所需下发的消息模板id 2.3:page:用户点击消息后跳转到小程序指定的页面路径 2.4:data:消息模板的实体
- 获取openid。由第2步可以知道,我们已经可以得到在微信公众平台配置的模板id、自定义的跳转路径、和第1步设置的消息模板的实体。那我们还需要设置touser(即获取到用户的openid),openid决定了我们要把消息推送给哪个用户
- 获取access_token。作为参数拼接出微信小程序推送消息的url接口。
- 推送消息
详情如下:
2.1 定义消息模板的参数实体
- 在微信公众平台的消息订阅中找到消息模板,找到具体有哪些参数。如下图所示,我们可以看到该模板有name1、date2、thing4、thing5四个参数(后面的DATA不用管)
- 定义消息模板参数实体,官方定义的消息模板demo的参数的json格式是这个样的
{
      "number01": {
          "value": "339208499"
      },
      "date01": {
          "value": "2015年01月05日"
      },
      "site01": {
          "value": "TIT创意园"
      } ,
      "site02": {
          "value": "广州市新港中路397号"
      }
  }
所以我们定义实体参数的时候,要相应的改成以下格式的
import java.util.HashMap;
import java.util.Map;

/*消息模板-扫码*/
public class WxMsgTemplateQRCode {

    /*扫码用户*/
    private Map name1;

    /*扫码时间*/
    private Map date2;

    /*扫描位置*/
    private Map thing4;

    /*扫码内容*/
    private Map thing5;


    public Map getName1() {
        return name1;
    }

    public void setName1(String name1) {
        this.name1 = getFormat(name1);
    }

    public Map getDate2() {
        return date2;
    }

    public void setDate2(String date2) {
        this.date2 = getFormat(date2);
    }

    public Map getThing4() {
        return thing4;
    }

    public void setThing4(String thing4) {
        this.thing4 = getFormat(thing4);
    }

    public Map getThing5() {
        return thing5;
    }

    public void setThing5(String thing5) {
        this.thing5 = getFormat(thing5);
    }

    public HashMap getFormat(String str) {
        return new HashMap() {{
            put("value", str);
        }};
    }
}
2.2 定义消息配置实体
public class WxMsgConfig {

    /*接收者(用户)的 openid*/
    private String touser;

    /*所需下发的订阅模板id*/
    private String template_id;

    /*点击消息后跳转的页面*/
    private String page;

    /*跳转小程序类型:developer为开发版;trial为体验版;formal为正式版;默认为正式版*/
    private String miniprogram_state="developer";

    /*进入小程序查看”的语言类型,支持zh_CN(简体中文)、en_US(英文)、zh_HK(繁体中文)、zh_TW(繁体中文),默认为zh_CN返回值*/
    private String lang="zh_CN";

    /*模板数据,这里定义为object是希望所有的模板都能使用这个消息配置*/
    private Object data;

    public String getTouser() {
        return touser;
    }

    public void setTouser(String touser) {
        this.touser = touser;
    }

    public String getTemplate_id() {
        return template_id;
    }

    public void setTemplate_id(String template_id) {
        this.template_id = template_id;
    }

    public String getPage() {
        return page;
    }

    public void setPage(String page) {
        this.page = page;
    }

    public  Object getData() {
        return data;
    }

    public void setData(Object data) {
        this.data = data;
    }
}
2.3 获取openid
上面的这个配置实体中包含的属性touser就是openid,openid与appID相对应,appID是小程序的唯一标识。
- 对于相同的小程序,同一用户的openid不变
- 对于不同小程序,同一用户的openid不同
那要怎么获取openid呢,可以通过appId、appSecret和code换取。appId和appSecret都是微信公众平台配置的固定值,我们可以在配置文件中定义好。那么只需要获取code,code的获取只能在微信小程序端操作,这个我们下面再讲,假设我们已经获取到code,那么我写了一个工具类,下面的code2Session()方法就是获取到openid的。
import java.io.IOException;
import java.util.Base64;
import java.util.HashMap;
import java.util.Map;

import com.alibaba.fastjson.JSON;
import com.alibaba.fastjson.JSONObject;
import org.springframework.beans.factory.annotation.Autowired;
import org.springframework.beans.factory.annotation.Value;
import org.springframework.http.HttpMethod;
import org.springframework.http.RequestEntity;
import org.springframework.http.ResponseEntity;
import org.springframework.stereotype.Component;
import org.springframework.web.client.RestTemplate;

import com.ddshj.srm.core.AES;
import com.fasterxml.jackson.core.JsonProcessingException;
import com.fasterxml.jackson.databind.JsonMappingException;
import com.fasterxml.jackson.databind.JsonNode;
import com.fasterxml.jackson.databind.ObjectMapper;
import com.google.common.collect.Maps;

@Component
public class WxUtils {

    @Value("${wx.appId}")
    private String appId;
    @Value("${wx.appSecret}")
    private String appSecret;
    /*微信官方换取openid的固定接口*/
    final String CODE2SESSION_URL = "https://api.weixin.qq.com/sns/jscode2session?appid={appId}&secret={appSecret}&js_code={code}&grant_type=authorization_code";

    @Autowired
    private RestTemplate restTemplate;
    @Autowired
    private ObjectMapper objectMapper;
    @Autowired
    private RedisUtils redisUtils;

    /*获取openid和session_key,参数code是小程序端传过来的*/
    public Map code2Session(String code) throws JsonMappingException, JsonProcessingException {
        Map params = Maps.newHashMap();
        params.put("appId", appId);
        params.put("appSecret", appSecret);
        params.put("code", code);
        ResponseEntity response = restTemplate.exchange(CODE2SESSION_URL, HttpMethod.GET, RequestEntity.EMPTY, String.class, params);
        JsonNode json = objectMapper.readTree(response.getBody());
        Map returnMap=new HashMap();
        returnMap.put("session_key",json.get("session_key").asText());
        /*获取到openid*/
        returnMap.put("openid",json.get("openid").asText());
        return returnMap;
    }

    public String getAccessToken() {
        /*先从缓存中取openid,缓存中取不到 说明已经过期,则重新申请*/
        String expires= redisUtils.get("access_token",String.class);
        if(expires!=null){
            return expires;
        }
        Map params = new HashMap<>();
        params.put("APPID", appId);
        params.put("APPSECRET", appSecret);
        ResponseEntity responseEntity = restTemplate.getForEntity(
                "https://api.weixin.qq.com/cgi-bin/token?grant_type=client_credential&appid={APPID}&secret={APPSECRET}", String.class, params);
        String body = responseEntity.getBody();
        JSONObject object = JSON.parseObject(body);
        String Access_Token = object.getString("access_token");
        /*access_token有效时长*/
        int expires_in = object.getInteger("expires_in");
        /*过期时间减去10毫秒:10毫秒是网络连接的程序运行所占用的时间*/
        redisUtils.set("access_token",Access_Token,expires_in-10);
        return Access_Token;
    }

    public JsonNode decryptData(String encryptedData, String session_key, String iv) throws IOException {
        AES aes = new AES();
        byte[] data = aes.decrypt(Base64.getDecoder().decode(encryptedData), Base64.getDecoder().decode(session_key), Base64.getDecoder().decode(iv));
        return objectMapper.readTree(data);
    }
}
我们利用三个参数(appId、appSecret、code)通过restTemplate发起get请求获取到openid后,出现了一个业务问题;
问题: 我虽然获取到了openid,但是我后台发送消息的时候 并没有将这个openid和用户表中具体的某个用户绑定,那我怎么知道我要发给谁呢。 (ps:你可能会想说,把用户手机号也作为参数传过来,通过手机号找寻到用户实体,不就可以绑定了吗? 答案是:不可以。因为在获取openid的时候可以看到我们还获取了一个参数session_key,手机号是通过session_key参数调用微信官方接口换取的,所以我们是先获取的openid和session_key,后获取的手机号,这是一个顺序问题)
解决方案:先将openid存储到小程序端的storage中,等通过session_key换取到手机号的时候,再将手机号和openid绑定,这样我们就可以正确推送了。
2.4 获取推送接口的参数:access_token
通过以上的步骤,我们已经可以正确的拼接出消息推送接口的请求参数 接下来的步骤,我们来拼接微信消息推送接口的路径。
微信订阅消息的推送接口是一个固定路径,但路径url的参数:access_token是变化的,如下:
https://api.weixin.qq.com/cgi-bin/message/subscribe/send?access_token=xxx那么这个access_token如何获取呢,在2.3的WxUtils工具类中我们可以看到getAccessToken()方法,这个方法就是获取access_token的,为了防止重复获取,我们将获取到的access_token存到redis中,并设置有效时长,有效时长也是接口在返回access_token的时候顺带返回的。
我们将获取到access_token拼接到url上
String url = "https://api.weixin.qq.com/cgi-bin/message/subscribe/send?access_token=" + wxUtils.getAccessToken()2.5 推送消息
- 定义一个消息发送接口类
public interface WxMsgService {

    /*扫码成功消息推送,参数可以自定义修改*/
    boolean sendQRCodeMsg(String roadName,TUser tUser);

}- 定义消息发送实现类继承接口。主要执行的代码是:先拼接参数,再执行请求
import com.alibaba.fastjson.JSON;
import com.alibaba.fastjson.JSONObject;
import com.x.core.component.LocalDateUtils;
import com.x.core.component.WxUtils;
import com.x.model.TUser;
import com.x.model.template.WxMsgConfig;
import com.x.model.template.WxMsgTemplateQRCode;
import com.x.service.WxMsgService;
import org.slf4j.Logger;
import org.slf4j.LoggerFactory;
import org.springframework.beans.factory.annotation.Autowired;
import org.springframework.http.HttpEntity;
import org.springframework.http.HttpHeaders;
import org.springframework.http.MediaType;
import org.springframework.stereotype.Service;
import org.springframework.web.client.RestTemplate;

@Service
public class WxMsgServiceImpl implements WxMsgService {

    protected static final Logger log = LoggerFactory.getLogger(WxMsgServiceImpl.class);

    @Autowired
    private RestTemplate restTemplate;

    @Autowired
    private WxUtils wxUtils;

    /*参数拼接*/
    public WxMsgConfig getQRCodeMsgConfig(String roadName, TUser tUser) {
        /*消息推送模板参数拼接*/
        WxMsgTemplateQRCode wxMsgTemplateQRCode = new WxMsgTemplateQRCode();
        wxMsgTemplateQRCode.setName1(tUser.getName());
        //获取本地当前时间
        wxMsgTemplateQRCode.setDate2(LocalDateUtils.getLocalDateStr());
        wxMsgTemplateQRCode.setThing4(roadName);
        wxMsgTemplateQRCode.setThing5("您已扫描成功,等待带班人确认开始封道");

        /*消息推送配置参数拼接*/
        WxMsgConfig wxMsgConfig = new WxMsgConfig();
        wxMsgConfig.setTouser(tUser.getOpenid());
        wxMsgConfig.setTemplate_id("7GHS90d0ETQXjC0qbq_rZe3-Hf2fsqkCip5wc5TNuqo");

        wxMsgConfig.setData(wxMsgTemplateQRCode);
        return wxMsgConfig;
    }
    /*发送请求*/
    public JSONObject postData(String url, WxMsgConfig param) {
        MediaType type = MediaType.parseMediaType("application/json; charset=UTF-8");
        HttpHeaders headers = new HttpHeaders();
        headers.setContentType(type);
        HttpEntity httpEntity = new HttpEntity<>(param, headers);
        JSONObject jsonResult = restTemplate.postForObject(url, httpEntity, JSONObject.class);
        return jsonResult;
    }

    @Override
    public boolean sendQRCodeMsg(String roadName, TUser tUser) {
        boolean sendSuccess = false;

        WxMsgConfig requesData = getQRCodeMsgConfig(roadName, tUser);
        log.info("二维码扫描推送消息请求参数:{}", JSON.toJSONString(requesData));

        String url = "https://api.weixin.qq.com/cgi-bin/message/subscribe/send?access_token=" + wxUtils.getAccessToken();
        log.info("二维码扫描推送消息请求地址:{}", url);
        JSONObject responseData = postData(url, requesData);
        log.info("二维码扫描推送消息返回参数:{}", JSON.toJSONString(responseData));

        Integer errorCode = responseData.getInteger("errcode");
        String errorMessage = responseData.getString("errmsg");
        if (errorCode == 0) {
            sendSuccess = true;
            log.info("二维码扫描推送消息发送成功");
        } else {
            log.info("二维码扫描推送消息发送失败,errcode:{},errorMessage:{}", errorCode, errorMessage);
            sendSuccess = false;
        }
        return sendSuccess;
    }

} - 调用扫码成功消息推送的方法
@Autowired
    private WxMsgService wxMsgService;

    public void sendQRCode(){
        /*业务逻辑代码...*/
        wxMsgService.sendQRCodeMsg("漕宝路入口(外圈)",tUser);
    }
3 微信小程序端
3.1 用户授权同意
发送微信订阅消息,首先需要用户授权同意,如下:
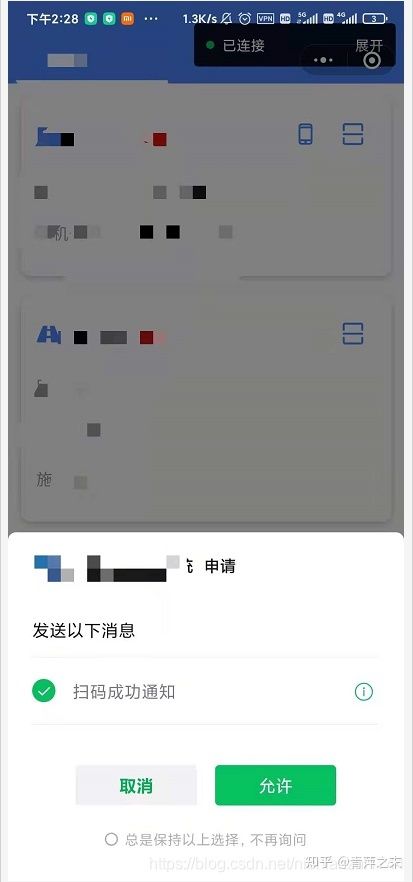
那要怎么实现呢,微信提供了一个方法: wx.requestSubscribeMessage() 通过这个方法可以调起消息订阅授权界面。 wx.requestSubscribeMessage():放在普通的业务逻辑方法中或onload中回调是不起作用的。只能通过wx.showModal()模态对话框调用或使用bindtap点击事件调用。 在我的程序中我是通过wx.showModal()方式实现的。
如下:
subscription() {
    let tmplIds= ['7GHS90d0ETQXjC0qbq_rZe3-Hf2fsqkCip5wc5TNuqo'];//  消息模板ID,可以多个
    // 这里是获取下发权限地方,根据官方文档,可以根据  wx.getSetting() 的 withSubscriptions   这个参数获取用户是否打开订阅消息总开关。后面我们需要获取用户是否同意总是同意消息推送。所以这里要给它设置为true 。
    wx.getSetting({
      withSubscriptions: true,   //  这里设置为true,下面才会返回mainSwitch
      success: function (res) {
        // 调起授权界面弹窗
        if (res.subscriptionsSetting.mainSwitch) {  // 用户打开了订阅消息总开关
          if (res.subscriptionsSetting.itemSettings != null) {   // 用户同意总是保持是否推送消息的选择, 这里表示以后不会再拉起推送消息的授权
            let moIdState = res.subscriptionsSetting.itemSettings[tmplIds];  // 用户同意的消息模板id
            if (moIdState === 'accept') {
              console.log('接受了消息推送');
            } else if (moIdState === 'reject') {
              console.log("拒绝消息推送");
              wx.showToast({
                title: '为保证您能收到带班人的指令,请授权勾选消息提醒',
                icon: 'none',
                duration: 3000
              })
            } else if (moIdState === 'ban') {
              console.log("已被后台封禁");

            }
          } else {
            // 当用户没有点击 ’总是保持以上选择,不再询问‘  按钮。那每次执到这都会拉起授权弹窗
            wx.showModal({
              title: '提示',
              content: '请授权开通服务通知',
              showCancel: true,
              success: function (ress) {
                if (ress.confirm) {
                  wx.requestSubscribeMessage({   // 调起消息订阅界面
                    tmplIds: tmplIds,
                    success(res) {
                      console.log('订阅消息 成功 ');
                      console.log(res);
                      for(var i=0;i
上面这段很长的代码是订阅授权的具体实现,大家如果copy过去的话只需要修改 消息模板的id,换成你自己的,同时弹窗消息提示也可以自定义。 将这段消息订阅的方法放到getPhoneNumber中,就可以在获取用户手机号的时候同时弹出授权消息提醒。
3.2 openid的前端存储
在上文2.3的小节中,我们知道了可以通过code来换取openid,code是前端传给后端接口的,那前端是怎么获取到code的呢。 如下:是在微信内置的登录方法中获取到的。
app.showLoadingPromise();
    app.loginPromise().then(res => {
       console.log(res.code)
    })
我们通过code换取到openid后就可以把openid存到缓存中,等到后续将openid传给后台绑定给具体的用户
wx.setStorageSync('openid', res.data.openid)
微笑小程序端的就这些了。 我们来看最终的效果。
4 效果展示
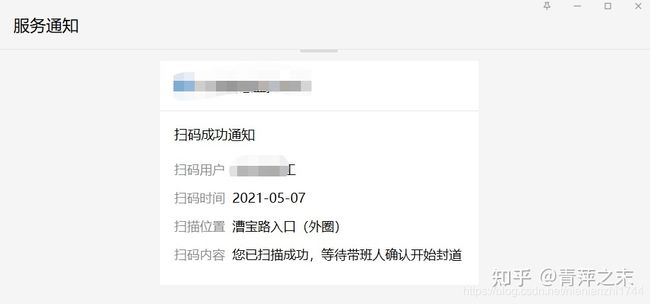
上面就是最终的效果了。
5 踩坑心得
- 5.1看了一些网上的教程,牛鬼蛇神都有。踩了不少坑,总结一下心得:
47003,errorMessage:argument invalid! data.name1.value is emtpy rid如果报错47003:那应该是消息模板参数传递不规范,可能有一些人的消息模板直接定义的实体,通过json序列化的,这样会产生转义符,建议不这样操作。
- 5.2 微信公众平台中可以看到一次性订阅和长期订阅: 一次性订阅:用户授权后,同一个模板只能推送一条消息给用户,如果用户授权一 次。要发多条消息,可以在小程序前端配置多个消息模板id(我曾为这个纠结了好久); 长期订阅:用户授权后,可以持续性推送消息给用户。