D435i相机的标定及VINS-Fusion config文件修改
引言
当我们想使用D435i相机去跑VINS-Fusion时,如果不把标定过的相机信息写入config文件中就运行,这样运动轨迹会抖动十分严重,里程计很容易漂。接下来将介绍如何标定D435i相机,并设置VINS-Fusion的config文件。
一 标定前的准备工作
在标定前我们需要查看相机的加速度在静止时是否正常,标准是加速度计的N:9.8左右。
通过打开realsense-viewer,点击Motion Module按键,然后放在Accel上观察。

如果你的此数值不在9.8附近,就需要对IMU进行校准,不然最后运行VINS-Fusion会发生抖动。
1.1校准IMU
若IMU加速度计正常,可跳过下面的校准过程。
realsense官方给了进行IMU校准的方法,参考网址为:https://dev.intelrealsense.com/docs/imu-calibration-tool-for-intel-realsense-depth-camera
下载对应的pdf文件,直接从第三节开始看即可。

校准完会发现加速度计的值在9.8左右,恢复正常。
1.2检查相机的健康状态
参考realsense官网给出的相机健康检查方法
https://www.intelrealsense.com/best-known-methods-for-optimal-camera-performance-over-lifetime
具体的校准方法在第三节部分,如下图所示
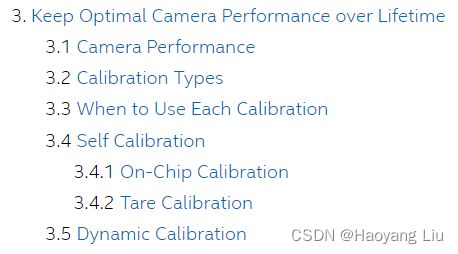
具体步骤参考官方教程
二 D435i相机标定
2.1 标定工具准备
2.1.1 code_utils
1.创建工作空间,将code_utils及imu_utils放入其中,工作空间名称自己定(当然也可以放在你已有的工作空间内)。这两个工具都是imu标定需要用到的,可以标定出imu的噪声密度和随机游走。
mkdir -p ~/catkin_ws/src
cd ~/catkin_ws/src
catkin_init_workspace
cd ..
catkin_make
2.下载编译code_utils
cd ~/catkin_ws/src
git clone https://github.com/gaowenliang/code_utils.git
cd ..
catkin_make
2.1.2 imu_utils
cd ~/catkin_ws/src
git clone https://github.com/gaowenliang/imu_utils.git
cd ..
catkin_make
2.1.3 Kalibr
参考官方的Installation步骤
https://github.com/ethz-asl/kalibr/wiki/installation
2.2 IMU标定
1.找到你安装的realsense-ros包,复制launch文件中的rs_camera.launch文件,并重命名为rs_camera2.launch(命名自定),修改如下的参数:
修改前:
<arg name="unite_imu_method" default=""/>
修改后
<arg name="unite_imu_method" default="linear_interpolation"/>
修改该参数的目的是为了将加速度计(accel)和陀螺仪(gyro)的数据合并得到imu话题。
运行相机启动文件
roslaunch realsense2_camera rs_camera2.launch
2.打开~/catkin_ws/src/imu_utils/launch(参考自己的安装路径),在此位置打开终端并运行命令
gedit d435i_imu_calibration.launch
写入如下内容:
<launch>

    <node pkg="imu_utils" type="imu_an" name="imu_an" output="screen">
    	<!--TOPIC名称和上面一致-->
        <param name="imu_topic" type="string" value= "/camera/imu"/>
        <!--imu_name 无所谓-->
        <param name="imu_name" type="string" value= "d435i"/>
        <!--标定结果存放路径-->
        <param name="data_save_path" type="string" value= "$(find imu_utils)/data/"/>
        <!--数据录制时间-min-->
        <param name="max_time_min" type="int" value= "50"/>
        <!--采样频率,即是IMU频率,采样频率可以使用rostopic hz /camera/imu查看,设置为200,为后面的rosbag play播放频率-->
        <param name="max_cluster" type="int" value= "200"/>
    </node>

</launch>
在imu_utils下创建data文件夹,标定结果将存放到此处。
3.录制数据包,将realsense相机静止放置,放置时间要略大于d435i_imu_calibration.launch中设置的录制时间,即大于50min(参考别的博客有设置120min的,也有50min的,经过自己测试50min是可以的)
rosbag record -O imu_calibration /camera/imu
其中imu_calibration是录制bag包的名字,可自己定义,录制的包会生成在当前终端的目录下,/camera/imu是相机发布的IMU话题。
4.运行标定程序
cd /catkin_ws
source ./devel/setup.bash
roslaunch imu_utils d435i_imu_calibration.launch
5.打开新终端,播放录制的数据包
cd 数据包所在路径
rosbag play -r 200 imu_calibration.bag
标定结束后,我们打开/catkin_ws/src/imu_utils/data,其中d435i_imu_param.yaml是我们需要的结果,内容如下:
%YAML:1.0
---
type: IMU
name: d435i
Gyr:
   unit: " rad/s"
   avg-axis:
      gyr_n: 1.9243758665672117e-03
      gyr_w: 2.7254175454049154e-05
   x-axis:
      gyr_n: 1.7617583709168296e-03
      gyr_w: 3.4288470593085246e-05
   y-axis:
      gyr_n: 2.5899357735630793e-03
      gyr_w: 3.5865484306354172e-05
   z-axis:
      gyr_n: 1.4214334552217264e-03
      gyr_w: 1.1608571462708043e-05
Acc:
   unit: " m/s^2"
   avg-axis:
      acc_n: 1.6855999652754222e-02
      acc_w: 7.0793241968111124e-04
   x-axis:
      acc_n: 1.1503084845270073e-02
      acc_w: 5.7285080233574772e-04
   y-axis:
      acc_n: 1.7596343469737430e-02
      acc_w: 8.4920699202932677e-04
   z-axis:
      acc_n: 2.1468570643255160e-02
      acc_w: 7.0173946467825925e-04
2.3 相机标定
1.自己下载打印标定板或购买标定板
进入https://github.com/ethz-asl/kalibr/wiki/downloads

但是我选择的Aprilgrid 6x6 0.5x0.5 m已经无法下载了,但不要怕,官方还给我们指令生成标定板的方法,参考https://github.com/ethz-asl/kalibr/wiki/calibration-targets
在kalibr文件路径下运行指令:
source ./devel/setup.bash
kalibr_create_target_pdf --type apriltag --nx 6 --ny 6 --tsize 0.055 --tspace 0.3
即可在该路径下生成标定板pdf文件,打印时缩放40%。

打印出来后的格子参数为:
大格子边长:2.2cm
小格子边长:0.66cm
小个子与大格子边长比例:0.3
新建april_6x6_A4.yaml文件,内容如下:
target_type: 'aprilgrid' #gridtype
tagCols: 6               #number of apriltags
tagRows: 6               #number of apriltags
tagSize: 0.022           #size of apriltag, edge to edge [m]
tagSpacing: 0.3          #ratio of space between tags to tagSize
2.关闭相机的结构光
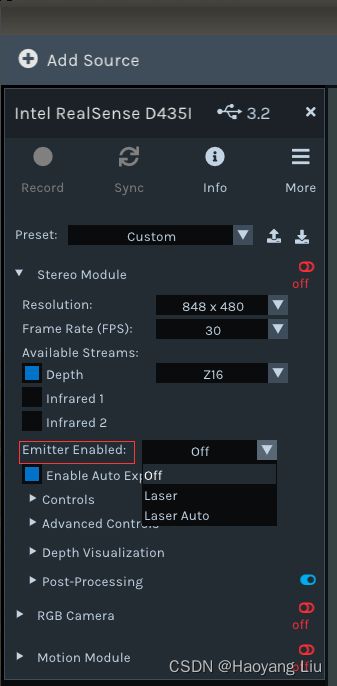
相机启动默认打开结构光,此时双目图像会有很多点,会对标定有影响,所以我们需要关闭结构光。
关闭结构光的两种方法:
(1)方法一:
先启动
roslaunch realsense2_camera rs_camera.launch
新开终端,运行
rosrun rqt_reconfigure rqt_reconfigure
打开后将camera->stereo_module中的emitter_enabled设置为off(0) ,如下图所示:

(2)方法二:
打开终端,运行realsense-viewer
realsense-viewer
3.将相机对准标定板准备标定
打开新终端,运行rviz
rviz
添加rgb相机和双目对应的话题,/camera/color/image_raw、/camera/infra1/image_rect_raw、/camera/infra2/image_rect_raw
效果如下:

开始移动相机,同时确保标定板一直在三个图像中,录制过程参考官方操作https://www.youtube.com/watch?app=desktop
步骤如下:
(1)俯仰角摆动3次
(2)偏航角摆动3次
(3)翻滚角摆动3次
(4)上下移动3次
(5)左右移动3次
(6)前后移动3次
(7)自由移动,摆动幅度大一些,但要移动缓慢些,使得标定目标尽可能出现在相机的所有视野范围内
整体标定时间在90s以上
4.修改相机帧数
官方推荐4Hz,通过如下命令更改topic发布频率
rosrun topic_tools throttle messages /camera/color/image_raw 4.0 /color
rosrun topic_tools throttle messages /camera/infra1/image_rect_raw 4.0 /infra_left
rosrun topic_tools throttle messages /camera/infra2/image_rect_raw 4.0 /infra_right
5.录制ROS bag
rosbag record -O multicameras_calibration_biaoding /infra_left /infra_right /color
/infra_left 、/infra_right、 /color为频率转换后的topic
6.使用Kalibr进行标定
cd kalibr_workspace/
source ./devel/setup.bash
kalibr_calibrate_cameras --target ~/kalibr_workspace/april_6x6_A4.yaml --bag ~/multicameras_calibration_biaoding.bag --models pinhole-radtan pinhole-radtan pinhole-radtan --topics /infra_left /infra_right /color --bag-from-to 10 145 --show-extraction --approx-sync 0.04
其中–target ~/kalibr_workspace/april_6x6_A4.yaml是标定板的配置文件
–bag ~/multicameras_calibration_biaoding.bag是录制的ROS bag数据包
–models pinhole-radtan pinhole-radtan pinhole-radtan表示三个摄像头的相机模型和畸变模型(VINS使用的畸变模型为radtan)
–topics /infra_left /infra_right /color表示双目相机和rgb相机的话题
–bag-from-to 10 145表示处理bag中10s-145s的数据(根据自己录制的数据包时间设置,rosbag info 你自己的数据包 即可查看数据包信息)
–show-extraction表示显示检测特征点的过程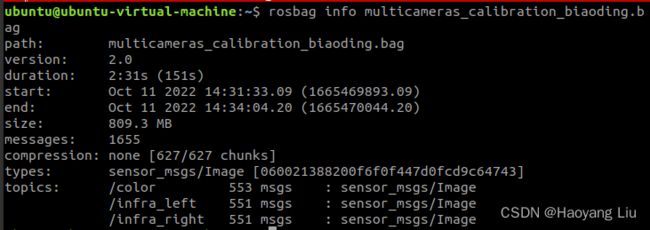
得到三个文件

查看results-cam-homeubuntumulticameras_calibration_biaoding.txt中的重投影误差reprojection error数值是多少,理想范围是0.1-0.2。
2.4 IMU+双目相机联合标定
1.编写chain_biaoding.yaml文件
格式参考Kalibr官方https://github.com/ethz-asl/kalibr/wiki/yaml-formats
中的chain.yaml
文件中的参数需要根据之前相机标定的参数进行修改,示例如下:
cam0:
  camera_model: pinhole
  distortion_coeffs: [0.002403959808138445, 0.001212094600722141, 0.0027975318922339606,
    0.0013305451339391025]
  distortion_model: radtan
  intrinsics: [389.1883630968763, 389.9466918297371, 322.6505040434058, 244.3879141231001]
  resolution: [640, 480]
  rostopic: /infra_left
cam1:
  T_cn_cnm1:
  - [0.9999926028685168, -0.001487673332607009, -0.0035469756557070867, -0.04984719672282643]
  - [0.0014555068111333671, 0.9999579513465346, -0.00905411722710673, -0.0008787616669883903]
  - [0.0035602960789059574, 0.009048887605385341, 0.9999527198447602, -0.001377119612210997]
  - [0.0, 0.0, 0.0, 1.0]
  camera_model: pinhole
  distortion_coeffs: [0.0030741870441258153, -0.0007281728041349596, 0.005821862258640268,
    0.002985916170301623]
  distortion_model: radtan
  intrinsics: [388.3951195864708, 388.5489092325429, 324.7077416689968, 248.62827656157992]
  resolution: [640, 480]
  rostopic: /infra_right
T_cn_cnm1表示的是左目相机到右目相机的旋转和平移,参考之前相机标定的结果。
2.编写imu_biaoding.yaml
格式参考https://github.com/ethz-asl/kalibr/wiki/yaml-formats
中的imu.yaml,文件中的参数参考之前imu标定得到的参数,示例如下:
#Accelerometers
accelerometer_noise_density: 1.6855999652754222e-02  #Noise density (continuous-time)
accelerometer_random_walk:   7.0793241968111124e-04  #Bias random walk

#Gyroscopes
gyroscope_noise_density:     1.9243758665672117e-03   #Noise density (continuous-time)
gyroscope_random_walk:       2.7254175454049154e-05  #Bias random walk

rostopic:                    /imu      #the IMU ROS topic
update_rate:          200.0      #Hz (for discretization of the values above)
3.准备好之前的april_6x6_A4.yaml
target_type: 'aprilgrid' #gridtype
tagCols: 6               #number of apriltags
tagRows: 6               #number of apriltags
tagSize: 0.022           #size of apriltag, edge to edge [m]
tagSpacing: 0.3          #ratio of space between tags to tagSize
# codeOffset: 0            #code offset for the first tag in the aprilboard
4.修改之前rs_camera2.launch中的文件,内容如下:
(1)imu和双目数据时间对齐
<arg name="enable_sync" default="true"/>
(2)合并加速度计和陀螺仪的topic(之前设置过了,再检查一下)
<arg name="unite_imu_method" default="linear_interpolation"/>
5.启动realsense相机
roslaunch realsense2_camera rs_camera2.launch
6.关闭结构光
参考2.3
7.打开rviz
添加imu、infra1和infra2的话题,同时调整相机位置,保证双目图像一直包含标定板的全部内容
8.调整imu和双目的话题发布频率并以新的话题发布
rosrun topic_tools throttle messages /camera/infra1/image_rect_raw 20.0 /infra_left
rosrun topic_tools throttle messages /camera/infra2/image_rect_raw 20.0 /infra_right
rosrun topic_tools throttle messages /camera/imu 200.0 /imu
9.录制ROS bag数据包
录制过程和之前相机的相同,只是录制命令不同:
rosbag record -O imu_stereo_biaoding.bag /infra_left /infra_right /imu
10.录制完毕后开始标定
将准备的文件放在kalibr_workspace文件夹下,包括chain_biaoding.yaml、imu_biaoding.yaml、april_6x6_A4.yaml和imu_stereo_biaoding.bag
标定命令如下:
kalibr_calibrate_imu_camera --bag imu_stereo_biaoding.bag --cam chain_biaoding.yaml --imu imu_biaoding.yaml --target april_6x6_A4.yaml --bag-from-to 10 140 --show-extraction
最终的到结果如下:
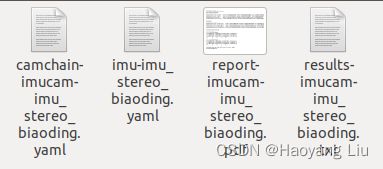
标定结果好坏查看results-imucam-imu_stereo_biaoding.txt中的重投影误差Reprojection error,两个相机的数值都在0.15以下说明标定结果良好

三 VINS-Fusion config文件修改
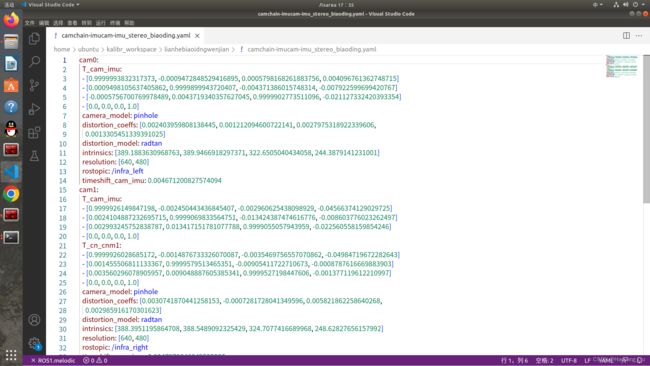
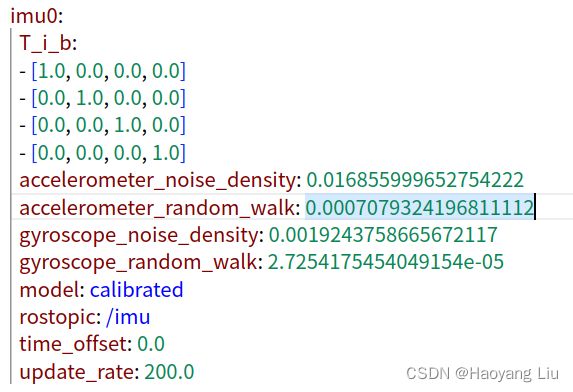
1.根据联合标定结果中的camchain-imucam-imu_stereo_biaoding.yaml和imu-imu_stereo_biaoding.yaml文件修改realsense_stereo_imu_config.yaml
标定结果如下图:
realsense_stereo_imu_config.yaml修改后效果如下:
%YAML:1.0

#common parameters
#support: 1 imu 1 cam; 1 imu 2 cam: 2 cam;
imu: 1
num_of_cam: 2

imu_topic: "/camera/imu"
image0_topic: "/camera/infra1/image_rect_raw"
image1_topic: "/camera/infra2/image_rect_raw"
output_path: "/home/rgmj/VINS_output"

cam0_calib: "left2.yaml"
cam1_calib: "right2.yaml"
image_width: 640
image_height: 480


# Extrinsic parameter between IMU and Camera.
estimate_extrinsic: 1   # 0  Have an accurate extrinsic parameters. We will trust the following imu^R_cam, imu^T_cam, don't change it.
                        # 1  Have an initial guess about extrinsic parameters. We will optimize around your initial guess.

body_T_cam0: !!opencv-matrix # 坐在body(imu)坐标系观察cam0的位姿变换
   rows: 4
   cols: 4
   dt: d
   data: [ 0.9999993832317373, 0.0009498105637405862, -0.0005756700769978489, -0.004096761362748715,
           -0.0009472848529416895,  0.9999069833564751, 0.0043719340357627045, 0.007922599699420767,
           0.0005798168261883756, -0.004371386015748314, 0.9999902773511096,0.021127332420393354,
           0.0, 0.0, 0.0, 1.0 ]

body_T_cam1: !!opencv-matrix
   rows: 4
   cols: 4
   dt: d
   data: [ 0.9999926149847198, 0.0024104887232695715, 0.002993245752838787, 0.04566374129029725,
           -0.002450443436845407, 0.9999069833564751, 0.013417151781077788, 0.008603776023262497,
            -0.002960625438098929, -0.013424387474616776, 0.9999055057943959, 0.022560558159854246,
           0.0, 0.0, 0.0, 1.0 ]

#Multiple thread support
multiple_thread: 1

#feature traker paprameters
max_cnt: 150            # max feature number in feature tracking
min_dist: 30            # min distance between two features
freq: 10                # frequence (Hz) of publish tracking result. At least 10Hz for good estimation. If set 0, the frequence will be same as raw image
F_threshold: 1.0        # ransac threshold (pixel)
show_track: 1           # publish tracking image as topic
flow_back: 1            # perform forward and backward optical flow to improve feature tracking accuracy

#optimization parameters
max_solver_time: 0.04  # max solver itration time (ms), to guarantee real time
max_num_iterations: 8   # max solver itrations, to guarantee real time
keyframe_parallax: 10.0 # keyframe selection threshold (pixel)

#imu parameters       The more accurate parameters you provide, the better performance
acc_n: 0.016855999652754222          # accelerometer measurement noise standard deviation. #0.2   0.04
gyr_n: 0.0019243758665672117         # gyroscope measurement noise standard deviation.     #0.05  0.004
acc_w: 0.0007079324196811112         # accelerometer bias random work noise standard deviation.  #0.002
gyr_w: 2.7254175454049154e-05       # gyroscope bias random work noise standard deviation.     #4.0e-5
g_norm: 9.805         # gravity magnitude

#unsynchronization parameters
estimate_td: 1                      # online estimate time offset between camera and imu
td: 0.00                             # initial value of time offset. unit: s. readed image clock + td = real image clock (IMU clock)

#loop closure parameters
load_previous_pose_graph: 0        # load and reuse previous pose graph; load from 'pose_graph_save_path'
pose_graph_save_path: "/home/rgmj/VINS_output/pose_graph/" # save and load path
save_image: 1                   # save image in pose graph for visualization prupose; you can close this function by setting 0
(1)cam0:T_cam_imu表示的是imu到相机的变换矩阵,我们填写到body_T_cam0的矩阵应该是相机到imu的矩阵,所以对T_cam_imu矩阵取逆,,因为旋转矩阵是正交矩阵,它的逆矩阵就等于它的转置矩阵,平移向量的逆,三轴取反就可以了,cam1的同理
(2)加速度计和陀螺仪的噪声和随机游走填入相应位置
2.修改config文件中的相机配置文件left.yaml和right.yaml
根据camchain-imucam-imu_stereo_biaoding.yaml中的相机内参和畸变参数进行修改,结果如下:
(1)left.yaml
%YAML:1.0
---
model_type: PINHOLE
camera_name: camera
image_width: 640
image_height: 480
distortion_parameters:
   k1: 0.002403959808138445
   k2: 0.001212094600722141
   p1: 0.0027975318922339606
   p2: 0.0013305451339391025
projection_parameters:
   fx: 389.1883630968763
   fy: 389.9466918297371
   cx: 322.6505040434058
   cy: 244.3879141231001
(3)right.yaml
%YAML:1.0
---
model_type: PINHOLE
camera_name: camera
image_width: 640
image_height: 480
distortion_parameters:
   k1: 0.0030741870441258153
   k2: -0.0007281728041349596
   p1: 0.005821862258640268
   p2: 0.002985916170301623
projection_parameters:
   fx: 388.3951195864708
   fy: 388.5489092325429
   cx: 324.7077416689968
   cy: 248.62827656157992
四 运行VINS-Fusion
1.启动相机
cd ~/catkin_ws
source ./devel/setup.bash
roslaunch realsense2_camera rs_camera2.launch
2.新开一个终端,启动rviz
我的VINS-Fusion放在工作空间vins_fusion_ws中
cd vins_fusion_ws
source ./devel/setup.bash
roslaunch vins vins_rviz.launch
3.再新开一个终端,运行起来
cd vins_fusion_ws
source ./devel/setup.bash
rosrun vins vins_node ~/vins_fusion_ws/src/VINS-Fusion/config/realsense_d435i/realsense_stereo_imu_config.yaml
参考文章:https://blog.csdn.net/qq_40186909/article/details/113104595
