独家总结 | 决策树算法Python实现(附代码详解及注释)
↑ 点击上方【计算机视觉联盟】关注我们
上一篇已经介绍过决策树基本原理机器学习经典算法决策树原理详解(简单易懂)
纸上得来终觉浅,仅仅懂了原理还不够,要用代码实践才是王道,今天小编就附上小编自己在学习中实践的决策树算法。
![]() 1、信息增益
1、信息增益
计算给定数据集的熵:
 1def calc_shannon_ent(data_set):
 2    """计算给定数据集的熵"""
 3    num_entries = len(data_set)  # 数据集中实例的总数
 4
 5    # 创建数据字典,键值是最后一列的数值。如果当前键值不存在,则扩展字典并将当前键值加入字典
 6    # 每个键值都记录了当前类别出现的次数
 7    label_counts = {}  # 创建数据字典
 8    for feat_vec in data_set:
 9        current_label = feat_vec[-1]  # 键值是最后一列的数值,表示类别标签
10        # 如果当前键值不存在,则扩展字典并将当前键值加入字典
11        if current_label not in label_counts.keys():
12            label_counts[current_label] = 0
13        label_counts[current_label] += 1
14
15    # 使用所有类标签的发生频率来计算类别出现的概率,并用这个概率来计算熵,统计所有类标签发生的次数
16    shannon_ent = 0
17    for key in label_counts:
18        prob = float(label_counts[key])/num_entries  # 计算类标签的概率
19        shannon_ent -= prob * log(prob, 2)  # 计算熵
20    return shannon_ent
![]() 2、划分数据集
2、划分数据集
对每个特征划分数据集的结果计算一次信息熵,然后判断按照哪个特征划分数据集是最好的划分方式
 1# data_set表示待划分的数据集,axis为划分数据集的特征,value指需要返回的特征的值
 2def split_data_set(data_set, axis, value):
 3    """按照给定的特征划分数据集"""
 4    # Python语言在函数中传递的是列表的引用。在函数内部对对象的修改,将会影响该列表对象的整个生存周期。
 5    # 为了消除这个不良影响,我们声明一个新列表对象(ret_data_set),用来存储符合要求的值
 6    ret_data_set = []
 7
 8    for feat_vec in data_set:
 9        # print(feat_vec)
10        # 将符合特征特征的数据抽取出来
11        if feat_vec[axis] == value:
12            reduced_feat_vec = feat_vec[: axis]  # 符合特征值的前边的数据(特征位置之前的数据)
13            # print(reduced_feat_vec)
14            reduced_feat_vec.extend(feat_vec[axis+1:])  # 符合特征值的后边数据(特征位置之后的数据)
15            # print(reduced_feat_vec)
16            ret_data_set.append(reduced_feat_vec)
17    return ret_data_set
代码过程:
1、输入三个参数:带划分的数据集、划分数据集的特征、需要返回的特征的值
2、Python语言在函数中传递的是列表的引用,在函数内部对列表对列表对象的修改,将会影响该列表对象的整个生存周期。为了不修改原始数据集,需要在函数的开始声明一个新列表对象,ret_data_set=[]
3、代码中使用extend和append方法(Python中append()和extend方法的使用和区别)
![]() 3、选择最好的数据集划分方式
3、选择最好的数据集划分方式
 1def choose_best_feature_to_split(data_set):
 2    """选择最好的数据集划分"""
 3    num_features = len(data_set[0])-1  # 数据集特征的个数
 4    base_entropy = calc_shannon_ent(data_set)  # 计算数据集的熵
 5    best_info_gain = 0  # 初始化信息最优信息增益
 6    best_feature = -1  # 初始化最优特征
 7
 8    # 遍历每个特征
 9    for i in range(num_features):
10        feat_list = [example[i] for example in data_set]  # 提取数据集中i位置特征
11        # 将数据集特征转化为独立元素的集合列表。
12        # 集合和列表类型相似,不同之处仅在于集合类型中的每个值互不相同
13        # 从列表中创建集合是Python语言得到的列表中唯一元素值的最快方法
14        unique_vals = set(feat_list)
15        new_entropy = 0  # 初始化特征值
16
17        # 遍历给定特征的每个特征值
18        for value in unique_vals:
19            # 按照给定特征及特征值,划分数据集
20            sub_data_set = split_data_set(data_set, i, value)
21            prob = len(sub_data_set)/float(len(data_set))  # 计算Dv/D
22            new_entropy += prob * calc_shannon_ent(sub_data_set)  # 计算Dv/D*Ent(Dv)并求和
23        info_gain = base_entropy - new_entropy  # 计算特征的信息增益
24
25        # 判断最优信息增益,即求最大信息增益
26        if info_gain > best_info_gain:
27            best_info_gain = info_gain
28            best_feature = i
29    return best_feature  # 返回最优特征
代码过程:
选择最好特征的原则是信息增益最大的特征
![]() 4、递归构建决策树
4、递归构建决策树
 1def majority_cnt(class_list):
 2    """返回出现次数最多的分类名称"""
 3    class_count = {}   # 键值为分类名称,值为每个分类名称出现的频率
 4    # 遍历分类名称列表
 5    for vote in class_list:
 6        if vote not in class_count.keys():
 7            class_count[vote] = 0
 8        class_count[vote] += 1
 9    # 由大到小排序
10    sorted_class_count = sorted(class_count.items(), key=operator.itemgetter(1), reverse=True)
11    # 返回出现次数最多的分类名称
12    return sorted_class_count[0][0]
13
14
15# 函数有两个参数:数据集和标签列表。标签列表包含了素有特征的标签
16def create_tree(data_set, labels):
17    """创建树"""
18    class_list = [example[-1] for example in data_set]  # 数据标签列表
19    # print('数据标签列表为:', end='')
20    # print(class_list)
21    # print('class_list[0]为:', end='')
22    # print(class_list[0])
23    # 第一停止条件是所有的类标签完全相同,则返回该类标签
24    # 这里是通过判断第一个键类标签的数量与总数据标签列表长度,如果两者相等,则表明类标签完全相同
25    if class_list.count(class_list[0]) == len(class_list):
26        return class_list[0]
27    # 第二个停止条件是使用完了所有特征,仍然不能将数据集划分成仅包含唯一类别的分组
28    # 判断data_set[0]的长度为1,说明只剩下标签值,即labels列
29    # 因为这里无法简单的返回唯一的类标签,所以这里调用前边的majority_cnt函数挑选出现次数最多的类别作为返回值
30    # print('data_set[0]为:', end='')
31    # print(data_set[0])
32    if len(data_set[0]) == 1:
33        return majority_cnt(class_list)
34    # 选取最好特征
35    best_feat = choose_best_feature_to_split(data_set)
36    # print('best_feat为:', end='')
37    # print(best_feat)
38    # 存储最优特征的label,因为label和最优特征其实就是对应的,best_feat的索引也是特征label的索引
39    best_feat_lable = labels[best_feat]
40    # print('best_feat_lable为:', end='')
41    # print(best_feat_lable)
42    my_tree = {best_feat_lable: {}}
43    del labels[best_feat]
44    # 获取最优特征的属性值
45    feat_values = [example[best_feat] for example in data_set]
46    # 将最优特征的属性值转换为唯一的元素
47    unique_vals = set(feat_values)
48    # 遍历最优特征中属性的值。在每个数据集划分上调用函数create_tree(),得到额返回值将会被插入到字典遍历my_tree中
49    # 函数终止时,字典中将会嵌套很多叶子节点信息的字典数据
50    for value in unique_vals:
51        sub_labels = labels[:]  # 使用列表切片复制列表标签类
52        my_tree[best_feat_lable][value] = create_tree(split_data_set(data_set, best_feat, value), sub_labels)
53    return my_tree
代码过程:
1、递归构建树的结束条件是:程序遍历完所有划分数据集的属性,或每个分支下的所有实例都具有相同的类
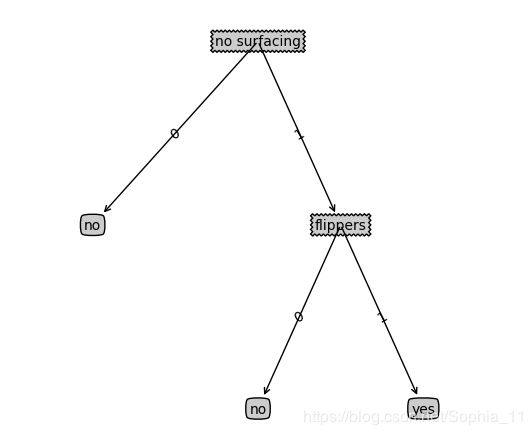
![]() 5、绘制决策树
5、绘制决策树
  1#!/usr/bin/env python
  2# -*- coding:utf-8 -*-
  3import matplotlib.pyplot as plt
  4# 设置决策节点和叶节点的边框形状、边距和透明度,以及箭头的形状
  5decision_node = dict(boxstyle='sawtooth', fc='0.8')  # 决策节点的样式
  6leaf_node = dict(boxstyle='round4', fc='0.8')  # 叶节点的样式
  7arrow_args = dict(arrowstyle='<-')  # 箭头的样式
  8
  9
 10def retrieve_tree(i):
 11    """存储树的信息"""
 12    list_of_trees = [{'no surfacing': {0: 'no', 1: {'flippers': {0: 'no', 1: 'yes'}}}},
 13                     {'no surfacing': {0: 'no', 1: {'flippers': {0: {'head': {0: 'no', 1: 'yes'}}, 1: 'no'}}}}
 14                     ]
 15    return list_of_trees[i]
 16
 17
 18def get_num_leafs(my_tree):
 19    num_leafs = 0
 20    # 强制转换keys返回类型
 21    first_str = list(my_tree.keys())[0]
 22    second_dict = my_tree[first_str]
 23    for key in second_dict.keys():
 24        # 使用type()函数判断叶子节点是否为字典类型。
 25        # 如果该节点是字典类型,则该节点也是一个判断节点,需要递归函数get_num_leafs()函数
 26        # get_num_leafs函数遍历整棵书,累计叶子节点的个数,并返回该数值
 27        if type(second_dict[key]).__name__ == 'dict':
 28            num_leafs += get_num_leafs(second_dict[key])
 29        else:
 30            num_leafs += 1
 31    return num_leafs
 32
 33
 34def get_tree_depth(my_tree):
 35    max_depth = 0
 36    first_str = list(my_tree.keys())[0]
 37    second_dict = my_tree[first_str]
 38    for key in second_dict.keys():
 39        # 使用type()函数判断叶子节点是否为字典类型。
 40        # 如果该节点是字典类型,则该节点也是一个判断节点,需要递归函数get_tree_depth()函数
 41        # get_tree_depth函数遍历整棵书,终止条件是叶子节点,一旦达到叶子节点,则从递归中返回,并将计算树的深度的数量加1
 42        if type(second_dict[key]).__name__ == 'dict':
 43            this_depth = 1 + get_tree_depth(second_dict[key])
 44        else:
 45            this_depth = 1
 46        if this_depth > max_depth:
 47            max_depth = this_depth
 48    return max_depth
 49
 50
 51# 该函数需要一个绘图区域
 52def plot_node(node_txt, center_pt, parent_pt, node_type):
 53    create_plot.ax1.annotate(node_txt, xy=parent_pt, xycoords='axes fraction',
 54                             xytext=center_pt, textcoords='axes fraction', va='center',
 55                             ha='center', bbox=node_type, arrowprops=arrow_args)
 56
 57
 58# cntr_pt指子节点的坐标,parent_pt指父节点的坐标,txt_string填充的文本消息
 59def plot_mid_text(cntr_pt, parent_pt, txt_string):
 60    """在父子节点间填充文本信息"""
 61    # 填充的位置在父节点和子节点中间位置
 62    xmid = (parent_pt[0]-cntr_pt[0])/2.0 + cntr_pt[0]
 63    ymid = (parent_pt[1]-cntr_pt[1])/2.0 + cntr_pt[1]
 64    create_plot.ax1.text(xmid, ymid, txt_string, va="center", ha="center", rotation=30)
 65
 66
 67# my_tree指树的信息,patent_pt指父节点的坐标,node_txt指标注的属性信息
 68def plot_tree(my_tree, parent_pt, node_txt):
 69    # 获取树的宽度
 70    num_leafs = get_num_leafs(my_tree)
 71    # 获取树的深度
 72    depth = get_tree_depth(my_tree)
 73    # 第一次划分数据集的类别标签
 74    first_str = list(my_tree.keys())[0]
 75    cntr_pt = (plot_tree.x_off + (1.0 + float(num_leafs))/2.0/plot_tree.totalw, plot_tree.y_off)
 76    # print(cntr_pt, parent_pt)
 77    # 标记子节点属性值
 78    plot_mid_text(cntr_pt, parent_pt, node_txt)
 79    # 子节点标记标签
 80    plot_node(first_str, cntr_pt, parent_pt, decision_node)
 81    # 第二个字典
 82    second_dict = my_tree[first_str]
 83    # 两个节点之间的距离间隔为:1.0/plot_tree.totald
 84    plot_tree.y_off = plot_tree.y_off - 1.0/plot_tree.totald
 85    for key in second_dict.keys():
 86        if type(second_dict[key]).__name__ == 'dict':
 87            plot_tree(second_dict[key], cntr_pt, str(key))
 88        else:
 89            plot_tree.x_off = plot_tree.x_off + 1.0/plot_tree.totalw
 90            print(plot_tree.x_off)
 91            plot_node(second_dict[key], (plot_tree.x_off, plot_tree.y_off), cntr_pt, leaf_node)
 92            plot_mid_text((plot_tree.x_off, plot_tree.y_off), cntr_pt, str(key))
 93    plot_tree.y_off = plot_tree.y_off + 1.0/plot_tree.totald
 94
 95
 96def create_plot(in_tree):
 97    fig = plt.figure(1, facecolor='white')
 98    fig.clf()
 99    axprops = dict(xticks=[], yticks=[])
100    create_plot.ax1 = plt.subplot(111, frameon=False, **axprops)
101    # plot_tree.totalw和plot_tree.totald存储书树的宽度和树的深度
102    plot_tree.totalw = get_num_leafs(in_tree)
103    plot_tree.totald = get_tree_depth(in_tree)
104    # plot_tree.x_off和plot_tree.y_off追踪已经绘制的节点位置,以及放置下一个节点的恰当位置
105    plot_tree.x_off = -0.5/plot_tree.totalw
106    # print(plot_tree.x_off)
107    plot_tree.y_off = 1.0
108    plot_tree(in_tree, (0.5, 1.0), '')
109    plt.show()
110
111
112# 调用绘制决策树
113my_tree = retrieve_tree(0)
114create_plot(my_tree)
代码过程:
(1)get_num_leafs和get_tree_depth函数:
1、第一个关键字是第一此划分数据集的类别标签,附带的数值比扫视子节点的取值。这里书中,直接使用 first_str = my_tree.keys()[0],这个使用在Python2版本管用,在3版本后会出“TypeError: 'dict_keys' object does not support indexing”错误,是因为python3以后的版本改变了dict.keys的返回值,返回的是dict_keys对象,不支持索引值。所以这里强制将keys返回类型转换为list即可,如上述代码方式。
2、使用Python提供的type()函数判断叶子节点是否为字典类型
绘制决策树运行结果:
![]() 6、测试算法:使用决策树执行分类
6、测试算法:使用决策树执行分类
 1def classify(input_tree, feat_labels, test_vec):
 2    """使用决策树分类测试数据"""
 3    first_str = list(input_tree.keys())[0]
 4    second_dict = input_tree[first_str]
 5    # 使用index方法查找当前列表中第一个匹配firstStr变量的元素
 6    feat_index = feat_labels.index(first_str)
 7    # 遍历整棵树
 8    for key in second_dict.keys():
 9        # 如果测试数据的属性值等于Key的值
10        if test_vec[feat_index] == key:
11            # 判断是否为字典类型,如果是字典类型,则说明不是叶子节点,得需要递归
12            # 这里判断得出类别,就是寻找是否是字典类型,如果是字典类型,则不是叶子节点,如果不是字典类型,则说明是叶子结点
13            if type(second_dict[key]).__name__ == 'dict':
14                class_label = classify(second_dict[key], feat_labels, test_vec)
15            else:
16                class_label = second_dict[key]
17    return class_label
这里如果进行调用的时候,在feat_index = feat_labels.index(first_str)代码行的位置会出现“ValueError: 'no surfacing' is not in list”的错误,因为在创建树的时候,labels内的元素是被删除了,我们在运行的时候,需要将labels备份副本即可。
这里是分步骤讲解决策树实践的步骤以及思路,每一个部分都是独立的函数,盟友可以自己组建起来组成一个决策树Python实现代码,也可以公众号回复关键词【决策树】下载整理好的完整代码练习理解!
往期回顾
亲身经历2019年校招8个大厂心得体会,纯干货分享(大疆、百度...)
2018年29篇必读机器学习论文总结,BERT, SeqGAN等上榜
机器学习经典算法决策树原理详解(简单易懂)
斯坦福李飞飞高徒Johnson博士论文: 组成式计算机视觉智能(附195页PDF)
带你详细了解机器视觉竞赛—ILSVRC竞赛
2018年度最强的30个机器学习项目!
何恺明等最新突破:视频识别快慢结合,取得人体动作AVA数据集最佳水平
对比两年斯坦福AI报告:32张图表带你全盘掌握行业发展