个人主页设计-web前端开发技术(html+css)
基本知识
https://www.w3cschool.cn/
https://www.w3school.com.cn/cssref/css_colors.asp
插入背景图片
转自于:https://www.php.cn/css-tutorial-410405.html
css怎样设置背景图片?
css 中background属性就是专门设置背景的属性,可以设置背景色,也可以设置背景图片。
下面看看background可以设置的属性:
background-color: 规定要使用的背景颜色。
background-position: 规定背景图像的位置。
background-size: 规定背景图片的尺寸。
background-repeat :规定如何重复背景图像。
background-origin :规定背景图片的定位区域。
background-clip: 规定背景的绘制区域。
background-attachment: 规定背景图像是否固定或者随着页面的其余部分滚动。
background-image :规定要使用的背景图像。
1.可以看出background-image属性就是给html页面设置背景图片的属性,下面看看它的用法
background-image:url(1.jpg);
这样在url()里给出图片的路径,就可以给div盒子设置一个背景图片;看似简单,但有一点要注意,设置背景图片的盒子必须要有实质的宽度与高度,这样才可以让背景图片在显示屏上显示。
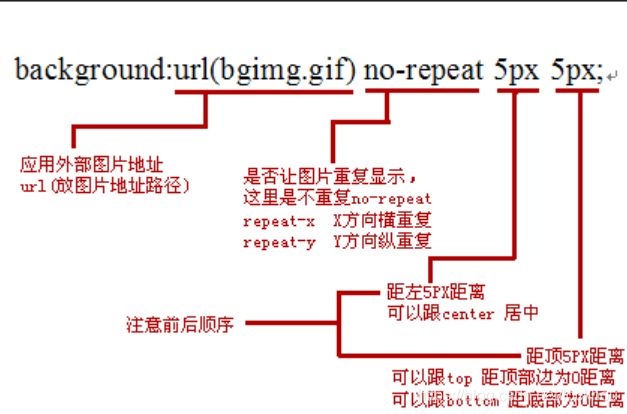
2.上面的这些background属性如果一个一个的设置是不是感到繁琐,其实有些属性是可以放在一起设置的,这样的css背景表达可以节约且优化了css文件代码。例:
background:url(bgimg.gif) no-repeat 5px 5px;
css设置背景图片的代码实例
1.css设置背景图片自适应全屏
<html>
	<head>
		<meta charset="UTF-8">
		<title>背景图片设置</title>
		<style>
			.demo{
				position:fixed;
				top: 0;
				left: 0;
				width:100%;
				height:100%;
				min-width: 1000px;
				z-index:-10;
				zoom: 1;
				background-color: #fff;
				background: url(2.png);
				background-repeat: no-repeat;
				background-size: cover;
				-webkit-background-size: cover;
				-o-background-size: cover;
				background-position: center 0;
			}
		</style>
	</head>;
	<body>;
		<div class="demo"></div>
	</body>
</html>
下面具体分析一下css样式的作用:
position:fixed;

top: 0;

left: 0;
这三句是让整个div.demo盒子固定在屏幕的最上方和最左方。
width:100%;

height:100%;
这是让整个div跟屏幕实现一模一样的大小,从而达到全屏效果。
min-width: 1000px;
min-width是为了实现让屏幕宽度在1000px以内时,div的大小保持不变,也就是说在这种情况下,缩放屏幕宽度时,图片不要缩放(只有在1000px以内才有效)。
z-index:-10;
这个是让整个div在HTML页面中处在各个层级的下方,正常情况下,第一个创建的层级z-index的值是0,所以如果我们这里写成-1也可以实现,不过这里写-10是确保整个div在最下面,因为如果页面中层级太多了,有的时候用-1不一定在最下面,但如果写成-100这样大数字的也没有什么意义。用index:-10 以此能达到看上去像背景图片,其实是一个最普通的div,只是层级关系变了,才让人看上去看是背景图片。
background-repeat: no-repeat;
这个css样式是设置背景图片不要重复的;例子中的是一张大图,如果是一张纯色(或伴有点状/条纹状)的图片,可以让图片平铺(重复)到整个屏幕上,达到全屏效果。(repeat-x是设置横向平铺、repeat-y是设置竖向平铺)
2.css设置背景图片透明
<html>
	<head>
		<meta charset="UTF-8">
		<title>背景图片设置</title>
		<style>
			.demo{
				width: 600px;
				height: 200px;
				background:url(1.jpg) no-repeat;

			}
			.demo1{
				width: 100%;
				height: 100%;
				background-color: rgba(255,255,255,0.5);
			}
		</style>
	</head>
	<body>
		<div class="demo">
			<div class="demo1"></div>
		</div>
	<body>
</html>
设置图片,图标,文字元素位置
转载于:https://www.html.cn/qa/css3/13781.html
1、使用position属性来设置img图片的位置,position 属性规定元素的定位类型。
说明
这个属性定义建立元素布局所用的定位机制。任何元素都可以定位,不过绝对或固定元素会生成一个块级框,而不论该元素本身是什么类型。相对定位元素会相对于它在正常流中的默认位置偏移。
有四个属性值:
-
absolute:生成绝对定位的元素,相对于 static 定位以外的第一个父元素进行定位。元素的位置通过 “left”, “top”, “right” 以及 “bottom” 属性进行规定。
-
fixed:生成绝对定位的元素,相对于浏览器窗口进行定位。元素的位置通过 “left”, “top”, “right” 以及 “bottom” 属性进行规定。
-
relative:生成相对定位的元素,相对于其正常位置进行定位。因此,“left:20” 会向元素的 LEFT 位置添加 20 像素。
-
static:默认值。没有定位,元素出现在正常的流中(忽略 top, bottom, left, right 或者 z-index 声明)。
示例:

<!DOCTYPE html>
<html>
	<head>
		<meta charset="UTF-8">
		<style type="text/css">
			img {
				position: absolute;
				left: 100px;
				top: 100px
			}
		</style>
	</head>

	<body>
		<img src="2.jpg" />
		<p>
		通过绝对定位,元素可以放置到页面上的任何位置。下面的标题距离页面左侧 100px,距离页面顶部 150px。
		</p>
	</body>

</html>
2、使用background-position属性设置背景图片的位置
在背景图片的背景图片位置属性中,background-position是用来控制元素背景图片的位置。它接受三种值:
- 关键词,如top、right、bottom、left、center
- 长度值,如px、em、rem等
- 百分值:%
background-position 属性设置背景图像的起始位置。
这个属性设置背景原图像(由 background-image 定义)的位置,背景图像如果要重复,将从这一点开始。
示例:
<!DOCTYPE html>
<html>
	<head>
		<meta charset="UTF-8">
		<title></title>
		<style type="text/css">
			div{width: 200px;height: 200px;
			border:1px solid #ccc;
			background: url('/i/eg_bg_03.gif') no-repeat left bottom;}
		</style>
	</head>
	<body>
	<div></div>
	</body>
</html>
css设置图片形状
转载于:https://blog.csdn.net/huangpb123/article/details/52766532
使用方法
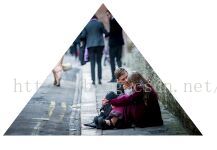
1.裁剪三角形
元素的左上角为(0 0);polygon裁剪多边形。
.clipClass{

-webkit-clip-path: polygon(0 100%, 50% 0, 100% 100%);

}
2.裁剪圆形
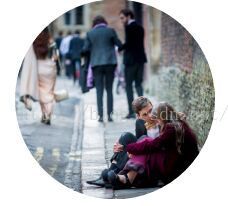
创建圆形,需要给circle传入三个值:半径和圆心坐标(x y),用at关键字来定义圆心坐标。
.clipClass{

-webkit-clip-path: circle(50% at 50% 50%);

}
3.裁剪椭圆
创建椭圆,需要给ellipse传入四个值:椭圆的x轴半径、y轴半径以及椭圆圆心(x y)。
.clipClass{

-webkit-clip-path: ellipse(30% 20% at 50% 50%);

}
4.裁剪插图

使用inset传入四个值,对应“上 右 下 左”的顺序来设置圆角半径。
.clipClass{

-webkit-clip-path: inset(25% 0 25% 0 round 0 25% 0 25%);

}
上面的各个值分别对应为:
inset(<top> <right> <bottom> <left> round <top-radius> <right-radius><bottom-radius> <left-radius>)
其简写形式:

.clipClass {

  -webkit-clip-path: inset(25% 0 round 0 25%);

}
5.动画切换
 .clipClass {

-webkit-clip-path: polygon(20% 0%, 0% 0%, 0% 50%, 0% 80%, 0% 100%, 50%100%, 80% 100%, 100% 100%, 100% 50%, 100% 0, 80% 0, 50% 0);

}

.clipClass:hover {

-webkit-clip-path: polygon(50% 0%, 0% 20%, 30% 50%, 0% 80%, 20% 100%,50% 70%, 80% 100%, 100% 80%, 70% 50%, 100% 20%, 80% 0%, 50% 30%);

}
分割线设置
转载于:https://www.cnblogs.com/ypppt/p/13114360.html
方式一:单个标签实现分隔线:
html:
<div class="line_01">小小分隔线 单标签实现</div>
css:
.demo_line_01{
    padding: 0 20px 0;
    margin: 20px 0;
    line-height: 1px;
    border-left: 190px solid #ddd;
    border-right: 190px solid #ddd;
    text-align: center;
}
优点:代码简洁
方式二、巧用背景色实现分隔线:
html:
<div class="line_02"><span>小小分隔线 巧用色实现</span></div>
css:
.demo_line_02{
    height: 1px;
    border-top: 1px solid #ddd;
    text-align: center;
}
.demo_line_02 span{
    position: relative;
    top: -8px;
    background: #fff;
    padding: 0 20px;
}
优点:代码简洁,可自适应宽度
方式三、inline-block实现分隔线:
html:
<div class="line_03"><b></b><span>小小分隔线 inline-block实现</span><b></b></div>
css:
.demo_line_03{
    width:600px;
}
.demo_line_03 b{
    background: #ddd;
    margin-top: 4px;
    display: inline-block;
    width: 180px;
    height: 1px;
    _overflow: hidden;
    vertical-align: middle;
}
.demo_line_03 span{
    display: inline-block;
    width: 220px;
    vertical-align: middle;
}
方式四、浮动实现分隔线:
html:
<div class="line_04"><b></b><span>小小分隔线 浮动来实现</span><b></b></div>
css:
.demo_line_04{
    width:600px;
}
.demo_line_04{
    overflow: hidden;
    _zoom: 1;
}
.demo_line_04 b{
    background: #ddd;
    margin-top: 8px;
    float: left;
    width: 26%;
    height: 1px;
    _overflow: hidden;
}
方式五、利用字符实现分隔线:
html:
<div class="line_05">———————————<span>小小分隔线 字符来实现</span>————————————</div>
css:
.demo_line_05{
    letter-spacing: -1px;
    color: #ddd;
}
.demo_line_05 span{
    letter-spacing: 0;
    color: #222;
    margin:0 20px;
}
设置文字颜色以及色号
色号参考:https://www.w3school.com.cn/cssref/css_colors.asp
<span style="color: #7CFC00; "> <h2><div class="text8">个人简介</div></h2> </span>
图标使用
常用网站:https://www.jianshu.com/p/09efe0b59f2e
图标库:https://fontawesome.dashgame.com/
使用方法(详见网站该网站提供的图标用法)
1.最简单的方式:BootstrapCDN (由MaxCDN提供)
一句话将Font Awesome加入您的网页中。您完全不用下载或者安装任何东西!
将以下代码粘贴到网页HTML代码的 部分.
<link href="//netdna.bootstrapcdn.com/font-awesome/4.7.0/css/font-awesome.min.css" rel="stylesheet">
2.基本图标
您可以将Font Awesome图标使用在几乎任何地方,只需要使用CSS前缀 fa ,再加上图标名称。 Font Awesome是为使用内联元素而设计的。我们通常更喜欢使用 ,因为它更简洁。 但实际上使用 才能更加语义化。
<i class="fa fa-camera-retro"></i> fa-camera-retro
3.用于列表
使用 fa-ul 和 fa-li 便可以简单的将无序列表的默认符号替换掉。
<ul class="fa-ul">
  <li><i class="fa-li fa fa-check-square"></i>List icons</li>
  <li><i class="fa-li fa fa-check-square"></i>can be used</li>
  <li><i class="fa-li fa fa-spinner fa-spin"></i>as bullets</li>
  <li><i class="fa-li fa fa-square"></i>in lists</li>
</ul>
实现代码
<!DOCTYPE html>
<html lang="en">
<head>
<meta charset="UTF-8">
<title>个人主页</title>
<style>
.demo{
position:fixed;
top: 0;
left: 0;
width:100%;
height:100%;
min-width: 1000px;
z-index:-10;
zoom: 1;
background-color: #fff;
background: url("./picture/D6694D4E62BC095C33C27D7E80D0F101.png");
background-repeat: no-repeat;
background-size: cover;
-webkit-background-size: cover;
-o-background-size: cover;
background-position: center 0;
}
.demo1{
position: absolute;
left: 100px;
top: 30px;
width: 240px;
height: 300px;
/*实现div里的图片水平垂直居中*/
display: table-cell;
text-align: center;
vertical-align: middle;
background-color: #fff;
background: url("./picture/210283200103241534.jpg");
-webkit-clip-path: circle(44% at 50% 50%);
}
.demo2{
position: absolute;
left: 650px;
top: 280px;
width: 240px;
height: 300px;
/*实现div里的图片水平垂直居中*/
display: table-cell;
text-align: center;
vertical-align: middle;
background-color: #fff;
background: url("./picture/interest.jpg");
-webkit-clip-path: circle(44% at 50% 50%);
}
.line_01{
padding: 0 20px 0;
margin: 30px 0;
line-height: 2px;
border-left: 500px solid #ddd;
border-right: 500px solid #ddd;
text-align: center;
}
.text1{
position: absolute;
left: 50px;
top: 330px;
}
.text2{
position: absolute;
left: 100px;
top: 380px;
}
.text3{
position: absolute;
left: 100px;
top: 430px;
}
.text4{
position: absolute;
left: 100px;
top: 480px;
}
.text5{
position: absolute;
left: 250px;
top: 380px;
}
.text6{
position: absolute;
left: 250px;
top: 430px;
}
.text7{
position: absolute;
left: 250px;
top: 480px;
}
.text8{
position: absolute;
left: 520px;
top: 80px;
}
.text9{
position: absolute;
left: 520px;
top: 310px;
}
.texta{
position: absolute;
left: 525px;
top: 120px;
}
.list{
position: absolute;
left: 525px;
top: 330px;
}
</style>
<link href="//netdna.bootstrapcdn.com/font-awesome/4.7.0/css/font-awesome.min.css" rel="stylesheet">
</head>
<body>
<div class="demo">
<div class="demo1">
</div>
<div class="line_01"><h1><span style="color: #FFFFFF; ">个人主页</span> </h1></div>
<span style="color: #7CFC00; "> <h2><div class="text1"><i class="fa fa-address-card-o"></i> 基本资料</div></h2> </span>
<span style="color: #7CFC00; "> <h3><div class="text2"><i class="fa fa-user-o"></i>  姓名</div></h3> </span>
<span style="color: #7CFC00; "> <h3><div class="text3"><i class="fa fa-calendar"></i> 2001.2.3</div></h3> </span>
<span style="color: #7CFC00; "> <h3><div class="text4"><i class="fa fa-map-marker"></i> 中国北京</div></h3> </span>
<span style="color: #7CFC00; "> <h3><div class="text5"><i class="fa fa-mortar-board"></i> 某某大学</div></h3> </span>
<span style="color: #7CFC00; "> <h3><div class="text6"><i class="fa fa-phone"></i> 15526587983</div></h3> </span>
<span style="color: #7CFC00; "> <h3><div class="text7"><i class="fa fa-qq"></i> 2759538945</div></h3> </span>
<span style="color: #7CFC00; "> <h2><div class="text8">个人简介</div></h2> </span>
<span style="color: #87CEFA; ">
<p><h3><div class="texta">我是来,是班级内的一名普通同学,但是最为一名正处于人生
<br>最好年龄的青年,我也怀揣着炙热的梦想,希望可以在这美丽的校园里绽放自己的青
<br>春。所以在过去的一年里,我从不敢懈怠,我的努力也得到了学院和学校的认可,在
<br>大一上下两学期均获得一等奖学金和单科状元的称号,而且也加入学校实验室积极参
<br>加大学生竞赛等活动。但是我知道我还有太多的不足,但是我一定会继续努力 牢记
</div></h3></p>
</span>
<span style="color: #7CFC00; "> <h2><div class="text9">兴趣爱好</div></h2> </span>
<div class="list">
<h3>
<span style="color: #32CD32; ">
<ul class="fa-ul">
<li><i class="fa-li fa fa-keyboard-o"></i>编程</li>
<li><i class="fa-li fa fa-spinner fa-spin"></i>漫画</li>
<li><i class="fa-li fa fa-soccer-ball-o"></i> 足球</li>
<li><i class="fa-li fa fa-camera"></i>摄影</li>
<li><i class="fa-li fa fa-gamepad"></i>游戏</li>
</span>
</ul>
</h3>
</div>
<div class="demo2">
</div>
</body>
</html>
