Joern工具下载与使用
Joern工具下载与使用
- Joern工具下载
-
- 安装JDK11
- 安装joern-cli
- Joern工具使用
- 更新:Joern画PDG,AST,CFG等图
Joern工具下载
安装JDK11
这篇博客环境是Ubuntu18.04,首先安装JDK11,在这个页面网址安装OpenJDK11,安装成功后会显示这样的结果:

安装joern-cli
安装好JDK后,就可以来安装joern-cli命令行工具了,安装命令如下:
mkdir joern
cd joern
curl -L "https://github.com/joernio/joern/releases/latest/download/joern-install.sh" -o joern-install.sh
chmod u+x joern-install.sh
./joern-install.sh --interactive
然后一路默认下来,joern工具就会被安装在/joern/joern-cli目录下,如果你的操作系统上没有解压工具,需要手动解压zip包
unzip joern-cli.zip
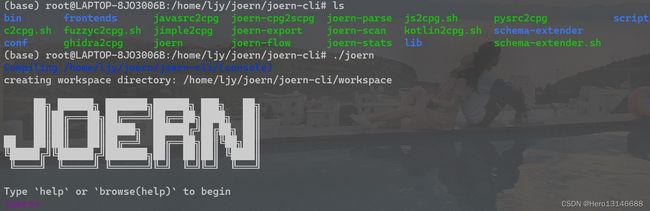
然后进入目录下查看是否安装正确,输入./joern,如果出现下面的结果则代表安装正确:
接下来设置为JVM分配内存,这里以4G为例:
export _JAVA_OPTS="-Xmx4G"
Joern工具使用
这里介绍最基础的Joern使用,首先下载一个官方案例如下:
git clone https://github.com/ShiftLeftSecurity/x42.git
使用这个案例./x42/c文件夹下的X42.c文件,文件内容如下:
// X42.c
#include 下面我们对这个文件进行简要的分析,以此介绍Joern的基于cpg的查询语句。首先输入./joern开启joern工具,随后使用importCode将该文件导入Joern中,如下:
joern> importCode(inputPath="./x42/c", projectName="x42-c")
res0: Cpg = io.shiftleft.codepropertygraph.generated.Cpg@4a9c188f
可以发现得到了一个代码属性图Cpg,这个图保存在joern/joern-cli/workspace/x42-c/cpg.bin.tmp这个路径下,输入cpg.加上tab键可以发现所有的cpg命令提示,当然也可以去官方文档查询命令格式。

回到X42.c这个文件,如果我们提出一个问题,该程序是否向stderr写入东西了,怎么通过joern查询语句验证呢?
joern> cpg.call.argument.code("stderr").toList
res2: List[Expression] = List(
  Identifier(
    id -> 1719L,
    argumentIndex -> 1,
    argumentName -> None,
    code -> "stderr",
    columnNumber -> Some(value = 13),
    dynamicTypeHintFullName -> ArraySeq(),
    lineNumber -> Some(value = 7),
    name -> "stderr",
    order -> 1,
    typeFullName -> "FILE"
  )
)
如上所示,程序既然要写一些东西到stderr,肯定有函数调用,那么首先查找类型为函数调用的结点,接着查找函数调用结点中与参数结点相关的结点,然后最后定位在字符串为“stderr”的结点,可见如上所示,定位到了stderr这个字符串。
但仅仅定位到stderr并没有用,我们要看有没有东西写入,因此查找该结点的上层结点,利用astParent,如下:
joern> cpg.call.argument.code("stderr").astParent.toList
res3: List[AstNode] = List(
  Call(
    id -> 1718L,
    argumentIndex -> -1,
    argumentName -> None,
    code -> "fprintf(stderr, \"It depends!\\n\")",
    columnNumber -> Some(value = 5),
    dispatchType -> "STATIC_DISPATCH",
    dynamicTypeHintFullName -> ArraySeq(),
    lineNumber -> Some(value = 7),
    methodFullName -> "fprintf",
    name -> "fprintf",
    order -> 1,
    signature -> "",
    typeFullName -> ""
  )
)
可见,上层结点是fprintf函数,确实是写入stderr,这样就验证了之前提出的问题。
在使用完成后,我们可以使用close命令关闭当前的cpg,如下:
joern> close
Turning working copy into new persistent CPG
res3: Option[workspacehandling.Project] = Some(
  value = Project(
    projectFile = ProjectFile(inputPath = "/home/ljy/joern/joern-cli/x42/c", name = "x42-c"),
    path = /home/ljy/joern/joern-cli/workspace/x42-c,
    cpg = None
  )
)
从上文的path路径也可以看出该文件保存的位置,最后输入exit退出joern的同时,输入y保存文件,这样就完成了一次简单的joern使用。
joern> exit
Bye!
Would you like to save changes? (y/N)
y
saving.
Joern工具在实际使用过程中多半是用来批量生成数据集的CPG图,并以此导出AST、CFG、PDG等等,用于后续的代码特征提取与表征。
更新:Joern画PDG,AST,CFG等图
进入joern-cli目录下,首先运行命令
./joern-parse ./x42/test
将./x42/test目录下的函数生成cpg(名字是cpg.bin),然后从cpg.bin导出所需要的图,这里以PDG图为例:
./joern-export cpg.bin --repr pdg --out outdir
这样,导出的文件就会保存在./outdir/文件夹下,如下图所示:
![]()
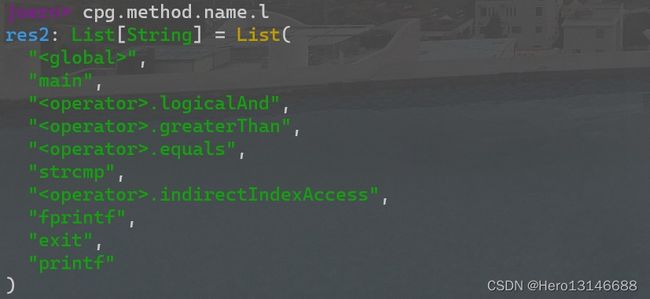
这里的10个.dot文件对应10张图,也是对应cpg.bin中的10个方法,可以通过
./joern
importCpg("cpg.bin")
cpg.method.name.l
命令来找到方法和图的对应关系,比如上面的10个图就对应如下的10个函数:
我们找一个函数来看一下效果,以main函数为例,对应1-pdg.dot,使用如下命令生成一个图片test.png:
dot -Tpng -o test.png 1-pdg.dot
查看test.png的效果如下:
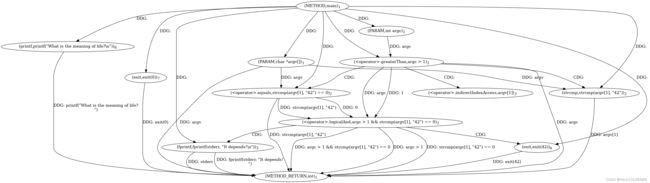
可见,确实是main函数的程序依赖图。