Latex学习
Latex学习
文章目录
-
- Latex学习
-
- 一、TeX,LaTeX,MikTex,CTeX,TeX Live到底是什么及其区别
- 二、TexLive安装与环境配置
-
- 1、VSCode+Texlive+SumatraPDF搭建Latex环境 (★★★)
- 2、Texlive安装宏包
- 三、MikTex安装
-
- 1、MikTex安装
- 2、winEdt的使用(★★★★★)
-
- 1)编译环境设置
- 2)正向反向索引
- 3)主文件设置
- 五、Latex技巧
-
- 1、适合LaTeX初学者的博客
- 2、带圈数字与带圈数字列表
- 3、插入超链接
- 4、插入图片 + 注释
-
- 1)插入图片
- 2)图片注释
- 5、修改字体
- 6、插入有序列表
- 7、插入无序列表
- 8、参考网址和脚注
- 9、绘制表格
-
- 1)表格基本使用
- 2)表格过宽和过窄调整
- 3)表格合并和拆分
- 4)表格整体居中
- 5)表格生成工具
- 10、公式编号和对齐
- 11、Tikz 绘图
- 12、latex多文件整合
- 13、添加算法表格
-
- 1)英文算法1
- 2)英文算法2
- 3)中文算法1
- 4)中文算法2(★★★★★)
- 5)问题解决(★★★★★)
- 14、latex插入gif动图
- 15、添加代码
- 16、latex引用参考文献
-
- 1)问题1:\citation,\bibstyle,\bibdata not found
- 2)问题2:pdf内容,reference显示异常
- 3)查看log文件,提示用biber替代bibtex
- 4)最终解决方案:使用biber.exe(★★★★★)
- 5)中文参考文献乱码问题
- 6)CNKI无Bibtex的文献导出格式
- 7)参考资料
- 六、问题汇总
一、TeX,LaTeX,MikTex,CTeX,TeX Live到底是什么及其区别
这个博客以FAQ的模式介绍了一下TeX是什么:王垠介绍的TeX,一个专业的排版系统,大概可以理解为用对比word、pdf的所见即所得,TeX是一个排版系统,使用代码编写,将排版工作都交给程序去做,达到所想即所得的效果,TeX 非常适合科学家用来写学术论文和书籍,如公式的输入会比word方便得多。
TeX,LaTeX,MikTex,CTeX,TeX Live等等众多版本看起来很令人迷惑,其实和linux的各种版本有点像,它们的宏有点不太一样。
Knuth 创造了 TeX 之后,免费公布了 TeX 程序的源代码。所以任何人都可以在保证不修改那个文件的情况下把它编译成程序,然后跟其它很多程序一起打包发行。这样就有了很多发行版本,比如 Windows 下有 MikTeX,fpTeX等,而Linux 和 UNIX 下有 teTeX. 这些简称“发行”。
TeX 和 MikTeX,teTeX等的关系,就像 Linux 和 Debian GNU/Linux, RedhatLinux等的关系。每一个TeX发行里都包含了 TeX, METAFONT,LaTeX, amsTeX, MetaPost, dvips, pdfTeX, dvipdfm等每一个 Linux 发行都包含Linux内核,bash, gcc, tar, XFree86等等。
所以要安装哪个呢?
虽然CTeX 中 MiKTeX 太旧,无法更新宏包解决方案这篇博客所述问题还未遇到,而且官网版本相较于这篇博客的还是有所更新了的,但依然不建议使用最小化安装(我已经来修改博客了)。
win下TeX Live 默认是完整安装,而 MikTeX 默认是最小化安装,当你真的用起来的时候,MikTeX会因为缺少各种东西而各种报错,所谓用到包再当场下并不能解决一大堆error,所以还是建议装完整版的TeX Live,一步到位。
MikTeX、TeX Live等都是编译环境,TexStudio、TexMaker等是编译器(应该是集成开发环境吧) (编译器?? 编译环境??不是一个东西吗?可以参考C/C++的编译器|编译环境(非常全面的比较))
参考LaTex+TexStudio环境配置
二、TexLive安装与环境配置
1、VSCode+Texlive+SumatraPDF搭建Latex环境 (★★★)
1)Texlive的安装和环境配置
-
环境变量设置:
path=D:\programmingSoftware\LaTeX\texlive\2020\bin\win32) -
cmd >> tex -v验证参考Texlive安装与环境变量配置
2)vscode(Latex workshop) + setting配置(主要设置用什么编译:xelatex,pdflatex,还是bibtex)
3)sumapdf安装,实现正向搜索/反向搜索(这里有个bug,需要先打开sumapdf,才能反向索引,正向索引用ctrl+alt+J)
参考b站up主的分享:Win10+VSCode+Texlive+SumatraPDF搭建Latex环境就足够了
问题:编译比CTEX中文套装费劲
2、Texlive安装宏包
参考windows下的TeX Live如何安装已经下载好的sty宏包?
三、MikTex安装
1、MikTex安装
CTeX中文套装是基于 Windows 下的 MiKTeX系统,集成了编辑器 WinEdt和 PostScript处理软件 Ghostscript 和 GSview 等主要工具。其中CTeX的一项重要功能是实现了TeX文档和PDF文件之间的正反向搜索,一般习惯称之为相互跳转。这对于平常的日常写作和修改来说是非常有用便捷的。
参考https://cloud.tencent.com/developer/news/727675
安装教程参考CTex+WinEdt10.2安装详细教程与破解 (傻瓜式安装,点下一步即可)
我安装的是CTeX_2.9.2.164_Full.exe版本(1.3G,包含MikTeX,winEdt,sumtrapdf)。清华镜像网址:https://mirrors.tuna.tsinghua.edu.cn/ctex/legacy/2.9/
MikTex环境变量配置:path = F:\latex\CTEX\MiKTeX\miktex\bin ,如果系统还安装了Texlive,并配置了path,建议设置优先级。
cmd >> tex --version 验证
2、winEdt的使用(★★★★★)
1)编译环境设置
Q:如果MikTex环境变量设置不对,或者说用了Tex Live的环境变量,则winEdt上面的编译按钮会识别不到编译文件(eg,pdflatex.exe,textify.exe),均显示灰色
解决方法:
- Options >> Execution Mode,看
Full Executable那一栏的exe文件是否真实存在。 - 如果不存在,重新配置MikTex环境变量,重启winEdt,再次打开时,winEdt会去自动识别系统latex的环境变量(之前我用的是texlive环境变量,导致winEdt编译按钮全是灰色)
- 我记得MikTex环境变量要配置多个,但我只配置了
path = F:\latex\CTEX\MiKTeX\miktex\bin, 大部分编译文件可以用(pdfTexify.exe可以用),少部分用不了(dvi2pdf不可用,所以以后插入图片用jpg,不用eps,因为eps需要通过dvi2pdf进行编译)
2)正向反向索引
参考Latex Winedt+SumatraPDF反向搜索不能的原因,WinEdt 与 SumatraPDF 的正反向搜索功能
- 注意打开
--src,先dvi2pdf,再pdfTexify,winedt的pdf Search才会亮 - 正向索引:将鼠标光标左击TeX文档的某源码处,然后在左击“PDF Search”按钮
- 反向索引:在编译生成PDF后,在PDF页面上双击某行,即可跳转至TeX文档的对应源码处(如果反向索引没反应,则先打开SumatraPDF, 再点击winedt的
pdf Search)
配置好后,编译文件,会看到一个文件夹:xxx.synctex.gz,主要是用来保存正向反向索引信息。
3)主文件设置
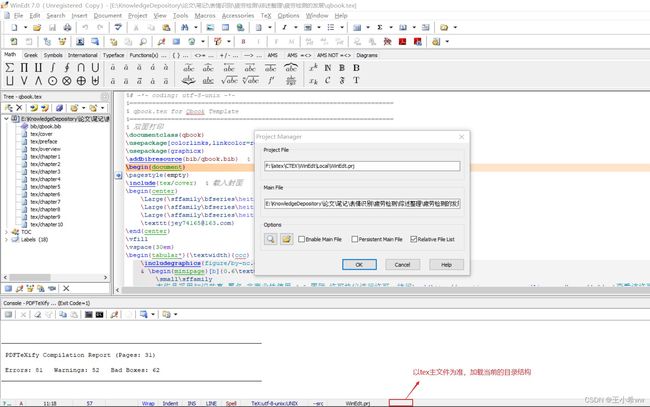
在winEdt最下面一栏的最后一列,可以指定当前项目位置,以tex主文件为准,加载当前的目录结构。(如果无法设置,则点击WinEdt.prj那一栏即可)
接着,View >> Tree 显示tex的文章结构,如果之前已存在,先删除掉现在的Tree,重新刷新即可得到新项目的tex Tree
五、Latex技巧
1、适合LaTeX初学者的博客
-
LaTeX学习之旅
-
LaTeX工作室
2、带圈数字与带圈数字列表
参考LaTeX技巧775:带圈数字与带圈数字列表
\usepackage{tikz}
\newcommand*{\circled}[1]{\lower.7ex\hbox{\tikz\draw (0pt, 0pt)%
    circle (.5em) node {\makebox[1em][c]{\small #1}};}}
\robustify{\circled}

\circled{20}  #带圈数字20
\documentclass{article}
\usepackage{tikz}
\usepackage{etoolbox}
\usepackage{enumitem}
\newcommand*{\circled}[1]{\lower.7ex\hbox{\tikz\draw (0pt, 0pt)%
    circle (.5em) node {\makebox[1em][c]{\small #1}};}}
\robustify{\circled}
\begin{document}
\mbox{}\rlap{\rule{.7\linewidth}{.4pt}}%
This is the circled number \circled{20}.

\begin{enumerate}[label=\circled{\arabic*}]
\item I
\item am
\item happy
\item to
\item join
\item with
\item you
\item today
\end{enumerate}
\end{document}
3、插入超链接
参考Latex教程: [10]插入超链接
#在文档头加上宏
\usepackage[colorlinks,linkcolor=red]{hyperref}

\url{www.baidu.com} #插入超链接
如果不想在正文中出现链接地址的话,而想用文字或其他字体显示链接,则可以输入如下代码:
\href{www.baidu.com}{百度}
4、插入图片 + 注释
1)插入图片
参考LaTeX文档插入图片的几种常用方法
-
如果是eps的图形, 编译过程是latex, dvips, ps2pdf。
-
如果是pdf jpg png图形, 编译过程是 pdflatex .
参考Latex中插图总结(一)
\usepackage{graphicx}

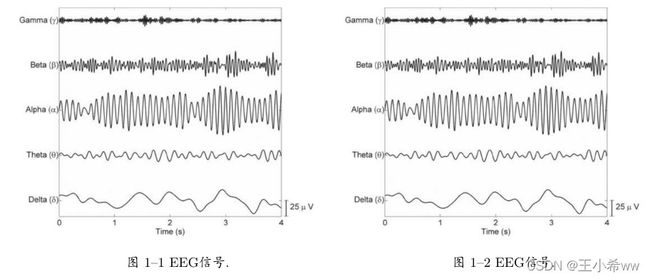
\centerline{\includegraphics[scale=0.6]{example/eeg.jpg}} #插入图片
\centerline{\fontsize{26pt}{26pt} EEG信号}  #插入图片注释(不建议这么用)
注意jpg图片后缀名为大写’JPG’,dvi2pdf -> pdfTextify才会正常显示
2)图片注释
参考LaTex 并列插入图片,并在每张图片下注释描述
\begin{figure}[t]
\centering
    \begin{tabular}{cc}
        \begin{minipage}[t]{3in}
        \includegraphics[width=2.8in]{example/eeg.jpg}
        \caption{EEG信号.}
        \end{minipage}
    %%
        \begin{minipage}[t]{3in}
        \includegraphics[width=2.8in]{example/eeg.jpg}
        \caption{EEG信号.}
        \end{minipage}
    \end{tabular}
\end{figure}
5、修改字体
参考用fontsize来修改文字的字体
6、插入有序列表
\begin{enumerate}
	\item 这是一个有序列表。
	\item 这是一个有序列表。
	\item 这是一个有序列表。
\end{enumerate}
7、插入无序列表
\begin{itemize}
	\item 这是一个无序列表。
	\item 这是一个无序列表。
	\item 这是一个无序列表。
\end{itemize}
8、参考网址和脚注
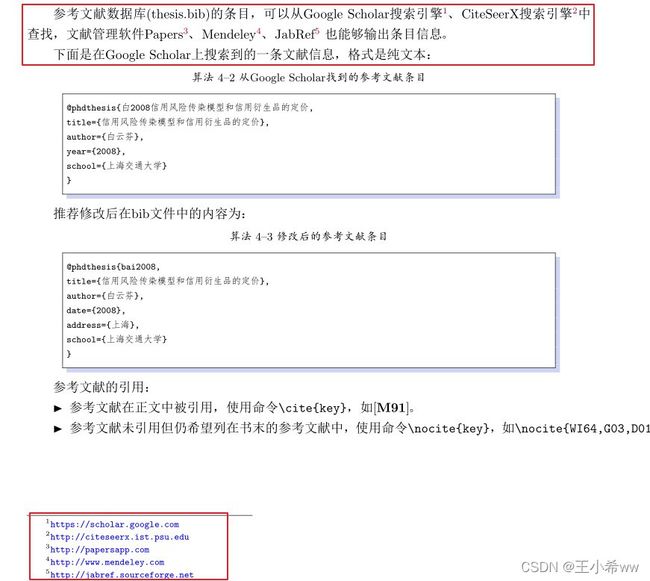
参考文献数据库(thesis.bib)的条目,可以从Google Scholar搜索引擎\footnote{\url{https://scholar.google.com}}、CiteSeerX搜索引擎\footnote{\url{http://citeseerx.ist.psu.edu}}中查找,文献管理软件Papers\footnote{\url{http://papersapp.com}}、Mendeley\footnote{\url{http://www.mendeley.com}}、JabRef\footnote{\url{http://jabref.sourceforge.net}} 也能够输出条目信息。
注意:\url{}无法处理含’’ % \% %"的链接(带转译符也不行),而\href{}可以。
\href{https://baike.baidu.com/item/%E5%80%92%E8%B0%B1/9851556?fr=aladdin}{百度百科:倒谱}
9、绘制表格
1)表格基本使用
参考LaTeX插入表格
Note:l向左对齐,c中间对齐,r向右对齐
\begin{table}[]
    \caption{basic structure}
    \vspace{20pt}
    \centering
    \begin{tabular}{lllll}
        \hline
        \thead[l]{Gene\\name} & \thead[l]{Gene accession\\No. }& \thead[l]{CDS length\\(bp)} & \thead[l]{Protein size\\(aa)} & \thead[l]{Protein MW\\(kDa)} \\
        \hline
        001  & 01g009860.2   & 819             & 272               & 31.34            \\
        002  & 01g021730.2   & 798             & 265               & 30.37            \\
        003  & 01g094490.2   & 630             & 209               & 24.58            \\
        004  & 01g102740.2   & 1242            & 413               & 46.94            \\
        005  & 01g104900.2   & 597             & 198               & 22.85            \\
        006  & 02g036430.1   & 1698            & 565               & 64.88            \\
        007  & 02g061780.2   & 735             & 244               & 28.23            \\
        008  & 02g061870.1   & 660             & 219               & 25.21            \\
        009  & 02g061900.1   & 915             & 304               & 34.61            \\
        010  & 02g061910.1   & 795             & 264               & 29.92 \\
        \hline
    \end{tabular}
    \abel{bs}
\end{table}
2)表格过宽和过窄调整
表格过宽怎么办? 参考Latex 表格过大(或过小)的调整方法
\begin{center}
\textbf{Table 1}~~Original table.\\
\resizebox{\textwidth}{15mm}{
\begin{tabular}{cccccccccccc} \toprule
Models  &  $\hat c$  &  $\hat\alpha$  &  $\hat\beta_0$  &  $\hat\beta_1$  &  $\hat\beta_2$ & Models  &  $\hat c$  &  $\hat\alpha$  &  $\hat\beta_0$  &  $\hat\beta_1$  &  $\hat\beta_2$  \\ \hline
model  & 30.6302  & 0.4127  & 9.4257  & - & -  & model  & 30.6302  & 0.4127  & 9.4257  & - & -\\
model  & 12.4089  & 0.5169  & 18.6986  & -6.6157  & - & model  & 30.6302  & 0.4127  & 9.4257  & - & - \\
model  & 14.8586  & 0.4991  & 19.5421  & -7.0717  & 0.2183 & model  & 30.6302  & 0.4127  & 9.4257  & - & - \\
model  & 3.06302  & 0.41266  & 0.11725  & - & - & model  & 30.6302  & 0.4127  & 9.4257  & - & - \\
model  & 1.24089  & 0.51691  & 0.83605  & -0.66157  & - & model  & 30.6302  & 0.4127  & 9.4257  & - & - \\
model  & 1.48586  & 0.49906  & 0.95609  & -0.70717  & 0.02183  & model  & 30.6302  & 0.4127  & 9.4257  & - & - \\
\bottomrule
\end{tabular}}
\end{center}
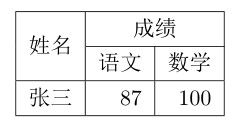
3)表格合并和拆分
参考Latex中的一些表格用法总结(二)——行列式的表格,表格的切分和合并
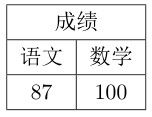
列的合并:
Note:\multicolumn{合并列数}{新列格式}{内容}
\documentclass[UTF8]{ctexart}

\begin{document}

\begin{tabular}{|c|c|c|}
\hline
\multicolumn{2}{|c|}{成绩}  \\ \hline
语文  &   数学  \\
\hline

87    & 100  \\
\hline

\end{tabular}


\end{document}
行的合并:
Note:\multirow{合并行数}{新列格式}{内容},注意引入宏包\usepackage{multirow}
\documentclass[UTF8]{ctexart}
\usepackage{multirow}
\begin{document}

\begin{tabular}{|c|r|r|}
\hline
\multirow{2}*{姓名} & \multicolumn{2}{c|}{成绩}  \\ \cline{2-3}
                    &  语文  &   数学  \\
\hline

            张三    & 87    &  100 \\
\hline

\end{tabular}

\end{document}
4)表格整体居中
参考Latex 表格整体居中
5)表格生成工具
表格生成工具:Table Generator,强烈建议使用,表格的合并拆分十分方便,样式修改也比较方便(居中,尺寸)。
10、公式编号和对齐
参考latex公式、编号、对齐
单公式:
\begin{equation}
\公式代码(例子:Omega\left(f_{t}\left(X_{i} ; \theta\right)\right)=\gamma T+\frac{1}{2} \lambda\|w\|^{2})
\end{equation}
多公式:
\begin{eqnarray}
PERCLOS = \frac{\sum(T_6 - T_5) }{T_2 - T_1} \\
p = e + 0.2 * (m - e)
\end{eqnarray}
去编号:
- 在公式末尾添加
\nonumber - 左对齐+去编号:参考Latex多行公式左对齐
\begin{align}
& \tilde s_i^2 = w^T S_i w \\
& \tilde s_1^2 + \tilde s_2^2 =  w^T S_w w
\end{align}
Note:
-
别空行写,否则会报错
-
在
\{equation}或\{eqnarray}代码块之间不用$..$ -
可以修改默认编号
-
公式中如果有中文,用
\mbox{xxx}P\{\mbox{拒绝} \mid H_{0} \mbox{为真}\} = \alphaKaTeX parse error: Undefined control sequence: \mbox at position 5: P\{\̲m̲b̲o̲x̲{拒绝} \mid H_{0}…
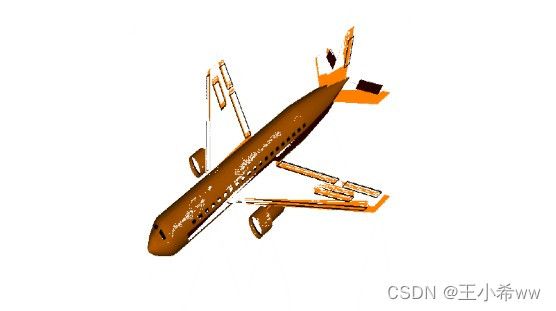
11、Tikz 绘图
%# -*- coding: utf-8-unix -*-
\thispagestyle{empty}
\begin{tikzpicture}[overlay,remember picture,font=\sffamily\bfseries]
\draw[ultra thick,c4,name path=big arc] ([xshift=-2mm]current page.north) arc(150:285:11)
coordinate[pos=0.225] (x0);
\begin{scope}
\clip ([xshift=-2mm]current page.north) arc(150:285:11) --(current page.north
east);
\fill[c4!50,opacity=0.25] ([xshift=4.55cm]x0) circle (4.55);
\fill[c4!50,opacity=0.25] ([xshift=3.4cm]x0) circle (3.4);
\fill[c4!50,opacity=0.25] ([xshift=2.25cm]x0) circle (2.25);
\draw[ultra thick,c4!50] (x0) arc(-90:30:6.5);
\draw[ultra thick,c4] (x0) arc(90:-30:8.75);
\draw[ultra thick,c4!50,name path=arc1] (x0) arc(90:-90:4.675);
\draw[ultra thick,c4!50] (x0) arc(90:-90:2.875);
\path[name intersections={of=big arc and arc1,by=x1}];
\draw[ultra thick,c4,name path=arc2] (x1) arc(135:-20:4.75);
\draw[ultra thick,c4!50] (x1) arc(135:-20:8.75);
\path[name intersections={of=big arc and arc2,by={aux,x2}}];
\draw[ultra thick,c4!50] (x2) arc(180:50:2.25);
\end{scope}
\path[decoration={text along path,text color=c4,
	raise = -2.8ex,
	text  along path,
	text = {|\sffamily\bfseries|\today},
	text align = center,
},
decorate
] ([xshift=-2mm]current page.north) arc(150:245:11);
%
\begin{scope}
\path[clip,postaction={fill=c3}]
([xshift=2cm,yshift=-8cm]current page.center) rectangle ++ (4.2,7.7);
\fill[c2] ([xshift=0.5cm,yshift=-8cm]current page.center)
([xshift=0.5cm,yshift=-8cm]current page.center)  arc(180:60:2)
|- ++ (-3,6) --cycle;
\draw[ultra thick,c4] ([xshift=-1.5cm,yshift=-8cm]current page.center)
arc(180:0:2);
\draw[ultra thick,c4] ([xshift=0.5cm,yshift=-8cm]current page.center)
arc(180:0:2);
\draw[ultra thick,c4] ([xshift=2.5cm,yshift=-8cm]current page.center)
arc(180:0:2);
\draw[ultra thick,c4] ([xshift=4.5cm,yshift=-8cm]current page.center)
arc(180:0:2);
\fill[red] ([xshift=2.5cm,yshift=-8cm]current page.center) +(60:2) circle(1.5mm);
\node[text=c5!80!black] at ([xshift=4.7cm,yshift=-5.2cm]current page.center) {$\rho:=\dfrac{1+\sqrt{-3}}{2}$};
\end{scope}
%
\fill[c1] ([xshift=2cm,yshift=-8cm]current page.center) rectangle ++ (-13.7,7.7);
\node[text=white,anchor=west,scale=4,inner sep=0pt] at
([xshift=-10.55cm,yshift=-3cm]current page.center) {$\mathbb{ Q }$-book 书籍模板};
\node[text=white,anchor=west,scale=2,inner sep=0pt] at
([xshift=-4.5cm,yshift=-5.5cm]current page.center) {333 \quad 制作};
\end{tikzpicture}
建议:
-
建议使用overleaf,可以实时查看效果,下载后保存成pdf,作为图片导入即可(不用svg,依然很清晰)。overleaf
-
不建议在各章节中用
\input,\include嵌套含tikz的.tex文件,容易编译错误(很大可能会改变原来代码编码格式,想恢复原来的编译,也会报错)。
参考
- 快速入门使用 tikz 绘制深度学习网络图
- PlotNeuralNet - python生成TikZ(绘制神经网络)
- TikZ: LaTeX绘图包
- 有什么神经网络结构图的画图工具值得推荐吗? - vctzhou的回答 - 知乎
- Texample.net
12、latex多文件整合
参考Latex多文件整合
13、添加算法表格
参考
- 在Latex中插入算法表格
- Latex 表格及算法排版记录
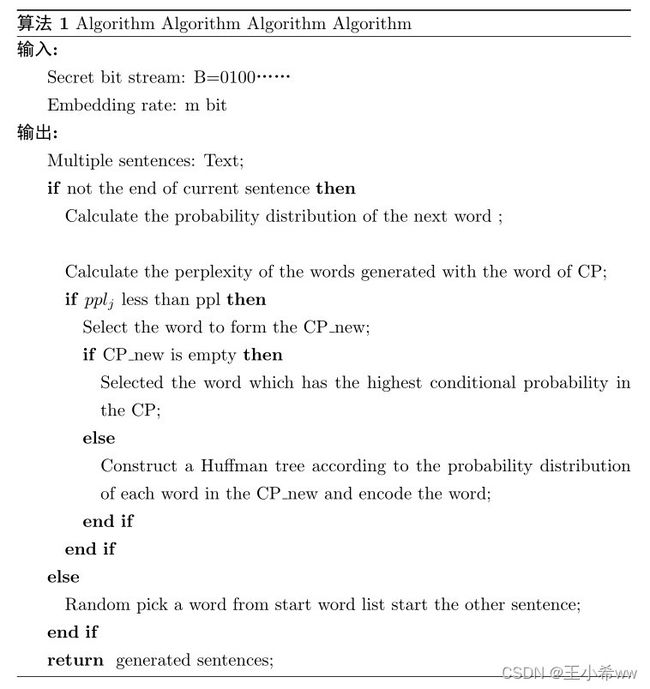
1)英文算法1
导入两个包:\usepackage{algorithmic},\usepackage{algorithm}
\documentclass[]{book}
%\usepackage[UTF8]{ctex}  %如果不添加不能正常显示中文
\usepackage{algorithmic}
\usepackage{algorithm}
%\floatname{algorithm}{算法}
%\renewcommand{\algorithmicrequire}{\textbf{输入:}}
%\renewcommand{\algorithmicensure}{\textbf{输出:}}
\renewcommand{\algorithmicensure}{\textbf{Output:}}
\renewcommand{\algorithmicrequire}{\textbf{Input:}}

\begin{document}
\begin{algorithm}[]
\caption{ Algorithm Algorithm Algorithm Algorithm}
\label{alg:Framwork}
\begin{algorithmic}[] %这个1 表示每一行都显示数字
\REQUIRE ~~\\ %算法的输入参数:Input
Secret bit stream: B={0100……}\\
Embedding rate: m bit\\

\ENSURE ~~\\ %算法的输出:Output
Multiple sentences: Text;
\IF {not the end of current sentence}
\STATE Calculate the probability distribution of the next word ;
\STATE \STATE Calculate the perplexity of the words generated with the word of CP;
\IF {$ppl_j$ less than ppl}
\STATE Select the word to form the CP\_new;
\IF {CP\_new is empty}
\STATE Selected the word which has the highest conditional probability in the CP;
\ELSE
\STATE Construct a Huffman tree according to the probability distribution of each word in the CP\_new and encode the word;
\ENDIF
\ENDIF
\ELSE
\STATE Random pick a word from start word list start the other sentence;
\ENDIF
\RETURN generated sentences; %算法的返回值
\end{algorithmic}
\end{algorithm}
\end{document}
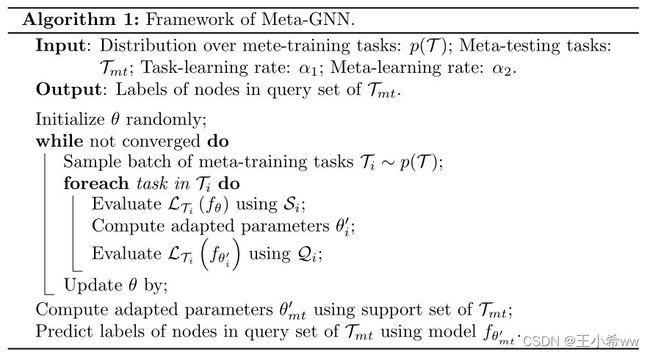
2)英文算法2
参考
- Latex 算法 Algorithm 一些使用总结 (基本用法,步骤标号,某一句加颜色)
- 利用alogrithm2e排版的一个算法概述
导入一个包:\usepackage[options]{algorithm2e}
\documentclass[]{book}
\usepackage[ruled,vlined]{algorithm2e}

\begin{document}
\begin{algorithm}[t]
	\caption{Framework of Meta-GNN.}
	\label{alg:algorithm1}
	\KwIn{Distribution over mete-training tasks: $p(\mathcal{T})$; Meta-testing tasks: $\mathcal{T}_{mt}$; Task-learning rate: $\alpha_{1}$; Meta-learning rate: $\alpha_{2}$.}
	\KwOut{Labels of nodes in query set of $\mathcal{T}_{mt}$.}
	\BlankLine
	Initialize $\bm{\theta}$ randomly;

	\While{\textnormal{not converged}}{
		Sample batch of meta-training tasks $\mathcal{T}_{i} \sim p(\mathcal{T})$;

		\ForEach{task in $\mathcal{T}_{i}$}{
			Evaluate $\mathcal{L}_{\mathcal{T}_{i}}\left(f_{\bm{\theta}}\right)$ using $\mathcal{S}_{i}$;

			Compute adapted parameters $\bm{{\theta}^{\prime}_{i}}$;

			Evaluate $\mathcal{L}_{\mathcal{T}_{i}}\left(f_{\bm{{\theta}_{i}^{\prime}}}\right)$ using $\mathcal{Q}_{i}$;
		}
		Update $\bm{\theta}$ by;
	}

	Compute adapted parameters $\bm{{\theta}^{\prime}_{mt}}$ using support set of $\mathcal{T}_{mt}$;

	Predict labels of nodes in query set of $\mathcal{T}_{mt}$ using model $f_{\bm{{\theta}_{mt}^{\prime}}}$.
\end{algorithm}
\end{document}
3)中文算法1
参考
- LaTeX中文伪代码
- Latex写算法的伪代码排版
- \documentclass[UTF8]{ctexart}能显示中文但是与图片不共存
在**“1)英文算法1”**的基础上添加:
%\documentclass[UTF8]{ctexart} %过时,不能用

\documentclass[]{book}
\usepackage[UTF8]{ctex}  %如果不添加不能正常显示中文

\floatname{algorithm}{算法}
\renewcommand{\algorithmicrequire}{\textbf{输入:}}  %添加新指令
\renewcommand{\algorithmicensure}{\textbf{输出:}}
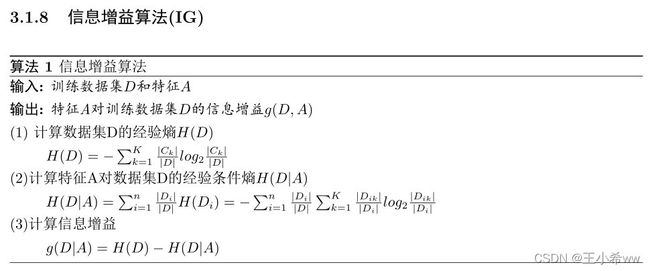
4)中文算法2(★★★★★)
参考利用alogrithm2e排版的一个算法概述
%\renewcommand{\algorithmcfname}{算法}  %不生效
\floatname{algorithm}{算法} %生效
\SetKw{KwInput}{\textbf{输入:}}{}
\SetKw{KwOutput}{\textbf{输出:}}{}
\begin{algorithm}[H]
\SetAlgoLined
\KwInput{训练数据集$D$和特征$A$} \\
\KwOutput{特征A对训练数据集$D$的信息增益$g(D,A)$ } \\
(1) 计算数据集D的经验熵$H(D)$ \\
\begin{array}{c}
\quad \quad H(D) = - \sum_{k=1}^{K} \frac{|C_k|}{|D|}log_2\frac{|C_k|}{|D|}
\end{array}

(2)计算特征A对数据集D的经验条件熵$H(D|A)$ \\
\begin{array}{c}
\quad \quad H(D|A)= \sum_{i=1}^{n} \frac{|D_i|}{|D|}H(D_i) = -\sum_{i=1}^n \frac{|D_i|}{|D|} \sum_{k=1}^K \frac{|D_{ik}|}{|D_i|}log_2\frac{|D_{ik}|}{|D_i|}
\end{array}

(3)计算信息增益 \\
\begin{array}{c}
\quad \quad g(D|A) = H(D) - H(D|A)
\end{array}
\caption{信息增益算法}
\end{algorithm}
5)问题解决(★★★★★)
对于第一种方法:导入\usepackage{algorithmic},\usepackage{algorithm} 英文算法1
有些包可能会在引入过程中和cls、sty文件发生冲突(比如\usepackage[UTF8]{ctex}),导致格式无法正常显示,解决方法是另创建一个tex(最好在main.tex子目录下,便于管理),绘制算法表格后,用图片的方式导入到main.tex文件中。
对于第二种方法:导入\usepackage[options]{algorithm2e},格式正常显示。 英文算法2
[外链图片转存失败,源站可能有防盗链机制,建议将图片保存下来直接上传(img-u8J4hSM8-1644548791917)(./img/Snipaste_2021-03-30_11-54-36.jpg)]
14、latex插入gif动图
Latex使用技巧:插入.gif动画
先将gif动图转换成多张png-24的图片(用PS将所有图层导出到文件即可)
使用:
-
引入
animate宏包:\usepackage[]{animate} -
此前必须先引入
graphicx宏包 -
\animategraphics[]{}{ }{ }{ }
最终还是失败了,图像动不起来,放弃挣扎。
15、添加代码
参考
-
LaTeX 里「添加程序代码」的完美解决方案
-
Source code highlighting in LaTeX
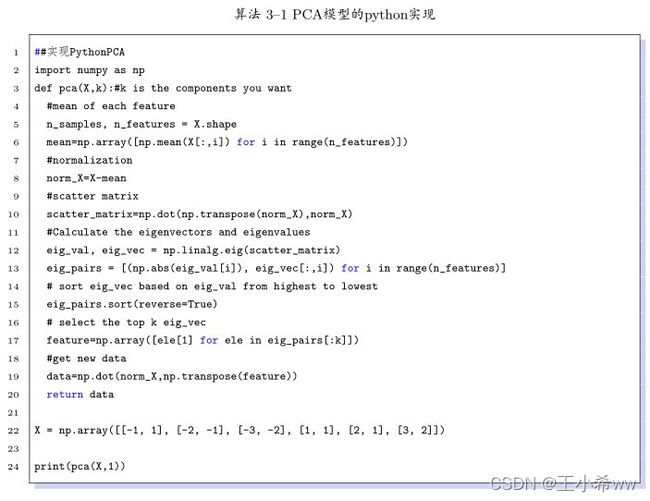
\begin{lstlisting}[language={C}, caption={PCA模型的python实现}]
##Python实现PCA
import numpy as np
def pca(X,k):#k is the components you want
  #mean of each feature
  n_samples, n_features = X.shape
  mean=np.array([np.mean(X[:,i]) for i in range(n_features)])
  #normalization
  norm_X=X-mean
  #scatter matrix
  scatter_matrix=np.dot(np.transpose(norm_X),norm_X)
  #Calculate the eigenvectors and eigenvalues
  eig_val, eig_vec = np.linalg.eig(scatter_matrix)
  eig_pairs = [(np.abs(eig_val[i]), eig_vec[:,i]) for i in range(n_features)]
  # sort eig_vec based on eig_val from highest to lowest
  eig_pairs.sort(reverse=True)
  # select the top k eig_vec
  feature=np.array([ele[1] for ele in eig_pairs[:k]])
  #get new data
  data=np.dot(norm_X,np.transpose(feature))
  return data

X = np.array([[-1, 1], [-2, -1], [-3, -2], [1, 1], [2, 1], [3, 2]])

print(pca(X,1))
\end{lstlisting}
虽然代码没有高亮,但起码没有报错(如果将language={C}改成language={python},会编译报错)
Note:
-
可以将代码放在一个文件夹下,在tex中引用即可
\lstinputlisting[
    style       =   C,
    caption     =   {\bf LDA.py},
    label       =   {LDA.py}
]{./code/LDA.py}
16、latex引用参考文献
参考LaTeX技巧873: 使用 BibTeX 生成参考文献列表
bibtex处理流程(依赖于xelatex生成的aux文件):
%name.bib
@mastersthesis{123a,
  title={基于深度学习的声纹识别算法研究},
  author={郭茗涵},
  year={2020},
  school={吉林大学}
}

%document.tex
\documentclass{article}
\bibliographystyle{plain}

\begin{document}
    1231\cite{123a}
    \bibliography{name}
\end{document}
在overleaf上正常显示(不能显示中文),但是在winEdt编译时出现的问题:
1)问题1:\citation,\bibstyle,\bibdata not found
I found no \citation commands---while reading file voiceRecognition.aux
I found no \bibdata command---while reading file voiceRecognition.aux
I found no
\bibstyle command---while reading file voiceRecognition.aux
---
I found no \citation commands I found no \bibdata command I found no
\bibstyle command
主要原因是没有引入两个标签\bibliographystyle,bibliography,这两个标签会被BibTex分别编译成\bibstyle,\bibdata,写入aux文件。
%name.bib
\bibliography{name}
\bibliographystyle{plain}
但是加了之后,按照latex >> bibtex >> latex >> latex的编译顺序,还是没效果
网上说,把aux,bbl等中间生成文件删除掉再运行就可以了,参考latex错误 Ifound no \bibdata command-while~ I found no \bibstyle comman-,但是还是没效果。
2)问题2:pdf内容,reference显示异常
%name.bib
@mastersthesis{123a,
  title={基于深度学习的声纹识别算法研究},
  author={郭茗涵},
  year={2020},
  school={吉林大学}
}

@article{ren2015faster,
  title={Faster r-cnn: Towards real-time object detection with region proposal networks},
  author={Ren, Shaoqing and He, Kaiming and Girshick, Ross and Sun, Jian},
  journal={arXiv preprint arXiv:1506.01497},
  year={2015}
}


%document.tex
\documentclass{article}
\begin{document}
    \include{tex/chapter1}
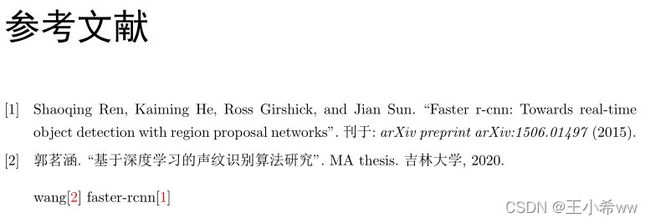
    wang\cite{123a}
    faster-rcnn\cite{ren2015faster}
    \bibliographystyle{alpha}
    \bibliography{name}
\end{document}
bibtex可以识别到aux文件:
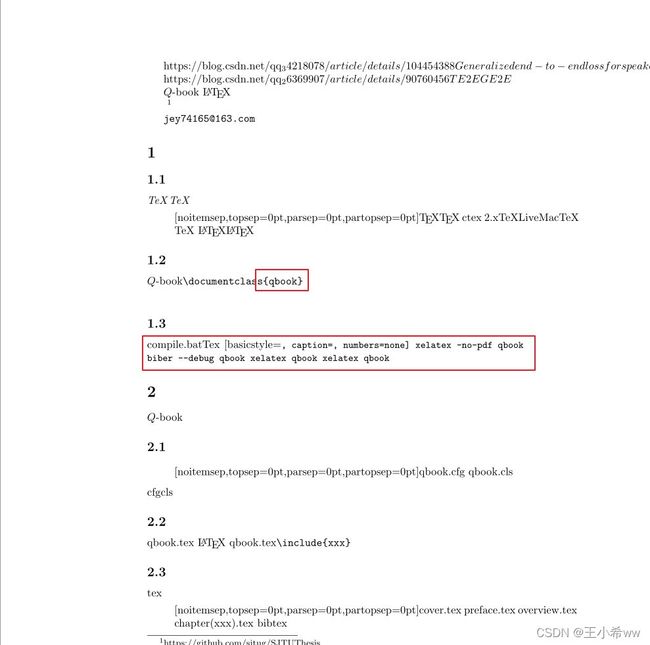
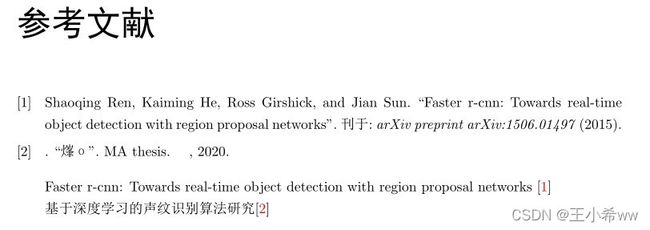
pdf内容无法正常显示(编译顺序为:pdflatex >> bibtex >> pdflatex >> pdflatex,我猜测主要原因是qbook类识别不了)
参考文献显示也有问题,显示不了中文。
3)查看log文件,提示用biber替代bibtex
Package biblatex Warning: Please (re)run Biber on the file:
(biblatex)                voiceRecognition
(biblatex)                and rerun LaTeX afterwards.
4)最终解决方案:使用biber.exe(★★★★★)
参考Biblatex with Biber: Configuring my editor to avoid undefined citations(https://tex.stackexchange.com/questions/154751/biblatex-with-biber-configuring-my-editor-to-avoid-undefined-citations/154755#154755)即可。
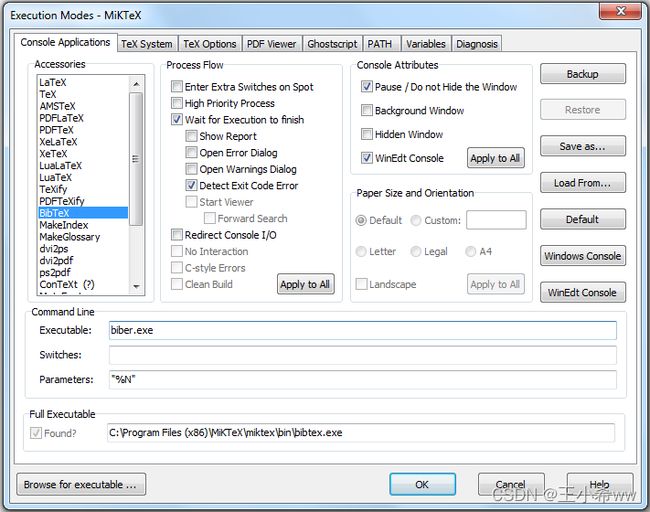
主要是将bibtex编译的bibtex.exe修改成biber.exe(文件具体位置用eveything搜索)
编译顺序:pdflatex >> bibtex >> pdflatex >> pdflatex
%\documentclass{article}
%\begin{document}
%    \include{tex/chapter1}
%
%\end{document}

%# -*- coding: utf-8-unix -*-
%======================================================================
% qbook.tex for Qbook Template
%======================================================================
% 双面打印
\documentclass{qbook}
\bibliographystyle{plain}
\bibliography{name,bib/qbook.bib}
\usepackage[colorlinks,linkcolor=red,anchorcolor=blue,citecolor=green]{hyperref}
\usepackage{graphicx}
\usepackage{multirow}
\usepackage{tikz}
\newcommand*{\circled}[1]{\lower.7ex\hbox{\tikz\draw (0pt, 0pt)%
    circle (.5em) node {\makebox[1em][c]{\small #1}};}}
\robustify{\circled}
\mbox{}\rlap{\rule{.7\linewidth}{.4pt}}%
\addbibresource{bib/qbook.bib}  % 导入参考文献数据库
\begin{document}
\pagestyle{empty}
\include{tex/cover}  % 载入封面
\begin{center}
	\Large{\sffamily\bfseries\heiti Version 2.00} \\ \vspace{2em}
	\Large{\sffamily\bfseries\heiti 编译日期: \today} \\ \vspace{1em}
	\Large{\sffamily\bfseries\heiti 任何建议及错误信息请发送至邮箱} \\
	\texttt{[email protected]}
\end{center}
\vfill
\vspace{30em}
\begin{tabular*}{\textwidth}{ccc}
	\includegraphics{figure/by-nc.eps}
	& \begin{minipage}[b]{0.6\textwidth}
		\small\sffamily
		本作品采用知识共享 署名-非商业性使用 4.0 国际 许可协议进行许可. 访问\url{http://creativecommons.org/licenses/by-nc/4.0/  }查看该许可协议.
	\end{minipage}
\end{tabular*}
\thispagestyle{empty}
\frontmatter  % 对前言和概览用罗马数字作为页码
\pagestyle{empty}
\include{tex/preface}
\pagestyle{empty}
\tableofcontents
\cleardoublepage
\include{tex/overview}
\mainmatter	  % 对正文用阿拉伯数字作为页码
%======================================================================
% 正文内容
\pagestyle{fancy}
\setcounter{page}{0}
\include{tex/chapter1}
\include{tex/chapter2}
\include{tex/chapter3}
\include{tex/chapter4}
\include{tex/chapter5}
%\include{tex/chapter6}
%\include{tex/chapter7}
%\include{tex/chapter8}
%\include{tex/chapter9}
%\include{tex/chapter10}
\backmatter
%======================================================================
% 打印参考文献
\printbibliography[heading=bibintoc]
    wang\cite{123a}
    faster-rcnn\cite{ren2015faster}
\makeatletter
\makeatother
\end{document}
5)中文参考文献乱码问题
解决方法:修改.bib文件编码格式为utf-8,bibtex三个重要语句如下:
\bibliographystyle{plain} %设置参考文献样式
\bibliography{name,bib/qbook.bib}  %引入参考文献.bib
\printbibliography[heading=bibintoc] %打印参考文献(有引用的才会打印)
6)CNKI无Bibtex的文献导出格式
参考如何使用BibTeX引用中文参考文献? - Vopaaz的回答 - 知乎
- 1、在Python官网下载安装Python
- 2、在Python根目录中进入script文件夹,运行cmd,执行“pip install cnki2bib”,就可以安装这个小应用的exe程序
- 3、将cnki2bib设置为打开.net后缀参考文献的默认程
- 4、打开.net后缀的参考文献即可生成.bib的参考文献
7)参考资料
biber和bibtex的区别!!
- LaTeX技巧873: 使用 BibTeX 生成参考文献列表
- Latext批量添加参考文献,利用bibtex进行参考文献排版
- BiBTeX, biber citation! no citation commands error in LaTeX, MiKTeX, TexMaker, TeXWorks
- Biblatex with Biber: Configuring my editor to avoid undefined citations(https://tex.stackexchange.com/questions/154751/biblatex-with-biber-configuring-my-editor-to-avoid-undefined-citations/154755#154755)
- biblatex宏包使用后端bibtex和biber的区别
- 如何使用BibTeX引用中文参考文献? - Vopaaz的回答 - 知乎
六、问题汇总
1、如果tex文件在编译过程中报错了,但是却能生成并更新pdf文件,则可以无视这个报错。
2、注意,latexmk默认是用pdflatex编译。若要使用中文请务必设置编码为UTF8,否则无法成功编译。如果想换用xelatex,需在参数中添加-xelatex。
3、winedt打不开tex文件:WinEdt 6 (最新的 CTeX 2.9.2.164 配套的版本) 默认按照 ANSI 编码打开 .tex 文件, 所以需要让其能够打开 UTF8 编码的 .tex 文件。 参考WinEdt 打不开 .tex 文件之解
4、pdflatex不能识别.eps文件格式,出现乱码:参考CTex中加载EPS图片的问题——pdflatex不能识别.eps文件格式
解决办法:
- 法1、可以将eps文件转换为pdf图片,或jpg,jpeg图片,或png图片。。∵pdflatex只认识这4种格式的图片。
- 法2、使用latex转换为dvi格式, 再通过程序将dvi转换为pdf,有两种方法,均为通过DOS命令行方式进行:
5、Latex的使用
- 1、latex,tex,xelatex,pdflatex,latexmk的区别(不用研究用什么编译的,直接用就行了)
- 2、latex分文件编译
- 3、vscode编写latex的插件
- 4、为什么有些latex项目(ctex)无法编译,总是报错
6、不建议在各章节中用\input,\include嵌套含tikz的.tex文件,容易编译错误(很大可能会改变原来代码编码格式,想恢复原来的编译,也会报错)。
