OpenCV(9)几何形状识别、ROI操作、图像去噪 C++
1.几何形状识别
#include 1.1.(cv :: approxPolyDP)多边形逼近
对指定的点集进行多边形逼近的函数,其逼近的精度可通过参数设置。
void approxPolyDP(InputArray curve, OutputArray approxCurve, double epsilon, bool closed);
- curve:输入的点集。
- approxCurve:输出的点集,当前点集是能最小包容指定点集的,draw出来即是一个多边形;
- epsilon:指定的精度,也即是原始曲线与近似曲线之间的最大距离。
- closed:若为true,则说明近似曲线是闭合的,它的首位都是相连,反之,若为false,则断开。
1.2.(cv :: drawContours)绘制轮廓或者填充轮廓
说明:该函数用于绘制图像中的轮廓(若thickness >= 0)或者填充轮廓所包围的区域(若thickness < 0)
CV_EXPORTS_W void drawContours( InputOutputArray image, InputArrayOfArrays contours,
                              int contourIdx, const Scalar& color,
                              int thickness = 1, int lineType = LINE_8,
                              InputArray hierarchy = noArray(),
                              int maxLevel = INT_MAX, Point offset = Point() );
- image:目标图像
- contours:输入的所有轮廓(每个轮廓以点集的方式存储)
- contoursIdx:指定绘制轮廓的下标(若为负数,则绘制所有轮廓)
- color:绘制轮廓的颜色
- thickness:绘制轮廓的线的宽度(若为负数,则填充轮廓内部)
- lineType:绘制轮廓的线型(4连通、8连通或者反锯齿)
- hierarchy:关于层级的可选信息,仅用于当你想要绘制部分轮廓的时候
- maxLevel:绘制轮廓的最大层级,若为0,则仅仅绘制指定的轮廓;若为1,则绘制该轮廓及其内嵌轮廓,若为2,则绘制该轮廓、其内嵌轮廓以及内嵌轮廓的内嵌轮廓,依次类推。该参数只有在有层级信息输入时才被考虑。
- offset:可选的轮廓偏移参数,所有的轮廓将会进行指定的偏移
注:
当thickness = FILLED,即使没有提供层级信息也可以正确处理带孔洞的连通域情况(分析轮廓时采用奇偶规则),但如果是单独检索的轮廓合并则可能会出现错误的情况,该情况下则需要分开处理。
1.3.(cv :: arcLength)计算封闭轮廓的周长或曲线的长度
1.4.(cv :: contourArea)计算轮廓面积
double contourArea(InputArray contour, bool oriented = false);
- contour:输入的二维点集(轮廓顶点),可以是 vector 或 Mat 类型。
- oriented:面向区域标识符。有默认值 false。若为
true,该函数返回一个带符号的面积值,正负取决于轮廓的方向(顺时针还是逆时针)。若为 false,表示以绝对值返回。
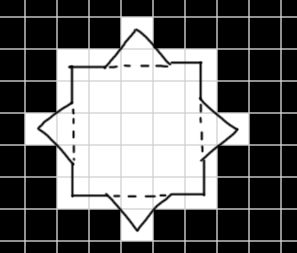
寻找轮廓时,取的点为像素中心点,连接起来的黑线就是这个图形的轮廓,那么计算的周长应该是4个对角+4个三角(42+42*≈19.313708499),与计算机输出的结果一致。
double arcLength(InputArray curve, bool closed);
- curve:输入的二维点集(轮廓顶点),可以是 vector 或 Mat 类型。
- closed:用于指示曲线是否封闭。
#include#include 2.图像ROI与ROI操作
在图像处理的领域,我们常常需要去设置自己感兴趣的区域(ROI,region of interest),来专注或者简化工作过程。也就是从图像中选择的一个图像区域,这个区域是图像分析所关注的重点。我们圈定这个区域,以便进行下一步的处理。而且,使用ROI指定想读入的目标,可以减少处理时间,增加精度,给图像处理带来不小的便利。
2.1.(cv :: inRange)提取图像中在阈值中间的部分
void cvInRange( const CvArr* src, const CvArr* lower, const CvArr* upper,CvArr* dst )
- src:目标图像
- lower:阈值下限
- upper:阈值上限
- dst:结果图像
#include2.2.(cv :: Rect)
原文链接:https://kings.blog.csdn.net/article/details/83857914
Rect(int x, int y, int width, int height);
参数含义: Rect(左上角x坐标 , 左上角y坐标,矩形的宽,矩形的高)
例如我们画一个图 Rect(20,50,30,40), 我用matlab画了一下,比较直观

那对于Rect(20,50,30,40)有哪些常用的操作?
rect.area(); //返回面积,1200
rect.size();//返回尺寸,30x40
rect.tl();// 返回左上角坐标(20,50)
rect.br();//返回右下角坐标(50,10)
rect.width();//返回宽度30
rect.height();//返回高度40
rect.contains(Point(x,y)) ; //返回布尔true/false, 判断x,y是否在这个矩形中
交集、并集, 矩阵对比,很像C语言
rect = rect1 & rect2;
rect = rect1 | rect2;
rect1 == rect2; //返回布尔值
rect1 != rect2 ; //返回布尔值
Rectangle用法
void cvRectangle( CvArr* img, CvPoint pt1, CvPoint pt2, CvScalar color,
                 int thickness=1, int line_type=8, int shift=0 );
- img: 图像.
- pt1 :矩形的一个顶点。
- pt2:矩形对角线上的另一个顶点
- color:线条颜色 (RGB) 或亮度(灰度图像 )(grayscale image)。
//后面这三个都是可有可没有的 - thickness:组成矩形的线条的粗细程度。取负值时(如 CV_FILLED)函数绘制填充了色彩的矩形。
- line_type:线条的类型。见cvLine的描述
- shift:坐标点的小数点位数。
#include3.图像去噪
原文链接:https://www.cnblogs.com/Vince-Wu/p/11855101.html
3.1.(cv :: blur)均值滤波
void blur(InputArray src, OutputArray dst, Size ksize, Point anchor=Point(-1,-1), int borderType=BORDER_DEFAULT )
- src:输入图像,即源图像,填Mat类的对象即可。该函数对通道是独立处理的,且可以处理任意通道数的图片,但需要注意,待处理的图片深度应该为CV_8U,
CV_16U, CV_16S, CV_32F 以及 CV_64F之一。 - dst:即目标图像,需要和源图片有一样的尺寸和类型。比如可以用Mat::Clone,以源图片为模板,来初始化得到如假包换的目标图。
- ksize:内核的大小。一般这样写Size( w,h )来表示内核的大小( 其中,w 为像素宽度,
h为像素高度)。Size(3,3)就表示3x3的核大小,Size(5,5)就表示5x5的核大小 - anchor:表示锚点(即被平滑的那个点),注意他有默认值Point(-1,-1)。如果这个点坐标是负值的话,就表示取核的中心为锚点,所以默认值Point(-1,-1)表示这个锚点在核的中心。
- borderType:用于推断图像外部像素的某种边界模式。有默认值BORDER_DEFAULT,我们一般不去管它。
3.2.(cv :: medianBlur)中值滤波
将图像的每个像素用邻域 (以当前像素为中心的正方形区域)像素的 中值 代替 。
void medianBlur( const Mat& src, Mat& dst, int ksize );
- src:输入图像,即源图像,填Mat类的对象即可。该函数对通道是独立处理的,且可以处理任意通道数的图片,但需要注意,待处理的图片深度应该为CV_8U,
- dst:即目标图像,需要和源图片有一样的尺寸和类型。比如可以用Mat::Clone,以源图片为模板,来初始化得到如假包换的目标图。
- ksize:内核的大小。一般这样写Size( w,h )来表示内核的大小( 其中,w 为像素宽度,
3.3.(cv :: GaussianBlur)高斯滤波
将输入数组的每一个像素点与 高斯内核 卷积,将卷积和当作输出像素值。
void GaussianBlur( const Mat& src, Mat& dst, Size ksize,double sigmaX, double sigmaY=0,int borderType=BORDER_DEFAULT );
- src:输入图像,即源图像,填Mat类的对象即可。该函数对通道是独立处理的,且可以处理任意通道数的图片,但需要注意,待处理的图片深度应该为CV_8U,
- dst:即目标图像,需要和源图片有一样的尺寸和类型。比如可以用Mat::Clone,以源图片为模板,来初始化得到如假包换的目标图。
- ksize:内核的大小。一般这样写Size( w,h )来表示内核的大小( 其中,w 为像素宽度,
- sigmaX:x方向的标准方差。可设置为0让系统自动计算。
- sigmaY:y方向的标准方差。可设置为0让系统自动计算。
3.4.(cv :: fastNlMeansDenoisingColored)非局部均值去噪声
(cv2 :: fastNlMeansDenoising)使用单个灰度图像
(cv2 :: fastNlMeansDenoisingColored)使用彩色图像。
(cv2 :: fastNlMeansDenoisingMulti)用于在短时间内捕获的图像序列(灰度图像)
(cv2 :: fastNlMeansDenoisingColoredMulti)与上面相同,但用于彩色图像。
fastNlMeansDenoisingColored( InputArray src,
				OutputArray dst,
                  float h = 3, float hColor = 3,
         int templateWindowSize = 7, int searchWindowSize = 21)
- src:输入图像,即源图像,填Mat类的对象即可。该函数对通道是独立处理的,且可以处理任意通道数的图片,但需要注意,待处理的图片深度应该为CV_8U,
- dst:即目标图像,需要和源图片有一样的尺寸和类型。比如可以用Mat::Clone,以源图片为模板,来初始化得到如假包换的目标图。
- h:决定过滤器强度。h 值高可以很好的去除噪声,但也会把图像的细节抹去。(取 10 的效果不错)
- hColor :与 h 相同,但使用与彩色图像。(与 h 相同,10)
- templateWindowSize:奇数。(推荐值为 7)
- searchWindowSize:奇数。(推荐值为 21)
#include 3.5.快速的图像边缘滤波算法
高斯双边模糊与mean shift均值模糊两种边缘保留滤波算法,都因为计算量比较大,无法实时实现图像边缘保留滤波,限制了它们的使用场景,OpenCV中还实现了一种快速的边缘保留滤波算法。高斯双边与mean shift均值在计算时候使用五维向量是其计算量大速度慢的根本原因,该算法通过等价变换到低纬维度空间,实现了数据降维与快速计算。
CV_EXPORTS_W void edgePreservingFilter(InputArray src, OutputArray dst, int flags = 1,
        float sigma_s = 60, float sigma_r = 0.4f);
- src:输入8位3通道图像。
- dst:输出8位3通道图像。
- flags:保持边缘的过滤器:
** recurs_filter ** = 1
** normconv_filter ** = 2 - sigma_s:范围0到200。
- sigma_r:0到1之间的范围。
#include 执行结果:
3.6.自定义滤波器
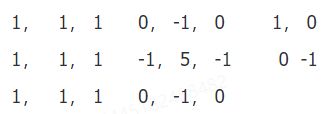
图像卷积最主要功能有图像模糊、锐化、梯度边缘等,前面已经分享图像卷积模糊的相关知识点,OpenCV除了支持上述的卷积模糊(均值与边缘保留)还支持自定义卷积核,实现自定义的滤波操作。自定义卷积核常见的主要是均值、锐化、梯度等算子。下面的三个自定义卷积核分别可以实现卷积的均值模糊、锐化、梯度功能。
CV_EXPORTS_W void filter2D( InputArray src, OutputArray dst, int ddepth,
                            InputArray kernel, Point anchor = Point(-1,-1),
                            double delta = 0, int borderType = BORDER_DEFAULT );
- src:输入图像。
- dst:输出与src相同大小和通道数的图像。
- ddepth:目标图像的期望深度,参见@ref filter_depth“组合”
- kernel:卷积核(或者说是相关核),一个单通道浮点数矩阵;如果您想将不同的内核应用到不同的通道,请将映像拆分为使用split来分离颜色平面并单独处理它们。
- anchor:内核的锚点,它指示被过滤点的相对位置内核;锚应该位于内核中;默认值(-1,-1)表示锚是在核心中心。
- delta:可选值添加到过滤像素之前存储他们在dst。
- borderType:像素外推方法,参见#BorderTypes
#include 
