LNMP一台搭建和zabbix监控nginx状态
搭建LNMP
参考lnmp分离部署,在一台上面安装好三个服务
安装后配置 修改nginx
修改/usr/local/nginx/conf/nginx.conf配置文件
[root@hyc ~]# cd /usr/local/nginx/conf/
[root@hyc conf]# vim nginx.conf
http {
    server {
        listen       80;
        server_name  localhost;		##注:若想用域名访问,请修改localhost
            location / {
            root   html;
            index  index.php index.html index.htm;		##注:添加index.php
            }
    }
找到此行将前面的注释全部取消
        location ~ \.php$ {
            root           html;		##注:网页文件存放目录,在本机的/usr/local/nginx/html/目录下
            fastcgi_pass   127.0.0.1:9000
            fastcgi_index  index.php;
            fastcgi_param  SCRIPT_FILENAME  /usr/local/nginx/html/$fastcgi_script_name;		##注:将$/scripts修改为服务器的存放网页文件的目录
            include        fastcgi_params;
        }
}
检查配置文件是否有误
[root@hyc conf]# nginx -t
nginx: the configuration file /usr/local/nginx/conf/nginx.conf syntax is ok
nginx: configuration file /usr/local/nginx/conf/nginx.conf test is successful
在存放网页的目录中创建index.php文件
[root@hyc ~]# cat > /usr/local/nginx/html/index.php <
 EOF
重启服务
[root@hyc ~]# ss -antl
State      Recv-Q Send-Q Local Address:Port               Peer Address:Port
LISTEN     0      128      *:80                   *:*
LISTEN     0      128      *:22                   *:*
LISTEN     0      100    127.0.0.1:25                   *:*
LISTEN     0      128    127.0.0.1:9000                 *:*
LISTEN     0      128     :::22                  :::*
LISTEN     0      100    ::1:25                  :::*
LISTEN     0      80      :::3306                :::*
测试
部署zabbix
参考zabbix部署4.1-4.2
zabbix服务端web界面安装与配置
zabbix web界面安装前配置
修改/etc/php.ini的配置并重启php-fpm
[root@hyc ~]# sed -ri 's/(post_max_size =).*/\1 16M/g' /etc/php.ini
[root@hyc ~]# sed -ri 's/(max_execution_time =).*/\1 300/g' /etc/php.ini
[root@hyc ~]# sed -ri 's/(max_input_time =).*/\1 300/g' /etc/php.ini
[root@hyc ~]# sed -i '/;date.timezone/a date.timezone = Asia/Shanghai' /etc/php.ini
[root@hyc ~]# service php-fpm restart
Gracefully shutting down php-fpm . done
Starting php-fpm  done


[root@hyc ~]# cd /usr/src/zabbix-4.0.3
[root@hyc zabbix-4.0.3]# mkdir /usr/local/nginx/html/zabbix
[root@hyc zabbix-4.0.3]# cp -a frontends/php/* /usr/local/nginx/html/zabbix/
[root@hyc zabbix-4.0.3]# chown -R zabbix.zabbix /usr/local/nginx/html
修改nginx
[root@hyc ~]# cd /usr/local/nginx/conf/
[root@hyc conf]# vim nginx.conf
http {
    server {
        listen       80;
        server_name  localhost;		##注:若想用域名访问,请修改localhost
            location / {
            root   html;
            index  zabbix index.php index.html index.htm;  ##注:添加zabbix
            }
    }
找到此行将前面的注释全部取消
        location ~ \.php$ {
            root           html;		##注:网页文件存放目录,在本机的/usr/local/nginx/html/目录下
            fastcgi_pass   127.0.0.1:9000
            fastcgi_index  zabbix;  #将此行改为zabbix
            fastcgi_param  SCRIPT_FILENAME  /usrlocal/nginx/html/$fastcgi_script_name;		##注:将$/scripts修改为服务器的存放网页文件的目录
            include        fastcgi_params;
        }
}
设置zabbix/conf目录的权限,让zabbix有权限生成配置文件zabbix.conf.php
[root@hyc ~]# chmod 777 /usr/local/nginx/html/zabbix/conf
[root@hyc ~]# ll -d /usr/local/nginx/html/zabbix/conf
drwxrwxrwx. 2 zabbix zabbix 104 8月  28 20:04 /usr/local/nginx/html/zabbix/conf
重启nginx
[root@hyc ~]# nginx -s stop
[root@hyc ~]# nginx
[root@hyc ~]# ss -antl
State      Recv-Q Send-Q Local Address:Port               Peer Address:Port
LISTEN     0      128      *:80                   *:*
LISTEN     0      128      *:22                   *:*
LISTEN     0      100    127.0.0.1:25                   *:*
LISTEN     0      128      *:10050                *:*
LISTEN     0      128      *:10051                *:*
LISTEN     0      128    127.0.0.1:9000                 *:*
LISTEN     0      128     :::22                  :::*
LISTEN     0      100    ::1:25                  :::*
LISTEN     0      80      :::3306                :::*
恢复zabbix/conf目录的权限为755
web界面部署参考zabbix部署
参考zabbix部署博客配置客户端
客户端创建脚本存放目录
[root@xiaoxiong ~]# mkdir /scripts
[root@xiaoxiong ~]# cd /scripts/
[root@xiaoxiong scripts]# vim nginx.sh
[root@xiaoxiong scripts]# cat nginx.sh
#!/bin/bash

case $1 in
    accepts)
        curl -s http://192.168.30.133/nginx_stat | awk 'NR==3 {print $1}'
    ;;
    handled)
        curl -s http://192.168.30.133/nginx_stat |awk 'NR==3 {print $2}'
    ;;
    requests)
        curl -s http://192.168.30.133/nginx_stat |awk 'NR==3 {print $3}'
    ;;
    *)
        echo "Usage: $0 { accepts | handled | requests }"
esac
给脚本执行权限
[root@hyc scripts]# chmod +x nginx.sh
[root@hyc scripts]# ll
总用量 4
-rwxr-xr-x 1 root root 378 8月  29 19:45 nginx.sh
[root@hyc scripts]# chmod -R zabbix.zabbix /scripts/
修改客户端配置文件
[root@xiaoxiong ~]# vim /usr/local/etc/zabbix_agentd.conf
修改:UnsafeUserParameters 等于 1 :UnsafeUserParameters=1
UserParameter=nginx[*],/bin/bash /scripts/nginx.sh $1		##末行加入此行
重启zabbix_agentd
[root@xiaoxiong ~]# pkill zabbix
[root@xiaoxiong ~]# zabbix_agentd
在服务端测试脚本
[root@hyc ~]# zabbix_get -s 192.168. 30.129 -k nginx[requests]
358
配置监控项和触发器
创建新主机:
主机名必须和刚刚自定义的主机名一致: Hostname=hanyuce

添加监控项
- 配置——主机——监控项
- 配置以下配置其他保持默认

添加触发器
- 配置——主机——触发器

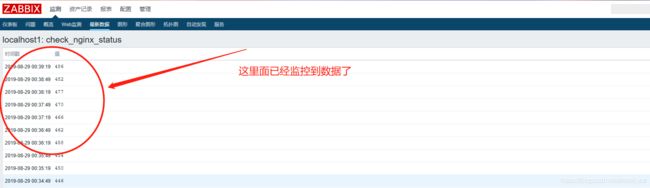
验证