Mybatis入门 基于XML实现增删改查(包含动态SQL标签的使用)
mybatis快速入门
1.配置mybatis环境
mybatis简介和入门以及配置问题可以去官网
https://mybatis.net.cn/getting-started.html
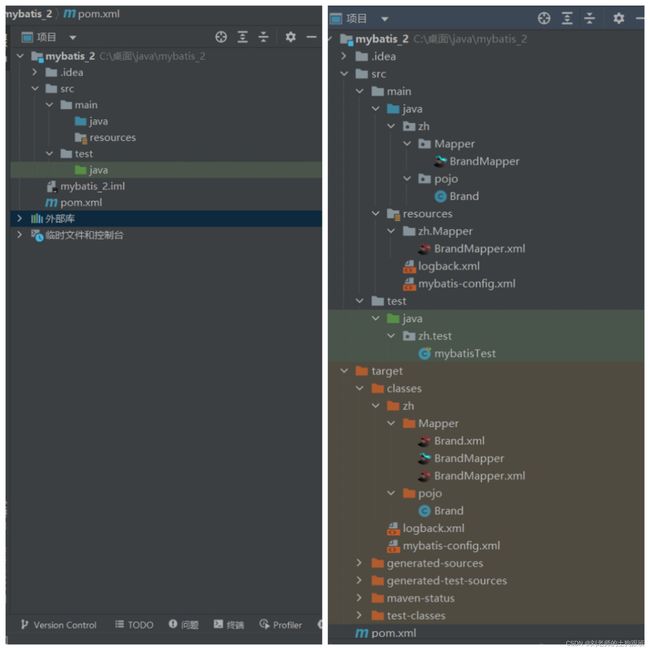
1.1 创建Maven项目
1.2 导入pom.xml文件相关依赖
导入相关依赖
pom.xml文件:
    4.0.0

    org.example
    mybatis_project
    1.0-SNAPSHOT


        UTF-8
        17
        17


            org.mybatis
            mybatis
             3.5.6


            mysql
            mysql-connector-java
            5.1.46


            junit
            junit
            4.13
            test


            org.slf4j
            slf4j-api
            1.7.20


            ch.qos.logback
            logback-classic
            1.2.3


            ch.qos.logback
            logback-core
            1.2.3
1.3 创建mybatis-config.xml和logback.xml配置文件
mybatis-config.xml是mybatis核心配置文件,用于解决JDBC硬编码问题,也可以直接去mybatis官网ctrl c+v
标签用于加载SQL映射文件,映射文件是指每个Mapper独立的配置文件,如果有多个Mapper配置文件,可以用单独每个文件扫描方式,也可以用包扫描方式。 标签是用来存储数据库连接信息,可以看看以前的JDBC代码
日志文件:logback.xml
[%level] %blue(%d{HH:mm:ss.SSS}) %cyan([%thread]) %boldGreen(%logger{15}) - %msg %n
1.4 创建数据库
目前只用到了一个Brand表
SQL语句:
create database mybatis_2;
use mybatis_2;
-- 删除tb_brand表
drop table if exists tb_brand;
-- 创建tb_brand表
create table tb_brand
(
    -- id 主键
    id           int primary key auto_increment,
    -- 品牌名称
    brand_name   varchar(20),
    -- 企业名称
    company_name varchar(20),
    -- 排序字段
    ordered      int,
    -- 描述信息
    description  varchar(100),
    -- 状态:0:禁用  1:启用
    status       int
) DEFAULT charset =utf8;
-- 添加数据
insert into tb_brand (brand_name, company_name, ordered, description, status)
values ('三只松鼠', '三只松鼠股份有限公司', 5, '好吃不上火', 0),
       ('华为', '华为技术有限公司', 100, '华为致力于把数字世界带入每个人、每个家庭、每个组织,构建万物互联的智能世界', 1),
       ('小米', '小米科技有限公司', 50, 'are you ok', 1);

SELECT * FROM tb_brand;
成功创建数据库以及Brand表
1.5 在pojo包下创建实体类
Brand实体类:
package zh.pojo;

public class Brand {
    // id 主键
    private Integer id;
    // 品牌名称
    private String brandName;
    // 企业名称
    private String companyName;
    // 排序字段
    private Integer ordered;
    // 描述信息
    private String description;
    // 状态:0:禁用  1:启用
    private Integer status;

    public Brand() {

    }

    public Brand(Integer id, String brandName, String companyName, Integer ordered, String description, Integer status) {
        this.id = id;
        this.brandName = brandName;
        this.companyName = companyName;
        this.ordered = ordered;
        this.description = description;
        this.status = status;
    }

    public Integer getId() {
        return id;
    }

    public void setId(Integer id) {
        this.id = id;
    }

    public String getBrandName() {
        return brandName;
    }

    public void setBrandName(String brandName) {
        this.brandName = brandName;
    }

    public String getCompanyName() {
        return companyName;
    }

    public void setCompanyName(String companyName) {
        this.companyName = companyName;
    }

    public Integer getOrdered() {
        return ordered;
    }

    public void setOrdered(Integer ordered) {
        this.ordered = ordered;
    }

    public String getDescription() {
        return description;
    }

    public void setDescription(String description) {
        this.description = description;
    }

    public Integer getStatus() {
        return status;
    }

    public void setStatus(Integer status) {
        this.status = status;
    }

    @Override
    public String toString() {
        return "Brand{" +
                "id=" + id +
                ", brandName='" + brandName + '\'' +
                ", companyName='" + companyName + '\'' +
                ", ordered=" + ordered +
                ", description='" + description + '\'' +
                ", status=" + status +
                '}';
    }
}
1.6 创建Mapper接口
package zh.Mapper;

import zh.pojo.Brand;

import java.util.List;
import java.util.Map;

public interface BrandMapper {

    /*
        查询所有
    */
    List selectAll();
}
1.7 创建同名 Mapper.xml文件
官网有模板
在resources目录下BrandMapoper.xml:
- namespace 是名称空间,应该改成接口的地址
- id是标签的唯一标识,应该和接口的方法名一致
- resultType会改成resultMap防止出现测试结果出现null
resultMap标签:
- 注意:Mapper接口和同名xml文件应该要放在同一目录下,但由于maven项目习惯把Java文件和配置文件分开。所以我们在resources目录下创建一个Mapper接口所在的包的同名目录,再在该目录下创建同名xml文件。
- 创建好文件后编译maven 可以看到在target目录下者两个文件已经在一起了
- 推荐在idea下载一个mybatisX插件,可以让接口和xml文件之间转换更加方便
- 此时xml文件中的sql的表名会爆红,解决方式就是在idea添加数据源
可以看到表名已经正常,现在mybatis框架的所有环境已经配置好了
2.创建测试类
环境配置完毕后就可以创建测试类了。先写好测试类里的准备工作。
package zh.test;

import org.apache.ibatis.io.Resources;
import org.apache.ibatis.session.SqlSession;
import org.apache.ibatis.session.SqlSessionFactory;
import org.apache.ibatis.session.SqlSessionFactoryBuilder;
import org.junit.After;
import org.junit.Before;
import org.junit.Test;
import zh.Mapper.BrandMapper;
import zh.Mapper.BrandMapper;
import zh.pojo.Brand;

import java.io.IOException;
import java.io.InputStream;
import java.util.ArrayList;
import java.util.HashMap;
import java.util.List;
import java.util.Map;

public class mybatisTest {
    private SqlSession sqlSession;
    private BrandMapper brandMapper;
    private SqlSessionFactory sqlSessionFactory;
    @Before
    public void init() throws IOException {
        //1.加载mybatis核心配置文件获取SqlSessionFactory,直接去官网找
        String resource = "mybatis-config.xml";
        //得到配置文件流
        InputStream inputStream = Resources.getResourceAsStream(resource);
        //根据配置文件信息,创建会话工厂
        sqlSessionFactory = new SqlSessionFactoryBuilder().build(inputStream);
        //2.获取sqlSession 用于执行sql
        sqlSession = sqlSessionFactory.openSession(true); //自动提交事务
        //创建代理对象
        brandMapper = sqlSession.getMapper(BrandMapper.class);
    }
    @After
    public void destroy() {
        //提交事务
        //sqlSession.commit();
        //关闭sqlSession,释放资源
        sqlSession.close();
    }
}
- 在测试类MybatisTest中,首先添加init()方法,并使用@Before 注解修饰。JUnit4 使Java5中的@Before注解,用于初始化,init0方法对于每一个测试方法都要执行一次。 在init()方法中,先根据MyBatis 配置文件构建SqlSessionFactory, 再通过SqlSessionFactory 创建SqlSession。
- 接着添加destroy()方法,并使用@After注解修饰。用于释放资源。destroy()方法对于每个测试方法都要执行 一次。
- 在测试类 MybatisTest中每一个用@Test注解修饰的方法称为测试方法,它们的调用顺序@Before→@Test→@After。
2.1 查询用户
- 查询所有品牌信息
BrandMapper接口:
List selectAll(); BrandMapper.xml:
测试方法
@Test
    public void testSelectAll() {
        List brands = brandMapper.selectAll();
        for (Brand b : brands) {
            System.out.println(b);
        }
    }
结果可以看见所有品牌信息都查询出来了
- 通过Id查询信息
跟上面的一样在UserMapper.xml文件中写sql语句,接口中写方法,测试类中写测试代码
后面的案例都是先展示sql语句和接口中的方法,再展示测试代码
//接口中的方法
Brand selectById(Integer id);解释一下#{}和${}占位符的区别
    @Test
    public void testSelectById() {
        //接收参数
        int id = 1;
        //执行sql
        Brand brand = brandMapper.selectById(id);
        System.out.println(brand);
    }
结果为:
- 多参数条件查询
- 多参数可以分成三种方式查询,分别为@Param注解,封装对象,封装Map集合
- 正常写sql如果传入的参数少于sql中的参数会导致sql拼接错误,这里我们直接采用动态sql标签解决,这里用到了
和 标签
/*
条件查询
参数接收
1.散装参数:如果方法中有多个参数,需要使用@Param("SQL参数占位符名称" 实体类属性)
2.对象参数:对象的属性名称要和参数占位符名称一致
3. map集合参数
* */
//散装参数
//List selectByCondition(@Param("status") int status,@Param("brandName") String brandName,@Param("companyName") String companyName);
//将参数封装成Brand对象
//List selectByCondition(Brand brand);
//将参数封装成map集合
List selectByCondition(Map map);
    @Test
    public void testSelectByCondition() {
        //接收参数
        int status = 1;
        String brandName = "华为";
        String companyName = "华为";
        //处理参数   也可以在sql语句中用concat拼接
        brandName = "%" + brandName + "%";
        companyName = "%" + companyName + "%";
        //封装对象
        /*Brand brand = new Brand();
        brand.setBrandName(brandName);
        brand.setCompanyName(companyName);
        brand.setStatus(status);*/
        //封装map
        Map map = new HashMap();
        //key对应sql的参数名,value对应接受的参数
        //map.put("status",status);
        map.put("brandName", brandName);
        map.put("companyName", companyName);
        //执行sql
        //List brands = brandMapper.selectByCondition(status, brandName, companyName);
        // List brands = brandMapper.selectByCondition(brand);
        List brands = brandMapper.selectByCondition(map);
        System.out.println(brands);

} 为了更好的熟悉动态sql,再来一个选择单个条件查询,用到了
标签
/*
单条件动态sql
*/
List selectBySingleCondition(Brand brand); @Test
public void testSelectBySingleCondition() {
//接收参数
int status = 1;
String brandName = "华为";
String companyName = "华为";
//处理参数
brandName = "%" + brandName + "%";
companyName = "%" + companyName + "%";
//封装对象
Brand brand = new Brand();
//brand.setStatus(status);
//brand.setBrandName(brandName);
brand.setCompanyName(companyName);
//执行sql
List brands = brandMapper.selectBySingleCondition(brand);
System.out.println(brands);
} 2.2 添加用户
和上面一样进行添加品牌信息,这里有一个细节是因为id是自增,所以不需要传入id参数,我们用getId()方法实现主键返回
        insert into tb_brand(brand_name, company_name, ordered, description, status)
        VALUES (#{brandName},#{companyName},#{ordered},#{description},#{status})


 void Add(Brand brand);
@Test
public void testAddBrand() {
String brandName = "农夫山泉矿泉水";
String companyName = "农夫山泉";
int ordered = 99;
String description = "农夫山泉有点甜";
int status = 1;
//封装对象
Brand brand = new Brand();
brand.setBrandName(brandName);
brand.setStatus(status);
brand.setDescription(description);
brand.setOrdered(ordered);
brand.setCompanyName(companyName);
//执行sql
brandMapper.Add(brand);
System.out.println(brand.getId());
}可以看到控制台输出了主键,Brand表也添加成功
2.3 修改用户
修改品牌信息时不一定所有信息都要修改,可能只需要修改一部分,可以用动态sql解决,用到了
和 标签
        update tb_brand


                brand_name = #{brandName},


                company_name = #{companyName},


                ordered = #{ordered},


                description = #{description},


                status=#{status},


        where id = #{id};


int update(Brand brand);//返回int类型时为了再控制台提示是否更新成功
@Test
public void testUpdate() {
String brandName = "东方树叶";
String companyName = "农夫山泉";
int ordered = 200;
String description = "农夫山泉有点甜";
int status = 0;
int id = 4;
//封装对象
Brand brand = new Brand();
brand.setBrandName(brandName);
brand.setStatus(status);
//brand.setDescription(description);
brand.setOrdered(ordered);
//brand.setCompanyName(companyName);
brand.setId(id);
//执行sql
int cnt = brandMapper.update(brand);
System.out.println(cnt);
}结果:
控制台没问题,数据库也没问题,修改成功。
2.4 删除用户
- 删除单个品牌
        delete from tb_brand where id= #{id};


 int deleteById(int id); 返回int类型时为了再控制台提示是否删除成功
@Test
public void testDeleteById() {
int id = 5;
//执行sql
int cnt = brandMapper.deleteById(id);
if(cnt>0 ) System.out.println("删除成功");
else System.out.println("删除失败");
}控制台 和数据库都没问题,可以看到id为5的品牌已经被删除
- 批量删除
有时我们会进行批量删除的业务,这时就要再次用到动态sql,用到
标签
        delete from tb_brand where id in

            #{id}


    void deleteByIds(List ids);
@Test
public void testDeleteByIds(){
List ids=new ArrayList<>();
ids.add(6);
ids.add(7);
brandMapper.deleteByIds(ids);
} 可以看到id为6,7的品牌一起被删除了,批量删除成功。
mybatis增删改差已经全部完成了。


