目标检测学习笔记——MMdetection下Faster RCNN源码解读
目录
- 一、代码流程
-
- 一、anchor生成过程
-
- 1. base_anchor生成
- 2. all_anchors生成
- 二、正负样本划分和proposal选择
- rpn与rcnn可视化!重要
- 总结:
-
- faster rcnn的训练过程
-
- 一、RPN
- 二、Propoasl layer
- 三、RCNN
RCNN、Fast RCNN和Faster RCNN都是two stage网络,第一步是生成proposal,第二步是分类和回归。
一、代码流程
Faster_RCNN 4.训练模型 :https://www.cnblogs.com/king-lps/p/8995412.html
从结构、原理到实现,Faster R-CNN全解析(原创)
h:ttps://zhuanlan.zhihu.com/p/32702387
一、anchor生成过程
https://zhuanlan.zhihu.com/p/161463275
代码在mmdet/core/anchor/anchor_generator.py里
1. base_anchor生成
def gen_base_anchors(self):
        """Generate base anchors.

        Returns:
            list(torch.Tensor): Base anchors of a feature grid in multiple \
                feature levels.
        """
        multi_level_base_anchors = []
        for i, base_size in enumerate(self.base_sizes):
            center = None
            if self.centers is not None:
                center = self.centers[i]
            multi_level_base_anchors.append(
                self.gen_single_level_base_anchors(
                    base_size,
                    scales=self.scales,
                    ratios=self.ratios,
                    center=center))
        return multi_level_base_anchors
base_size等于stride,所以当scale为1,ratio为1时生成的base_anchor等于每一个grid cell,所以如果scale等于1,不同特征图实际生成的base_anchor大小是相等的,因此scale的大小决定了生成anchor的大小,也使得不同特征图生成了不同大小的anchor。
2. all_anchors生成
 def single_level_grid_priors(self,
                                 featmap_size,
                                 level_idx,
                                 dtype=torch.float32,
                                 device='cuda'):
        """Generate grid anchors of a single level.

        Note:
            This function is usually called by method ``self.grid_priors``.

        Args:
            featmap_size (tuple[int]): Size of the feature maps.
            level_idx (int): The index of corresponding feature map level.
            dtype (obj:`torch.dtype`): Date type of points.Defaults to
                ``torch.float32``.
            device (str, optional): The device the tensor will be put on.
                Defaults to 'cuda'.

        Returns:
            torch.Tensor: Anchors in the overall feature maps.
        """

        base_anchors = self.base_anchors[level_idx].to(device).to(dtype)
        feat_h, feat_w = featmap_size
        stride_w, stride_h = self.strides[level_idx]
        # First create Range with the default dtype, than convert to
        # target `dtype` for onnx exporting.
        shift_x = torch.arange(0, feat_w, device=device).to(dtype) * stride_w
        shift_y = torch.arange(0, feat_h, device=device).to(dtype) * stride_h

        shift_xx, shift_yy = self._meshgrid(shift_x, shift_y)
        shifts = torch.stack([shift_xx, shift_yy, shift_xx, shift_yy], dim=-1)
        # first feat_w elements correspond to the first row of shifts
        # add A anchors (1, A, 4) to K shifts (K, 1, 4) to get
        # shifted anchors (K, A, 4), reshape to (K*A, 4)

        all_anchors = base_anchors[None, :, :] + shifts[:, None, :]
        all_anchors = all_anchors.view(-1, 4)
        # first A rows correspond to A anchors of (0, 0) in feature map,
        # then (0, 1), (0, 2), ...
        return all_anchors
base_anchors: tensor([[-22.6274, -11.3137, 22.6274, 11.3137],
[-16.0000, -16.0000, 16.0000, 16.0000],
[-11.3137, -22.6274, 11.3137, 22.6274]], device=‘cuda:0’)
base_anchor是grid cell中(0,0)坐标产生的三个基本的anchor
feat_h, feat_w : 192, 336,特征图的尺寸,为原图尺寸初一stride4的结果,可知原图下采样后成为了192 * 336的特征图,每一个grid cell是4 * 4的。

stride_w, stride_h : 4, 4
shift_x,shift_y: 是base_anchor生成所有anchor要移动的像素,所以base_anchor可以向右移动336次,每次以4为步长,向下移动192次,每次也以4为步长,所以一共有336 * 192 = 64512个组合,每个base_anchor可以生成64512个anchors

最终生成64512 * 3 = 193536个anchors, 这些anchors是基于原图尺寸的。

二、正负样本划分和proposal选择
关于 Faster RCNN正负样本选取的问题:https://blog.csdn.net/qq_34945661/article/details/120589053
yolo 负样本_目标检测正负样本区分策略和平衡策略总结(一):https://blog.csdn.net/weixin_39838028/article/details/112509907
rpn与rcnn可视化!重要
总结:
faster rcnn的训练过程
一、RPN
特征提取网络的特征图作为输入,经过分类和回归两条通道后得到KMN个propoasl,分类是由softmax输出前景和后景的概率,并通过和GT求iou可确定其label,回归是输出proposal相较于anchor的偏移量targets,anchor和GT的坐标偏移量作为label,但是rpn的loss不是由全部生成的anchor来计算,是要按照规定的挑选规则来进行挑选,(覆盖到feature map边界线的不要,iou在0.3和0.7之间的不要,正负样本的划分规则(assinger))再在从中挑选出256个proposal进行rpn的loss计算(sampler),rpn loss由cls loss和reg loss相加联合训练RPN,rpn生成
二、Propoasl layer
从RPN网络输出的很多个proposal中根据前景概率挑选前N个、然后进行NMS,再按前景概率挑选前M个proposal(大概2000个),这时proposal已经较为精确,再回去进行一次回归得到更准确的proposal送给rcnn。
三、RCNN
送给RCNN的是前景proposal和其label,label在RPN时就已经确定了,分为类别标签和位置偏移量标签,不会将2000个proposal都用来计算,先用assigner划分正负比例,再用sampler抽样来(512个)进行训练rcnn。
1、RCNN的region proposal是使用SS算法生成2k个region proposal,然后进行warp或者crop成统一尺寸。
2、Fast RCNN同样是通过SS算法生成候选框,但是通过ROI Pooling层将ROI(region of interest,对应feature map上面的proposal)变成统一尺寸。Fast RCNN将提取特征与回归和分类都由神经网络完成。
3、Faster RCNN将生成候选区域和分类回归都将由神经网络来实现,由RPN生成候选区域再由ROI Pooling来将proposal变成统一尺寸(第一次用到了RPN、anchors)。
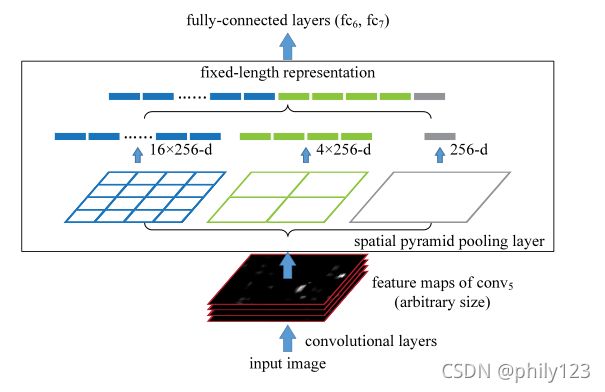
4、SPPNet的作用是将任意尺度的输入输出成想要的统一尺寸。

如1313的特征图经过kernel size和stride分别为4,3;7,6;13,13的最大池化后输出结果是44,22,和11,再将这三个输出拼接作为下一层全连接层或者svm的输入。
目标检测算法RCNN,Fast RCNN,Faster RCNN,YOLO和SSD
Faster-rcnn 代码详解
Faster R-CNN算法详细流程:https://blog.csdn.net/qq_37392244/article/details/88837784