Python数据分析--Matplotlib(1)
绘制图象
plt.plot()
plot可以绘制线性图表
from matplotlib import pyplot as plt
#%%
import numpy as np
#%%
#获得-50-50的数组
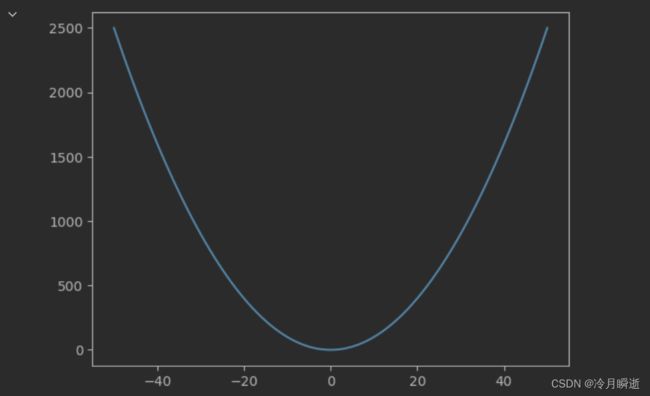
x=np.arange(-50,51)
print(x)
y=x**2
plt.plot(x,y)
基本方法

修改字体配置plt.rcParams[“font.sans-serif”]
字体说明:

例如:
plt.rcParams[“font.sans-serif”]=[“SimHei”]
当字体设置支持中文后,需要设置负号,否则出现负数时无法显示负号
plt.reParams[‘axes.unicode_minus’]=False
在使用xlabel和ylabel时
可以使用fontsize参数调整文字大小
使用linewidth参数调整线条
设置x轴和y轴的刻度
from matplotlib import pyplot as plt
#%%
import numpy as np
#%%
#获得-50-50的数组
x=np.arange(-50,51)
print(x)
#%%
y=x**2
plt.plot(x,y)
#%%
#以日期作为x轴的值
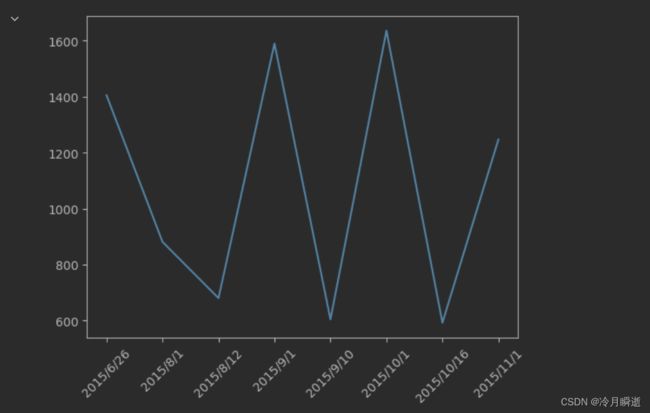
times=['2015/6/26','2015/8/1','2015/8/12','2015/9/1','2015/9/10','2015/10/1','2015/10/16','2015/11/1']
#随机出y轴的值
sales=np.random.randint(500,2000,size=len(times))
#用xtick设置
plt.xticks(range(0,len(times),1),rotation=45)
#绘制图形
plt.plot(times,sales)
结果:
图例legend()
图例是集中于地图一角或一侧的地图上各种符号和颜色所代表内容与指标的说明,有助于更好的认识地图。
#以日期作为x轴的值
times=['2015/6/26','2015/8/1','2015/8/12','2015/9/1','2015/9/10','2015/10/1','2015/10/16','2015/11/1']
#随机出y轴的值
sales=np.random.randint(300,1500,size=len(times))
incomes=np.random.randint(500,2000,size=len(times))
#用xtick设置
plt.xticks(range(0,len(times),1),rotation=45)
#绘制图形
plt.plot(times,sales,label="sale")
plt.plot(times,incomes,label="income")
plt.legend()
其他元素可视性
显示网格:plt.grid()

plt.gca()对坐标轴的操作
x=np.arange(-50,51)
y=x**2
plt.plot(x,y)
#获取当前坐标轴
ax=plt.gca()
#不需要右侧和上侧的线条,则可以设置他的颜色
ax.spines['right'].set_color("none")
ax.spines['top'].set_color("none")
#在这里,position位置参数有"data","axes"
#axes:0.0-1.0之间的值,整个轴的比例
#将左边的轴移到中间
ax.spines['left'].set_position('axes',0.5)
#将左边的轴移到x=0的位置
#ax.spines['left'].set_position('data',0.0)
#限制y的范围为0-2500
plt.ylim(0,y.max())
plt.plot(x,y)
结果:

plt.rcParams设置画图的分辨率,大小等信息

线条样式
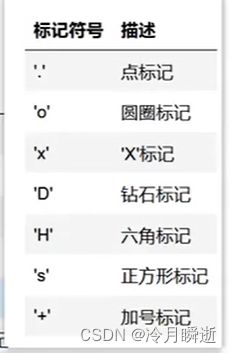
plt.plot(x,y,color=,alpha=0.3,linestyle=‘-’,linewideth=5,marker=‘o’,markeredgecolor=‘r’,marksize=‘20’,markeredgewidth=10)
(1)color

(2)alpha 透明度0-1
(3)linestyle:折线样式

创建图形对象
figure的方法
x=np.arange(0,50)
y=x**2
fig=plt.figure('f1',figsize=(4,2),dpi=100,facecolor='red')
plt.plot(x,y)
多子图
添加区域
add_axes(rect)

subplot()
作用:均等地划分画布
ax=plt.subplot(nrows,ncols,index,*args,**kwargs)


plt.plot([1,2,3,4])

#先设置画布的大小,再通过画布创建区域
fig=plt.figure(figsize=(4,2),dpi=100)
fig.add_subplot(111)
plt.plot(range(20))
fig.add_subplot(221)
plt.plot(range(12))
