games101,作业1
正交变换
左边是缩放变换,右边是平移变换
对图形进行正交变换需要:
- 先平移
- 再缩放
但是做矩阵乘法时,先相乘的矩阵放在右边,后相乘的矩阵放在左边。

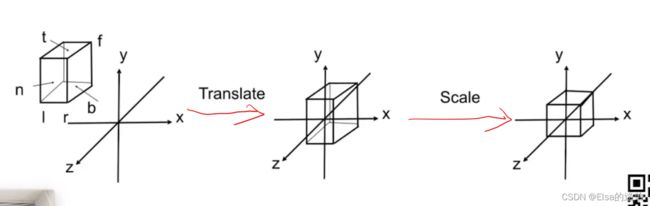
视口平移(Translate)
M_ortho_trans <<  1, 0, 0, -(r + l) / 2,
    	          0, 1, 0, -(t + b) / 2,
    	          0, 0, 1, -(zNear + zFar) / 2,
    	          0, 0, 0, 1;
视口缩放 (Scale)
	M_ortho_scale << 2/(r - l),   0,              0,                  0,
		              0,          2/(t - b),      0,                  0,
		              0,          0,              2/(zNear - zFar),   0,
		              0,          0,              0,                  1;
透视变换
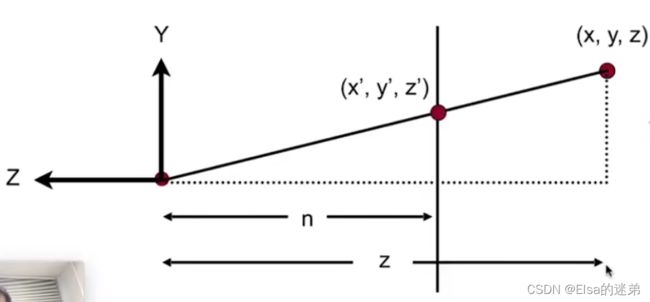
将如上空间转换为如下红色矩形区域。

透视变化
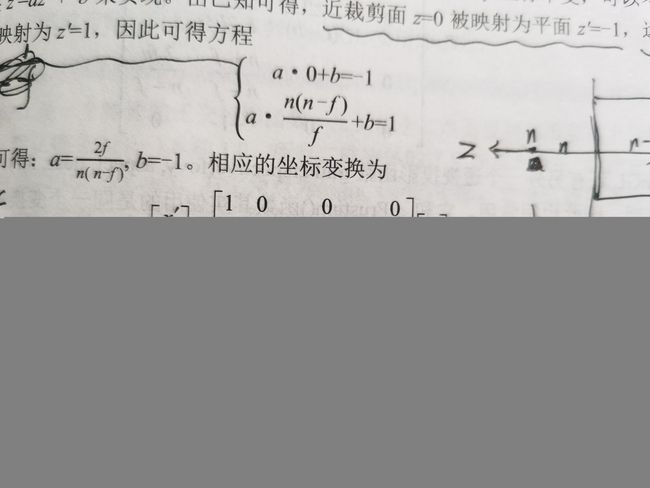
M_persp2ortho <<  zNear, 0, 0, 0,
		          0, zNear, 0, 0,
		          0, 0, zNear + zFar, -zNear * zFar,
		          0, 0, 1, 0;
变换为标准正方体
先进行透视变化(M_ortho_scale * M_ortho_trans),再进行正交投影变换(M_persp2ortho)。
projection = M_ortho_scale * M_ortho_trans * M_persp2ortho;
代码表示
Eigen::Matrix4f get_projection_matrix(float eye_fov, float aspect_ratio,float zNear, float zFar){
    // Students will implement this function
    Eigen::Matrix4f projection = Eigen::Matrix4f::Identity();
    Eigen::Matrix4f M_persp2ortho(4, 4);
	Eigen::Matrix4f M_ortho_scale(4, 4);
	Eigen::Matrix4f M_ortho_trans(4, 4);

    float angle = eye_fov * MY_PI / 180.0; // half angle

    auto t = -zNear * tan(angle / 2);
	auto r = t * aspect_ratio;
	auto l = -r;
	auto b = -t;

	M_persp2ortho <<  zNear, 0, 0, 0,         // 透视变化
		                0, zNear, 0, 0,
		                0, 0, zNear + zFar, -zNear * zFar,
		                0, 0, 1, 0;
    M_ortho_trans <<  1, 0, 0, -(r + l) / 2,  //正交视口平移
    	                0, 1, 0, -(t + b) / 2,
    	                0, 0, 1, -(zNear + zFar) / 2,
    	                0, 0, 0, 1;
	M_ortho_scale << 2/(r - l),   0,              0,                  0,//正交视口缩放
		                0,          2/(t - b),      0,                  0,
		                0,          0,              2/(zNear - zFar),   0,
		                0,          0,              0,                  1;


    return M_ortho_scale * M_ortho_trans * M_persp2ortho * projection;
}
拓展
在计算机图形学(OpenGL版)第二版【清华大学出版社】这本书书中讲了另一种透视变换。
先将下图

变换为

使用 平移(T1) - > 平移后的透视变换(T2)(与不平移时不同)
此处,透视投影使用了伪深度值(即z值并非原先的z值,而是统一除以(1-z/d),这并不改变物体的先后顺序,不影响深度测试)

-> z轴标准化(T3)
-> x,y轴标准化(T4,T5)

T = T5T4T3T2T1
T =

也可以表示为

代码表示
其中对Eigen::Matrix4f赋值(x,y),x为矩阵纵轴,y为矩阵横轴
Eigen::Matrix4f get_projection_matrix(float eye_fov, float aspect_ratio,float zNear, float zFar){
    // Students will implement this function

    Eigen::Matrix4f projection_matrix;
    projection_matrix.setIdentity();
    float angle = eye_fov * EIGEN_PI / 360;//视角除以2==俯仰角
    float top = zNear * tan(angle);
    float bottom = -top;
    float right = top * aspect_ratio;//aspect_ratio为纵轴除以横轴
    float left = -right;
    //projection_matrix(纵轴,横轴)
    projection_matrix(0, 0) = 2 / (right - left);//x方向长度标准化
    projection_matrix(1, 1) = 2 / (top - bottom);//y方向长度标准化
    projection_matrix(2, 2) = (zNear + zFar) / zFar / (zNear - zFar);//z轴复合变化
    projection_matrix(2, 0) = (right + left) / zNear / (right - left);//正方形x轴中心标准化
    projection_matrix(2, 1) = (top + bottom) / zFar / (top - bottom);//正方形y轴中心标准化
    projection_matrix(2, 3) = -1 / zNear;//透视变化
    projection_matrix(3, 2) = 2 * zFar / (zNear - zFar);
    projection_matrix(3, 3) = 0;
    return projection_matrix;
}
补充
拓展方法与games101与方法运行结果相同。
在测试代码时发现,若不能正确的写出透视变化矩阵,运行时会报错。也不知为什么!!!
框架代码说明
rasterizer.hpp rasterizer.cpp是光栅化代码:有VAO,VBO功能,直线绘制功能(保存在vector中)。
Triangle是三角形类,有顶点,顶点颜色,顶点法线,顶点法线贴图。
main函数提供命令行输入,
- 非命令行输入运行窗口,可以提供a,d旋转z轴。
- 命令行输入应该可以保存一张图片(我没有成功,根本没有保存图片,不知道什么原因!!!)。保存图片使用了
cv::imwrite(filename, image);,改了filename的地址为绝对地址也没有成功。。。。