python模块 之 xlwt模块
1. 模块简介
1)xlrd是可用于对excel表格进行写操作的(不支持读操作,读操作需要xlrd模块实现)
2)仅支持 xls 格式的excel表格(xlwt支持Excel versions 95 to 2003;xlsx格式是2007及以上版本的excel的文件扩展名)
3)模块安装方式:pip3 install xlwt
4)模块导入方式: import xlwt
2. 模块的使用
2.1 向xls文件中写入内容
方法介绍
# 导入xlwt模块
import xlwt

# 创建一个workbook对象,就相当于创建了一个Excel文件
book = xlwt.Workbook(encoding='utf-8',style_compression=0)  # encoding:设置编码,可写中文;style_compression:是否压缩,不常用

# 创建一个sheet对象,相当于创建一个sheet页
sheet = book.add_sheet('test_sheet',cell_overwrite_ok=True) # cell_overwrite_ok:是否可以覆盖单元格,默认为False

# 向sheet页中添加数据
text = '字串测试'
sheet.write(1,2,'EnglishTest')  # 第1行第2列,写入'EnglishTest';从第0行开始计数
sheet.write(2,2,'中文测试')
sheet.write(3,2,text)

# 将以上内容保存到指定的文件中
book.save('blog.xls')   # 在字符串前加r,声明为raw字符串,这样就不会处理其中的转义了
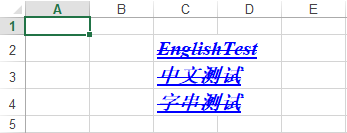
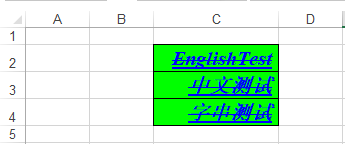
执行结果
2.2 设置写入文件的格式
2.2.1 字体设置(font)
1)语法描述
# ...代码掠过...
# 1. 初始化样式
style = xlwt.XFStyle()

# 2. 为样式创建字体(font)
font = xlwt.Font()

# 3. 指定字体的具体属性(仅列出常用属性)
font.name = 'Times New Roman'   # 指定字体
font.height = 300   # 和excel字体大小比例是1:20
font.bold = True    # 字体是否加粗
font.underline = True   # 字体是否下划线
font.struck_out = True  # 字体是否有横线
font.italic = True  # 是否斜体字
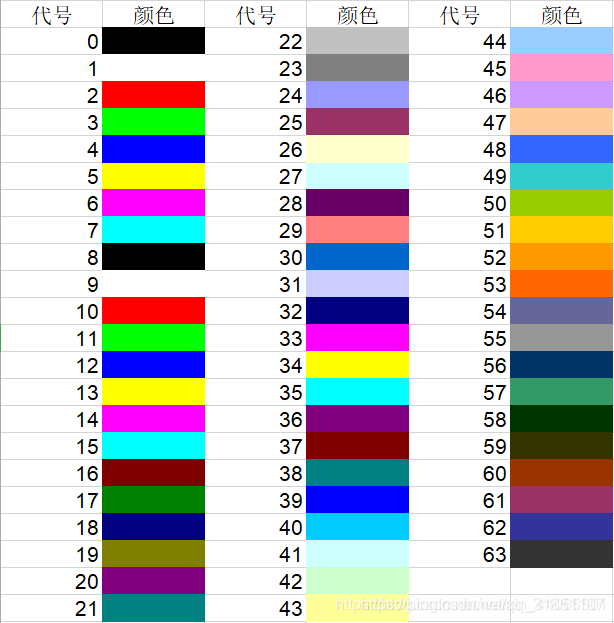
font.colour_index = 4   # 字体颜色
# [...其他属性掠过...]

# 4. 设定字体样式
style.font = font

# 5. 带样式将内容写入Excel
sheet.write(1,2,'EnglishTest',style)	# style代表上面定义的样式
# ...代码掠过...
2)代码示例说明指定字体各属性
# 导入xlwt模块
import xlwt

# 创建一个workbook对象,就相当于创建了一个Excel文件
book = xlwt.Workbook(encoding='utf-8',style_compression=0)  # encoding:设置编码,可写中文;style_compression:是否压缩,不常用
# 创建一个sheet对象,相当于创建一个sheet页
sheet = book.add_sheet('test_sheet',cell_overwrite_ok=True) # cell_overwrite_ok:是否可以覆盖单元格,默认为False

# 初始化样式
style = xlwt.XFStyle()

# 1. 为样式创建字体(font)
font = xlwt.Font()
# 指定字体的具体属性(仅列出常用属性)
font.name = 'Times New Roman'   # 指定字体
font.height = 300   # 和excel字体大小比例是1:20
font.bold = True    # 字体是否加粗
font.underline = True   # 字体是否下划线
font.struck_out = True  # 字体是否有横线
font.italic = True  # 是否斜体字
font.colour_index = 4   # 字体颜色

# 设定字体样式
style.font = font

# 向sheet页中添加数据
text = '字串测试'
sheet.write(1,2,'EnglishTest',style)  # 第1行第2列,写入'EnglishTest';从第0行开始计数;带上面定义的style样式写入
sheet.write(2,2,'中文测试',style)
sheet.write(3,2,text,style)

# 将以上内容保存到指定的文件中
book.save('blog.xls')   # 在字符串前加r,声明为raw字符串,这样就不会处理其中的转义了
4)补充字体颜色对照图
2.2.2 背景颜色设置(pattern)
1)语法描述
# ...代码掠过...
# 1. 初始化样式
style = xlwt.XFStyle()

# 2. 为样式创建背景图案(pattern)
pattern = xlwt.Pattern()

# 3. 指定背景颜色
pattern.pattern = xlwt.Pattern.SOLID_PATTERN  # 设置背景颜色模式
pattern.pattern_fore_colour = 26  # May be: 8 through 63. 0 = Black, 1 = White, 2 = Red, 3 = Green, 4 = Blue, 5 = Yellow, 6 = Magenta, 7 = Cyan, 16 = Maroon, 17 = Dark Green, 18 = Dark Blue, 19 = Dark Yellow , almost brown), 20 = Dark Magenta, 21 = Teal, 22 = Light Gray, 23 = Dark Gray, the list goes on...
# [...其他属性掠过...]

# 4. 设定背景图案样式
style.pattern = pattern

# 5. 带样式将内容写入Excel
sheet.write(1,2,'EnglishTest',style)	# style代表上面定义的样式
# ...代码掠过...
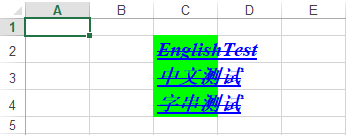
2)代码示例说明指定背景各属性
# 导入xlwt模块
import xlwt

# 创建一个workbook对象,就相当于创建了一个Excel文件
book = xlwt.Workbook(encoding='utf-8',style_compression=0)  # encoding:设置编码,可写中文;style_compression:是否压缩,不常用
# 创建一个sheet对象,相当于创建一个sheet页
sheet = book.add_sheet('test_sheet',cell_overwrite_ok=True) # cell_overwrite_ok:是否可以覆盖单元格,默认为False

# 初始化样式
style = xlwt.XFStyle()

# 1. 为样式创建字体(font)
font = xlwt.Font()
# 指定字体的具体属性(仅列出常用属性)
font.name = 'Times New Roman'   # 指定字体
font.height = 300   # 和excel字体大小比例是1:20
font.bold = True    # 字体是否加粗
font.underline = True   # 字体是否下划线
font.struck_out = True  # 字体是否有横线
font.italic = True  # 是否斜体字
font.colour_index = 4   # 字体颜色

# 2. 为样式创建背景图案(pattern)
pattern = xlwt.Pattern()
# 指定背景颜色
pattern.pattern = xlwt.Pattern.SOLID_PATTERN  # 设置背景颜色模式
pattern.pattern_fore_colour = 3    # 不同的值代表不同颜色背景

# 设置style的各个属性的样式
style.font = font   # 设定字体样式
style.pattern = pattern # 设定背景图案样式

# 向sheet页中添加数据
text = '字串测试'
sheet.write(1,2,'EnglishTest',style)  # 第1行第2列,写入'EnglishTest';从第0行开始计数
sheet.write(2,2,'中文测试',style)
sheet.write(3,2,text,style)

# 将以上内容保存到指定的文件中
book.save('blog.xls')   # 在字符串前加r,声明为raw字符串,这样就不会处理其中的转义了
4)补充字体颜色对照图
见字体的颜色对比表;和字体颜色映射相同
2.2.3 边框设置(borders)
1)语法描述
# ...代码掠过...

# 1. 初始化样式
style = xlwt.XFStyle()

# 2. 为样式创建边框(borders)
# borders.left = xlwt.Borders.THIN
#     NO_LINE: 官方代码中NO_LINE所表示的值为0,没有边框
#     THIN:官方代码中THIN所表示的值为1,边框为实线
borders = xlwt.Borders()

# 3. 设定边框属性
borders.left = xlwt.Borders.THIN
borders.right = xlwt.Borders.THIN
borders.top = xlwt.Borders.THIN
borders.bottom = xlwt.Borders.THIN
# [...其他属性掠过...]

# 4. 设置边框样式
style.borders = borders

# 5. 带样式将内容写入Excel
sheet.write(1,2,'EnglishTest',style)	# style代表上面定义的样式

# ...代码掠过...
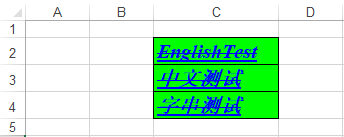
2)代码示例说明指定边框各属性
# 导入xlwt模块
import xlwt

# 创建一个workbook对象,就相当于创建了一个Excel文件
book = xlwt.Workbook(encoding='utf-8',style_compression=0)  # encoding:设置编码,可写中文;style_compression:是否压缩,不常用
# 创建一个sheet对象,相当于创建一个sheet页
sheet = book.add_sheet('test_sheet',cell_overwrite_ok=True) # cell_overwrite_ok:是否可以覆盖单元格,默认为False

# 初始化样式
style = xlwt.XFStyle()

# 1. 为样式创建字体(font)
font = xlwt.Font()
# 指定字体的具体属性(仅列出常用属性)
font.name = 'Times New Roman'   # 指定字体
font.height = 300   # 和excel字体大小比例是1:20
font.bold = True    # 字体是否加粗
font.underline = True   # 字体是否下划线
font.struck_out = True  # 字体是否有横线
font.italic = True  # 是否斜体字
font.colour_index = 4   # 字体颜色

# 2. 为样式创建背景图案(pattern)
pattern = xlwt.Pattern()
# 指定背景颜色
pattern.pattern = xlwt.Pattern.SOLID_PATTERN  # 设置背景颜色模式
pattern.pattern_fore_colour = 3    # 不同的值代表不同颜色背景

# 3. 为样式创建边框(borders)
borders = xlwt.Borders()
# 设定边框属性
borders.left = xlwt.Borders.THIN
borders.right = xlwt.Borders.THIN
borders.top = xlwt.Borders.THIN
borders.bottom = xlwt.Borders.THIN

# 设置style的各个属性的样式
style.font = font   # 设定字体样式
style.pattern = pattern # 设定背景图案样式
style.borders = borders     # 设定边框样式

# 向sheet页中添加数据
text = '字串测试'
sheet.write(1,2,'EnglishTest',style)  # 第1行第2列,写入'EnglishTest';从第0行开始计数
sheet.write(2,2,'中文测试',style)
sheet.write(3,2,text,style)

# 将以上内容保存到指定的文件中
book.save('blog.xls')   # 在字符串前加r,声明为raw字符串,这样就不会处理其中的转义了
2.2.4 对齐方式设置(alignment)
1)语法描述
# ...代码掠过...

# 1. 初始化样式
style = xlwt.XFStyle()

# 2. 对齐方式的设置(alignment)
alignment = xlwt.Alignment()

# 3. 设置具体的对齐方式
    # vert代表垂直对齐方式;horz代表水平对齐方式
alignment.vert = 0x01   # 0x00 上端对齐;0x01 居中对齐(垂直方向上);0x02 底端对齐
alignment.horz = 0x03   # 0x01 左端对齐;0x02 居中对齐(水平方向上);0x03 右端对齐
# [...其他属性掠过...]

# 4. 设定对齐方式
style.alignment = alignment

# 5. 带样式将内容写入Excel
sheet.write(1,2,'EnglishTest',style)	# style代表上面定义的样式

# ...代码掠过...
2)代码示例说明指定字体各属性
# 导入xlwt模块
import xlwt

# 创建一个workbook对象,就相当于创建了一个Excel文件
book = xlwt.Workbook(encoding='utf-8',style_compression=0)  # encoding:设置编码,可写中文;style_compression:是否压缩,不常用
# 创建一个sheet对象,相当于创建一个sheet页
sheet = book.add_sheet('test_sheet',cell_overwrite_ok=True) # cell_overwrite_ok:是否可以覆盖单元格,默认为False

# 初始化样式
style = xlwt.XFStyle()

# 1. 为样式创建字体(font)
font = xlwt.Font()
# 指定字体的具体属性(仅列出常用属性)
font.name = 'Times New Roman'   # 指定字体
font.height = 300   # 和excel字体大小比例是1:20
font.bold = True    # 字体是否加粗
font.underline = True   # 字体是否下划线
font.struck_out = True  # 字体是否有横线
font.italic = True  # 是否斜体字
font.colour_index = 4   # 字体颜色

# 2. 为样式创建背景图案(pattern)
pattern = xlwt.Pattern()
# 指定背景颜色
pattern.pattern = xlwt.Pattern.SOLID_PATTERN  # 设置背景颜色模式
pattern.pattern_fore_colour = 3    # 不同的值代表不同颜色背景

# 3. 为样式创建边框(borders)
borders = xlwt.Borders()
# 设定边框属性
borders.left = xlwt.Borders.THIN
borders.right = xlwt.Borders.THIN
borders.top = xlwt.Borders.THIN
borders.bottom = xlwt.Borders.THIN

# 4. 对齐方式的设置(alignment)
alignment = xlwt.Alignment()
# 设置具体的对齐方式
    # vert代表垂直对齐方式;horz代表水平对齐方式
alignment.vert = 0x01   # 0x00 上端对齐;0x01 居中对齐(垂直方向上);0x02 底端对齐
alignment.horz = 0x03   # 0x01 左端对齐;0x02 居中对齐(水平方向上);0x03 右端对齐

# 设置style的各个属性的样式
style.font = font   # 设定字体样式
style.pattern = pattern # 设定背景图案样式
style.borders = borders     # 设定边框样式
style.alignment = alignment     # 设定对齐方式

# 向sheet页中添加数据
text = '字串测试'
sheet.write(1,2,'EnglishTest',style)  # 第1行第2列,写入'EnglishTest';从第0行开始计数
sheet.write(2,2,'中文测试',style)
sheet.write(3,2,text,style)

# 将以上内容保存到指定的文件中
book.save('blog.xls')   # 在字符串前加r,声明为raw字符串,这样就不会处理其中的转义了
3. 脚本实战
1)题目描述
以下是ansible.conf配置文件内内容,读取ansible.conf,并指定格式写入到excel(abcd.xls)文件的hostInfo sheet页中
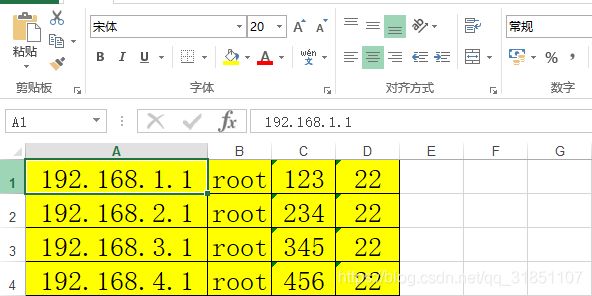
格式要求:宋体,20,黄色背景,有边框,水平居中

写入后的格式展示:
2)代码实现
import xlwt

def set_style(fontName,fontSize,backColour,isBorder,ahorz):
    style = xlwt.XFStyle()

    # 1. 字体属性
    font = xlwt.Font()
    font.name = fontName
    font.height = fontSize
    # 2. 背景属性
    pattern = xlwt.Pattern()
    pattern.pattern = xlwt.Pattern.SOLID_PATTERN
    pattern.pattern_fore_colour = backColour
    # 3. 是否边框
    borders = xlwt.Borders()
    if isBorder == True:
        borders.left = xlwt.Borders.THIN
        borders.right = xlwt.Borders.THIN
        borders.top = xlwt.Borders.THIN
        borders.bottom = xlwt.Borders.THIN
    # 4. 对齐方式
    alignment = xlwt.Alignment()
    if ahorz == 'left':
        alignment.horz = 0x01
    elif ahorz == 'center':
        alignment.horz = 0x02
    elif ahorz == 'right':
        alignment.horz == 0x03

    style.font = font  # 设定字体样式
    style.pattern = pattern  # 设定背景图案样式
    style.borders = borders  # 设定边框样式
    style.alignment = alignment  # 设定对齐方式

    return style


def writeFunc(srcFileName,dstFileName,sheetName):
    book = xlwt.Workbook(encoding='utf-8',style_compression=0)
    sheet = book.add_sheet(sheetName,cell_overwrite_ok=True)

    with open(srcFileName,'r',encoding='utf-8') as f:
        rowNum = 0
        for line in f:  # 遍历文件一行数据
            line_new1 = line.strip().split(' ')     # 列表形式返回每行数据
            colNum = 0
            for i in line_new1:     # 遍历每行数据组成的列表
                content = i.strip().split('=')[1]   # 返回列表中每个元素
                if '"' in content:
                    content = content.replace("\"","")      # 替换双引号 "
                sheet.write(rowNum,colNum,content,set_style('宋体',400,5,True,'center'))      # 向单元格写入数据
                colNum += 1
            rowNum += 1

    book.save(dstFileName)

if __name__ == '__main__':
    writeFunc('ansible.conf','abcd.xls','hostInfo')

