win10上用实例分割网络SOLO训练自己的数据集(mmdetection版本)
这个网络架构在win10上和ubuntu上都搭起来了,里面有的截图是用的ubuntu系统的截图,不影响
我的环境
Python版本 3.7
CUDA版本 11.1
PyTorch版本 1.7.0+cu110(PyTorch官网-历史版本)
VS版本 community 2019
具体步骤
- 从GitHub上把SOLO源码copy下来
git clone https://github.com/WXinlong/SOLO.git
cd SOLO
- 把requirements里要求的包装好
pip install -r requirements/build.txt
- 安装pycocoapi
pip install "git+https://github.com/cocodataset/cocoapi.git#subdirectory=PythonAPI"
国内用这一命令会失败,改为
pip install git+https://github.com/philferriere/cocoapi.git#subdirectory=PythonAPI
linux环境下改为
pip install “git+https://gitee.com/philferriere/cocoapi.git#subdirectory=PythonAPI”
参考文章2
- mmdet配置
在此之前要装好mmcv:pip install mmcv==0.2.16(官方文档里是0.2.16版本,但是好像其他版本也可以)
pip install -v -e . # or "python setup.py develop"
!由于CUDA的版本太高了,这一步会有一些错误,这里只记录了个别
—————————————————————————————————
配环境过程中的ERRORS
-
mmdet\ops\nms\src/nms_cuda.cpp(9): error C3861: “AT_CHECK”: 找不到标识符
这里需要把对应的.cpp文件里的“AT_CHECK”全部换成“TORCH_CHECK” -
FAILED: .../xxx.cu
一系列.cu文件里需要把ceil改为ceilf; floor改为floorf; round改为roundf,取决于具体的报错(当时忘存错误信息了,这里凭回忆记的) -
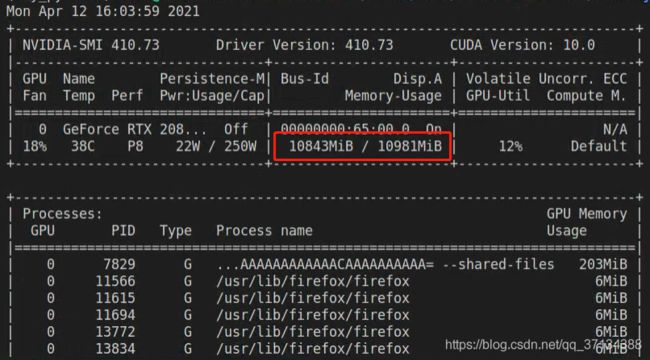
RuntimeError: CUDA error: out of memory
解决:输入nvidia-smi查看GPU使用情况

把占用内存过大的不用进程kill掉kill -9 [PID] -
运行demo时的警告
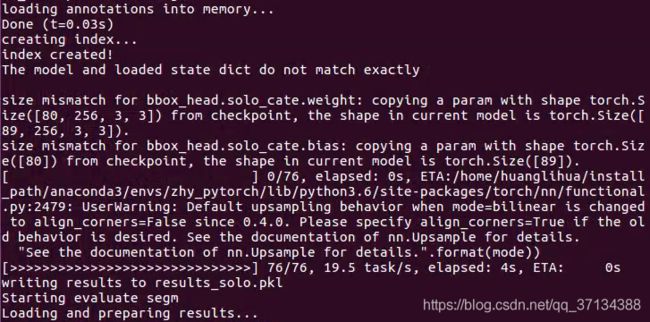
UserWarning: Default upsampling behavior when mode=bilinear is changed to align_corners=False since 0.4.0. Please specify align_corners=True if the old behavior is desired. See the documentation of nn.Upsample for details.
  "See the documentation of nn.Upsample for details.".format(mode))
解决:这是一个警告,不影响结果输出,demo文件夹里已经得到了demo_out.jpg

测试自己的数据
# single-gpu testing
python tools/test_ins.py ${CONFIG_FILE} ${CHECKPOINT_FILE} --show --out  ${OUTPUT_FILE} --eval segm

Example:
python tools/test_ins.py configs/solo/solo_r50_fpn_8gpu_1x.py  SOLO_R50_1x.pth --show --out  results_solo.pkl --eval segm
# multi-gpu testing
./tools/dist_test.sh ${CONFIG_FILE} ${CHECKPOINT_FILE} ${GPU_NUM}  --show --out  ${OUTPUT_FILE} --eval segm

Example:
./tools/dist_test.sh configs/solo/solo_r50_fpn_8gpu_1x.py SOLO_R50_1x.pth  8  --show --out results_solo.pkl --eval segm
- 测试之前要把自己的数据集保存到mmdet/datasets/,否则会报错:
KeyError: 'YourDataset is not in the dataset registry'
①在mmdet/datasets/下创建your_data.py文件:
from .coco import CocoDataset
from .registry import DATASETS

@DATASETS.register_module
class your_data(CocoDataset):
    CLASSES = ['class1','class2','class3'...]
②修改mmdet/datasets/–init–.py文件,添加自己的数据集
from .builder import build_dataset
from .cityscapes import CityscapesDataset
from .coco import CocoDataset
from .custom import CustomDataset
from .dataset_wrappers import ConcatDataset, RepeatDataset
from .loader import DistributedGroupSampler, GroupSampler, build_dataloader
from .registry import DATASETS
from .voc import VOCDataset
from .wider_face import WIDERFaceDataset
from .xml_style import XMLDataset
from .your_data import your_data   #your_data

__all__ = [
    'CustomDataset', 'XMLDataset', 'CocoDataset', 'VOCDataset',
    'CityscapesDataset', 'GroupSampler', 'DistributedGroupSampler',
    'build_dataloader', 'ConcatDataset', 'RepeatDataset', 'WIDERFaceDataset',
    'DATASETS', 'build_dataset', 'your_data'
]
- 修改你选择的CONFIG_FILE
# model settings
model = dict(
    type='SOLOv2',
    pretrained='torchvision://resnet50',
    backbone=dict(
        type='ResNet',
        depth=50,
        num_stages=4,
        out_indices=(0, 1, 2, 3), # C2, C3, C4, C5
        frozen_stages=1,
        style='pytorch',
        dcn=dict(
            type='DCN',
            deformable_groups=1,
            fallback_on_stride=False),
        stage_with_dcn=(False, True, True, True)),
    neck=dict(
        type='FPN',
        in_channels=[256, 512, 1024, 2048],
        out_channels=256,
        start_level=0,
        num_outs=5),
    bbox_head=dict(
        type='SOLOv2LightHead',
        num_classes=81,    # 修改,种类数+背景,例如COCO数据集80个类,此处为81
        in_channels=256,
        stacked_convs=3,
        use_dcn_in_tower=True,
        type_dcn='DCN',
        seg_feat_channels=256,
        strides=[8, 8, 16, 32, 32],
        scale_ranges=((1, 64), (32, 128), (64, 256), (128, 512), (256, 2048)),
        sigma=0.2,
        num_grids=[40, 36, 24, 16, 12],
        ins_out_channels=128,
        loss_ins=dict(
            type='DiceLoss',
            use_sigmoid=True,
            loss_weight=3.0),
        loss_cate=dict(
            type='FocalLoss',
            use_sigmoid=True,
            gamma=2.0,
            alpha=0.25,
            loss_weight=1.0)),
    mask_feat_head=dict(
            type='MaskFeatHead',
            in_channels=256,
            out_channels=128,
            start_level=0,
            end_level=3,
            num_classes=128,  # 注意这里不要改
            norm_cfg=dict(type='GN', num_groups=32, requires_grad=True)),
    )
# training and testing settings
train_cfg = dict()
test_cfg = dict(
    nms_pre=500,
    score_thr=0.1,
    mask_thr=0.5,
    update_thr=0.05,
    kernel='gaussian',  # gaussian/linear
    sigma=2.0,
    max_per_img=100)
# dataset settings
dataset_type = 'your_data'   # 我的数据集名称
data_root = '.../SOLO/data/your_data'   # 数据集路径
img_norm_cfg = dict(
    mean=[123.675, 116.28, 103.53], std=[58.395, 57.12, 57.375], to_rgb=True)
train_pipeline = [
    dict(type='LoadImageFromFile'),
    dict(type='LoadAnnotations', with_bbox=True, with_mask=True),
    dict(type='Resize',
         img_scale=[(852, 512), (852, 480), (852, 448),   # 可以修改图片大小
                   (852, 416), (852, 384), (852, 352)],
         multiscale_mode='value',
         keep_ratio=True),
    dict(type='RandomFlip', flip_ratio=0.5),
    dict(type='Normalize', **img_norm_cfg),
    dict(type='Pad', size_divisor=32),
    dict(type='DefaultFormatBundle'),
    dict(type='Collect', keys=['img', 'gt_bboxes', 'gt_labels', 'gt_masks']),
]
test_pipeline = [
    dict(type='LoadImageFromFile'),
    dict(
        type='MultiScaleFlipAug',
        img_scale=(852, 512),
        flip=False,
        transforms=[
            dict(type='Resize', keep_ratio=True),
            dict(type='RandomFlip'),
            dict(type='Normalize', **img_norm_cfg),
            dict(type='Pad', size_divisor=32),
            dict(type='ImageToTensor', keys=['img']),
            dict(type='Collect', keys=['img']),
        ])
]
data = dict(
    imgs_per_gpu=2,  # #每张gpu训练多少张图片  batch_size = gpu_num(训练使用gpu数量) * imgs_per_gpu
    workers_per_gpu=2,
    train=dict(
        type=dataset_type,
        ann_file=data_root + 'annotations/train.json',   # 读取训练数据集
        img_prefix=data_root + 'train/',
        pipeline=train_pipeline),
    val=dict(
        type=dataset_type,
        ann_file=data_root + 'annotations/val.json',   # 读取测试数据集
        img_prefix=data_root + 'val/',
        pipeline=test_pipeline),
    test=dict(
        type=dataset_type,
        ann_file=data_root + 'annotations/test.json',
        img_prefix=data_root + 'test/',
        pipeline=test_pipeline))
# optimizer
optimizer = dict(type='SGD', lr=0.01, momentum=0.9, weight_decay=0.0001)  # lr = 0.00125*batch_size
optimizer_config = dict(grad_clip=dict(max_norm=35, norm_type=2))
# learning policy
lr_config = dict(
    policy='step',
    warmup='linear',
    warmup_iters=500,
    warmup_ratio=0.01,
    step=[27, 33])
checkpoint_config = dict(interval=1)
# yapf:disable
log_config = dict(
    interval=50,
    hooks=[
        dict(type='TextLoggerHook'),
        # dict(type='TensorboardLoggerHook') # 取消注释可以开启Tensorboard
    ])
# yapf:enable
# runtime settings
total_epochs = 36  # 总的训练epoch
device_ids = range(8)
dist_params = dict(backend='nccl')
log_level = 'INFO'
work_dir = './work_dirs/solov2_light_512_dcn_release_r50_fpn_8gpu_1x'   # 存储模型路径
load_from = None # 改这里调整预训练模型
resume_from = None
workflow = [('train', 1)]
接下来运行测试命令,开始测试
 后面evaluate segm没成功,报错:
IndexError: list index out of range
可能是我数据集的问题
训练自己的数据集
python tools/train.py ${CONFIG_FILE}

Example:
python tools/train.py configs/solo/solo_r50_fpn_8gpu_1x.py
训练碰到的errors
UnicodeDecodeError: 'gbk' codec can't decode byte 0x9f in position 519: illegal multibyte sequence
改E:\Anaconda3\envs\solo\lib\site-packages\mmcv\utils\config.py的123行:with open(filename, 'r') as f:为with open(filename, 'r', encoding='utf-8') as f:RuntimeError: Expected number of channels in input to be divisible by num_groups, but got input of shape [2, 20, 120, 120] and num_groups=32
这是因为改了config文件里的第二个num_classes,不要改OSError: symbolic link privilege not held
以管理员身份运行IDE
模型测试
命令:
python tools/test_ins.py configs/solov2/solov2_light_448_r34_fpn_8gpu_3x.py work_dirs/SOLOv2_LIGHT_release_R34_fpn_8gpu_3x/epoch_36.pth --show --out results_solo.pkl --eval segm
终端显示:
...
[>>>>>>>>>>>>>>>>>>>>>>>>>>>>>>>>>>>>>>>>>>>>>>>>>>] 14/14, 0.3 task/s, elapsed: 53s, ETA:     0s
writing results to results_solo.pkl
Starting evaluate segm
Loading and preparing results...
DONE (t=0.06s)
creating index...
index created!
Traceback (most recent call last):
  File "tools/test_ins.py", line 269, in
    main()
  File "tools/test_ins.py", line 247, in main
    coco_eval(result_files, eval_types, dataset.coco)
  File "d:\user\zhy\solo\mmdet\core\evaluation\coco_utils.py", line 44, in coco_eval
    cocoEval = COCOeval(coco, coco_dets, iou_type)
  File "D:\Software\Anaconda3\envs\zhy_solo\lib\site-packages\pycocotools\cocoeval.py", line 76, in __init__
    self.params = Params(iouType=iouType) # parameters
  File "D:\Software\Anaconda3\envs\zhy_solo\lib\site-packages\pycocotools\cocoeval.py", line 527, in __init__
    self.setDetParams()
  File "D:\Software\Anaconda3\envs\zhy_solo\lib\site-packages\pycocotools\cocoeval.py", line 507, in setDetParams
    self.iouThrs = np.linspace(.5, 0.95, np.round((0.95 - .5) / .05) + 1, endpoint=True)
  File "<__array_function__ internals>", line 6, in linspace
  File "D:\Software\Anaconda3\envs\zhy_solo\lib\site-packages\numpy\core\function_base.py", line 120, in linspace
    num = operator.index(num)
TypeError: 'numpy.float64' object cannot be interpreted as an integer
这个错误需要把
pycocotools库下的cocoeval.py()中
506        self.iouThrs = np.linspace(.5, 0.95, np.round((0.95 - .5) / .05) + 1, endpoint=True)
507        self.recThrs = np.linspace(.0, 1.00, np.round((1.00 - .0) / .01) + 1, endpoint=True)
改为
     self.iouThrs = np.linspace(.5, 0.95, 10, endpoint=True)
     self.recThrs = np.linspace(.0, 1.00, 101, endpoint=True)
参考训练数据出现TypeError: ‘numpy.float64’ object cannot be interpreted as an integer错误
成功,终端显示:
Starting evaluate segm
Loading and preparing results...
DONE (t=0.06s)
creating index...
index created!
Running per image evaluation...
Evaluate annotation type *segm*
DONE (t=0.17s).
Accumulating evaluation results...
DONE (t=0.02s).
 Average Precision  (AP) @[ IoU=0.50:0.95 | area=   all | maxDets=100 ] = 0.054
 Average Precision  (AP) @[ IoU=0.50      | area=   all | maxDets=100 ] = 0.130
 Average Precision  (AP) @[ IoU=0.75      | area=   all | maxDets=100 ] = 0.033
 Average Precision  (AP) @[ IoU=0.50:0.95 | area= small | maxDets=100 ] = -1.000
 Average Precision  (AP) @[ IoU=0.50:0.95 | area=medium | maxDets=100 ] = 0.000
 Average Precision  (AP) @[ IoU=0.50:0.95 | area= large | maxDets=100 ] = 0.054
 Average Recall     (AR) @[ IoU=0.50:0.95 | area=   all | maxDets=  1 ] = 0.062
 Average Recall     (AR) @[ IoU=0.50:0.95 | area=   all | maxDets= 10 ] = 0.089
 Average Recall     (AR) @[ IoU=0.50:0.95 | area=   all | maxDets=100 ] = 0.094
 Average Recall     (AR) @[ IoU=0.50:0.95 | area= small | maxDets=100 ] = -1.000
 Average Recall     (AR) @[ IoU=0.50:0.95 | area=medium | maxDets=100 ] = 0.000
 Average Recall     (AR) @[ IoU=0.50:0.95 | area= large | maxDets=100 ] = 0.094
* 修改预训练模型
SOLO默认采用在ImageNet上预训练的模型,可以根据自身需求调整预训练模型,比如这里改为COCO数据集上预训练模型。
- 修改config文件的checkpoint第135行为
load_from = './checkpoints/coco_pretrained_weights.pth'(这个checkpoint文件自己去准备)
* 进一步修改训练类别
如果需要修改预训练模型类别数
- 查看模型state_dict的值,确定要修改的key
def main():
    import torch
    model_coco = torch.load("SOLOv2_LIGHT_448_R50_3x.pth") # weight
    for key, value in model_coco["state_dict"].items():
        print(key)

if __name__ == '__main__':
    main()
- 终端会显示模型的key值,参考下面这个cascade网络的修改方法
# cascade_rcnn_r50_fpn_1x_20190501-3b6211ab.pth
    model_coco["state_dict"]["bbox_head.0.fc_cls.weight"] = \
    model_coco["state_dict"]["bbox_head.0.fc_cls.weight"][:num_classes, :]

    model_coco["state_dict"]["bbox_head.1.fc_cls.weight"] = \
    model_coco["state_dict"]["bbox_head.1.fc_cls.weight"][:num_classes, :]

    model_coco["state_dict"]["bbox_head.2.fc_cls.weight"] = \
    model_coco["state_dict"]["bbox_head.2.fc_cls.weight"][:num_classes, :]

    model_coco["state_dict"]["bbox_head.0.fc_cls.bias"] = \
    model_coco["state_dict"]["bbox_head.0.fc_cls.bias"][:num_classes]

    model_coco["state_dict"]["bbox_head.1.fc_cls.bias"] = \
    model_coco["state_dict"]["bbox_head.1.fc_cls.bias"][:num_classes]

    model_coco["state_dict"]["bbox_head.2.fc_cls.bias"] = \
    model_coco["state_dict"]["bbox_head.2.fc_cls.bias"][:num_classes]
    # save new model
    torch.save(model_coco, "cascade_rcnn_r50_fpn_1x_coco_pretrained_weights_classes_%d.pth" % num_classes)
if __name__ == "__main__":
    main()
我改的是
bbox_head.solo_cate.weight
bbox_head.solo_cate.bias
这两个,不确定是否改对了:
import torch

num_classes = 20
model_coco = torch.load("SOLOv2_LIGHT_448_R50_3x.pth")

# weight
model_coco["state_dict"]["bbox_head.solo_cate.weight"] = model_coco["state_dict"]["bbox_head.solo_cate.weight"][
                                                        :num_classes, :]
# bias
model_coco["state_dict"]["bbox_head.solo_cate.bias"] = model_coco["state_dict"]["bbox_head.solo_cate.bias"][:num_classes]

# save new model
torch.save(model_coco, "coco_pretrained_weights_classes_%d.pth" % num_classes)
- 修改对应config文件的load_from行,然后开始训练
- 日志可视化
python tools/analyze_logs.py plot_curve your.log.json --keys loss_ins loss_cate loss --out losses.pdf可以看出模型收敛会变快

References
- SOLOv2-Github
- 跑通SOLOV1-V2实例分割代码,并训练自己的数据集
- mmdetection训练自己的数据集
- MMDetection笔记:修改预训练模型权重类别数
