Android系统启动流程
本文讲解Android系统在启动过程中的关键动作,摈弃特定平台之间的差异,讨论共性的部分,至于启动更加详细的过程,需要结合代码分析,这里给出流程框架,旨在让大家对开机过程更明了。各个平台启动流程基本类似,但代码追踪却有较大区别。高通,MTK,Sprd各有不同处理,均有各自的一套源码,本文代码以展讯平台SC7710系列Android4.1源码进行追踪。
1,Android启动概述
Android系统启动基本可分为3个阶段:Bootloader启动,linux启动,Android启动。
1.1,Bootloader启动
系统引导bootloader(bootable/bootloader/* u-boot/*),加电后,CPU先执行bootloader程序,正常启动系统,加载boot.img,中包含内核。
源码:bootable/bootloader/* , 说明:加电后,CPU将先执行bootloader程序,此处有三种选择:
a: 开机按Camera+Power启动到fastboot,即命令或SD卡烧写模式,不加载内核及文件系统,此处可以进行工厂模式的烧写
b: 开机按Home+Power启动到recovery模式,加载recovery.img,recovery.img包含内核,基本的文件系统,用于工程模式的烧写
c:开机按Power,正常启动系统,加载boot.img,boot.img包含内核,基本文件系统,用于正常启动手机(以下只分析正常启动的情况)
1.2,linux启动
由bootloader加载kernel,kernel经自解压,初始化,载入built-in驱动程序,完成启动。kernel启动后会创建若干内核线程,之后装入并执行程序/sbin/init/,载入init process,切换至user-space。
1.3,Android启动
1.3.1,init进程启动
源码:system/core/init/*
配置文件:system/rootdir/init.rc
说明:init是一个由内核启动的用户级进程,它按照init.rc中的设置执行:启动服务(这里的服务指linux底层服务,如adbd提供adb支持,vold提供SD卡挂载等),执行命令和按其中的配置语句执行相应功能。
1.3.2,zygote服务启动
源码:frameworks/base/cmds/app_main.cpp等。
说明:zygote是一个在init.rc中被指定启动的服务,该服务对应的命令是/system/bin/app_process。
作用:建立Java Runtime,建立虚拟机;建立Socket接收ActivityManangerService的请求,用于Fork应用程序;启动System Server。
1.3.3,systemserver服务启动
源码:frameworks/base/services/java/com/android/server/SystemServer.java
说明:被zygote启动,通过System Manager管理android的服务(这里的服务指frameworks/base/services下的服务,如卫星定位服务,剪切板服务等)。
1.3.4,launcher桌面启动
源码:ActivityManagerService.java为入口,packages/apps/launcher*实现。
说明:系统启动成功后SystemServer使用xxx.systemReady()通知各个服务,系统已经就绪,桌面程序Home就是在ActivityManagerService.systemReady()通知的过程中建立的,最终调用startHomeActivityLocked()启launcher。
1.3.5,lockscreen启动
源码:frameworks/policies/base/phone/com/android/internal/policy/impl/*lock*
说明:系统启动成功后SystemServer调用wm.systemReady()通知WindowManagerService,进而调用PhoneWindowManager,最终通过LockPatternKeyguardView显示解锁界面,跟踪代码可以看到解锁界面并不是一个Activity,这是只是向特定层上绘图,其代码了存放在特殊的位置。
1.3.6,othersapp启动
源码:frameworks/base/services/java/com/android/server/am/ActivityManagerService.java
说明:系统启动成功后SystemServer调用ActivityManagerNative.getDefault().systemReady()通知ActivityManager启动成功,ActivityManager会通过置变量mBooting,通知它的另一线程,该线程会发送广播android.intent.action.BOOT_COMPLETED以告知已注册的第三方程序在开机时自动启动。
2,bootloader启动详细分析
2.1,Bootloader的定义和种类
简单地说,BootLoader是在操作系统运行之前运行的一段程序,它可以将系统的软硬件环境带到一个合适状态,为运行操作系统做好准备。这样描述是比较抽象的,但是它的任务确实不多,终极目标就是把OS拉起来运行。在嵌入式系统世界里存在各种各样的Bootloader,种类划分也有多种方式。除了按照处理器体系结构不同划分以外,还有功能复杂程度的不同。
先区分一下Bootloader和Monitor[l1] : 严格来说,Bootloader只是引导OS运行起来的代码;而Monitor另外还提供了很多的命令行接口,可以进行调试、读写内存、烧写Flash、配置环境变量等。在开发过程中Monitor提供了很好地调试功能,不过在开发结束之后,可以完全将其设置成一个Bootloader。所以习惯上将其叫做Bootloader。
| Bootloader |
Monitor |
描述 |
X86 |
ARM |
PowerPC |
| U-boot |
是 |
通用引导程序 |
是 |
是 |
是 |
| RedBoot |
是 |
基于eCos的引导程序 |
是 |
是 |
是 |
| BLOB |
否 |
LART(主板)等硬件平台的引导程序 |
否 |
是 |
否 |
| LILO |
否 |
Linux磁盘引导程序 |
是 |
否 |
否 |
| GRUB |
否 |
GNU的LILO替代程序 |
是 |
否 |
否 |
| Loadlin |
否 |
从DOS引导Linux |
是 |
否 |
否 |
| Vivi |
是 |
韩国mizi 公司开发的bootloader |
否 |
是 |
否 |
更多bootloader还有:ROLO、Etherboot、ARMboot 、LinuxBIOS等。
对于每种体系结构,都有一系列开放源码Bootloader可以选用:
X86:X86的工作站和服务器上一般使用LILO和GRUB。
ARM:最早有为ARM720处理器开发板所做的固件,又有了armboot,StrongARM平台的blob,还有S3C2410处理器开发板上的vivi等。现在armboot已经并入了U-Boot,所以U-Boot也支持ARM/XSCALE平台。U-Boot已经成为ARM平台事实上的标准Bootloader。
PowerPC:最早使用于ppcboot,不过现在大多数直接使用U-boot。
MIPS:最早都是MIPS开发商自己写的bootloader,不过现在U-boot也支持MIPS架构。
M68K:Redboot能够支持m68k系列的系统。
2.2,Arm特定平台的bootloader
到目前为止,我们公司已经做过多个Arm平台的android方案,包括:marvell(pxa935)、informax(im9815)、mediatek(mt6516/6517)、broadcom(bcm2157)。由于不同处理器芯片厂商对arm core的封装差异比较大,所以不同的arm处理器,对于上电引导都是由特定处理器芯片厂商自己开发的程序,这个上电引导程序通常比较简单,会初始化硬件,提供下载模式等,然后才会加载通常的bootloader。
下面是几个arm平台的bootloader方案:
marvell(pxa935) : bootROM + OBM [l4] + BLOB
informax(im9815) : bootROM + barbox + U-boot
mediatek(mt6516/6517) : bootROM + pre-loader[l5] + U-boot
broadcom(bcm2157) : bootROM + boot1/boot2 + U-boot
为了明确U-boot之前的两个loader的作用,下面以broadcom平台为例,看下在上电之后到U-boot的流程,如图1.2.1:
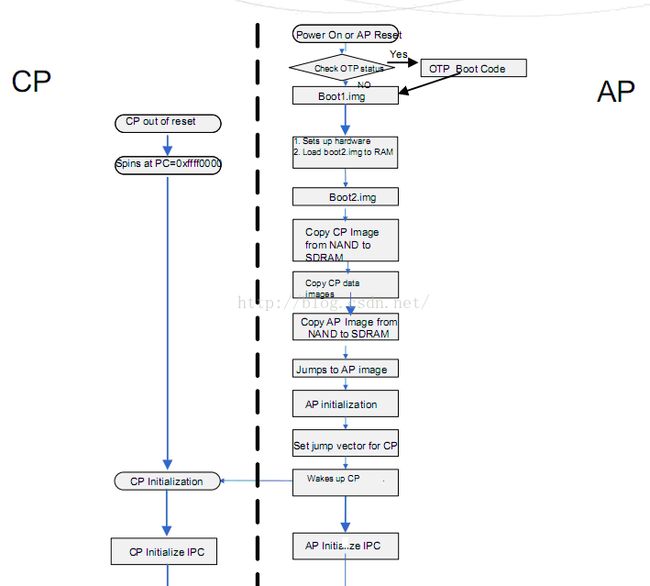
图1.2.1 broadcom平台上电流程
2.3,uboot启动流程详解
最常用的bootloader还是U-boot,可以引导多种操作系统,支持多种架构的CPU。它支持的操作系统有:Linux、NetBSD、VxWorks、QNX、RTEMS、ARTOS、LynxOS等,支持的CPU架构有:ARM、PowerPC、MISP、X86、NIOS、Xscale等。手机系统不像其他的嵌入式系统,它还需要在启动的过程中关心CP的启动,这个时候就涉及到CP的image和唤醒时刻,而一般的嵌入式系统的uboot只负责引导OS内核。所以这里我们也暂不关心CP的启动,而主要关心AP侧。
从上面第二小节中可以看出,bootloader通常都包含有处理器厂商开发的上电引导程序,不过也不是所有的处理都是这样,比如三星的S3C24X0系列,它的bootROM直接跳到U-boot中执行,首先由bootROM将U-boot的前4KB拷贝到处理器ISRAM,接着在U-boot的前4KB中必须保证要完成的两项主要工作:初始化DDR,nand和nand控制器,接着将U-boot剩余的code拷贝到SDRAM中,然后跳到SDRAM的对应地址上去继续跑U-boot。
所以U-boot的启动过程,大致上可以分成两个阶段:第一阶段,汇编代码;第二阶段,c代码。
2.3.1,汇编代码阶段
U-boot的启动由u-boot/arch/arm/cpu/xxx/u-boot.lds开始,其引导调用u-boot/arch/arm/cpu/xxx/start.S。u-boot.lds:
OUTPUT_FORMAT("elf32-littlearm", "elf32-littlearm", "elf32-littlearm")
OUTPUT_ARCH(arm)
ENTRY(_start)
SECTIONS
{
    . = 0x00000000;

    . = ALIGN(4);
    .text :
    {
        arch/arm/cpu/arm920t/start.o    (.text)//调用对应的start.S,start.o由start.S编译生成
        *(.text)
    }

    . = ALIGN(4);
    .rodata : { *(SORT_BY_ALIGNMENT(SORT_BY_NAME(.rodata*))) }

    . = ALIGN(4);
    .data : {
        *(.data)
    }

    . = ALIGN(4);

    . = .;
    __u_boot_cmd_start = .;
    .u_boot_cmd : { *(.u_boot_cmd) }
    __u_boot_cmd_end = .;

    . = ALIGN(4);

    .rel.dyn : {
        __rel_dyn_start = .;
        *(.rel*)
        __rel_dyn_end = .;
    }

    .dynsym : {
        __dynsym_start = .;
        *(.dynsym)
    }

    .bss __rel_dyn_start (OVERLAY) : {
        __bss_start = .;
        *(.bss)
         . = ALIGN(4);
        _end = .;
    }

    /DISCARD/ : { *(.dynstr*) }
    /DISCARD/ : { *(.dynamic*) }
    /DISCARD/ : { *(.plt*) }
    /DISCARD/ : { *(.interp*) }
    /DISCARD/ : { *(.gnu*) }
}
include $(TOPDIR)/config.mk

LIB = $(obj)lib$(CPU).o

START   = start.o

COBJS-y += cpu.o
COBJS-$(CONFIG_USE_IRQ) += interrupts.o

SRCS    := $(START:.o=.S) $(SOBJS:.o=.S) $(COBJS-y:.o=.c)
OBJS    := $(addprefix $(obj),$(COBJS-y) $(SOBJS))
START   := $(addprefix $(obj),$(START))

all:    $(obj).depend $(START) $(LIB)

$(LIB): $(OBJS)
    $(call cmd_link_o_target, $(OBJS))

#########################################################################

# defines $(obj).depend target
include $(SRCTREE)/rules.mk

sinclude $(obj).depend
所以U-boot的第一条指令从u-boot/arch/arm/cpu/xxx/start.S文件开始,第一阶段主要做了如下事情:
(1). 设置CPU进入SVC模式(系统管理模式),cpsr[4:0]=0xd3。
(2). 关中断,INTMSK=0xFFFFFFFF, INTSUBMSK=0x3FF。
(3). 关看门狗,WTCON=0x0。
(4). 调用s3c2410_cache_flush_all函数,使TLBS,I、D Cache,WB中数据失效。
(5). 时钟设置CLKDIVN=0x3 , FCLK:HCLK:PCLK = 1:2:4。
(6). 读取mp15的c1寄存器,将最高两位改成11,表示选择了异步时钟模型。
(7). 检查系统的复位状态,以确定是不是从睡眠唤醒。
#include
#include
#include

.globl _start
_start: b   start_code
    ldr pc, _undefined_instruction
    ldr pc, _software_interrupt
    ldr pc, _prefetch_abort
    ldr pc, _data_abort
    ldr pc, _not_used
    ldr pc, _irq
    ldr pc, _fiq

......

//开始的一些初始化操作
start_code:
    /*
     * set the cpu to SVC32 mode
     */
    mrs r0, cpsr
    bic r0, r0, #0x1f
    orr r0, r0, #0xd3
    msr cpsr, r0

    bl  coloured_LED_init
    bl  red_LED_on

......

    /*
     * we do sys-critical inits only at reboot,
     * not when booting from ram!
     */
#ifndef CONFIG_SKIP_LOWLEVEL_INIT
    bl  cpu_init_crit //重点函数
#endif

/* Set stackpointer in internal RAM to call board_init_f */
/*board.c的board_init_f()函数*/
call_board_init_f:
    ldr sp, =(CONFIG_SYS_INIT_SP_ADDR)
    bic sp, sp, #7 /* 8-byte alignment for ABI compliance */
    ldr r0,=0x00000000
    bl  board_init_f//board初始化


    .globl  relocate_code
relocate_code:
    mov r4, r0  /* save addr_sp */
    mov r5, r1  /* save addr of gd */
    mov r6, r2  /* save addr of destination */

    /* Set up the stack                         */
stack_setup:
    mov sp, r4

    adr r0, _start
    cmp r0, r6
    beq clear_bss       /* skip relocation */
    mov r1, r6          /* r1 <- scratch for copy_loop */
    ldr r2, _TEXT_BASE
    ldr r3, _bss_start_ofs
    add r2, r0, r3      /* r2 <- source end address      */

copy_loop:
    ldmia   r0!, {r9-r10}       /* copy from source address [r0]    */
    stmia   r1!, {r9-r10}       /* copy to   target address [r1]    */
    cmp r0, r2          /* until source end address [r2]    */
    blo copy_loop

#ifndef CONFIG_PRELOADER
    /*
     * fix .rel.dyn relocations
     */
    ldr r0, _TEXT_BASE      /* r0 <- Text base */
    sub r9, r6, r0      /* r9 <- relocation offset */
    ldr r10, _dynsym_start_ofs  /* r10 <- sym table ofs */
    add r10, r10, r0        /* r10 <- sym table in FLASH */
    ldr r2, _rel_dyn_start_ofs  /* r2 <- rel dyn start ofs */
    add r2, r2, r0      /* r2 <- rel dyn start in FLASH */
    ldr r3, _rel_dyn_end_ofs    /* r3 <- rel dyn end ofs */
    add r3, r3, r0      /* r3 <- rel dyn end in FLASH */
fixloop:
    ldr r0, [r2]        /* r0 <- location to fix up, IN FLASH! */
    add r0, r0, r9      /* r0 <- location to fix up in RAM */
    ldr r1, [r2, #4]
    and r7, r1, #0xff
    cmp r7, #23         /* relative fixup? */
    beq fixrel
    cmp r7, #2          /* absolute fixup? */
    beq fixabs
    /* ignore unknown type of fixup */
    b   fixnext
fixabs:
    /* absolute fix: set location to (offset) symbol value */
    mov r1, r1, LSR #4      /* r1 <- symbol index in .dynsym */
    add r1, r10, r1     /* r1 <- address of symbol in table */
    ldr r1, [r1, #4]        /* r1 <- symbol value */
    add r1, r1, r9      /* r1 <- relocated sym addr */
    b   fixnext
fixrel:
    /* relative fix: increase location by offset */
    ldr r1, [r0]
    add r1, r1, r9
fixnext:
    str r1, [r0]
    add r2, r2, #8      /* each rel.dyn entry is 8 bytes */
    cmp r2, r3
    blo fixloop
#endif

clear_bss:
#ifndef CONFIG_PRELOADER
    ldr r0, _bss_start_ofs
    ldr r1, _bss_end_ofs
    ldr r3, _TEXT_BASE      /* Text base */
    mov r4, r6          /* reloc addr */
    add r0, r0, r4
    add r1, r1, r4
    mov r2, #0x00000000     /* clear                */

clbss_l:str r2, [r0]        /* clear loop...            */
    add r0, r0, #4
    cmp r0, r1
    bne clbss_l

    bl coloured_LED_init
    bl red_LED_on
#endif

/*
 * We are done. Do not return, instead branch to second part of board
 * initialization, now running from RAM.
 */
#ifdef CONFIG_NAND_SPL
    ldr     r0, _nand_boot_ofs
    mov pc, r0

_nand_boot_ofs:
    .word nand_boot
#else
    ldr r0, _board_init_r_ofs
    adr r1, _start
    add lr, r0, r1
    add lr, lr, r9
    /* setup parameters for board_init_r */
    mov r0, r5      /* gd_t */
    mov r1, r6      /* dest_addr */
    /* jump to it ... */
    mov pc, lr
/*board_init_r 此处走至u-boot\arch\arm\lib\board.c的board_init_r()函数 */
_board_init_r_ofs:
    .word board_init_r - _start
#endif
/*至此走至C代码的阶段*/
_rel_dyn_start_ofs:
    .word __rel_dyn_start - _start
_rel_dyn_end_ofs:
    .word __rel_dyn_end - _start
_dynsym_start_ofs:
    .word __dynsym_start - _start

......

#endif 根据这几条语句来判断系统是从nand启动的还是直接将程序下载到SDRAM中运行的,这里涉及到运行时域 和位置无关代码的概念,ldr r0,_TEXT_BASE的作用是将config.mk文件中定义的TEXT_BASE值(0x33f80000)装载到r0中,adr r1,_start该指令是条伪指令,在编译的时候会被转换成ADD或SUB指令根据当前pc值计算出_start标号的地址,这样的话就可以知道当前程序在什么地址运行(位置无关代码:做成程序的所有指令都是相对寻址的指令,包括跳转指令等,这样代码就可以不在链接所指定的地址上运行)。在上电之后,系统从nand启动,这里得到r0和r1值是不一样的,r0=0x33f80000,而r1=0x00000000。所以接下来会执行cpu_init_crit函数。
cpu_init_crit函数,主要完成了两个工作:首先使ICache and Dcache,TLBs中早期内容失效,再设置p15 control register c1,关闭MMU,Dcache,但是打开了Icache和Fault checking,(要求mmu和Dcache是必须要关闭的,而Icache可以打开可以关闭);其次调用/board/nextdvr2410/memsetup.S文件中的memsetup函数来建立对SDRAM的访问时序。
Relocate函数,加载nand flash中的uboot到SDRAM中,代码会加载到0x33f80000开始的地址,空间大小是512。
//这里参考的是展讯平台7710的源代码,所以并无start_armboot函数,取而代之的是board_init_r函数。请知悉。
ldr pc, _start_armboot
_start_armboot: .word start_armboot
这里将会进入第二阶段的c代码部分:board_init_r()函数,/u-boot/arch/arm/lib/board.c。
2.3.2,C代码阶段
先看/u-boot/arch/arm/lib/board.c的board_init_r()函数:
void board_init_r (gd_t *id, ulong dest_addr)
{
......
/**一系列初始化操作之后 重点为do_cboot(NULL, 0, 1, NULL)和main_loop ()*/
    board_init();   /* Setup chipselects */

  boot_pwr_check();

#ifdef CONFIG_SERIAL_MULTI
    serial_initialize();
#endif

    debug ("Now running in RAM - U-Boot at: %08lx\n", dest_addr);

#ifdef CONFIG_LOGBUFFER
    logbuff_init_ptrs ();
#endif
#ifdef CONFIG_POST
    post_output_backlog ();
#endif

    /* The Malloc area is immediately below the monitor copy in DRAM */
    malloc_start = dest_addr - TOTAL_MALLOC_LEN;
#ifdef SPRD_EVM_TAG_ON
        SPRD_EVM_TAG(4);
#endif
    mem_malloc_init (malloc_start, TOTAL_MALLOC_LEN);
#ifdef SPRD_EVM_TAG_ON
        SPRD_EVM_TAG(5);
#endif
    boot_pwr_check();

#if !defined(CONFIG_SYS_NO_FLASH)
    puts ("FLASH: ");

    if ((flash_size = flash_init ()) > 0) {
# ifdef CONFIG_SYS_FLASH_CHECKSUM
        print_size (flash_size, "");
        /*
         * Compute and print flash CRC if flashchecksum is set to 'y'
         *
         * NOTE: Maybe we should add some WATCHDOG_RESET()? XXX
         */
        s = getenv ("flashchecksum");
        if (s && (*s == 'y')) {
            printf ("  CRC: %08X",
                crc32 (0, (const unsigned char *) CONFIG_SYS_FLASH_BASE, flash_size)
            );
        }
        putc ('\n');
# else  /* !CONFIG_SYS_FLASH_CHECKSUM */
        print_size (flash_size, "\n");
# endif /* CONFIG_SYS_FLASH_CHECKSUM */
    } else {
        puts (failed);
        hang ();
    }
#endif
    boot_pwr_check();

#if !defined(CONFIG_EMMC_BOOT)
#if defined(CONFIG_CMD_NAND)
    puts ("NAND:  ");
    ret = nand_init();      /* go init the NAND */
        if (ret) {
            puts ("NAND init error  ");
            while(1);
        }
#endif
#endif

    boot_pwr_check();
#ifdef SPRD_EVM_TAG_ON
        SPRD_EVM_TAG(6);
#endif

#if defined(CONFIG_CMD_ONENAND)
#if !(defined CONFIG_TIGER && defined CONFIG_EMMC_BOOT)
    onenand_init();
#endif
#endif

#ifdef CONFIG_GENERIC_MMC
       puts("MMC:   ");
       mmc_initialize(bd);
#endif

#ifdef CONFIG_HAS_DATAFLASH
    AT91F_DataflashInit();
    dataflash_print_info();
#endif

#ifdef CONFIG_EMMC_BOOT
    mmc_legacy_init(1);
#endif
    /* initialize environment */
    env_relocate ();
    boot_pwr_check();

#ifdef CONFIG_VFD
    /* must do this after the framebuffer is allocated */
    drv_vfd_init();
#endif /* CONFIG_VFD */

/*tempaily use for tiger to avoid died as refreshing LCD*/

    /* IP Address */
    gd->bd->bi_ip_addr = getenv_IPaddr ("ipaddr");

    stdio_init ();  /* get the devices list going. */
    boot_pwr_check();

    jumptable_init ();
    boot_pwr_check();

#if defined(CONFIG_API)
    /* Initialize API */
    api_init ();
#endif
    char fake[4]="fak";
    setenv("splashimage", fake);

    console_init_r ();  /* fully init console as a device */
    boot_pwr_check();

#if defined(CONFIG_ARCH_MISC_INIT)
    /* miscellaneous arch dependent initialisations */
    arch_misc_init ();
#endif
#if defined(CONFIG_MISC_INIT_R)
    /* miscellaneous platform dependent initialisations */
    misc_init_r ();
#endif

     /* set up exceptions */
    interrupt_init ();
    /* enable exceptions */
    enable_interrupts ();
    boot_pwr_check();

    /* Perform network card initialisation if necessary */
#if defined(CONFIG_DRIVER_SMC91111) || defined (CONFIG_DRIVER_LAN91C96)
    /* XXX: this needs to be moved to board init */
    if (getenv ("ethaddr")) {
        uchar enetaddr[6];
        eth_getenv_enetaddr("ethaddr", enetaddr);
        smc_set_mac_addr(enetaddr);
    }
#endif /* CONFIG_DRIVER_SMC91111 || CONFIG_DRIVER_LAN91C96 */

    /* Initialize from environment */
    if ((s = getenv ("loadaddr")) != NULL) {
        load_addr = simple_strtoul (s, NULL, 16);
    }
#if defined(CONFIG_CMD_NET)
    if ((s = getenv ("bootfile")) != NULL) {
        copy_filename (BootFile, s, sizeof (BootFile));
    }
#endif
    boot_pwr_check();
    //usb_eth_initialize(NULL);
#ifdef BOARD_LATE_INIT
    board_late_init ();
#endif
......

#ifdef SPRD_EVM_TAG_ON
        SPRD_EVM_TAG(11);
#endif
    extern int do_cboot(cmd_tbl_t *cmdtp, int flag, int argc, char *const argv[]);
    boot_pwr_check();

    do_cboot(NULL, 0, 1, NULL);//重点操作函数,此处走至u-boot\property\cmd_cboot.c
    /* main_loop() can return to retry autoboot, if so just run it again. */
    for (;;) {
        main_loop ();
    }

    /* NOTREACHED - no way out of command loop except booting */
} int boot_pwr_check(void)
{
static int total_cnt = 0;
if(!power_button_pressed())
total_cnt ++;
return total_cnt;
}
#define mdelay(_ms) udelay(_ms*1000)
int do_cboot(cmd_tbl_t *cmdtp, int flag, int argc, char *const argv[])
{
uint32_t key_mode = 0;
uint32_t key_code = 0;
volatile int i;
if(argc > 2)
goto usage;
#ifdef CONFIG_SC8830
if(cali_file_check())
calibration_detect(2);
#endif
#ifdef CONFIG_SC7710G2
{
extern void set_cp_emc_pad(void);
set_cp_emc_pad();
}
#endif
CHG_Init();
#ifdef CONFIG_SC8830
DCDC_Cal_ArmCore();
//DCDC_Cal_All(0);
#endif
#ifdef CONFIG_AUTOBOOT
normal_mode();//如果down的是autopoweron的uboot,这里会直接去正常开机
#endif
#ifdef CONFIG_SC7710G2
if(!pbint2_connected())
normal_mode();
#endif
boot_pwr_check();
#ifdef CONFIG_SC8800G
CHG_ShutDown();
if(charger_connected()){
mdelay(10);
CHG_TurnOn();
}else{
//根据sp8810.h里的LOW_BAT_VOL,如果电压低于3.5V,则直接power down
if(is_bat_low()){
printf("shut down again for low battery\n");
power_down_devices();
while(1)
;
}
}
#else
#ifndef CONFIG_MACH_CORI
if(is_bat_low()){
printf("shut down again for low battery\n");
mdelay(10000);
power_down_devices();
while(1)
;
}
#endif
#endif
boot_pwr_check();
board_keypad_init();//初始化键盘
boot_pwr_check();
#ifdef CONFIG_SPRD_SYSDUMP
write_sysdump_before_boot();
#endif
int recovery_init(void);
int ret =0;
ret = recovery_init();
if(ret == 1){
DBG("func: %s line: %d\n", __func__, __LINE__);
recovery_mode_without_update();
}else if(ret == 2){
#ifndef CONFIG_SC8830
try_update_modem(); //update img from mmc
#endif
normal_mode();
}
unsigned check_reboot_mode(void);
//获取寄存器里HW的rest标志位,得到当前的开机模式
//此处主要是异常重启,恢复出厂设置,关机闹钟等(没有按power键导致的开机)
unsigned rst_mode= check_reboot_mode();
//检查是否是recovery模式
if(rst_mode == RECOVERY_MODE){
DBG("func: %s line: %d\n", __func__, __LINE__);
recovery_mode();
}
else if(rst_mode == FASTBOOT_MODE){
DBG("func: %s line: %d\n", __func__, __LINE__);
fastboot_mode();
}else if(rst_mode == NORMAL_MODE){
normal_mode();
}else if(rst_mode == WATCHDOG_REBOOT){
watchdog_mode();
}else if(rst_mode == UNKNOW_REBOOT_MODE){
unknow_reboot_mode();
}else if(rst_mode == PANIC_REBOOT){
panic_reboot_mode();
}else if(rst_mode == ALARM_MODE){
int flag =alarm_flag_check();
if(flag == 1)
alarm_mode();
else if(flag == 2)
normal_mode();
}else if(rst_mode == SLEEP_MODE){
sleep_mode();
}else if(rst_mode == SPECIAL_MODE){
special_mode();
}else if(rst_mode == CALIBRATION_MODE){
calibration_detect(0);
}
#ifdef CONFIG_SC8810
// normal_mode();
#endif
DBG("func: %s line: %d\n", __func__, __LINE__);
if(charger_connected()){
DBG("%s: charger connected\n", __FUNCTION__);
#if defined (CONFIG_SP8810W) || defined(CONFIG_SC7710G2)
calibration_detect(1);
#endif
charge_mode();
}
//find the power up trigger
//如果按power键的“次数”达标了,认为这个是一次长按事件
else if(boot_pwr_check() >= get_pwr_key_cnt()){
DBG("%s: power button press\n", __FUNCTION__);
DBG("boot_pwr_check=%d,get_pwr_key_cnt=%d\n",boot_pwr_check(),get_pwr_key_cnt());
//go on to check other keys
mdelay(50);
for(i=0; i<10;i++){
key_code = board_key_scan();//获取另外一个按键
if(key_code != KEY_RESERVED)
break;
}
DBG("key_code %d\n", key_code);
//查找对应的按键码对应的开机模式
key_mode = check_key_boot(key_code);
switch(key_mode){
case BOOT_FASTBOOT:
fastboot_mode();
break;
case BOOT_RECOVERY:
recovery_mode();
break;
case BOOT_CALIBRATE:
engtest_mode();
return 0; //back to normal boot
break;
case BOOT_DLOADER:
dloader_mode();
break;
default:
break;//如果是正常开机模式,因为没有
}
}
else if(alarm_triggered() && alarm_flag_check()){
DBG("%s: alarm triggered\n", __FUNCTION__);
int flag =alarm_flag_check();
if(flag == 1){
//如果是闹钟触发导致的开机,则进入关机闹钟模式
alarm_mode();
}
else if(flag == 2){
normal_mode();//如果只按了power键。
}
}else{
#if BOOT_NATIVE_LINUX_MODEM
*(volatile u32*)CALIBRATION_FLAG = 0xca;
#endif
#if !defined (CONFIG_SC8830) && !defined(CONFIG_SC7710G2)
calibration_detect(0);
#endif
//if calibrate success, it will here
DBG("%s: power done again\n", __FUNCTION__);
power_down_devices();
while(1)
;
}
if(argc == 1){
DBG("func: %s line: %d\n", __func__, __LINE__);
normal_mode();
return 1;
}
if(argc == 2){
DBG("func: %s line: %d\n", __func__, __LINE__);
if(strcmp(argv[1],"normal") == 0){
normal_mode();
return 1;
}
DBG("func: %s line: %d\n", __func__, __LINE__);
if(strcmp(argv[1],"recovery") == 0){
recovery_mode();
return 1;
}
DBG("func: %s line: %d\n", __func__, __LINE__);
if(strcmp(argv[1],"fastboot") == 0){
fastboot_mode();
return 1;
}
DBG("func: %s line: %d\n", __func__, __LINE__);
if(strcmp(argv[1],"dloader") == 0){
dloader_mode();
return 1;
}
DBG("func: %s line: %d\n", __func__, __LINE__);
if(strcmp(argv[1],"charge") == 0){
//如果没有按power键,且插入了充电器,则进入充电模式
charge_mode();
return 1;
}
DBG("func: %s line: %d\n", __func__, __LINE__);
if(strcmp(argv[1],"caliberation") == 0){
calibration_detect(1);
return 1;
}
DBG("func: %s line: %d\n", __func__, __LINE__);
}
DBG("func: %s line: %d\n", __func__, __LINE__);
usage:
cmd_usage(cmdtp);
return 1;
} 接下来分析正常开机的流程也就是normal_mode(),其他几种开机流程与normal_mode()类似,不再一一分析。android共提供了多种mode:

void normal_mode(void)
{
#if defined (CONFIG_SC8810) || defined (CONFIG_SC8825) || defined (CONFIG_SC8830)
    //MMU_Init(CONFIG_MMU_TABLE_ADDR);
    vibrator_hw_init();//初始化马达
#endif
    set_vibrator(1);//起震,这个就是开机震的那一下

#ifndef UART_CONSOLE_SUPPORT
#ifdef CONFIG_SC7710G2
    extern int  serial1_SwitchToModem(void);
    serial1_SwitchToModem();
#endif
#endif

#if BOOT_NATIVE_LINUX
    vlx_nand_boot(BOOT_PART, CONFIG_BOOTARGS, BACKLIGHT_ON);
#else
    vlx_nand_boot(BOOT_PART, NULL, BACKLIGHT_ON);
#endif

}
最终将操作交给vlx_nand_boot(),其实现在u-boot/property/normal_nand_mode.c
void vlx_nand_boot(char * kernel_pname, char * cmdline, int backlight_set)
{
......
    char *fixnvpoint = "/fixnv";
    char *fixnvfilename = "/fixnv/fixnv.bin";
    char *fixnvfilename2 = "/fixnv/fixnvchange.bin";
    char *backupfixnvpoint = "/backupfixnv";
    char *backupfixnvfilename = "/backupfixnv/fixnv.bin";

    char *runtimenvpoint = "/runtimenv";
    char *runtimenvpoint2 = "/runtimenv";
    char *runtimenvfilename = "/runtimenv/runtimenv.bin";
    char *runtimenvfilename2 = "/runtimenv/runtimenvbkup.bin";

    char *productinfopoint = "/productinfo";
    char *productinfofilename = "/productinfo/productinfo.bin";
    char *productinfofilename2 = "/productinfo/productinfobkup.bin";

    int orginal_right, backupfile_right;
    unsigned long orginal_index, backupfile_index;
    nand_erase_options_t opts;
    char * mtdpart_def = NULL;
#if (defined CONFIG_SC8810) || (defined CONFIG_SC8825)
    MMU_Init(CONFIG_MMU_TABLE_ADDR);
#endif
    ret = mtdparts_init();
    if (ret != 0){
        printf("mtdparts init error %d\n", ret);
        return;
    }

#ifdef CONFIG_SPLASH_SCREEN
#define SPLASH_PART "boot_logo"
    ret = find_dev_and_part(SPLASH_PART, &dev, &pnum, &part);
    if(ret){
        printf("No partition named %s\n", SPLASH_PART);
        return;
    }else if(dev->id->type != MTD_DEV_TYPE_NAND){
        printf("Partition %s not a NAND device\n", SPLASH_PART);
        return;
    }
    //读取下载到nand中的boot_logo,就是开机亮的那一屏
    off=part->offset;
    nand = &nand_info[dev->id->num];
    //read boot image header
    size = 1<<19;//where the size come from????//和dowload工具中的地址一致
    char * bmp_img = malloc(size);
    if(!bmp_img){
        printf("not enough memory for splash image\n");
        return;
    }
    ret = nand_read_offset_ret(nand, off, &size, (void *)bmp_img, &off);
    if(ret != 0){
        printf("function: %s nand read error %d\n", __FUNCTION__, ret);
        return;
    }
    //第一次LCD logo
    lcd_display_logo(backlight_set,(ulong)bmp_img,size);
#endif
    set_vibrator(0);//停止震动,如果发现开机狂震不止,那就是没走到这里。
    {
        nand_block_info(nand, &good_blknum, &bad_blknum);
        printf("good is %d  bad is %d\n", good_blknum, bad_blknum);
    }

    ret = load_sector_to_memory(fixnvpoint,
            fixnvfilename2,
            fixnvfilename,
            (unsigned char *)FIXNV_ADR,
            (unsigned char *)MODEM_ADR,
            FIXNV_SIZE + 4);
......

#elif defined(CONFIG_CALIBRATION_MODE_NEW)
#if defined(CONFIG_SP7702) || defined(CONFIG_SP8810W)
    /*
       force dsp sleep in native 8810 verson to reduce power consumption
     */
    extern void DSP_ForceSleep(void);
    DSP_ForceSleep();
    printf("dsp nand read ok1 %d\n", ret);
#endif

#ifdef CONFIG_SC7710G2
    ret = try_update_spl();
    if(ret == -1){
        printf("try update spl faild!\n");
        return -1;
    }

    ret =  try_load_fixnv();
    if(ret == -1){
        printf("try load fixnv faild!\n");
        return -1;
    }

    ret =  try_load_runtimenv();
    if(ret == -1){
        printf("try load runtimenv faild!\n");
    }

    ret =  try_load_productinfo();
    if(ret == -1){
        printf("try load productinfo faild!\n");
    }
#endif
    if(poweron_by_calibration())
    {
#ifndef CONFIG_SC7710G2
        // ---------------------fix nv--------------------------------

......

        // ---------------------runtime nv----------------------------
......
        // ---------------------DSP ----------------------------
......

#endif

    /* KERNEL_PART */
    printf("Reading kernel to 0x%08x\n", KERNEL_ADR);

    ret = find_dev_and_part(kernel_pname, &dev, &pnum, &part);
    if(ret){
        printf("No partition named %s\n", kernel_pname);
        return;
    }else if(dev->id->type != MTD_DEV_TYPE_NAND){
        printf("Partition %s not a NAND device\n", kernel_pname);
        return;
    }

    off=part->offset;
    nand = &nand_info[dev->id->num];
    //read boot image header
#if 0
    size = nand->writesize;
    flash_page_size = nand->writesize;
    ret = nand_read_offset_ret(nand, off, &size, (void *)hdr, &off);
    if(ret != 0){
        printf("function: %s nand read error %d\n", __FUNCTION__, ret);
        return;
    }
    if(memcmp(hdr->magic, BOOT_MAGIC, BOOT_MAGIC_SIZE)){
        printf("bad boot image header, give up read!!!!\n");
        return;
    }
    else
    {
        //read kernel image
        size = (hdr->kernel_size+(flash_page_size - 1)) & (~(flash_page_size - 1));
        if(size <=0){
            printf("kernel image should not be zero\n");
            return;
        }
        ret = nand_read_offset_ret(nand, off, &size, (void *)KERNEL_ADR, &off);
        if(ret != 0){
            printf("kernel nand read error %d\n", ret);
            return;
        }
        //read ramdisk image
        size = (hdr->ramdisk_size+(flash_page_size - 1)) & (~(flash_page_size - 1));
        if(size<0){
            printf("ramdisk size error\n");
            return;
        }
        ret = nand_read_offset_ret(nand, off, &size, (void *)RAMDISK_ADR, &off);
        if(ret != 0){
            printf("ramdisk nand read error %d\n", ret);
            return;
        }
    }
#else

    ret = load_kernel_and_layout(nand,
            (unsigned int)off,
            (char *)raw_header,
            (char *) KERNEL_ADR,
            (char *) RAMDISK_ADR,
            2048,
            nand->writesize);

    if (ret != 0) {
        printf("ramdisk nand read error %d\n", ret);
        return;
    }

#endif

......

{

    good_blknum = 0;
    bad_blknum  = 0;
    nand_block_info(nand, &good_blknum, &bad_blknum);
    printf("good is %d  bad is %d\n", good_blknum, bad_blknum);
}
creat_cmdline(cmdline,hdr);
vlx_entry();//末尾进入entry(),其实现在normal_mode.c
}
该函数的重点在开头和结尾的相关操作,开头部分见注释,重点分析vlx_entry()函数,其实现在normal_mode.c:
void vlx_entry()
{
#if !(defined CONFIG_SC8810 || defined CONFIG_TIGER || defined CONFIG_SC8830)
    MMU_InvalideICACHEALL();
#endif

#if (defined CONFIG_SC8810) || (defined CONFIG_SC8825) || (defined CONFIG_SC8830)
    MMU_DisableIDCM();
#endif

#ifdef REBOOT_FUNCTION_INUBOOT
    reboot_func();
#endif

#if BOOT_NATIVE_LINUX
    start_linux();
#else
    void (*entry)(void) = (void*) VMJALUNA_ADR;
    entry();
#endif
}
这里的entry()跳转到VM虚拟机的首地址,start_linux()则是进入kernel的方法,仍在normal_mode.c中实现:
static int start_linux()
{
    void (*theKernel)(int zero, int arch, u32 params);
    u32 exec_at = (u32)-1;
    u32 parm_at = (u32)-1;
    u32 machine_type;

    machine_type = machine_arch_type;         /* get machine type */
    //重点根据KERNEL的地址
    theKernel = (void (*)(int, int, u32))KERNEL_ADR; /* set the kernel address */
#ifndef CONFIG_SC8830
    *(volatile u32*)0x84001000 = 'j';
    *(volatile u32*)0x84001000 = 'm';
    *(volatile u32*)0x84001000 = 'p';
#endif
    //根据Kernel的地址走至Kernel\init\main.c的start_kernel()
    theKernel(0, machine_type, VLX_TAG_ADDR);    /* jump to kernel with register set */
    while(1);
    return 0;
}
至此,已经到了Kernel\init\main.c的start_kernel(),即来到了linux的世界。
3,linux启动详细分析
Kernel\init\main.c的start_kernel()的kernel的起点,先看这个函数:
asmlinkage void __init start_kernel(void)
{
    char * command_line;
    extern const struct kernel_param __start___param[], __stop___param[];

#ifdef CONFIG_NKERNEL
    jiffies_64 = INITIAL_JIFFIES;
#endif
    smp_setup_processor_id();

    /*
     * Need to run as early as possible, to initialize the
     * lockdep hash:
     */
    lockdep_init();
    debug_objects_early_init();

    /*
     * Set up the the initial canary ASAP:
     */
    boot_init_stack_canary();

    cgroup_init_early();

    local_irq_disable();
    early_boot_irqs_disabled = true;

/*
 * Interrupts are still disabled. Do necessary setups, then
 * enable them
 */
    tick_init();
    boot_cpu_init();
    page_address_init();
    printk(KERN_NOTICE "%s", linux_banner);
    setup_arch(&command_line);
    mm_init_owner(&init_mm, &init_task);
    mm_init_cpumask(&init_mm);
    setup_command_line(command_line);
    setup_nr_cpu_ids();
    setup_per_cpu_areas();
    smp_prepare_boot_cpu(); /* arch-specific boot-cpu hooks */

    build_all_zonelists(NULL);
    page_alloc_init();

    printk(KERN_NOTICE "Kernel command line: %s\n", boot_command_line);
    parse_early_param();
    parse_args("Booting kernel", static_command_line, __start___param,
           __stop___param - __start___param,
           &unknown_bootoption);
    /*
     * These use large bootmem allocations and must precede
     * kmem_cache_init()
     */
    setup_log_buf(0);
    pidhash_init();
    vfs_caches_init_early();
    sort_main_extable();
    trap_init();
    mm_init();

    /*
     * Set up the scheduler prior starting any interrupts (such as the
     * timer interrupt). Full topology setup happens at smp_init()
     * time - but meanwhile we still have a functioning scheduler.
     */
    sched_init();
    /*
     * Disable preemption - early bootup scheduling is extremely
     * fragile until we cpu_idle() for the first time.
     */
    preempt_disable();
    if (!irqs_disabled()) {
        printk(KERN_WARNING "start_kernel(): bug: interrupts were "
                "enabled *very* early, fixing it\n");
        local_irq_disable();
    }
    idr_init_cache();
    perf_event_init();
    rcu_init();
    radix_tree_init();
    /* init some links before init_ISA_irqs() */
    early_irq_init();
    init_IRQ();
    prio_tree_init();
    init_timers();
    hrtimers_init();
    softirq_init();
    timekeeping_init();
    time_init();
    profile_init();
    call_function_init();
    if (!irqs_disabled())
        printk(KERN_CRIT "start_kernel(): bug: interrupts were "
                 "enabled early\n");
    early_boot_irqs_disabled = false;
    local_irq_enable();

    /* Interrupts are enabled now so all GFP allocations are safe. */
    gfp_allowed_mask = __GFP_BITS_MASK;

    kmem_cache_init_late();

    /*
     * HACK ALERT! This is early. We're enabling the console before
     * we've done PCI setups etc, and console_init() must be aware of
     * this. But we do want output early, in case something goes wrong.
     */
    console_init();
    if (panic_later)
        panic(panic_later, panic_param);

    lockdep_info();

    /*
     * Need to run this when irqs are enabled, because it wants
     * to self-test [hard/soft]-irqs on/off lock inversion bugs
     * too:
     */
    locking_selftest();

#ifdef CONFIG_BLK_DEV_INITRD
    if (initrd_start && !initrd_below_start_ok &&
        page_to_pfn(virt_to_page((void *)initrd_start)) < min_low_pfn) {
        printk(KERN_CRIT "initrd overwritten (0x%08lx < 0x%08lx) - "
            "disabling it.\n",
            page_to_pfn(virt_to_page((void *)initrd_start)),
            min_low_pfn);
        initrd_start = 0;
    }
#endif
    page_cgroup_init();
    enable_debug_pagealloc();
    debug_objects_mem_init();
    kmemleak_init();
    setup_per_cpu_pageset();
    numa_policy_init();
    if (late_time_init)
        late_time_init();
    sched_clock_init();
    calibrate_delay();
    pidmap_init();
    anon_vma_init();
#ifdef CONFIG_X86
    if (efi_enabled)
        efi_enter_virtual_mode();
#endif
    thread_info_cache_init();
    cred_init();
    fork_init(totalram_pages);
    proc_caches_init();
    buffer_init();
    key_init();
    security_init();
    dbg_late_init();
    vfs_caches_init(totalram_pages);
    signals_init();
    /* rootfs populating might need page-writeback */
    page_writeback_init();
#ifdef CONFIG_PROC_FS
    proc_root_init();
#endif
    cgroup_init();
    cpuset_init();
    taskstats_init_early();
    delayacct_init();

    check_bugs();

    acpi_early_init(); /* before LAPIC and SMP init */
    sfi_init_late();

    ftrace_init();

    /* Do the rest non-__init'ed, we're now alive */
    //第一个跟init 进程相关的函数
    rest_init();
}
该函数所调用的大部分都是相关的初始化操作,而跟启动关联的是结尾的rest_init() ,该函数是第一个跟init进程相关的函数,看其实现:
static noinline void __init_refok rest_init(void)
{
    int pid;

    rcu_scheduler_starting();
    /*
     * We need to spawn init first so that it obtains pid 1, however
     * the init task will end up wanting to create kthreads, which, if
     * we schedule it before we create kthreadd, will OOPS.
     */
     //启动kernel_init来进行接下来的初始化
    kernel_thread(kernel_init, NULL, CLONE_FS | CLONE_SIGHAND);
    numa_default_policy();
    pid = kernel_thread(kthreadd, NULL, CLONE_FS | CLONE_FILES);
    rcu_read_lock();
    kthreadd_task = find_task_by_pid_ns(pid, &init_pid_ns);
    rcu_read_unlock();
    complete(&kthreadd_done);

    /*
     * The boot idle thread must execute schedule()
     * at least once to get things moving:
     */
    init_idle_bootup_task(current);
    preempt_enable_no_resched();
    schedule();
    preempt_disable();

    /* Call into cpu_idle with preempt disabled */
    cpu_idle();//将系统交给调度器处理。
}
该函数启动了kernel_init来进行后续的初始化,进而看kernel_init(),这些函数任然在main.c中实现。
static int __init kernel_init(void * unused)
{
    /*
     * Wait until kthreadd is all set-up.
     */
    wait_for_completion(&kthreadd_done);
    /*
     * init can allocate pages on any node
     */
    set_mems_allowed(node_states[N_HIGH_MEMORY]);
    /*
     * init can run on any cpu.
     */
    set_cpus_allowed_ptr(current, cpu_all_mask);

    cad_pid = task_pid(current);

    smp_prepare_cpus(setup_max_cpus);

    do_pre_smp_initcalls();
    lockup_detector_init();

    smp_init();
    sched_init_smp();
    //此函数中会调用各个驱动模块的加载函数(静态编译的,非ko)来初始化设备
    do_basic_setup();

    /* Open the /dev/console on the rootfs, this should never fail */
    if (sys_open((const char __user *) "/dev/console", O_RDWR, 0) < 0)
        printk(KERN_WARNING "Warning: unable to open an initial console.\n");

    (void) sys_dup(0);
    (void) sys_dup(0);
    /*
     * check if there is an early userspace init.  If yes, let it do all
     * the work
     */

    if (!ramdisk_execute_command)
        ramdisk_execute_command = "/init";

    if (sys_access((const char __user *) ramdisk_execute_command, 0) != 0) {
        ramdisk_execute_command = NULL;
        prepare_namespace();
    }

    /*
     * Ok, we have completed the initial bootup, and
     * we're essentially up and running. Get rid of the
     * initmem segments and start the user-mode stuff..
     */
    //走至init 进程的相关操作
    init_post();
    return 0;
}
init进程由init_post()创建 即main.c 的init_post():
static noinline int init_post(void)
{
    /* need to finish all async __init code before freeing the memory */
    async_synchronize_full();
    free_initmem();
    mark_rodata_ro();
    system_state = SYSTEM_RUNNING;
    numa_default_policy();


    current->signal->flags |= SIGNAL_UNKILLABLE;

    if (ramdisk_execute_command) {
        run_init_process(ramdisk_execute_command);
        printk(KERN_WARNING "Failed to execute %s\n",
                ramdisk_execute_command);
    }

    /*
     * We try each of these until one succeeds.
     *
     * The Bourne shell can be used instead of init if we are
     * trying to recover a really broken machine.
     */
    if (execute_command) {
        //至此init启动完成,接下来的启动就是System\core\init\init.c的main()
        run_init_process(execute_command);
        printk(KERN_WARNING "Failed to execute %s.  Attempting "
                    "defaults...\n", execute_command);
    }
    run_init_process("/sbin/init");
    run_init_process("/etc/init");
    run_init_process("/bin/init");
    run_init_process("/bin/sh");

    panic("No init found.  Try passing init= option to kernel. "
          "See Linux Documentation/init.txt for guidance.");
}
4,android启动详细分析
android部分的启动包括几个部分:init,zygote,systemserver,launcher,lockscreen,othersapps。
4.1,init启动
init是一个进程,确切的说,是linux系统用户空间的第一个进程,android是基于linux 的,所以init也是android用户空间的第一个进程,他的进程号是1,作为天字第一号进程,其有很多重要的职责。其最重要的职责是创建了Zygote以及提供了systemserver。system\core\init\init.c的入口函数是main()。
int main(int argc, char **argv)
{
    int fd_count = 0;
    struct pollfd ufds[4];
    char *tmpdev;
    char* debuggable;
    char tmp[32];
    int property_set_fd_init = 0;
    int signal_fd_init = 0;
    int keychord_fd_init = 0;
    bool is_charger = false;

    if (!strcmp(basename(argv[0]), "ueventd"))
        return ueventd_main(argc, argv);

    /* clear the umask */
    umask(0);

        /* Get the basic filesystem setup we need put
         * together in the initramdisk on / and then we'll
         * let the rc file figure out the rest.
         */
    //创建一些文件夹,并挂载设备,这些是与linux相关的
    mkdir("/dev", 0755);
    mkdir("/proc", 0755);
    mkdir("/sys", 0755);

    mount("tmpfs", "/dev", "tmpfs", MS_NOSUID, "mode=0755");
    mkdir("/dev/pts", 0755);
    mkdir("/dev/socket", 0755);
    mount("devpts", "/dev/pts", "devpts", 0, NULL);
    mount("proc", "/proc", "proc", 0, NULL);
    mount("sysfs", "/sys", "sysfs", 0, NULL);

        /* indicate that booting is in progress to background fw loaders, etc */
    close(open("/dev/.booting", O_WRONLY | O_CREAT, 0000));

        /* We must have some place other than / to create the
         * device nodes for kmsg and null, otherwise we won't
         * be able to remount / read-only later on.
         * Now that tmpfs is mounted on /dev, we can actually
         * talk to the outside world.
         */
    //重定向标准输入输出 错误输出到/dev/_null_
    open_devnull_stdio();
    //设置init的日志输出设备为/dev/_kmsg_,不过该文件打开后
    //会立刻被unlink,这样其他进程就无法打开这个文件读取日志信息
    klog_init();
    //prop配置文件的解析与初始化操作,如//设置"/default.prop"属性文件
    property_init();
        //通过读取proc/cpuinfo得到机器的hardware名
    get_hardware_name(hardware, &revision);

    process_kernel_cmdline();

#ifdef HAVE_SELINUX
    INFO("loading selinux policy\n");
    selinux_load_policy();
#endif

    is_charger = !strcmp(bootmode, "charger");

    INFO("property init\n");
    if (!is_charger)
        property_load_boot_defaults();

    INFO("reading config file\n");
    //解析init.rc配置文件 非常重要,文件系统的挂载,权限设置
    //以及系统server的启动,包括Zygote的创建
    init_parse_config_file("/init.rc");
     /**
        **解析完init.rc 会得到一系列的action动作
        **keychord_init_action和console_init_action
        **/
    action_for_each_trigger("early-init", action_add_queue_tail);

    queue_builtin_action(wait_for_coldboot_done_action, "wait_for_coldboot_done");
    queue_builtin_action(keychord_init_action, "keychord_init");
    //console_init_action为控制台初始化,此处会加载一帧boot logo文件为initlogo.rle
    queue_builtin_action(console_init_action, "console_init");

    /* execute all the boot actions to get us started */
    action_for_each_trigger("init", action_add_queue_tail);

    /* skip mounting filesystems in charger mode */

    action_for_each_trigger("early-fs", action_add_queue_tail);
    //action_for_each_trigger("fs", action_add_queue_tail);
    {
        bool has_3partions = false;

        has_3partions = (!access("/sys/block/mmcblk0/mmcblk0p3",R_OK))
            && (!access("/sys/block/mmcblk0/mmcblk0p2",R_OK))
            && (!access("/sys/block/mmcblk0/mmcblk0p1",R_OK));

        if (has_3partions) {
            action_for_each_trigger("fs-two", action_add_queue_tail);
        } else {
            action_for_each_trigger("fs", action_add_queue_tail);
        }
    }
    action_for_each_trigger("post-fs", action_add_queue_tail);
    if (!is_charger) {
        //action_for_each_trigger("post-fs", action_add_queue_tail);
        action_for_each_trigger("post-fs-data", action_add_queue_tail);
    }

    queue_builtin_action(property_service_init_action, "property_service_init");
    queue_builtin_action(signal_init_action, "signal_init");
    queue_builtin_action(check_startup_action, "check_startup");

    if (!strcmp(bootmode, "alarm")) {
        action_for_each_trigger("alarm", action_add_queue_tail);
    }
    if (is_charger) {
        action_for_each_trigger("charger", action_add_queue_tail);
    } else {
        action_for_each_trigger("early-boot", action_add_queue_tail);
        action_for_each_trigger("boot", action_add_queue_tail);
    }

        /* run all property triggers based on current state of the properties */
    queue_builtin_action(queue_property_triggers_action, "queue_property_triggers");


#if BOOTCHART
    queue_builtin_action(bootchart_init_action, "bootchart_init");
#endif

    for(;;) {//无限循环启动进程
        int nr, i, timeout = -1;

        execute_one_command();//再循环中执行动作
        restart_processes();//重启已经死去的进程

        if (!property_set_fd_init && get_property_set_fd() > 0) {
            ufds[fd_count].fd = get_property_set_fd();
            ufds[fd_count].events = POLLIN;
            ufds[fd_count].revents = 0;
            fd_count++;
            property_set_fd_init = 1;
        }
        if (!signal_fd_init && get_signal_fd() > 0) {
            ufds[fd_count].fd = get_signal_fd();
            ufds[fd_count].events = POLLIN;
            ufds[fd_count].revents = 0;
            fd_count++;
            signal_fd_init = 1;
        }
        if (!keychord_fd_init && get_keychord_fd() > 0) {
            ufds[fd_count].fd = get_keychord_fd();
            ufds[fd_count].events = POLLIN;
            ufds[fd_count].revents = 0;
            fd_count++;
            keychord_fd_init = 1;
        }

        if (process_needs_restart) {
            timeout = (process_needs_restart - gettime()) * 1000;
            if (timeout < 0)
                timeout = 0;
        }

        if (!action_queue_empty() || cur_action)
            timeout = 0;

#if BOOTCHART
        if (bootchart_count > 0) {
            if (timeout < 0 || timeout > BOOTCHART_POLLING_MS)
                timeout = BOOTCHART_POLLING_MS;
            if (bootchart_step() < 0 || --bootchart_count == 0) {
                bootchart_finish();
                bootchart_count = 0;
            }
        }
#endif

        nr = poll(ufds, fd_count, timeout);
        if (nr <= 0)
            continue;

        for (i = 0; i < fd_count; i++) {
            if (ufds[i].revents == POLLIN) {
                if (ufds[i].fd == get_property_set_fd())
                    handle_property_set_fd();
                else if (ufds[i].fd == get_keychord_fd())
                    handle_keychord();
                else if (ufds[i].fd == get_signal_fd())
                    handle_signal();
            }
        }
    }

    return 0;
}
从以上代码可知,init的工作任务还是很重的,上面的代码已经省略的不少,但任然很多,不过分析两个知识点来看,可将init的工作流程精简为四点:1,解析配置文件重点是init.rc。2,执行各个阶段的动作,创建zygote的工作就在其中的某一个阶段完成。3,调用property_init()初始化属性相关的资源,并且通过property_load_boot_defaults()启动属性服务。4,init进入一个无限循环,并且等待一些事情的发生。接下来重点看下解析配置文件的init.rc。解析函数:
int init_parse_config_file(const char *fn)
{
    char *data;
    data = read_file(fn, 0);
    if (!data) return -1;

    parse_config(fn, data);
    DUMP();
    return 0;
}
再看init.rc文件:
......

// service管理器 ---- > servicemanager.cpp/ servicemanager.java
service servicemanager /system/bin/servicemanager
    class core
    user system
    group system
    critical
    onrestart restart zygote ------ > 启动zygote进程
    onrestart restart media ------ > 启动media
    onrestart restart surfaceflinger------ > 启动surfaceflinger
    onrestart restart drm------ > 启动drm

service vold /system/bin/vold
    class core
    socket vold stream 0660 root mount
    ioprio be 2

service netd /system/bin/netd
    class main
    socket netd stream 0660 root system
    socket dnsproxyd stream 0660 root inet

service debuggerd /system/bin/debuggerd
    class main

service ril-daemon /system/bin/rild
    class main
    socket rild stream 660 root radio
    socket rild-debug stream 660 radio system
    user root
    group radio cache inet misc audio sdcard_rw log
// surfaceflinger服务
//对应surfaceflinger.cpp----- >在system_server中具体实现
service surfaceflinger /system/bin/surfaceflinger
    class main
    user system
    group graphics
onrestart restart zygote

// zygote进程
//后面重点分析
service zygote /system/bin/app_process -Xzygote /system/bin --zygote --start-system-server
    class main
    socket zygote stream 666
    onrestart write /sys/android_power/request_state wake
    onrestart write /sys/power/state on
    onrestart restart media
onrestart restart netd

// drm服务
service drm /system/bin/drmserver
    class main
    user drm
group system inet drmrpc

// mediaserver服务
//在Main_mediaserver.cpp中实现,启动audio camera 等服务
service media /system/bin/mediaserver
    class main
    user media
    group audio camera inet net_bt net_bt_admin net_bw_acct drmrpc
    ioprio rt 4
//此处引导播放开机动画,并在surfaceflinger中具体实现
service bootanim /system/bin/bootanimation
    class main
    user graphics
    group graphics
    disabled
oneshot
......
在init.rc中完成了一系列的重要操作:文件系统权限及挂载,启动zygote,启动系统服务,播放开机动画。当然如何解析对应的代码,并完成对应的操作,如启动zygote、播放开机动画,可以参考相关资料或查看源码,此处不再详述。至此init已经将部分操作交给了zygote。
4.2,zygote启动
zygote的启动预示着真正的来到了java的世界。zygote这个词的中文意思的受精卵,他和android系统中的java世界有着重要关系。zygote本身是一个native的应用程序,与驱动,内核均无关系。根据对init的了解我们知道,zygote是有init进程根据init.rc文件中的配置项创建的。先分析其来历,zygote最初的名字叫app_process,这个名字是在android.mk文件中指定的。但在运行过程中,app_process通过linux下的pctrl系统调用将自己的名字换成了zygote,所以通过进程看到的名称是zygote。
Zygote进程中完成了java虚拟机的创建及初始化,以及准备了java运行时环境,还有jni的准备工作,所以zygote占据了整个android世界的半壁江山,另半壁江山则是system_server,后续会详细介绍。
Zygote---- >入口文件App_main.cpp ---- >main()
Zygote原意是受精卵的意思。
在linux中指app_process即:frameworks/base/cmds/app_process目录下的App_main.cpp
此处可发现main()
int main(int argc, const char* const argv[])
{
    // These are global variables in ProcessState.cpp
    mArgC = argc;
    mArgV = argv;

    mArgLen = 0;
    for (int i=0; i
该代码主要完成工作如下:
1,niceName = "zygote";---- >重命名,原进程名称为app_process
,2,setArgv0(argv0, niceName);
,3,set_process_name(niceName); ---- >完成重命名操作
,4,AppRuntime runtime;----- >App_main.cpp的一个内部类,其继承AndroidRuntime.cpp
,5,runtime.start("com.android.internal.os.ZygoteInit",startSystemServer("startsystemserver"));
备注:AppRuntime 作为一个内部类,在main()里调用。其完成:
1, getClassName() ---- >运行时文件类名
2, onVmCreated()---- >java虚拟机创建
3, onStarted()---- >调用时加载
4, onZygoteInit()---- >初始化虚拟机
5, onExit()---- >退出时的操作 --------- > 上述函数基本自动调用
接着,走进runtime.start(com.android.internal.os.ZygoteInit)。runtime来自AndroidRuntime.cpp。AndroidRuntime.cpp------ >AndroidRuntime::start(const char* className, const char* options)。frameworks\base\core\jni\AndroidRuntime.cpp。分析其start()函数:
void AndroidRuntime::start(const char* className, const char* options)
{
    ALOGD("\n>>>>>> AndroidRuntime START %s <<<<<<\n",
            className != NULL ? className : "(unknown)");

    blockSigpipe();

    /*
     * 'startSystemServer == true' means runtime is obsolete and not run from
     * init.rc anymore, so we print out the boot start event here.
     */
    if (strcmp(options, "start-system-server") == 0) {
        /* track our progress through the boot sequence */
        const int LOG_BOOT_PROGRESS_START = 3000;
        LOG_EVENT_LONG(LOG_BOOT_PROGRESS_START,
                       ns2ms(systemTime(SYSTEM_TIME_MONOTONIC)));
    }

    const char* rootDir = getenv("ANDROID_ROOT");
    if (rootDir == NULL) {
        rootDir = "/system";
        if (!hasDir("/system")) {
            LOG_FATAL("No root directory specified, and /android does not exist.");
            return;
        }
        setenv("ANDROID_ROOT", rootDir, 1);
    }

    //const char* kernelHack = getenv("LD_ASSUME_KERNEL");
    //ALOGD("Found LD_ASSUME_KERNEL='%s'\n", kernelHack);

    /* start the virtual machine */
    JNIEnv* env;
    if (startVm(&mJavaVM, &env) != 0) {
        return;
    }
    onVmCreated(env);

    /*
     * Register android functions.
     */
    if (startReg(env) < 0) {
        ALOGE("Unable to register all android natives\n");
        return;
    }

    /*
     * We want to call main() with a String array with arguments in it.
     * At present we have two arguments, the class name and an option string.
     * Create an array to hold them.
     */
    jclass stringClass;
    jobjectArray strArray;
    jstring classNameStr;
    jstring optionsStr;

    stringClass = env->FindClass("java/lang/String");
    assert(stringClass != NULL);
    strArray = env->NewObjectArray(2, stringClass, NULL);
    assert(strArray != NULL);
    classNameStr = env->NewStringUTF(className);
    assert(classNameStr != NULL);
    env->SetObjectArrayElement(strArray, 0, classNameStr);
    optionsStr = env->NewStringUTF(options);
    env->SetObjectArrayElement(strArray, 1, optionsStr);

    /*
     * Start VM.  This thread becomes the main thread of the VM, and will
     * not return until the VM exits.
     */
    char* slashClassName = toSlashClassName(className);
    jclass startClass = env->FindClass(slashClassName);
    if (startClass == NULL) {
        ALOGE("JavaVM unable to locate class '%s'\n", slashClassName);
        /* keep going */
    } else {
        jmethodID startMeth = env->GetStaticMethodID(startClass, "main",
            "([Ljava/lang/String;)V");
        if (startMeth == NULL) {
            ALOGE("JavaVM unable to find main() in '%s'\n", className);
            /* keep going */
        } else {
            env->CallStaticVoidMethod(startClass, startMeth, strArray);

#if 0
            if (env->ExceptionCheck())
                threadExitUncaughtException(env);
#endif
        }
    }
    free(slashClassName);

    ALOGD("Shutting down VM\n");
    if (mJavaVM->DetachCurrentThread() != JNI_OK)
        ALOGW("Warning: unable to detach main thread\n");
    if (mJavaVM->DestroyJavaVM() != 0)
        ALOGW("Warning: VM did not shut down cleanly\n");
}
该函数完成操作:
1, onVmCreated(env);----- >创建虚拟机
2, JNIEnv* env; ---- > JNI环境的初始化
3, env->CallStaticVoidMethod(startClass, startMeth, strArray); ----- >最终函数与上述步骤中的runtime.start(com.android.internal.os.ZygoteInit)对应。
4, 至此走到---- ZygoteInit.java----main()
ZygoteInit.java ---main()----- >java世界准备已经完成,欢迎来到java世界。
public static void main(String argv[]) {
    try {
        // Start profiling the zygote initialization.
        SamplingProfilerIntegration.start();

        registerZygoteSocket();
        EventLog.writeEvent(LOG_BOOT_PROGRESS_PRELOAD_START,
            SystemClock.uptimeMillis());
        preload();
        EventLog.writeEvent(LOG_BOOT_PROGRESS_PRELOAD_END,
            SystemClock.uptimeMillis());

        // Finish profiling the zygote initialization.
        SamplingProfilerIntegration.writeZygoteSnapshot();

        // Do an initial gc to clean up after startup
        gc();

        // If requested, start system server directly from Zygote
        if (argv.length != 2) {
            throw new RuntimeException(argv[0] + USAGE_STRING);
        }

        if (argv[1].equals("start-system-server")) {
            startSystemServer();
        } else if (!argv[1].equals("")) {
            throw new RuntimeException(argv[0] + USAGE_STRING);
        }

        Log.i(TAG, "Accepting command socket connections");

        if (ZYGOTE_FORK_MODE) {
            runForkMode();
        } else {
            runSelectLoopMode();
        }

        closeServerSocket();
    } catch (MethodAndArgsCaller caller) {
        caller.run();
    } catch (RuntimeException ex) {
        Log.e(TAG, "Zygote died with exception", ex);
        closeServerSocket();
        throw ex;
    }
}
该函数重点完成如下3项工作:
1, registerZygoteSocket();
2, startSystemServer();----- > 核心方法,Zygote进程一分为二,此处分裂出一个system_server进程。
3, 至此system_server进程进入SystemServer.java---- >main()
先看下startSystemServer()方法:
private static boolean startSystemServer()
          throws MethodAndArgsCaller, RuntimeException {
      /* Hardcoded command line to start the system server */
      String args[] = {
          "--setuid=1000",
          "--setgid=1000",
          "--setgroups=1001,1002,1003,1004,1005,1006,1007,1008,1009,1010,1018,3001,3002,3003,3006,3007",
          "--capabilities=130104352,130104352",
          "--runtime-init",
          "--nice-name=system_server",
          "com.android.server.SystemServer",
      };
      ZygoteConnection.Arguments parsedArgs = null;

      int pid;

      try {
          parsedArgs = new ZygoteConnection.Arguments(args);
          ZygoteConnection.applyDebuggerSystemProperty(parsedArgs);
          ZygoteConnection.applyInvokeWithSystemProperty(parsedArgs);

          /* Request to fork the system server process */
          pid = Zygote.forkSystemServer(
                  parsedArgs.uid, parsedArgs.gid,
                  parsedArgs.gids,
                  parsedArgs.debugFlags,
                  null,
                  parsedArgs.permittedCapabilities,
                  parsedArgs.effectiveCapabilities);
      } catch (IllegalArgumentException ex) {
          throw new RuntimeException(ex);
      }

      /* For child process */
      if (pid == 0) {
          handleSystemServerProcess(parsedArgs);
      }

      return true;
  }
com.android.server.SystemServer的创建,预示着SystemServer的的正式启动,自此Zygote一分为二。Zygote将系统服务交给SystemServer统一管理。而zygote则负责java运行时环境和Dalvik虚拟机的管理工作。
4.3,systemserver启动
system_server进程是android的第二大进程,其余zygote紧密联系,若其中任何一个进程死掉,就会导致系统死掉,其启动过程包含两个阶段Main()----- >init1()和init2()。
Init1(),为system_server的第一阶段SystemServer.java--- >Init1()的本地实现在com_android_server_SystemServer.cpp中。
先看frameworks\base\services\java\com\android\server\SystemServer.java的main()函数。
native public static void init1(String[] args);

public static void main(String[] args) {
    if (System.currentTimeMillis() < EARLIEST_SUPPORTED_TIME) {
        // If a device's clock is before 1970 (before 0), a lot of
        // APIs crash dealing with negative numbers, notably
        // java.io.File#setLastModified, so instead we fake it and
        // hope that time from cell towers or NTP fixes it
        // shortly.
        Slog.w(TAG, "System clock is before 1970; setting to 1970.");
        SystemClock.setCurrentTimeMillis(EARLIEST_SUPPORTED_TIME);
    }

    if (SamplingProfilerIntegration.isEnabled()) {
        SamplingProfilerIntegration.start();
        timer = new Timer();
        timer.schedule(new TimerTask() {
            @Override
            public void run() {
                SamplingProfilerIntegration.writeSnapshot("system_server", null);
            }
        }, SNAPSHOT_INTERVAL, SNAPSHOT_INTERVAL);
    }

    // Mmmmmm... more memory!
    dalvik.system.VMRuntime.getRuntime().clearGrowthLimit();

    // The system server has to run all of the time, so it needs to be
    // as efficient as possible with its memory usage.
    VMRuntime.getRuntime().setTargetHeapUtilization(0.8f);

    System.loadLibrary("android_servers");
    init1(args);
}

public static final void init2() {
    Slog.i(TAG, "Entered the Android system server!");
    Thread thr = new ServerThread();
    thr.setName("android.server.ServerThread");
    thr.start();
}
其中init1()的本地实现在com_android_server_SystemServer.cpp中:
static void android_server_SystemServer_init1(JNIEnv* env, jobject clazz)
{
    system_init();
}
system_init()在frameworks\base\cmds\system_server\library\system_init.cpp中:
extern "C" status_t system_init()
{
    ALOGI("Entered system_init()");

    sp proc(ProcessState::self());

    sp sm = defaultServiceManager();
    ALOGI("ServiceManager: %p\n", sm.get());

    sp grim = new GrimReaper();
    sm->asBinder()->linkToDeath(grim, grim.get(), 0);

    char propBuf[PROPERTY_VALUE_MAX];
    property_get("system_init.startsurfaceflinger", propBuf, "1");
    if (strcmp(propBuf, "1") == 0) {
        // Start the SurfaceFlinger
        SurfaceFlinger::instantiate();
    }

    property_get("system_init.startsensorservice", propBuf, "1");
    if (strcmp(propBuf, "1") == 0) {
        // Start the sensor service
        SensorService::instantiate();
    }

    // And now start the Android runtime.  We have to do this bit
    // of nastiness because the Android runtime initialization requires
    // some of the core system services to already be started.
    // All other servers should just start the Android runtime at
    // the beginning of their processes's main(), before calling
    // the init function.
    ALOGI("System server: starting Android runtime.\n");
    AndroidRuntime* runtime = AndroidRuntime::getRuntime();

    ALOGI("System server: starting Android services.\n");
    JNIEnv* env = runtime->getJNIEnv();
    if (env == NULL) {
        return UNKNOWN_ERROR;
    }
    jclass clazz = env->FindClass("com/android/server/SystemServer");
    if (clazz == NULL) {
        return UNKNOWN_ERROR;
    }
    jmethodID methodId = env->GetStaticMethodID(clazz, "init2", "()V");
    if (methodId == NULL) {
        return UNKNOWN_ERROR;
    }
    env->CallStaticVoidMethod(clazz, methodId);

    ALOGI("System server: entering thread pool.\n");
    ProcessState::self()->startThreadPool();
    IPCThreadState::self()->joinThreadPool();
    ALOGI("System server: exiting thread pool.\n");

    return NO_ERROR;
}
再回到SystemServer.java的main()中的init2():init2()将操作交给了内部类ServerThread处理,看起run()函数:
   public void run() {
       EventLog.writeEvent(EventLogTags.BOOT_PROGRESS_SYSTEM_RUN,
           SystemClock.uptimeMillis());

       Looper.prepare();

       android.os.Process.setThreadPriority(
               android.os.Process.THREAD_PRIORITY_FOREGROUND);

.......


       AccountManagerService accountManager = null;
       ContentService contentService = null;
       LightsService lights = null;
       PowerManagerService power = null;
       BatteryService battery = null;
       VibratorService vibrator = null;
       AlarmManagerService alarm = null;
       NetworkManagementService networkManagement = null;
       NetworkStatsService networkStats = null;
       NetworkPolicyManagerService networkPolicy = null;
       ConnectivityService connectivity = null;
       WifiP2pService wifiP2p = null;
       WifiService wifi = null;
       NsdService serviceDiscovery= null;
       IPackageManager pm = null;
       Context context = null;
       WindowManagerService wm = null;
       BluetoothService bluetooth = null;
       BluetoothA2dpService bluetoothA2dp = null;
       DockObserver dock = null;
       UsbService usb = null;
       SerialService serial = null;
       UiModeManagerService uiMode = null;
       RecognitionManagerService recognition = null;
       ThrottleService throttle = null;
       NetworkTimeUpdateService networkTimeUpdater = null;
       CommonTimeManagementService commonTimeMgmtService = null;
       InputManagerService inputManager = null;

       //Bug#185069 fix low storage ,check the space&delete the temp file weather need.
       DeviceStorageMonitorService.freeSpace();

       .......
       ServiceManager.addService("xxx",XXX);
       .......

       DevicePolicyManagerService devicePolicy = null;
       StatusBarManagerService statusBar = null;
       InputMethodManagerService imm = null;
       AppWidgetService appWidget = null;
       NotificationManagerService notification = null;
       WallpaperManagerService wallpaper = null;
       LocationManagerService location = null;
       CountryDetectorService countryDetector = null;
       TextServicesManagerService tsms = null;
       LockSettingsService lockSettings = null;
       DreamManagerService dreamy = null;

......

       // These are needed to propagate to the runnable below.
       final Context contextF = context;
       final BatteryService batteryF = battery;
       final NetworkManagementService networkManagementF = networkManagement;
       final NetworkStatsService networkStatsF = networkStats;
       final NetworkPolicyManagerService networkPolicyF = networkPolicy;
       final ConnectivityService connectivityF = connectivity;
       final DockObserver dockF = dock;
       final UsbService usbF = usb;
       final ThrottleService throttleF = throttle;
       final UiModeManagerService uiModeF = uiMode;
       final AppWidgetService appWidgetF = appWidget;
       final WallpaperManagerService wallpaperF = wallpaper;
       final InputMethodManagerService immF = imm;
       final RecognitionManagerService recognitionF = recognition;
       final LocationManagerService locationF = location;
       final CountryDetectorService countryDetectorF = countryDetector;
       final NetworkTimeUpdateService networkTimeUpdaterF = networkTimeUpdater;
       final CommonTimeManagementService commonTimeMgmtServiceF = commonTimeMgmtService;
       final TextServicesManagerService textServiceManagerServiceF = tsms;
       final StatusBarManagerService statusBarF = statusBar;
       final DreamManagerService dreamyF = dreamy;
       final InputManagerService inputManagerF = inputManager;
       final BluetoothService bluetoothF = bluetooth;


       ActivityManagerService.self().systemReady(new Runnable() {
           public void run() {
               Slog.i(TAG, "Making services ready");

               if (!headless) startSystemUi(contextF);
               try {
                   if (batteryF != null) batteryF.systemReady();
               } catch (Throwable e) {
                   reportWtf("making Battery Service ready", e);
               }
               try {
                   if (networkManagementF != null) networkManagementF.systemReady();
               } catch (Throwable e) {
                   reportWtf("making Network Managment Service ready", e);
               }
               try {
                   if (networkStatsF != null) networkStatsF.systemReady();
               } catch (Throwable e) {
                   reportWtf("making Network Stats Service ready", e);
               }
               try {
                   if (networkPolicyF != null) networkPolicyF.systemReady();
               } catch (Throwable e) {
                   reportWtf("making Network Policy Service ready", e);
               }
               try {
                   if (connectivityF != null) connectivityF.systemReady();
               } catch (Throwable e) {
                   reportWtf("making Connectivity Service ready", e);
               }
               try {
                   if (dockF != null) dockF.systemReady();
               } catch (Throwable e) {
                   reportWtf("making Dock Service ready", e);
               }
               try {
                   if (usbF != null) usbF.systemReady();
               } catch (Throwable e) {
                   reportWtf("making USB Service ready", e);
               }
               try {
                   if (uiModeF != null) uiModeF.systemReady();
               } catch (Throwable e) {
                   reportWtf("making UI Mode Service ready", e);
               }
               try {
                   if (recognitionF != null) recognitionF.systemReady();
               } catch (Throwable e) {
                   reportWtf("making Recognition Service ready", e);
               }
               Watchdog.getInstance().start();

               // It is now okay to let the various system services start their
               // third party code...

               try {
                   if (appWidgetF != null) appWidgetF.systemReady(safeMode);
               } catch (Throwable e) {
                   reportWtf("making App Widget Service ready", e);
               }
               try {
                   if (wallpaperF != null) wallpaperF.systemReady();
               } catch (Throwable e) {
                   reportWtf("making Wallpaper Service ready", e);
               }
               try {
                   if (immF != null) immF.systemReady(statusBarF);
               } catch (Throwable e) {
                   reportWtf("making Input Method Service ready", e);
               }
               try {
                   if (locationF != null) locationF.systemReady();
               } catch (Throwable e) {
                   reportWtf("making Location Service ready", e);
               }
               try {
                   if (countryDetectorF != null) countryDetectorF.systemReady();
               } catch (Throwable e) {
                   reportWtf("making Country Detector Service ready", e);
               }
               try {
                   if (throttleF != null) throttleF.systemReady();
               } catch (Throwable e) {
                   reportWtf("making Throttle Service ready", e);
               }
               try {
                   if (networkTimeUpdaterF != null) networkTimeUpdaterF.systemReady();
               } catch (Throwable e) {
                   reportWtf("making Network Time Service ready", e);
               }
               try {
                   if (commonTimeMgmtServiceF != null) commonTimeMgmtServiceF.systemReady();
               } catch (Throwable e) {
                   reportWtf("making Common time management service ready", e);
               }
               try {
                   if (textServiceManagerServiceF != null) textServiceManagerServiceF.systemReady();
               } catch (Throwable e) {
                   reportWtf("making Text Services Manager Service ready", e);
               }
               try {
                   if (dreamyF != null) dreamyF.systemReady();
               } catch (Throwable e) {
                   reportWtf("making DreamManagerService ready", e);
               }
               try {
                   if (inputManagerF != null) inputManagerF.systemReady(bluetoothF);
               } catch (Throwable e) {
                   reportWtf("making InputManagerService ready", e);
               }
           }
       });

       //PowerManagerServer WakeLock dump thread
       (new Thread(new WakelockMonitor(power))).start();

......

       Looper.loop();
       Slog.d(TAG, "System ServerThread is exiting!");
   }
该函数有3个重要功能:
1,ServiceManager.addService("xxx",XXX),将系统服务注册进去。
2,systemReady(),告诉已经实现该接口servers,系统已经启动OK。
3,WakelockMonitor的启动。
至此,systemserver的启动工作已经完成。
4.4,launcher启动
桌面launcher即Home:
1)源码:ActivityManagerService.java为入口,packages/apps/launcher*实现
2)说明:系统启动成功后SystemServer使用xxx.systemReady()通知各个服务,系统已经就绪,桌面程序Home就是在ActivityManagerService.systemReady()通知的过程中建立的,最终调用startHomeActivityLocked()启动launcher。Home在((ActivityManagerService)ActivityManagerNative.getDefault()).systemReady(.)。函数调用的过程中启动,其中systemReady()的参数是一段callback代码,如上面灰色显示的部分。这个函数的实现部分在文件:ActivityManagerService.java中。
先看ActivityManagerService.java的systemReady():
public void systemReady(final Runnable goingCallback) {

..

    retrieveSettings();

    if (goingCallback != null) goingCallback.run();

    synchronized (this) {
        if (mFactoryTest != SystemServer.FACTORY_TEST_LOW_LEVEL) {
            try {
                List apps = AppGlobals.getPackageManager().
                    getPersistentApplications(STOCK_PM_FLAGS);
                if (apps != null) {
                    int N = apps.size();
                    int i;
                    for (i=0; i
跳转至launcher的操作由resumeTopActivityLocked()完成,其实现在ActivityStack.java里的resumeTopActivityLocked()。
final ActivityManagerService mService;
final boolean resumeTopActivityLocked(ActivityRecord prev, Bundle options) {
    // Find the first activity that is not finishing.
    ActivityRecord next = topRunningActivityLocked(null);

    // Remember how we'll process this pause/resume situation, and ensure
    // that the state is reset however we wind up proceeding.
    final boolean userLeaving = mUserLeaving;
    mUserLeaving = false;

    if (next == null) {
        // There are no more activities!  Let's just start up the
        // Launcher...
        if (mMainStack) {
            ActivityOptions.abort(options);
            return mService.startHomeActivityLocked(0);
        }
    }
从上述代码可以看出其实是走到了mService.startHomeActivityLocked(0),而这里的mService也就是ActivityManagerService.java,再次回到ActivityManagerService.java的startHomeActivityLocked(0),至此launcher启动完成。
4.5,lockscreen启动
源码:frameworks/policies/base/phone/com/android/internal/policy/impl/*lock*
说明:系统启动成功后SystemServer调用wm.systemReady()通知WindowManagerService,进而调用PhoneWindowManager,最终通过LockPatternKeyguardView显示解锁界面,跟踪代码可以看到解锁界面并不是一个Activity,这是只是向特定层上绘图,其代码了存放在特殊的位置。此处不再详细分析。
frameworks\base\policy\src\com\android\internal\policy\impl\PhoneWindowManager.java的systemReady()方法:
/** {@inheritDoc} */
public void systemReady() {
    if (mKeyguardMediator != null) {
        // tell the keyguard
        mKeyguardMediator.onSystemReady();
    }
    synchronized (mLock) {
        updateOrientationListenerLp();
        mSystemReady = true;
        mHandler.post(new Runnable() {
            public void run() {
                updateSettings();
            }
        });
    }
}
第一步,告诉锁屏控制器,系统已经启动完成,接下来有锁屏处理。 frameworks\base\policy\src\com\android\internal\policy\impl\KeyguardViewMediator.java:
public void onSystemReady() {
    synchronized (this) {
        if (DEBUG) Log.d(TAG, "onSystemReady");
        mSystemReady = true;
        doKeyguardLocked();
    }
}
再看其doKeyguardLocked()方法:
private void doKeyguardLocked() {


    if(engModeFlag){
        Log.d(TAG, "show engmode!");
        engModeFlag = false;
        return ;
    }

    // if another app is disabling us, don't show
    if (!mExternallyEnabled) {
        if (DEBUG) Log.d(TAG, "doKeyguard: not showing because externally disabled");

        // note: we *should* set mNeedToReshowWhenReenabled=true here, but that makes
        // for an occasional ugly flicker in this situation:
        // 1) receive a call with the screen on (no keyguard) or make a call
        // 2) screen times out
        // 3) user hits key to turn screen back on
        // instead, we reenable the keyguard when we know the screen is off and the call
        // ends (see the broadcast receiver below)
        // TODO: clean this up when we have better support at the window manager level
        // for apps that wish to be on top of the keyguard
        return;
    }

    // if the keyguard is already showing, don't bother
    if (mKeyguardViewManager.isShowing()) {
        if (DEBUG) Log.d(TAG, "doKeyguard: not showing because it is already showing");
        return;
    }

    final boolean provisioned = mUpdateMonitor.isDeviceProvisioned();
    final boolean lockedOrMissing = isSimLockedOrMissing();

    if (!lockedOrMissing && !provisioned) {
        if (DEBUG) Log.d(TAG, "doKeyguard: not showing because device isn't provisioned"
                + " and the sim is not locked or missing");
        return;
    }

    if (mLockPatternUtils.isLockScreenDisabled() && !lockedOrMissing) {
        if (DEBUG) Log.d(TAG, "doKeyguard: not showing because lockscreen is off");
        return;
    }

    if (DEBUG) Log.d(TAG, "doKeyguard: showing the lock screen");
    showLocked();
}
至此,锁屏启动完成。
4.6,othersapps启动
系统启动完成后,launcher会加载系统已经安装的apk,并显示在launcher上。
至此,android启动完成。
5,android启动动画效果剖析
在android启动的过程中我们通常可以看到若干个启动画面,均代表着不同的启动阶段,接下来根据启动阶段分析启动画面。
uboot启动:会有一帧 uboot logo。
kernel启动:会有一帧kernel logo。(默认不显示,其控制宏是默认关闭的)
android启动:会有一帧静态图片+一个闪动的图片序列(即开机动画)。
通常情况下,我们在分析android的开机动画效果时,很少去分析uboot logo和kernel logo,因为ubootlogo 属于uboot阶段,kernel logo 属于linux范围。正常情况下,我们在down版本,烧到手机里去时,会吧logo.bmp加进去,这是系统的处理是:uboot logo,kernel logo,android static logo是同一张图片,即我们加的logo.bmp。
双framebuffer显示logo机制分析:本来一直走的是一级logo显示,从uboot logo一直持续到系统动画,但考虑期间时间偏长,欲采用标准三级logo。1、uboot logo 2、kernle logo 3 initlogo.rle 最后动画bootanimation.zip。但是kernel 对framebuffer修改较大,故考虑在uboot开始和结束显示两张logo(第二幅logo显示调用在theKernel()跳入内核函数之前),kernel跳过。uboot 直接刷屏显示第二幅logo 动作过慢,效果不佳,经考虑采用双buffer策略。思路:
1.原来只要显示一张uboot logo :把nand 中boot.logo 拷贝至lcd_base+fbsize处,然后搬至lcd_base显示;
2.现在创建第二个framebuffer于lcd_base+2*fbsize处,在显示第二幅logo前把nand 中第二幅logo 仍然拷贝至lcd_base+fbsize处,然后搬至lcd_base+2*fbsize第二个framebuffer基地址;
3.把第二个framebuffer基地址告诉lcd 控制寄存器,更新framebuffer基地址;
4.但在kernel中,寄存器仍然会指向第一个framebuffer基地址,那么第二幅logo显示犹如昙花一现啊,不过这个问题好解决,既然第二幅logo已经搬进了第二个framebuffer那,那么只要在进入内核前做一个memcpy就好了。
注:logo是bmp格式,在拷贝前需要进行相应的解析,参考uboot给的解析代码,自定义函数。
5.1,uboot logo
以正常模式启动分析uboot logo。即normal_mode.c根据前部分的分析可知,流程会走至normal_nand_mode.c的vlx_nand_boot()函数。
//读取下载到nand中的boot_logo,就是开机亮的那一屏
   off=part->offset;
   nand = &nand_info[dev->id->num];
   //read boot image header
   size = 1<<19;//where the size come from????//和dowload工具中的地址一致
   char * bmp_img = malloc(size);
   if(!bmp_img){
       printf("not enough memory for splash image\n");
       return;
   }
   ret = nand_read_offset_ret(nand, off, &size, (void *)bmp_img, &off);
   if(ret != 0){
       printf("function: %s nand read error %d\n", __FUNCTION__, ret);
       return;
   }
   //第一次LCD logo
   lcd_display_logo(backlight_set,(ulong)bmp_img,size);
即由lcd_display_logo()完成相关操作。该函数在normal_mode.c中定义。
void lcd_display_logo(int backlight_set,ulong bmp_img,size_t size)
{
#ifdef CONFIG_SPLASH_SCREEN
    extern int lcd_display_bitmap(ulong bmp_image, int x, int y);
    extern void lcd_display(void);
    extern void *lcd_base;
    extern void Dcache_CleanRegion(unsigned int addr, unsigned int length);
    extern void set_backlight(uint32_t value);
    if(backlight_set == BACKLIGHT_ON){
        lcd_display_bitmap((ulong)bmp_img, 0, 0);
#if defined(CONFIG_SC8810) || defined(CONFIG_SC8825) || defined(CONFIG_SC8830)
        Dcache_CleanRegion((unsigned int)(lcd_base), size);//Size is to large.
#endif
        lcd_display();
        set_backlight(255);
    }else{
        memset((unsigned int)lcd_base, 0, size);
#if defined(CONFIG_SC8810) || defined(CONFIG_SC8825) || defined(CONFIG_SC8830)
        Dcache_CleanRegion((unsigned int)(lcd_base), size);//Size is to large.
#endif
        lcd_display();
    }
#endif
}
5.2,kernel logo
kernel logo 属于linux系统自带的logo机制,由于在android平台其显示默认是关闭的,此处不做多的分析,详细可参考博文:Android系统的开机画面显示过程分析 ,该博文只分析了启动过程的 kernel logo,android logo anim。
相关代码:
/kernel/drivers/video/fbmem.c
/kernel/drivers/video/logo/logo.c
/kernel/drivers/video/logo/Kconfig
/kernel/include/linux/linux_logo.h
static int nologo;
module_param(nologo, bool, 0);
MODULE_PARM_DESC(nologo, "Disables startup logo");
/* logo's are marked __initdata. Use __init_refok to tell
* modpost that it is intended that this function uses data
* marked __initdata.
*/
const struct linux_logo * __init_refok fb_find_logo(int depth)
{
const struct linux_logo *logo = NULL;
if (nologo)
return NULL;
    ......
}
5.3,android logo anim
Android 系统启动后,init.c中main()调用queue_builtin_action(console_init_action, "console_init")时会根据console_init_action函数调用load_565rle_image()函数读取/initlogo.rle(一张565 rle压缩的位图),如果读取成功,则在/dev/graphics/fb0显示Logo图片;如果读取失败,则将/dev/tty0设为TEXT模式, 并打开/dev/tty0,输出文本“A N D R I O D”字样。
static int console_init_action(int nargs, char **args)
{
    int fd;
    char tmp[PROP_VALUE_MAX];

    if (console[0]) {
        snprintf(tmp, sizeof(tmp), "/dev/%s", console);
        console_name = strdup(tmp);
    }

    fd = open(console_name, O_RDWR);
    if (fd >= 0)
        have_console = 1;
    close(fd);

    if( load_565rle_image(INIT_IMAGE_FILE) ) {
        fd = open("/dev/tty0", O_WRONLY);
        if (fd >= 0) {
            const char *msg;
                msg = "\n"
            "\n"
            "\n"
            "\n"
            "\n"
            "\n"
            "\n"  // console is 40 cols x 30 lines
            "\n"
            "\n"
            "\n"
            "\n"
            "\n"
            "\n"
            "\n"
            "             A N D R O I D ";
            write(fd, msg, strlen(msg));
            close(fd);
        }
    }
    return 0;
}
由此调用logo.c 的load_565rle_image()函数。
int load_565rle_image(char *fn)
{
    struct FB fb;
    struct stat s;
    unsigned short *data, *bits, *ptr;
    unsigned count, max;
    int fd;

    if (vt_set_mode(1))
        return -1;

    fd = open(fn, O_RDONLY);
    if (fd < 0) {
        ERROR("cannot open '%s'\n", fn);
        goto fail_restore_text;
    }

    if (fstat(fd, &s) < 0) {
        goto fail_close_file;
    }

    data = mmap(0, s.st_size, PROT_READ, MAP_SHARED, fd, 0);
    if (data == MAP_FAILED)
        goto fail_close_file;

    if (fb_open(&fb))
        goto fail_unmap_data;

    max = fb_width(&fb) * fb_height(&fb);
    ptr = data;
    count = s.st_size;
    bits = fb.bits;
    while (count > 3) {
        unsigned n = ptr[0];
        if (n > max)
            break;
        android_memset16(bits, ptr[1], n << 1);
        bits += n;
        max -= n;
        ptr += 2;
        count -= 4;
    }

    munmap(data, s.st_size);
    fb_update(&fb);
    fb_close(&fb);
    close(fd);
    unlink(fn);
    return 0;

fail_unmap_data:
    munmap(data, s.st_size);
fail_close_file:
    close(fd);
fail_restore_text:
    vt_set_mode(0);
    return -1;
}
该图片格式是565RLE image format格式的,可用工具将bmp格式转化为rle格式。之后会有init.rc 并发开机动画。
相关文件:
/frameworks/base/cmds/bootanimation/BootAnimation.h
/frameworks/base/cmds/bootanimation/BootAnimation.cpp
/frameworks/base/cmds/bootanimation/bootanimation_main.cpp
/system/core/init/init.c
/system/core/rootdir/init.rc
init.c解析init.rc(其中定义服务:“service bootanim /system/bin/bootanimation”),bootanim 服务由SurfaceFlinger.readyToRun()(property_set("ctl.start", "bootanim");)执行开机动画、bootFinished()(property_set("ctl.stop", "bootanim");)执行停止开机动画。 BootAnimation.h和BootAnimation.cpp文件放到了/frameworks/base/cmds /bootanimation目录下了,增加了一个入口文件bootanimation_main.cpp。Android.mk文件中可以看到,将开机 动画从原来的SurfaceFlinger里提取出来了,生成可执行文件:bootanimation。Android.mk代码如下:
//=============Android.mk======================
LOCAL_PATH:= $(call my-dir)
include $(CLEAR_VARS)
LOCAL_SRC_FILES:= \
    bootanimation_main.cpp \
    BootAnimation.cpp
# need "-lrt" on Linux simulator to pick up clock_gettime
ifeq ($(TARGET_SIMULATOR),true)
    ifeq ($(HOST_OS),linux)
        LOCAL_LDLIBS += -lrt
    endif
endif
LOCAL_SHARED_LIBRARIES := \
    libcutils \
    libutils \
    libui \
    libcorecg \
    libsgl \
    libEGL \
    libGLESv1_CM \
    libmedia
LOCAL_C_INCLUDES := \
    $(call include-path-for, corecg graphics)
LOCAL_MODULE:= bootanimation
include $(BUILD_EXECUTABLE)
//==========================================
备注:
1,adb shell后,可以直接运行“bootanimation”来重新看开机动画,它会一直处于动画状态,而不会停止。
2,adb shell后,命令“setprop ctl.start bootanim”执行开机动画;命令“getprop ctl.start bootanim”停止开机动画。这两句命令分别对应SurfaceFlinger.cpp的两句语 句:property_set("ctl.start", "bootanim");和property_set("ctl.stop", "bootanim")。
至此android启动动画分析结束。
转载请署名来源:http://blog.csdn.net/galensphang/article/details/13631929#t26