SpringCloud 2021版本教程:使用nacos作为注册中心和配置中心(2021版本+Boot2.7.6)
目录
前言
系列文章目录
一、什么是Nacos
1、nacos架构原理
2、nacos、eureka、zookeeper的区别
1、参考博客,写得很详细通俗易懂:一文说清eureka、zookepeer、nacos三者的关系 - 知乎
2、三者区别:
3、CAP原理:
二、项目目录
1.目录截图
2.完整pom文件
三.服务提供者provider
1.目录截图
2.完整pom文件
3.编写接口类
4.启动Java类
5.application.yml配置文件
6.bootstrap.yml配置文件
四.服务消费者consumer
1.目录截图
2.完整pom文件
3.编写FeignClient去调用消费者接口
4、编写消费者controller类
5.启动Java类
6.application.yml配置文件
7.bootstrap.yml配置文件
五、Nacos注册中心
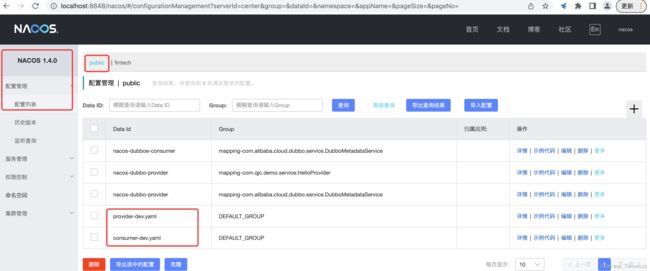
1、配置中心截图
2、provider服务提供者完整配置文件
3、consumer消费者完整配置文件
4、查看服务注册
六、测试访问
1、启动服务
2、输入地址:http://localhost:8763/hello-feign?name=1
总结
前言
本篇博客使用Spring Cloud 2021版本、Nacos、Spring Boot 2.7.6
系列文章目录
Spring Boot2.0系列教程合集、Spring Cloud系列教程合集、Spring Boot常见错误合集、Spring Cloud常见错误合集_zjh_746140129的博客-CSDN博客
以下是本篇文章正文内容,下面案例可供参考
一、什么是Nacos
Nacos 致力于帮助您发现、配置和管理微服务。Nacos 提供了一组简单易用的特性集,帮助您快速实现动态服务发现、服务配置、服务元数据及流量管理。是Spring Cloud A 中的服务注册发现组件,类似于Consul、Eureka,同时它又提供了分布式配置中心的功能,这点和Consul的config类似,支持热加载。
1、nacos架构原理
参考博客:Nacos原理详解(注册中心,配置中心) - 腾讯云开发者社区-腾讯云
2、nacos、eureka、zookeeper的区别
1、参考博客,写得很详细通俗易懂:一文说清eureka、zookepeer、nacos三者的关系 - 知乎
2、三者区别:
1、协议:
eureka内部是AP协议,即它可以保证服务的高可用,但是对于一致性的要求不高
zookepper内部是CP协议,即它可以保证服务的数据一致性,但是对于服务的可用性要求不高
nacos内部是AP/CP协议,默认AP协议,如果对一致性的要求比较高可以切换为CP协议
nacos使用的是netty和服务直接进行连接,属于长连接;eureka是使用定时发送和服务进行联系,属于短连接
2、雪崩保护:
eureka是存在雪崩保护机制的,服务注册列表会缓存再调用方的本地
zookepper没有雪崩保护机制
nacos的雪崩保护机制和eureka的原理相同,将服务的注册列表保存在调用方的本地
3、容器化部署:
eureka和zookepper暂时不支持k8s
nacos在这方面是支持的
3、CAP原理:
C:Consistency
即一致性,访问所有的节点得到的数据应该是一样的。注意,这里的一致性指的是强一致性,也就是数据更新完,访问任何节点看到的数据完全一致,要和弱一致性,最终一致性区分开来。
A:Availability
即可用性,所有的节点都保持高可用性。注意,这里的高可用还包括不能出现延迟,比如如果节点B由于等待数据同步而阻塞请求,那么节点B就不满足高可用性。
P:Partiton tolerance
即分区容忍性,这里的分区是指网络意义上的分区。由于网络是不可靠的,所有节点之间很可能出现无法通讯的情况,在节点不能通信时,要保证系统可以继续正常服务。
nacos是根据配置识别CP或AP模式,如果注册Nacos的client节点注册时是ephemeral=true即为临时节点,那么Naocs集群对这个client节点效果就是AP,反之则是CP,即不是临时节点。
#false为永久实例,true表示临时实例开启,注册为临时实例
 spring.cloud.nacos.discovery.ephemeral=true
二、项目目录
1.目录截图
2.完整pom文件
    4.0.0

        org.springframework.boot
        spring-boot-starter-parent
        2.6.0


    org.example
    cloud-2021-boot2-7
    pom
    1.0-SNAPSHOT

        cloud-consumer
        cloud-provider
        cloud-gateway


        UTF-8
        UTF-8
        1.8
        2.7.3
        2021.0.3
        2021.0.1.0
        2.2.6.RELEASE


                org.springframework.boot
                spring-boot-dependencies
                ${spring-boot.version}
                pom
                import


                org.springframework.cloud
                spring-cloud-dependencies
                ${spring-cloud.version}
                pom
                import


                com.alibaba.cloud
                spring-cloud-alibaba-dependencies
                ${spring.cloud.alibaba.version}
                pom
                import


            dev

                dev


                true


            uat

                uat


        cloud-2021-boot2-7


                src/main/resources


                    environment/dev/**
                    environment/uat/**


                src/main/resources/environment/${environment}
                ${project.build.directory}/classes


                org.apache.maven.plugins
                maven-compiler-plugin
                3.8.1

                    1.8
                    1.8
三.服务提供者provider
1.目录截图
2.完整pom文件
        cloud-2021-boot2-7
        org.example
        1.0-SNAPSHOT

    4.0.0

    cloud-provider
    jar


            com.alibaba.cloud
            spring-cloud-starter-alibaba-nacos-discovery


            com.alibaba.cloud
            spring-cloud-starter-alibaba-nacos-config


            org.springframework.cloud
            spring-cloud-starter-bootstrap


            org.springframework.cloud
            spring-cloud-starter-openfeign


            org.springframework.cloud
            spring-cloud-starter-loadbalancer


            io.github.openfeign
            feign-httpclient


            org.springframework.boot
            spring-boot-starter-web


            org.springframework.boot
            spring-boot-starter-actuator


        cloud-provider


                org.springframework.boot
                spring-boot-maven-plugin

                    true
3.编写接口类
package com.cloud.provider.controller;

import org.springframework.beans.factory.annotation.Value;
import org.springframework.web.bind.annotation.GetMapping;
import org.springframework.web.bind.annotation.RequestParam;
import org.springframework.web.bind.annotation.RestController;

/**
 * @Description: 服务提供者
 * @Author: zhoujh
 * @CreateDate: 2022/12/20$ 9:13 上午$
 * @Version: 1.0
 */
@RestController
public class HelloController {
    @Value("${server.port}")
    String port;

    @GetMapping("/hello")
    public String hello(@RequestParam(value = "name", defaultValue = "cloud2021",required = false) String name) {
        return "hello " + name + ", i'm provider ,my port:" + port;

    }
}
4.启动Java类
package com.cloud.provider;

import org.springframework.boot.SpringApplication;
import org.springframework.boot.autoconfigure.SpringBootApplication;
import org.springframework.cloud.client.discovery.EnableDiscoveryClient;

/**
 * @Description: 启动类
 * @Author: zhoujh
 * @CreateDate: 2022/12/16$ 3:21 下午$
 * @Version: 1.0
 */

@SpringBootApplication
@EnableDiscoveryClient
public class ProviderApplication {
    public static void main(String[] args) {
        SpringApplication.run(ProviderApplication.class, args);
    }
}
5.application.yml配置文件
server:
  port: 8765
6.bootstrap.yml配置文件
spring:
  profiles:
    active: dev
  application:
    name: provider


  cloud:
    nacos:
      discovery:
        server-addr: 127.0.0.1:8848
      config:
        server-addr: 127.0.0.1:8848 #Nacos作为配置中心地址
file-extension: yaml #指定yaml格式的配置四.服务消费者consumer
1.目录截图
2.完整pom文件
        cloud-2021-boot2-7
        org.example
        1.0-SNAPSHOT

    4.0.0

    cloud-consumer

    jar


            com.alibaba.cloud
            spring-cloud-starter-alibaba-nacos-discovery


            com.alibaba.cloud
            spring-cloud-starter-alibaba-nacos-config


            org.springframework.cloud
            spring-cloud-starter-bootstrap


            org.springframework.cloud
            spring-cloud-starter-openfeign


            org.springframework.cloud
            spring-cloud-starter-loadbalancer


            io.github.openfeign
            feign-httpclient


            org.springframework.boot
            spring-boot-starter-web


            org.springframework.boot
            spring-boot-starter-actuator


        cloud-consumer


                org.springframework.boot
                spring-boot-maven-plugin

                    true
3.编写FeignClient去调用消费者接口
package com.cloud.consumer.service;

import org.springframework.cloud.openfeign.FeignClient;
import org.springframework.web.bind.annotation.GetMapping;
import org.springframework.web.bind.annotation.RequestParam;

/**
 * @Description: 通过feign去调用provider接口
 * @Author: zhoujh
 * @CreateDate: 2022/12/16$ 3:28 下午$
 * @Version: 1.0
 */
@FeignClient(value = "provider" )
public interface HelloService {

    @GetMapping("/hello")
    String hello(@RequestParam(value = "name", defaultValue = "cloud2021", required = false) String name);

}
4、编写消费者controller类
package com.cloud.consumer.controller;

import com.cloud.consumer.service.HelloService;
import org.springframework.beans.factory.annotation.Autowired;
import org.springframework.web.bind.annotation.GetMapping;
import org.springframework.web.bind.annotation.RestController;

/**
 * @Description: 消费者controller
 * @Author: zhoujh
 * @CreateDate: 2022/12/16$ 3:31 下午$
 * @Version: 1.0
 */
@RestController
public class HelloController {

    @Autowired
    HelloService helloService;

    @GetMapping("/hello-feign")
    public String helloFeign(){
        return helloService.hello("feign");
    }
}
5.启动Java类
package com.cloud.consumer;

import org.springframework.boot.SpringApplication;
import org.springframework.boot.autoconfigure.SpringBootApplication;
import org.springframework.cloud.client.discovery.EnableDiscoveryClient;
import org.springframework.cloud.openfeign.EnableFeignClients;

/**
 * @Description: 启动类
 * @Author: zhoujh
 * @CreateDate: 2022/12/16$ 11:22 上午$
 * @Version: 1.0
 */
@SpringBootApplication
@EnableDiscoveryClient
@EnableFeignClients
public class ConsumerApplication {
    public static void main(String[] args) {
        SpringApplication.run(ConsumerApplication.class, args);
    }


}
@EnableFeignClients注解很重要!!!
6.application.yml配置文件
server:
  port: 8762
7.bootstrap.yml配置文件
spring:
  profiles:
    active: dev
  application:
    name: consumer


  cloud:
    nacos:
      discovery:
        server-addr: 127.0.0.1:8848
      config:
        server-addr: 127.0.0.1:8848 #Nacos作为配置中心地址
        file-extension: yaml #指定yaml格式的配置
五、Nacos注册中心
1、配置中心截图
2、provider服务提供者完整配置文件
server:
  port: 8769

spring:
  profiles:
    active: dev
  application:
    name: provider


  cloud:
    nacos:
      discovery:
        server-addr: 127.0.0.1:8848
      config:
        server-addr: 127.0.0.1:8848 #Nacos作为配置中心地址
        file-extension: yaml #指定yaml格式的配置
3、consumer消费者完整配置文件
server:
  port: 8763
spring:
  profiles:
    active: dev
  application:
    name: consumer


  cloud:
    nacos:
      discovery:
        server-addr: 127.0.0.1:8848
      config:
        server-addr: 127.0.0.1:8848 #Nacos作为配置中心地址
        file-extension: yaml #指定yaml格式的配置
4、查看服务注册
六、测试访问
1、启动服务
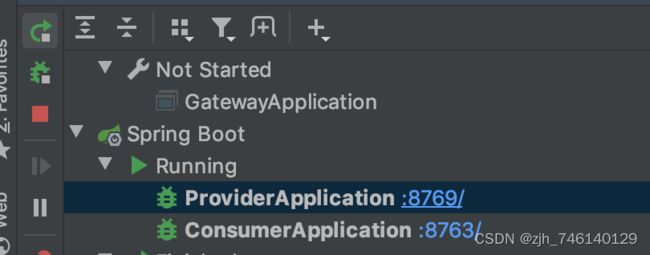
这里由于使用了配置中心,会优先读取Nacos配置的端口
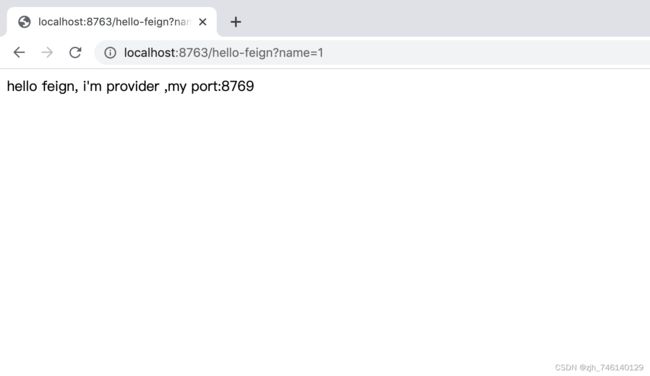
2、输入地址:http://localhost:8763/hello-feign?name=1
总结
本Demo通过整合Spring Cloud 、Spring Boot、Nacos 、Feign,学习了Nacos作为服务注册中心和配置中心的使用,使用Feign作为服务发现与服务调用的使用。


