目标检测Tensorflow:Yolo v3代码详解 (2)
目标检测Tensorflow:Yolo v3代码详解 (2)
- 三、解析Dataset()数据预处理部分
- 四. 模型训练 yolo_train.py
- 五. 模型冻结 model_freeze.py
- 六. 模型测试
- 六 Convert to PB(加载预训练模型)
-
- 模型导出
三、解析Dataset()数据预处理部分
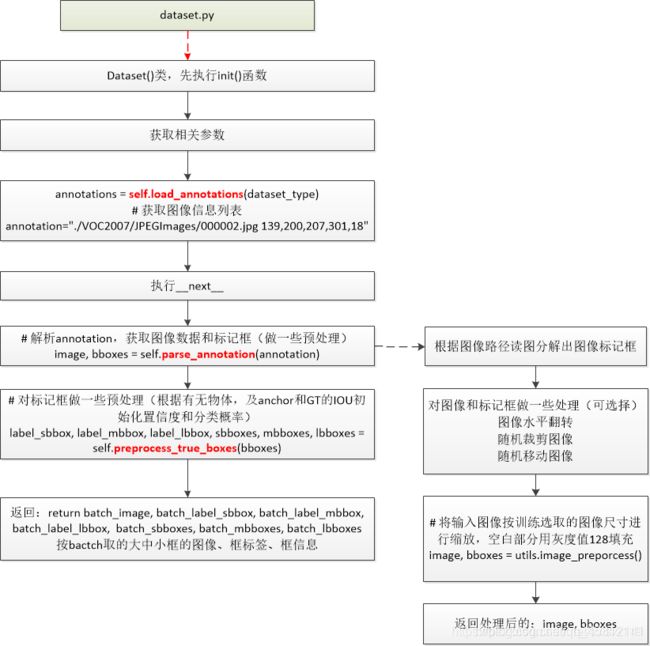
有了网络结构,我们还不能直接训练,因为,还缺乏对数据的操作,即,我们要如何对网络灌入数据,ground truth 又如何处理等问题,这时候,我们就需要 dataset.py 来为我们分工了。

import os
import cv2
import numpy as np
import tensorflow as tf
import core.utils as utils
from config import cfg


class Dataset(object):

    def __init__(self, train_flag=True):
        """
        :param train_flag: 是否是训练,默认训练
        """
        self.train_flag = train_flag

        # 训练数据
        if train_flag:
            self.data_file_path = cfg.TRAIN.TRAIN_DATA_PATH
            self.batch_size = cfg.TRAIN.TRAIN_BATCH_SIZE
            pass
        # 验证数据
        else:
            self.data_file_path = cfg.TRAIN.VAL_DATA_PATH
            self.batch_size = cfg.TRAIN.VAL_BATCH_SIZE
            pass

        self.train_input_size_list = cfg.TRAIN.INPUT_SIZE_LIST
        self.strides = np.array(cfg.YOLO.STRIDES)
        self.classes = utils.read_class_names(cfg.COMMON.CLASS_FILE_PATH)
        self.class_num = len(self.classes)
        self.anchor_list = utils.get_anchors(cfg.COMMON.ANCHOR_FILE_PATH)
        self.anchor_per_scale = cfg.YOLO.ANCHOR_PER_SCALE
        self.max_bbox_per_scale = cfg.COMMON.MAX_BBOX_PER_SCALE

        self.annotations = self.read_annotations()
        self.sample_num = len(self.annotations)
        self.batch_num = int(np.ceil(self.sample_num / self.batch_size))
        self.batch_count = 0
        pass

    # 迭代器
    def __iter__(self):
        return self

    # 使用迭代器 Dataset() 进行迭代,类似于 for 循环
    def __next__(self):
        with tf.device("/gpu:0"):
            # 从 train_input_size_list 中随机获取一个数值 作为 train_input_size
            self.train_input_size = np.random.choice(self.train_input_size_list)
            self.train_output_size = self.train_input_size // self.strides

            # 构建 输入图像 计算图
            batch_image = np.zeros((self.batch_size, self.train_input_size, self.train_input_size, 3))

            # 构建 3 个尺度预测图
            batch_label_sbbox = np.zeros((self.batch_size, self.train_output_size[0], self.train_output_size[0],
                                          self.anchor_per_scale, 5 + self.class_num))
            batch_label_mbbox = np.zeros((self.batch_size, self.train_output_size[1], self.train_output_size[1],
                                          self.anchor_per_scale, 5 + self.class_num))
            batch_label_lbbox = np.zeros((self.batch_size, self.train_output_size[2], self.train_output_size[2],
                                          self.anchor_per_scale, 5 + self.class_num))

            # 构建每个尺度上最多的 bounding boxes 的图
            batch_sbboxes = np.zeros((self.batch_size, self.max_bbox_per_scale, 4))
            batch_mbboxes = np.zeros((self.batch_size, self.max_bbox_per_scale, 4))
            batch_lbboxes = np.zeros((self.batch_size, self.max_bbox_per_scale, 4))

            num = 0
            # 是否还在当前的 epoch
            if self.batch_count < self.batch_num:
                # 这个 while 用于一个 epoch 中的数据一条一条凑够一个 batch_size
                while num < self.batch_size:
                    index = self.batch_count * self.batch_size + num
                    # 如果最后一个 batch 不够数据,则 从头拿数据来凑
                    if index >= self.sample_num:
                        index -= self.sample_num
                    annotation = self.annotations[index]
                    image, bboxes = self.parse_annotation(annotation)
                    label_sbbox, label_mbbox, label_lbbox, sbboxes, mbboxes, lbboxes = self.preprocess_true_boxes(
                        bboxes)

                    batch_image[num, :, :, :] = image

                    # [batch_size, x_scope, y_scope, iou_flag, 5 + classes]
                    batch_label_sbbox[num, :, :, :, :] = label_sbbox
                    batch_label_mbbox[num, :, :, :, :] = label_mbbox
                    batch_label_lbbox[num, :, :, :, :] = label_lbbox

                    batch_sbboxes[num, :, :] = sbboxes
                    batch_mbboxes[num, :, :] = mbboxes
                    batch_lbboxes[num, :, :] = lbboxes

                    num += 1

                self.batch_count += 1

                return batch_image, batch_label_sbbox, batch_label_mbbox, batch_label_lbbox, \
                       batch_sbboxes, batch_mbboxes, batch_lbboxes
            # 下一个 epoch
            else:
                self.batch_count = 0
                np.random.shuffle(self.annotations)
                raise StopIteration
            pass
        pass

    # 可以让 len(Dataset()) 返回 self.batch_num 的值
    def __len__(self):
        return self.batch_num

    # 获取 annotations.txt 文件信息
    def read_annotations(self):
        with open(self.data_file_path) as file:
            file_info = file.readlines()
            annotation = [line.strip() for line in file_info if len(line.strip().split()[1:]) != 0]
            np.random.shuffle(annotation)
            return annotation
        pass

    # 根据 annotation 信息 获取 image 和 bounding boxes
    def parse_annotation(self, annotation):
        # 将 "./data/images\Anime_180.jpg 388,532,588,729,0 917,154,1276,533,0"
        # 根据空格键切成 ['./data/images\\Anime_180.jpg', '388,532,588,729,0', '917,154,1276,533,0']
        line = annotation.split()
        image_path = line[0]
        if not os.path.exists(image_path):
            raise KeyError("%s does not exist ... " % image_path)
        image = np.array(cv2.imread(image_path))
        # 将 bboxes 做成 [[388, 532, 588, 729, 0], [917, 154, 1276, 533, 0]]
        bboxes = np.array([list(map(int, box.split(','))) for box in line[1:]])

        # 训练数据,进行仿射变换,让训练模型更好
        if self.train_flag:
            image, bboxes = self.random_horizontal_flip(np.copy(image), np.copy(bboxes))
            image, bboxes = self.random_crop(np.copy(image), np.copy(bboxes))
            image, bboxes = self.random_translate(np.copy(image), np.copy(bboxes))

        image, bboxes = utils.image_preporcess(np.copy(image), [self.train_input_size, self.train_input_size],
                                               np.copy(bboxes))
        return image, bboxes

    # 随机水平翻转
    def random_horizontal_flip(self, image, bboxes):

        if np.random.random() < 0.5:
            _, w, _ = image.shape
            image = image[:, ::-1, :]
            bboxes[:, [0, 2]] = w - bboxes[:, [2, 0]]

        return image, bboxes

    # 随机裁剪
    def random_crop(self, image, bboxes):

        if np.random.random() < 0.5:
            h, w, _ = image.shape
            max_bbox = np.concatenate([np.min(bboxes[:, 0:2], axis=0), np.max(bboxes[:, 2:4], axis=0)], axis=-1)

            max_l_trans = max_bbox[0]
            max_u_trans = max_bbox[1]
            max_r_trans = w - max_bbox[2]
            max_d_trans = h - max_bbox[3]

            crop_xmin = max(0, int(max_bbox[0] - np.random.uniform(0, max_l_trans)))
            crop_ymin = max(0, int(max_bbox[1] - np.random.uniform(0, max_u_trans)))
            crop_xmax = max(w, int(max_bbox[2] + np.random.uniform(0, max_r_trans)))
            crop_ymax = max(h, int(max_bbox[3] + np.random.uniform(0, max_d_trans)))

            image = image[crop_ymin: crop_ymax, crop_xmin: crop_xmax]

            bboxes[:, [0, 2]] = bboxes[:, [0, 2]] - crop_xmin
            bboxes[:, [1, 3]] = bboxes[:, [1, 3]] - crop_ymin

        return image, bboxes

    # 随机平移: 水平和竖直 方向移动变化,被移走后的位置,数值为0,显示为黑色
    def random_translate(self, image, bboxes):

        if np.random.random() < 0.5:
            h, w, _ = image.shape
            max_bbox = np.concatenate([np.min(bboxes[:, 0:2], axis=0), np.max(bboxes[:, 2:4], axis=0)], axis=-1)

            # 左上角 x、y 的数值,距离上边和下边的距离长度
            max_l_trans = max_bbox[0]
            max_u_trans = max_bbox[1]
            # 右下角 距离 右边和下边 的距离长度
            max_r_trans = w - max_bbox[2]
            max_d_trans = h - max_bbox[3]

            # 移动的偏移量,用来确保目标还在图像中
            tx = np.random.uniform(-(max_l_trans - 1), (max_r_trans - 1))
            ty = np.random.uniform(-(max_u_trans - 1), (max_d_trans - 1))

            # 仿射变换核函数
            M = np.array([[1, 0, tx], [0, 1, ty]])
            # 仿射变换操作
            image = cv2.warpAffine(image, M, (w, h))

            # 对 bboxes 进行相应值 处理
            bboxes[:, [0, 2]] = bboxes[:, [0, 2]] + tx
            bboxes[:, [1, 3]] = bboxes[:, [1, 3]] + ty

        return image, bboxes

    # 对 ground truth boxes 进行预处理
    def preprocess_true_boxes(self, bboxes):

        # 构建 [train_output_sizes, train_output_sizes, anchor_per_scale, 5 + num_classes] 结构 的 label 图, 全部填 0 值
        label = [np.zeros((self.train_output_size[i], self.train_output_size[i], self.anchor_per_scale,
                           5 + self.class_num)) for i in range(3)]

        # 构建 xywh 的结构图 [max_bbox_per_scale, 4, 3]
        bboxes_xywh = [np.zeros((self.max_bbox_per_scale, 4)) for _ in range(3)]
        # bbox_count = [0, 0, 0]
        bbox_count = np.zeros((3,))

        # 将 bboxes ['388,532,588,729,0', '917,154,1276,533,0'] list 进行遍历
        for bbox in bboxes:
            # 获取单个 ground truth boxes 的坐标 [xmin, ymin, xmax, ymax]
            bbox_coor = bbox[:4]
            # 获取 ground truth 类别的下标
            bbox_class_ind = bbox[4]

            # 构建一个 c 类 大小的 one_hot list 并用 0 填充
            one_hot = np.zeros(self.class_num, dtype=np.float)
            # 构建真实的 label: 将上面获取到的 ground truth 类别的下标 定义 该类别的 one_hot 值为 1
            one_hot[bbox_class_ind] = 1.0
            # 构建 class_num 长度 的 list,并均匀分布,并填充 1.0 / class_num 值,
            # 让平滑看起来更舒服点,使用倒数值,是为了下面做平滑的时候,方便将总概率凑够 100%
            uniform_distribution = np.full(self.class_num, 1.0 / self.class_num)
            deta = 0.01
            # 对 one_hot 进行平滑处理, 模拟真实预测情况,前景概率是 90+%,但不是 100%; 而背景的概率,也不是 0%
            # 不过,这个平滑也可以不做的,没什么必要,因为 调用 np.argmax() 获取最大概率下标的结果是一样的。
            smooth_one_hot = one_hot * (1 - deta) + deta * uniform_distribution

            # 转换 [xmin, ymin, xmax, ymax] --> [x, y, w, h] bounding boxes 结构
            bbox_xywh = utils.bbox_dxdy_xywh(bbox_coor)

            # 归一化处理,将 ground truth boxes 缩放到 strides=[8, 16, 32] 对应的尺度
            bbox_xywh_scaled = 1.0 * bbox_xywh[np.newaxis, :] / self.strides[:, np.newaxis]

            iou = []
            exist_positive = False
            # 这里的 3 表示 yolo v3 中有 3 个预测尺度
            for i in range(3):
                # 构建 anchors 结构 [[0, 0, 0, 0], [0, 0, 0, 0], [0, 0, 0, 0]]
                anchors_xywh = np.zeros((self.anchor_per_scale, 4))
                # 将 ground truth box 的中心点 设置进去, 后面 + 0.5 是给一个偏置值
                # [[x + 0.5, y + 0.5, 0, 0], [x + 0.5, y + 0.5, 0, 0], [x + 0.5, y + 0.5, 0, 0]]
                anchors_xywh[:, 0:2] = np.floor(bbox_xywh_scaled[i, 0:2]).astype(np.int32) + 0.5
                # 将 anchors box 的 w, h 设置进去, 例如下面的小尺度 anchor 值
                # [[x + 0.5, y + 0.5, 10, 13], [x + 0.5, y + 0.5, 16, 30], [x + 0.5, y + 0.5, 33, 23]]
                anchors_xywh[:, 2:4] = self.anchor_list[i]

                # 计算 ground truth box 与 anchor boxes 的 IOU
                # [x, y, w, h] --> [xmin, ymin, xmax, ymax]
                ground_truth_scaled = utils.bbox_xywh_dxdy(bbox_xywh_scaled[i][np.newaxis, :])
                anchor_boxes = utils.bbox_xywh_dxdy(anchors_xywh)

                # 缩放 再偏移 中心点,之后再计算 IOU,这样,用来比较判断 是否是正样本
                # anchor_boxes 里面有 3 个不同尺度 box,所以结果为 3 个 iou 值的 list
                iou_scale = utils.bboxes_iou(ground_truth_scaled, anchor_boxes)
                iou.append(iou_scale)
                # 这里 iou_mask 是 3 个 bool 元素的 list
                iou_mask = iou_scale > 0.3

                # np.any 为 逻辑 or 的意思,只要有一个是 True,这为 True
                if np.any(iou_mask):
                    # 获取 中心点 x、y
                    xind, yind = np.floor(bbox_xywh_scaled[i, 0:2]).astype(np.int32)

                    label[i][yind, xind, iou_mask, :] = 0
                    # 在 output 大小的 feature maps 中,找到映射 缩放后的中心点 对应的格子,
                    # 赋值 bbox_xywh、conf、prob
                    label[i][yind, xind, iou_mask, 0:4] = bbox_xywh
                    # 进入这个 if,则证明 IOU > 0.3, 有交集,是 前景,所以置信度为 1.0
                    label[i][yind, xind, iou_mask, 4:5] = 1.0
                    label[i][yind, xind, iou_mask, 5:] = smooth_one_hot

                    # 获取 bbox 对应的 下标; bbox_count = [0, 0, 0]
                    bbox_ind = int(bbox_count[i] % self.max_bbox_per_scale)
                    # bbox_ind 表示 一张图 第几个 ground truth box
                    bboxes_xywh[i][bbox_ind, :4] = bbox_xywh

                    bbox_count[i] += 1

                    exist_positive = True

            if not exist_positive:
                # 获取 IOU 值最大 所对应的下标
                best_anchor_ind = np.argmax(np.array(iou).reshape(-1), axis=-1)
                best_detect = int(best_anchor_ind / self.anchor_per_scale)
                # 获取最佳 anchor
                best_anchor = int(best_anchor_ind % self.anchor_per_scale)
                # 获取 最佳 anchor 对应的 中心点
                xind, yind = np.floor(bbox_xywh_scaled[best_detect, 0:2]).astype(np.int32)

                label[best_detect][yind, xind, best_anchor, :] = 0
                label[best_detect][yind, xind, best_anchor, 0:4] = bbox_xywh
                label[best_detect][yind, xind, best_anchor, 4:5] = 1.0
                label[best_detect][yind, xind, best_anchor, 5:] = smooth_one_hot

                bbox_ind = int(bbox_count[best_detect] % self.max_bbox_per_scale)
                # bbox_ind 表示 一张图 第几个 ground truth box
                bboxes_xywh[best_detect][bbox_ind, :4] = bbox_xywh

                bbox_count[best_detect] += 1

        label_sbbox, label_mbbox, label_lbbox = label
        sbboxes, mbboxes, lbboxes = bboxes_xywh
        return label_sbbox, label_mbbox, label_lbbox, sbboxes, mbboxes, lbboxes
函数返回
batch_image       # one batch resized images
batch_label_sbbox # 第一个尺度下的匹配结果
batch_label_mbbox # 第二个尺度下的匹配结果
batch_label_lbbox # 第三个尺度下的匹配结果
batch_sbboxes     # 第一个尺度下匹配的 GT 集合
batch_mbboxes     # 第二个尺度下匹配的 GT 集合
batch_lbboxes     # 第三个尺度下匹配的 GT 集合
- 其中 batch_image 为网络输入特征,按照 NxHxWxC 维度排列,batch_label_sbbox、batch_label_mbbox 、batch_label_lbbox 这三个用以确定不同尺度下的 anchor 做正样本还是负样本;batch_sbboxes、batch_mbboxes、batch_lbboxes 这三个就有点意思了,是为了后续区分负样本是否有可能变成正样本(回归到 bbox 了) 做准备
- label 最后一个维度是 5 + self.num_classes,其中 5, 前 4 维是 [center_x, center_y, w, h] GT bbox, 第 5 维是 0/1, 0 表示无匹配,1 表示匹配成功。self.num_classes 用来表示目标类别,之所以要用这么多维数据来表示,是因为将整形 label 转换成了 one-hot 形式。同时这里做了 label smooth 操作,例如 label 0 ->[9.90833333e-01 8.33333333e-04 8.33333333e-04 8.33333333e-04 8.33333333e-04 8.33333333e-04 8.33333333e-04 8.33333333e-04 8.33333333e-04 8.33333333e-04 8.33333333e-04 8.33333333e-04]。
- 匹配计算 bbox_iou -> [0.19490255 0.47240051 0.65717606],如果找到满足大于 0.3 的一对,即为匹配成功 (False, True, True)。匹配成功后就往 label 和 bboxes_xywh 里填信息就好了。
四. 模型训练 yolo_train.py
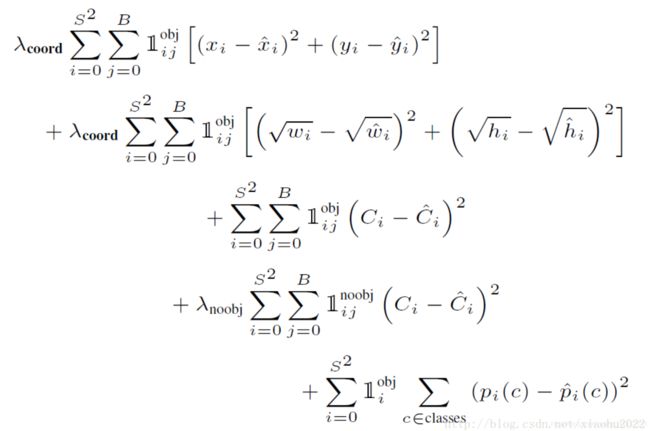
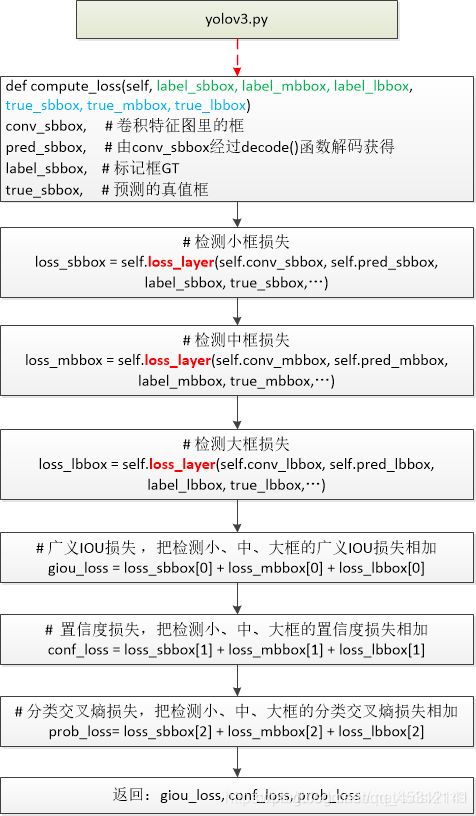
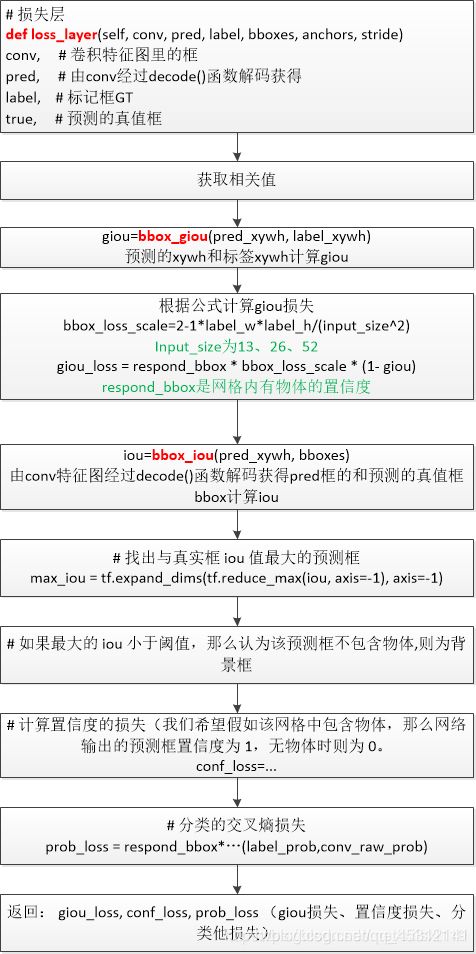
YOLOV3 的 loss 分为三部分,回归 loss, 二分类(前景/背景) loss, 类别分类 loss


two stage train
整个训练按照任务划分成了两个阶段,之所以这么设计,是考虑作者是拿原始的 DarkNet 来 finetune 的。
finetune 的一般流程就是,利用预训练的模型赋初值,先固定 backbone,只训练最后的分类/回归层。然后放开全部训练。
也可以对于浅层特征可以用小的学习率来微调(因为网络里浅层特征提取的边界纹理信息可能都是相近的,不需要作大调整),越接近于输出层可能需要调整的越多,输出层因为没有用其他模型初始化(随机初始化),因此需要从头训练。
first_stage_train
这个阶段将专注于训练最后的检测部分,即分类和回归
with tf.name_scope("define_first_stage_train"):
    self.first_stage_trainable_var_list = []
    for var in tf.trainable_variables():
        var_name = var.op.name
        var_name_mess = str(var_name).split('/')
        if var_name_mess[0] in ['conv_sbbox', 'conv_mbbox', 'conv_lbbox']:
            self.first_stage_trainable_var_list.append(var)

    first_stage_optimizer = tf.train.AdamOptimizer(self.learn_rate).minimize(self.loss,
                                                                             var_list=self.first_stage_trainable_var_list)
    with tf.control_dependencies(tf.get_collection(tf.GraphKeys.UPDATE_OPS)):
        with tf.control_dependencies([first_stage_optimizer, global_step_update]):
            with tf.control_dependencies([moving_ave]):
                self.train_op_with_frozen_variables = tf.no_op()
second_stage_train
这个阶段就是整体训练,没什么好说的
with tf.name_scope("define_second_stage_train"):
    second_stage_trainable_var_list = tf.trainable_variables()
    second_stage_optimizer = tf.train.AdamOptimizer(self.learn_rate).minimize(self.loss,
                                                                              var_list=second_stage_trainable_var_list)

    with tf.control_dependencies(tf.get_collection(tf.GraphKeys.UPDATE_OPS)):
        with tf.control_dependencies([second_stage_optimizer, global_step_update]):
            with tf.control_dependencies([moving_ave]):
                self.train_op_with_all_variables = tf.no_op()
import os
from datetime import datetime
import shutil
import numpy as np
import tensorflow as tf
from tqdm import tqdm
from core.dataset import Dataset
from core.yolov3 import YoloV3
from config import cfg


class YoloTrain(object):

    def __init__(self):
        # 学习率的范围
        self.learning_rate_init = cfg.TRAIN.LEARNING_RATE_INIT
        self.learning_rate_end = cfg.TRAIN.LEARNING_RATE_END
        # 两个阶段的 epochs
        self.first_stage_epochs = cfg.TRAIN.FIRST_STAGE_EPOCHS
        self.second_stage_epochs = cfg.TRAIN.SECOND_STAGE_EPOCHS
        # 预热 epoch
        self.warm_up_epochs = cfg.TRAIN.WARM_UP_EPOCHS
        # 模型初始化
        self.initial_weight = cfg.TRAIN.INITIAL_WEIGHT
        # 衰变率 移动平均值
        self.moving_ave_decay = cfg.COMMON.MOVING_AVE_DECAY
        # 每个尺度最多的 boxes 数
        self.max_bbox_per_scale = cfg.COMMON.MAX_BBOX_PER_SCALE
        # 训练日志路径
        self.train_log = cfg.TRAIN.TRAIN_LOG
        # 验证日志路径
        self.val_log = cfg.TRAIN.VAL_LOG

        # 获取训练数据集
        self.train_data = Dataset()
        # 获取一个 epoch 需要训练多少次
        self.batch_num = len(self.train_data)
        # 获取验证数据集
        self.val_data = Dataset(train_flag=False)

        self.conv_bbox = ['conv_sbbox', 'conv_mbbox', 'conv_lbbox']

        self.train_loss_info = "train loss: %.2f"
        self.ckpt_info = "./checkpoint/val_loss=%.4f.ckpt"
        self.loss_info = "=> Epoch: %2d, Time: %s, Train loss: %.2f, Val loss: %.2f, Saving %s ..."

        # 加载 Session
        self.config = tf.ConfigProto()
        self.config.gpu_options.allow_growth = True
        self.sess = tf.Session(config=self.config)

        # 定义 feed_dict 图
        with tf.name_scope('define_input'):
            self.input_data = tf.placeholder(dtype=tf.float32, name='input_data')
            self.label_sbbox = tf.placeholder(dtype=tf.float32, name='label_sbbox')
            self.label_mbbox = tf.placeholder(dtype=tf.float32, name='label_mbbox')
            self.label_lbbox = tf.placeholder(dtype=tf.float32, name='label_lbbox')
            self.true_sbboxes = tf.placeholder(dtype=tf.float32, name='sbboxes')
            self.true_mbboxes = tf.placeholder(dtype=tf.float32, name='mbboxes')
            self.true_lbboxes = tf.placeholder(dtype=tf.float32, name='lbboxes')
            self.training_flag = tf.placeholder(dtype=tf.bool, name='training')

        # 定义 loss
        with tf.name_scope("define_loss"):
            self.model = YoloV3(self.input_data, self.training_flag)
            self.net_var = tf.global_variables()
            self.giou_loss, self.conf_loss, self.prob_loss = self.model.compute_loss(
                self.label_sbbox, self.label_mbbox, self.label_lbbox,
                self.true_sbboxes, self.true_mbboxes, self.true_lbboxes)
            self.loss = self.giou_loss + self.conf_loss + self.prob_loss
            pass

        # 定义学习率 和 衰减变化
        with tf.name_scope('learn_rate'):

            self.global_step = tf.Variable(1.0, dtype=tf.float64, trainable=False, name='global_step')
            # 预热训练的 batch 数
            warm_up_steps = tf.constant(self.warm_up_epochs * self.batch_num,
                                        dtype=tf.float64, name='warm_up_steps')

            # 总训练的 batch 次数
            train_steps = tf.constant((self.first_stage_epochs + self.second_stage_epochs) * self.batch_num,
                                      dtype=tf.float64, name='train_steps')

            # tf.cond() 类似于 if else 语句, if pred true_fn else false_fn
            # tf.cos() 余弦函数
            # 通过这个算法,用来在训练过程中逐渐缩小 learning_rate
            self.learn_rate = tf.cond(
                pred=self.global_step < warm_up_steps,
                true_fn=lambda: self.global_step / warm_up_steps * self.learning_rate_init,
                false_fn=lambda: self.learning_rate_end + 0.5 * (self.learning_rate_init - self.learning_rate_end) *
                                 (1 + tf.cos(
                                     (self.global_step - warm_up_steps) / (train_steps - warm_up_steps) * np.pi))
            )

            # 类似于 self.global_step += 1; 但是,使用这个方法的话,必须按照 tf 的规矩,
            # 先构建 变量图,再初始化,最后 run() 的时候,才会执行
            global_step_update = tf.assign_add(self.global_step, 1.0)

            pass

        # 衰变率 移动平均值
        with tf.name_scope("define_weight_decay"):
            moving_ave = tf.train.ExponentialMovingAverage(self.moving_ave_decay).apply(tf.trainable_variables())
            pass

        # 第一阶段训练
        with tf.name_scope("define_first_stage_train"):

            self.first_stage_trainable_var_list = []

            for var in tf.trainable_variables():
                var_name = var.op.name
                var_name_mess = str(var_name).split('/')
                if var_name_mess[0] in self.conv_bbox:
                    self.first_stage_trainable_var_list.append(var)

            first_stage_optimizer = tf.train.AdamOptimizer(self.learn_rate).minimize(self.loss,
                                                                                     var_list=self.first_stage_trainable_var_list)

            with tf.control_dependencies(tf.get_collection(tf.GraphKeys.UPDATE_OPS)):
                with tf.control_dependencies([first_stage_optimizer, global_step_update]):
                    with tf.control_dependencies([moving_ave]):
                        self.train_op_with_frozen_variables = tf.no_op()

        # 第二阶段训练
        with tf.name_scope("define_second_stage_train"):

            second_stage_trainable_var_list = tf.trainable_variables()

            second_stage_optimizer = tf.train.AdamOptimizer(self.learn_rate).minimize(self.loss,
                                                                                      var_list=second_stage_trainable_var_list)

            with tf.control_dependencies(tf.get_collection(tf.GraphKeys.UPDATE_OPS)):
                with tf.control_dependencies([second_stage_optimizer, global_step_update]):
                    with tf.control_dependencies([moving_ave]):
                        self.train_op_with_all_variables = tf.no_op()

        with tf.name_scope('loader_and_saver'):
            self.loader = tf.train.Saver(self.net_var)
            self.saver = tf.train.Saver(tf.global_variables(), max_to_keep=10)

        with tf.name_scope('summary'):
            tf.summary.scalar("learn_rate", self.learn_rate)
            tf.summary.scalar("giou_loss", self.giou_loss)
            tf.summary.scalar("conf_loss", self.conf_loss)
            tf.summary.scalar("prob_loss", self.prob_loss)
            tf.summary.scalar("total_loss", self.loss)

            if os.path.exists(self.train_log):
                shutil.rmtree(self.train_log)

            os.mkdir(self.train_log)

            if os.path.exists(self.val_log):
                shutil.rmtree(self.val_log)
            os.mkdir(self.val_log)

            # 汇总日志
            self.write_op = tf.summary.merge_all()
            # 定义两个tf.summary.FileWriter文件记录器再不同的子目录,分别用来存储训练和测试的日志数据
            # 同时,将Session计算图sess.graph加入训练过程,这样再TensorBoard的GRAPHS窗口中就能展示
            self.train_writer = tf.summary.FileWriter(self.train_log, graph=self.sess.graph)
            # 验证集日志
            self.val_writer = tf.summary.FileWriter(self.val_log)
            pass

        pass

    def do_train(self):
        # 初始化参数
        self.sess.run(tf.global_variables_initializer())

        try:
            # 加载已有模型
            print('=> Restoring weights from: %s ... ' % self.initial_weight)
            self.loader.restore(self.sess, self.initial_weight)
        # 如果模型不存在,则初始化模型
        except:
            print('=> %s does not exist !!!' % self.initial_weight)
            print('=> Now it starts to train YOLOV3 from scratch ...')
            # 并重新定义 第一阶段训练 epoch 为 0
            self.first_stage_epochs = 0

        for epoch in range(1, 1 + self.first_stage_epochs + self.second_stage_epochs):
            if epoch <= self.first_stage_epochs:
                train_op = self.train_op_with_frozen_variables
            else:
                train_op = self.train_op_with_all_variables

            # 调取进度条
            pbar = tqdm(self.train_data)

            train_epoch_loss = []
            val_epoch_loss = []

            for train_data in pbar:
                _, train_summary, train_step_loss, global_step_val = self.sess.run(
                    [train_op, self.write_op, self.loss, self.global_step], feed_dict={
                        self.input_data: train_data[0],
                        self.label_sbbox: train_data[1],
                        self.label_mbbox: train_data[2],
                        self.label_lbbox: train_data[3],
                        self.true_sbboxes: train_data[4],
                        self.true_mbboxes: train_data[5],
                        self.true_lbboxes: train_data[6],
                        self.training_flag: True,
                    })

                train_epoch_loss.append(train_step_loss)
                self.train_writer.add_summary(train_summary, global_step_val)
                pbar.set_description(self.train_loss_info % train_step_loss)

            for test_data in self.val_data:
                val_summary, val_step_loss = self.sess.run([self.write_op, self.loss],
                                                           feed_dict={
                                                               self.input_data: test_data[0],
                                                               self.label_sbbox: test_data[1],
                                                               self.label_mbbox: test_data[2],
                                                               self.label_lbbox: test_data[3],
                                                               self.true_sbboxes: test_data[4],
                                                               self.true_mbboxes: test_data[5],
                                                               self.true_lbboxes: test_data[6],
                                                               self.training_flag: False,
                                                           })

                val_epoch_loss.append(val_step_loss)
                self.val_writer.add_summary(val_summary, epoch + 1)

            train_epoch_loss = np.mean(train_epoch_loss)
            val_epoch_loss = np.mean(val_epoch_loss)
            ckpt_file = self.ckpt_info % val_epoch_loss
            now_time = datetime.now()
            print(self.loss_info % (epoch, now_time, train_epoch_loss, val_epoch_loss, ckpt_file))
            self.saver.save(self.sess, ckpt_file, global_step=epoch)


if __name__ == "__main__":
    # 代码开始时间
    start_time = datetime.now()
    print("开始时间: {}".format(start_time))

    demo = YoloTrain()
    demo.do_train()

    # 代码结束时间
    end_time = datetime.now()
    print("结束时间: {}, 训练模型耗时: {}".format(end_time, end_time - start_time))
    pass
五. 模型冻结 model_freeze.py
当训练活动 .ckpt 模型之后,我们常常需要对模型进行冻结操作
from datetime import datetime
from config import cfg
import tensorflow as tf
from core.yolov3 import YoloV3


class ModelFreeze(object):

    def __init__(self):
        pass

    # 调用 yolo 的节点,对模型进行冻结
    def yolo_model(self):

        output_node_names = cfg.FREEZE.YOLO_OUTPUT_NODE_NAME

        ckpt_model_path = cfg.FREEZE.CKPT_MODEL_PATH
        pb_model_path = cfg.FREEZE.PB_MODEL_PATH

        # 获取节点名
        with tf.name_scope('input'):
            input_data = tf.placeholder(dtype=tf.float32, name='input_data')
        model = YoloV3(input_data, training_flag=False)

        self.freeze_model(ckpt_model_path, pb_model_path, output_node_names)
        pass

    # 模型冻结
    def freeze_model(self, ckpt_file, pb_file, output_node_names):

        sess = tf.Session(config=tf.ConfigProto(allow_soft_placement=True))
        saver = tf.train.Saver()

        saver.restore(sess, ckpt_file)
        converted_graph_def = tf.graph_util.convert_variables_to_constants(sess,
                                                                           input_graph_def=sess.graph.as_graph_def(),
                                                                           output_node_names=output_node_names)

        with tf.gfile.GFile(pb_file, "wb") as f:
            f.write(converted_graph_def.SerializeToString())
        pass


if __name__ == '__main__':
    # 代码开始时间
    start_time = datetime.now()
    print("开始时间: {}".format(start_time))

    demo = ModelFreeze()
    demo.yolo_model()

    # 代码结束时间
    end_time = datetime.now()
    print("结束时间: {}, 训练模型耗时: {}".format(end_time, end_time - start_time))
六. 模型测试
图像测试 yolo_test.py
from datetime import datetime
import os
import cv2
import numpy as np
import tensorflow as tf
import shutil
from core import utils
from config import cfg


class YoloTest(object):

    def __init__(self):
        # pb 模型路径
        self.pb_model_path = cfg.TEST.TEST_PB_MODEL_PATH
        # yolov3 网络 返回 3 个尺度节点
        self.return_elements = cfg.TEST.RETURN_ELEMENTS
        # class_name 字典
        self.class_name_dir = utils.read_class_names(cfg.COMMON.CLASS_FILE_PATH)
        # c 类 个数
        self.class_name_len = len(self.class_name_dir)
        # 输入尺度
        self.input_size = cfg.TEST.INPUT_SIZE
        # 输出 图像 文件夹
        self.output_image_file = cfg.TEST.OUTPUT_IMAGE_FILE
        # 输出 预测框信息 文件夹
        self.output_box_info_file = cfg.TEST.OUTPUT_BOX_INFO_FILE
        # 是否保存预测打框图像,默认为 True 保存
        self.save_boxes_image_flag = cfg.TEST.SAVE_BOXES_IMAGE_FLAG

        self.graph = tf.Graph()
        # 加载模型
        self.return_tensors = utils.read_pb_return_tensors(self.graph,
                                                           self.pb_model_path,
                                                           self.return_elements)
        self.sess = tf.Session(graph=self.graph)
        pass

    def object_predict(self, data_line_list):

        for data_line in data_line_list:

            data_info_list = data_line.strip().split()
            image_path = data_info_list[0]
            image_path = image_path.replace("\\", "/")
            image_name = image_path.split("/")[-1]
            txt_name = image_name.split(".")[0] + ".txt"

            image_info = cv2.imread(image_path)

            pred_box = self.do_predict(image_info, image_name)
            print("predict result of {}".format(image_name))

            output_box_info_path = os.path.join(self.output_box_info_file, txt_name)

            # 保存预测图像信息
            with open(output_box_info_path, 'w') as f:
                for bbox in pred_box:
                    coor = np.array(bbox[:4], dtype=np.int32)
                    score = bbox[4]
                    class_ind = int(bbox[5])
                    class_name = self.class_name_dir[class_ind]
                    score = '%.4f' % score
                    x_min, y_min, x_max, y_max = list(map(str, coor))
                    bbox_mess = ' '.join([class_name, score, x_min, y_min, x_max, y_max]) + '\n'
                    f.write(bbox_mess)
                    print('\t' + str(bbox_mess).strip())
                    pass
                pass

            pass
        pass

    # 预测操作
    def do_predict(self, image_info, image_name):
        image_shape = image_info.shape[: 2]
        # image_2_rgb = cv2.cvtColor(image_info, cv2.COLOR_BGR2RGB)
        image_data = utils.image_preporcess(np.copy(image_info),
                                            [self.input_size, self.input_size])
        image_data = image_data[np.newaxis, ...]
        pred_sbbox, pred_mbbox, pred_lbbox = self.sess.run(
            [self.return_tensors[1], self.return_tensors[2], self.return_tensors[3]],
            feed_dict={self.return_tensors[0]: image_data})

        pred_bbox = np.concatenate([np.reshape(pred_sbbox, (-1, 5 + self.class_name_len)),
                                    np.reshape(pred_mbbox, (-1, 5 + self.class_name_len)),
                                    np.reshape(pred_lbbox, (-1, 5 + self.class_name_len))],
                                   axis=0)

        bboxes = utils.postprocess_boxes(pred_bbox, image_shape, self.input_size, 0.3)
        pred_box = utils.nms(bboxes, 0.45, method='nms')

        if self.save_boxes_image_flag:
            new_image = utils.draw_bbox(image_info, pred_box)
            new_image = cv2.cvtColor(new_image, cv2.COLOR_BGR2RGB)
            save_image_path = os.path.join(self.output_image_file, image_name)
            cv2.imwrite(save_image_path, new_image)
            pass

        # # 展示图像
        # new_image = utils.draw_bbox(image_2_rgb, pred_box)
        # cv2.imshow("predict_image", new_image)
        # new_image.show()
        # cv2.waitKey(0)

        return pred_box
        pass


if __name__ == '__main__':

    # 代码开始时间
    start_time = datetime.now()
    print("开始时间: {}".format(start_time))

    # image data 的 路径 list
    data_path_list = utils.read_data_path(cfg.TEST.TEST_DATA_PATH)

    demo = YoloTest()

    if os.path.exists(demo.output_image_file):
        shutil.rmtree(demo.output_image_file)

    if os.path.exists(demo.output_box_info_file):
        shutil.rmtree(demo.output_box_info_file)

    os.mkdir(demo.output_image_file)
    os.mkdir(demo.output_box_info_file)

    demo.object_predict(data_path_list)

    # 代码结束时间
    end_time = datetime.now()
    print("结束时间: {}, 训练模型耗时: {}".format(end_time, end_time - start_time))
视频测试 yolo_video.py
from datetime import datetime
import cv2
import numpy as np
import tensorflow as tf
from core import utils
from config import cfg


class YoloVideo(object):

    def __init__(self):
        # pb 模型路径
        self.pb_model_path = cfg.TEST.TEST_PB_MODEL_PATH
        # yolov3 网络 返回 3 个尺度节点
        self.return_elements = cfg.TEST.RETURN_ELEMENTS
        # class_name 字典
        self.class_name_dir = utils.read_class_names(cfg.COMMON.CLASS_FILE_PATH)
        # c 类 个数
        self.class_name_len = len(self.class_name_dir)
        # 输入尺度
        self.input_size = cfg.TEST.INPUT_SIZE
        # 视频文件路径
        self.video_path = cfg.TEST.VEDIO_PATH

        self.graph = tf.Graph()
        # 加载模型
        self.return_tensors = utils.read_pb_return_tensors(self.graph,
                                                           self.pb_model_path,
                                                           self.return_elements)
        self.sess = tf.Session(graph=self.graph)
        pass

    # 对视频流的处理
    def do_video(self):
        vid = cv2.VideoCapture(self.video_path)
        while True:
            # frame 是 RGB 颜色空间
            return_value, frame = vid.read()
            if return_value:
                # utils.image_preporcess 这个方法里面有 cv2.COLOR_BGR2RGB 方法
                # 如果自己写的模型,可以调一下,也许不需要这里
                frame = cv2.cvtColor(frame, cv2.COLOR_RGB2BGR)
                pass
            else:
                raise ValueError("No image!")
                pass

            frame_size = frame.shape[:2]
            # 之前训练的时候,转了一次颜色空间
            image_data = utils.image_preporcess(np.copy(frame), [self.input_size, self.input_size])
            image_data = image_data[np.newaxis, ...]

            pred_start_time = datetime.now()

            pred_sbbox, pred_mbbox, pred_lbbox = self.sess.run(
                [self.return_tensors[1], self.return_tensors[2], self.return_tensors[3]],
                feed_dict={self.return_tensors[0]: image_data})

            pred_bbox = np.concatenate([np.reshape(pred_sbbox, (-1, 5 + self.class_name_len)),
                                        np.reshape(pred_mbbox, (-1, 5 + self.class_name_len)),
                                        np.reshape(pred_lbbox, (-1, 5 + self.class_name_len))],
                                       axis=0)

            bboxes = utils.postprocess_boxes(pred_bbox, frame_size, self.input_size, 0.3)
            bboxes = utils.nms(bboxes, 0.45, method='nms')
            image = utils.draw_bbox(frame, bboxes)

            pred_end_time = datetime.now()
            print("一帧耗时: {}".format(pred_end_time - pred_start_time))

            cv2.namedWindow("result", cv2.WINDOW_AUTOSIZE)
            result = cv2.cvtColor(image, cv2.COLOR_RGB2BGR)
            cv2.imshow("result", result)
            # 退出按键
            if cv2.waitKey(1) & 0xFF == ord('q'):
                break
            pass
        pass


if __name__ == '__main__':

    # 代码开始时间
    start_time = datetime.now()
    print("开始时间: {}".format(start_time))

    demo = YoloVideo()
    demo.do_video()

    # 代码结束时间
    end_time = datetime.now()
    print("结束时间: {}, 训练模型耗时: {}".format(end_time, end_time - start_time))
六 Convert to PB(加载预训练模型)
在 tensorflow-yolov3 版本里,由于 README 里训练的是 VOC 数据集,因此推荐加载预训练模型。由于在 YOLOv3 网络的三个分支里的最后卷积层与训练的类别数目有关,因此除掉这三层的网络权重以外,其余所有的网络权重都加载进来了。
YOLO权重文件下载
百度网盘链接: https://pan.baidu.com/s/1Il1ASJq0MN59GRXlgJGAIw 密码:vw9x
$ cd checkpoint
$ tar -xvf yolov3_coco.tar.gz
$ cd ..
$ python convert_weight.py
$ python freeze_graph.py
-
调用 convert_weight.py 去掉 ckpt 模型中有关训练的冗余参数,比较转换前后的模型,你会发现大小变小了很多
-
调用 freeze_graph.py 转换 ckpt 为 pb 模型
-
最后可以调用 video_demo.py 测试下模型
convert_weight.py
运行demo
$ python image_demo_Chinese.py             # 中文显示
$ python image_demo.py                                # 英文显示
$ python video_demo.py # if use camera, set video_path = 0
import argparse
import tensorflow as tf
from core.yolov3 import YOLOV3
from core.config import cfg


parser = argparse.ArgumentParser()
parser.add_argument("--train_from_coco", action='store_true')
flag = parser.parse_args()

org_weights_path = cfg.YOLO.ORIGINAL_WEIGHT
cur_weights_path = cfg.YOLO.DEMO_WEIGHT
preserve_cur_names = ['conv_sbbox', 'conv_mbbox', 'conv_lbbox']
preserve_org_names = ['Conv_6', 'Conv_14', 'Conv_22']


org_weights_mess = []
tf.Graph().as_default()
load = tf.train.import_meta_graph(org_weights_path + '.meta')
with tf.Session() as sess:
    load.restore(sess, org_weights_path)
    for var in tf.global_variables():
        var_name = var.op.name
        var_name_mess = str(var_name).split('/')
        var_shape = var.shape
        if flag.train_from_coco:
            if (var_name_mess[-1] not in ['weights', 'gamma', 'beta', 'moving_mean', 'moving_variance']) or \
                    (var_name_mess[1] == 'yolo-v3' and (var_name_mess[-2] in preserve_org_names)): continue
        org_weights_mess.append([var_name, var_shape])
        print("=> " + str(var_name).ljust(50), var_shape)
print()
tf.reset_default_graph()

cur_weights_mess = []
tf.Graph().as_default()
with tf.name_scope('input'):
    # 608 can be changed to 416
    input_data = tf.placeholder(dtype=tf.float32, shape=(1, 608, 608, 3), name='input_data')
    training = tf.placeholder(dtype=tf.bool, name='trainable')
model = YOLOV3(input_data, training)
for var in tf.global_variables():
    var_name = var.op.name
    var_name_mess = str(var_name).split('/')
    var_shape = var.shape
    print(var_name_mess[0])
    if flag.train_from_coco:
        if var_name_mess[0] in preserve_cur_names: continue
    cur_weights_mess.append([var_name, var_shape])
    print("=> " + str(var_name).ljust(50), var_shape)

org_weights_num = len(org_weights_mess)
cur_weights_num = len(cur_weights_mess)
if cur_weights_num != org_weights_num:
    raise RuntimeError

print('=> Number of weights that will rename:\t%d' % cur_weights_num)
cur_to_org_dict = {}
for index in range(org_weights_num):
    org_name, org_shape = org_weights_mess[index]
    cur_name, cur_shape = cur_weights_mess[index]
    if cur_shape != org_shape:
        print(org_weights_mess[index])
        print(cur_weights_mess[index])
        raise RuntimeError
    cur_to_org_dict[cur_name] = org_name
    print("=> " + str(cur_name).ljust(50) + ' : ' + org_name)

with tf.name_scope('load_save'):
    name_to_var_dict = {var.op.name: var for var in tf.global_variables()}
    restore_dict = {cur_to_org_dict[cur_name]: name_to_var_dict[cur_name] for cur_name in cur_to_org_dict}
    load = tf.train.Saver(restore_dict)
    save = tf.train.Saver(tf.global_variables())
    for var in tf.global_variables():
        print("=> " + var.op.name)

with tf.Session() as sess:
    sess.run(tf.global_variables_initializer())
    print('=> Restoring weights from:\t %s' % org_weights_path)
    load.restore(sess, org_weights_path)
    save.save(sess, cur_weights_path)


tf.reset_default_graph()
freeze_graph.py
import tensorflow as tf
from core.yolov3 import YOLOV3

pb_file = "./yolov3_coco_v3.pb"

ckpt_file = "./checkpoint/yolov3_coco_demo.ckpt"
output_node_names = ["input/input_data", "pred_sbbox/concat_2", "pred_mbbox/concat_2", "pred_lbbox/concat_2",
                     "pred_multi_scale/concat"]

with tf.name_scope('input'):
    input_data = tf.placeholder(dtype=tf.float32, name='input_data')

model = YOLOV3(input_data, trainable=False)
print(model.conv_sbbox, model.conv_mbbox, model.conv_lbbox)

sess  = tf.Session(config=tf.ConfigProto(allow_soft_placement=True))
saver = tf.train.Saver()
saver.restore(sess, ckpt_file)

converted_graph_def = tf.graph_util.convert_variables_to_constants(sess,
                            input_graph_def  = sess.graph.as_graph_def(),
                            output_node_names = output_node_names)

with tf.gfile.GFile(pb_file, "wb") as f:
    f.write(converted_graph_def.SerializeToString())
模型导出
上述步骤训练得到了checkpoint文件,我们在部署时一般会使用pb文件,所以接下来将checkpoint文件转化成pb文件,转化方法很简单,只需要修改freeze_graph.py文件中的pb_file(输出路径)和ckpt_file(输入路径)即可,然后运行该脚本,即可生成。
https://blog.csdn.net/Dontla/article/details/102679311?utm_medium=distribute.pc_relevant.none-task-blog-BlogCommendFromMachineLearnPai2-4.channel_param&depth_1-utm_source=distribute.pc_relevant.none-task-blog-BlogCommendFromMachineLearnPai2-4.channel_param