st-gcn基本配置及运行
Python 3.7
1.下载源码
https://github.com/yysijie/st-gcn
2.安装requirements
终端下进入目录,输入pip install -r requirements.txt
如果失败则手动安装(哪个没装上就运行哪个指令)
conda install pyyaml
conda install argparse
conda install numpy
conda install h5py
conda install opencv-python
conda install imageio
conda install scikit-video
3.运行setup.py
切换到torchligh目录下运行python setup.py install
4.安装CUDA 11.1和对应的cuDNN
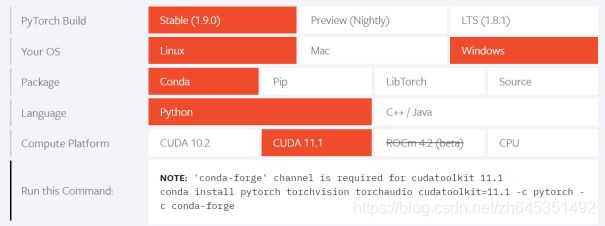
5.根据上述步骤继续安装PyTorch
Pytorch官网https://pytorch.org/
终端运行 conda install pytorch torchvision torchaudio cudatoolkit=11.1 -c pytorch -c conda-forge
6.下载数据集
这里使用的ntu-rgbd数据集, 百度云版本的可以在这里下载,https://github.com/Hrener/3D-Action-recognition
7.将原生数据集处理为ST-GCN的输入
运行python tools/ntu_gendata.py --data_path F:\skeleton+D0-30000(数据的路径)
在st-gcn/data/目录下可找到处理后的数据
8.训练模型(先看9)
终端运行F:\st-gcn>python main.py recognition -c config/st_gcn/ntu-xsub/train.yaml
在models下生成st_gcn.ntu-xsub.pt
9.对config/st_gcn/ntu-xsub文件下的train.yaml文件进行修改
(1)出现错误 RuntimeError: CUDA error: invalid device ordinal,发现源码中有4个gpu,将train.yaml中的device=[0,1,2,3]改为device=[0]
(2)出现错误 BrokenPipeError: [Errno 32] Broken pipe,将processor.py下的函数load_data中的两个DataLoader()函数的参数num_workers设置为0,避免使用多线程读取数据
(3)出现错误 cuda runtime error (2) : out of memory, 经过尝试,4G显存将batch_size设置为8时(在config下的train.yaml中设置),显存占用率刚好接近100%
(4)num_epoch为训练次数,每训练10次保存一次训练模型,根据需要修改
10.测试训练模型
运行python main.py recognition -c config/st_gcn/ntu-xsub/test.yaml
运行结果:
[07.19.21|17:59:45] Model: net.st_gcn.Model.
[07.19.21|17:59:45] Weights: ./models/st_gcn.ntu-xsub.pt.
[07.19.21|17:59:45] Evaluation Start:
[07.19.21|18:03:49] mean_loss: 1.3519932218626434
[07.19.21|18:03:49] Top1: 60.79%
[07.19.21|18:03:49] Top5: 89.78%
[07.19.21|18:03:49] Done.


