小程序 | 黑马商城【未更完--实习去了】
文章目录
- 起步
- tabBar
-
- 创建 tabBar 分支
- 创建 tabBar 页面
- 配置 tabBar 效果
- 删除默认的 index 首页
- 修改导航条的样式效果
- 分支的提交与合并
- 首页
-
- 1. 创建 home 分支
- 2. 配置网络请求
-
- 配置请求根路径,请求拦截器和响应拦截器
- 封装uni.$showMsg() 方法
- 3. 轮播图区域
-
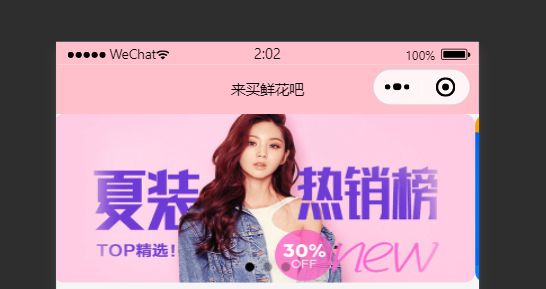
- 获取轮播图的数据
- 渲染轮播图
- 配置小程序分包
- 点击轮播图跳转到商品详情页面
- 4. 分类导航区域
-
- 获取数据
- 渲染结构
- 点击第一项,切换到分类页面
- 5. 楼层区域
-
- 获取楼层数据
- 渲染楼层的标题
- 渲染楼层里的图片
- 点击楼层图片跳转到商品列表页
- 6. 分支的合并与提交
- 分类
-
- 1. 创建 cate 分支
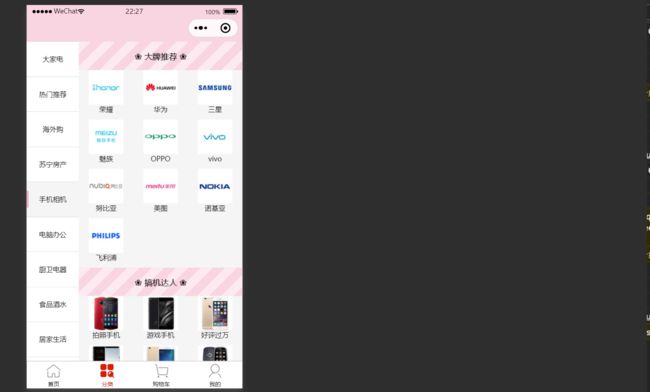
- 2. 渲染分类页面的基本结构
-
- 动态计算窗口的剩余高度
- 美化页面结构
- 3. 获取分类数据
- 4. 动态渲染左侧的一级分类列表
-
- 循环渲染列表结构
- 渲染当前选中项
- 5. 动态渲染右侧的二级分类列表
- 6. 动态渲染右侧的三级分类列表
- 7. 切换一级分类后重置滚动条的位置
- 8. 点击三级分类跳转到商品列表页面
- 9. 分支的合并与提交
- 搜索
-
- 1. 创建 search 分支
- 2. 自定义搜索组件
-
- 自定义 my-search 组件
- 通过自定义属性增强组件的通用性
- 为自定义组件封装 click 事件
- 实现首页搜索组件的吸顶效果
- 2. 搜索建议
黑马优购:起步看这个--------->>>>>> https://www.escook.cn/docs-uni-shop/
起步
⭐uni-app 品优购 开发文档
https://www.escook.cn/docs-uni-shop/#tabbar-%E7%9B%B8%E5%85%B3%E7%9A%84%E9%A1%B5%E9%9D%A2
-
了解 uni-app
uni-app 是一个使用 Vue.js 开发所有前端应用的框架。开发者编写一套代码,可发布到 iOS、Android、H5、以及各种小程序(微信/支付宝/百度/头条/QQ/钉钉/淘宝)、快应用等多个平台。详细的 uni-app 官方文档,请翻阅 https://uniapp.dcloud.net.cn/
-
下载 HBuilderX
uni-app 官方推荐使用 HBuilderX 来开发 uni-app 类型的项目。HBuilderX 的官网首页 https://www.dcloud.io/hbuilderx.html
-
安装 scss/sass 编译
为了方便编写样式(例如:),建议安装 插件。插件下载地址:scss/sass 编译下载 scss/sass : https://ext.dcloud.net.cn/plugin?name=compile-node-sass
-
新建uni-app项目
模板选择 uni-ui 项目 -
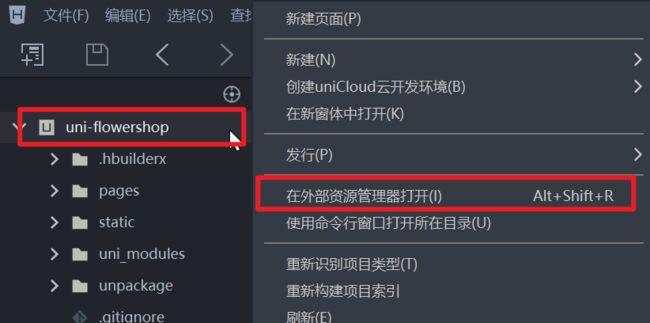
把项目运行到微信开发者工具(具体看最最最最上面链接)
-
使用 Git 管理项目
-
把项目托管到码云(生成公钥)
我的公钥存放位置:

生成并配置公钥后可在powershell中运行ssh -t [email protected]监测公钥是否配置成功
tabBar
创建 tabBar 分支
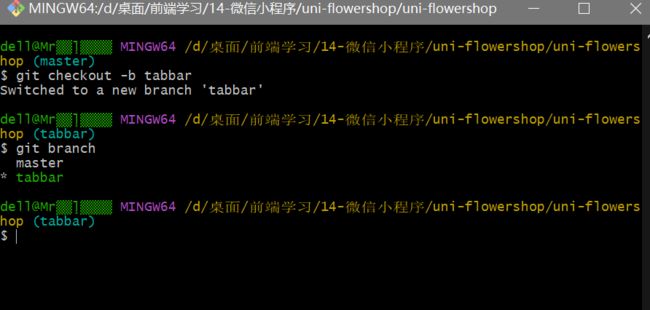
运行如下的命令,基于 master 分支在本地创建 tabBar 子分支,用来开发和 tabBar 相关的功能:
git checkout -b tabbar
创建 tabBar 页面
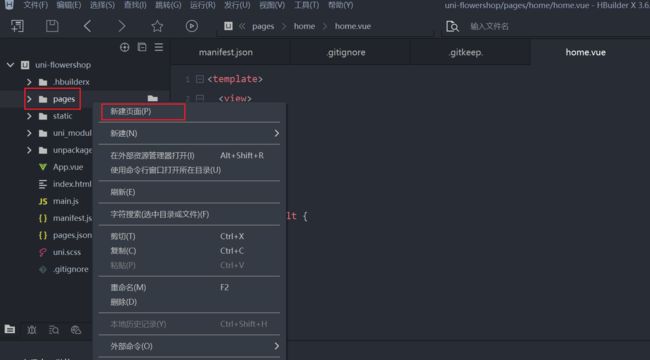
在 目录中,创建首页(home)、分类(cate)、购物车(cart)、我的(my) 这 4 个 tabBar 页面。
在 HBuilderX 中,可以通过如下的两个步骤,快速新建页面:pages
配置 tabBar 效果
-
将 资料 目录下的 static 文件夹(用来存放静态资源) 拷贝一份,替换掉项目根目录中的 static 文件夹
-
修改项目根目录中的
pages.json配置文件,新增tabBar的配置节点如下:
删除默认的 index 首页
如果要展示 tabbar
-
在 HBuilderX 中,把
pages目录下的index首页文件夹删除掉 -
同时,把
page.json中记录的index 首页路径删除掉
修改导航条的样式效果
-
打开
pages.json这个全局的配置文件 -
修改
globalStyle节点如下:
// 与 tabBar 和 pages 平齐
  "globalStyle": {
    "navigationBarTextStyle": "black",
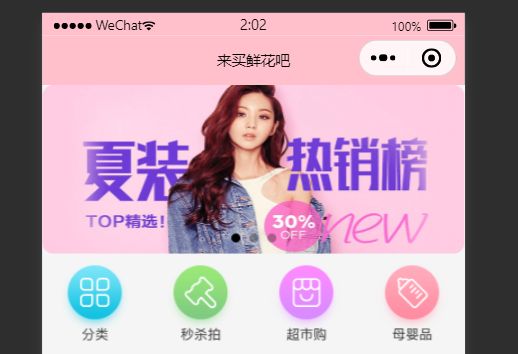
    "navigationBarTitleText": "来买鲜花吧",
    "navigationBarBackgroundColor": "#ffc0cb",
    "backgroundColor": "#F8F8F8",
    "app-plus": {
      "background": "#efeff4"
    }
  }
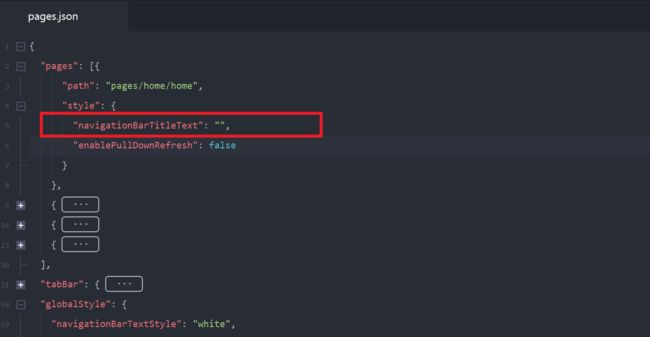
- 头部导航栏标题不显示的原因
其中
navigationBarTitleText默认为空,所以此时在globalStyle中的全局配置会被覆盖,即navigationBarTitleText不会生效
我们只需要删除掉就好
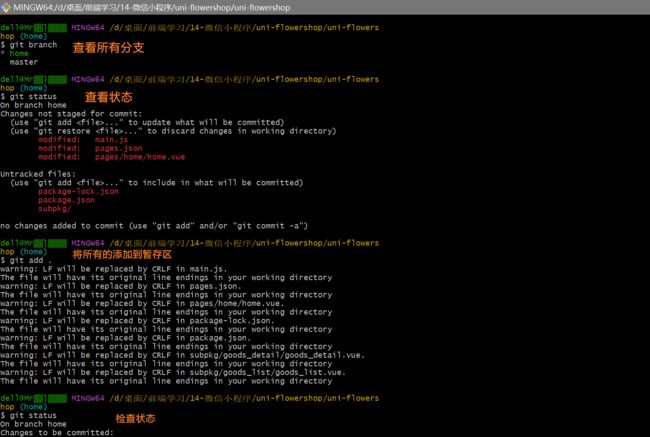
分支的提交与合并
先把tabbar 推送到远程仓库,然后把tabbar 和 master 合并,再把master 重新推送一遍
- 将本地的 tabbar 分支进行本地的 commit 提交:
git add .
git commit -m "完成了 tabBar 的开发" - 将本地的 tabbar 分支推送到远程仓库进行保存:
git push -u origin tabbar - 将本地的 tabbar 分支合并到本地的 master 分支:
git checkout master切换到master分支
git merge tabbar合并分支 - 重新推送 master 分支
git push - 删除本地的 tabbar 分支:
git branch -d tabbar
首页
1. 创建 home 分支
运行如下的命令,基于 master 分支在本地创建 home 子分支,用来开发和 home 首页相关的功能:
git checkout -b home 创建分支
2. 配置网络请求
由于平台的限制,小程序项目中不支持 axios,而且原生的 wx.request() API 功能较为简单,不支持拦截器等全局定制的功能。因此,建议在 uni-app 项目中使用 @escook/request-miniprogram 第三方包发起网络数据请求。
请参考 @escook/request-miniprogram 的官方文档进行安装、配置、使用
⭐官方文档:https://www.npmjs.com/package/@escook/request-miniprogram
-
npm init -y初始化package.json 文件npm i @escook/request-miniprogram进行安装 -
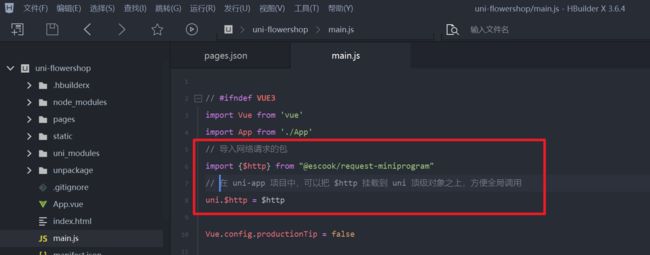
在 main.js 入口文件中进行导入
// 按需导入 $http 对象
import { $http } from '@escook/request-miniprogram'

// 将按需导入的 $http 挂载到 wx 顶级对象之上,方便全局调用
wx.$http = $http

// 在 uni-app 项目中,可以把 $http 挂载到 uni 顶级对象之上,方便全局调用
uni.$http = $http
配置请求根路径,请求拦截器和响应拦截器
// main.js
	// 请求根路径
	$http.baseUrl = "https://www.uinav.com"
	// 请求拦截器
	$http.beforeRequest = function(options){
	  // 展示loading效果
	  uni.showLoading({
	    title:"数据加载中..."
	  })
	}
	// 响应拦截器
	$http.afterRequest = function(options){
	  // 隐藏loading效果
	  uni.hideLoading();
	}
封装uni.$showMsg() 方法
当数据请求失败之后,经常需要调用 uni.showToast({ /* 配置对象 */ })方法来提示用户。
此时,可以在全局封装一个 uni.$showMsg()方法,来简化 uni.showToast()方法的调用。
- 在
main.js中,为uni对象挂载自定义的$showMsg()方法:
// 封装的展示消息提示的方法
uni.$showMsg = function (title = '数据加载失败!', duration = 1500) {
  uni.showToast({
    title,
    duration,
    icon: 'none',
  })
}
- 今后,在需要提示消息的时候,直接调用
uni.$showMsg()方法即可:
async getSwiperList() {
   const { data: res } = await uni.$http.get('/api/public/v1/home/swiperdata')
   if (res.meta.status !== 200) return uni.$showMsg()
   this.swiperList = res.message
}
3. 轮播图区域
获取轮播图的数据
请求路径:https://www.uinav.com/api/public/v1/home/swiperdata
请求方法:GET
无参数
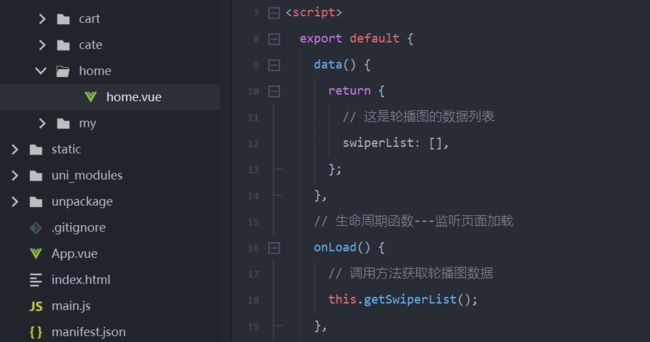
实现步骤:
-
在 data 中定义轮播图的数组
-
在 onLoad 生命周期函数中调用获取轮播图数据的方法
-
在 methods 中定义获取轮播图数据的方法
获取轮播图数据的方法:
    methods: {
      async getSwiperList() {
        // 发请求获取数据
        const {data} = await uni.$http.get('/api/public/v1/home/swiperdata') // {}解构赋值
        if(data.meta.status === 200){
          // 获取数据成功,开始赋值
          this.swiperList = data.message;
        }else{
          // 请求失败,展示提示消息 uni.showToast
          return uni.showToast({
            title:"轮播图数据请求失败",
            duration:1500, // 1.5s后隐藏
            icon:'none'
          })
        }
      }
    }
  }
请求回来的数据:
渲染轮播图
利用 v-for循环来遍历数据
    <swiper :indicator-dots="true" :autoplay="true" :interval="3000" :duration="1000">
      <swiper-item v-for="(item,i) in swiperList" :key="i">
        <view class="swiper-item">

          <image :src="item.image_src" mode="">image>
        view>
      swiper-item>
    swiper>
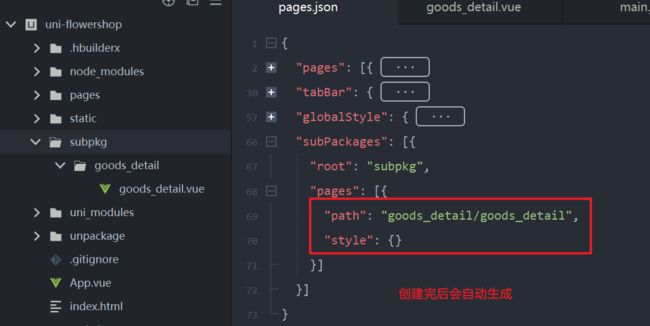
配置小程序分包
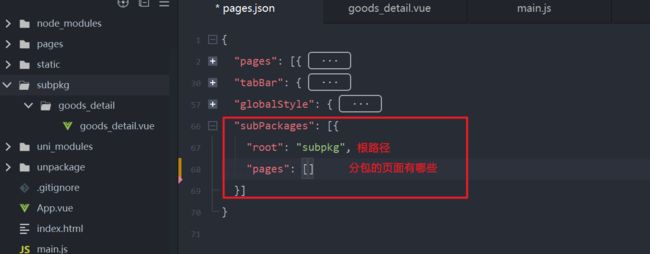
在小程序中,我们可以把 tabBar 相关的 4 个页面放到主包中,其它页面(例如:商品详情页、商品列表页)放到分包中
分包步骤:
点击轮播图跳转到商品详情页面
将 view 组件,改造为 navigatorurl导航组件,并动态绑定 url属性的值。
    <swiper :indicator-dots="true" :autoplay="true" :interval="3000" :duration="1000">
      <swiper-item v-for="(item,i) in swiperList" :key="i">
        <navigator class="swiper-item" :url="'/subpkg/goods_detail/goods_detail?goods_id=' + item.goods_id">

          <image :src="item.image_src" mode="">image>
        navigator>
      swiper-item>
    swiper>
4. 分类导航区域
获取首页分类选项数据
请求路径:[https://www.uinav.com]/api/public/v1/home/catitems
请求方法:GET
无参数
获取数据
实现思路:
-
定义
data数据 -
在
onLoad中调用获取数据的方法 -
在
methods中定义获取数据的方法
export default {
  data() {
    return {
        // 分类导航的数据列表
        navList: [],
    }
  },
  onLoad() {
      // 调用获取分类导航的数据
      this.getNavList();
  },
  methods: {
    // 3. 在 methods 中定义获取数据的方法
    async getNavList() {
        // 发请求获取数据
        const {data} = await uni.$http.get('/api/public/v1/home/catitems')
        if(data.meta.status === 200){
          // 请求成功,数据转存到 data 中
          this.navList = data.message;
        }else{
          // 请求失败,展示错误弹窗
          return uni.$showMsg()
        }
    },
  },
}
渲染结构
    <view class="nav-list">
      <view class="nav-item" v-for="(item,i) in navList" :key="i">
        <image :src="item.image_src">image>
      view>
    view>
点击第一项,切换到分类页面
- 为
nav-item绑定点击事件处理函数
    <view class="nav-list">
      <view class="nav-item" v-for="(item,i) in navList" :key="i" @click="navClickHandler(item)">
        <image :src="item.image_src">image>
      view>
    view>
- 定义
navClickHandler事件处理函数
      // 分类列表被点击时候的事件处理函数
      navClickHandler(item){
        // 判断点击的是哪个列表
        if(item.name === "分类"){
          uni.switchTab({
            url:'/pages/cate/cate',
          })
        }
      },
5. 楼层区域
请求路径:【https://www.uinav.com】/api/public/v1/home/floordata
请求方法:GET
无参数
获取楼层数据
实现思路:
-
定义 数据 数据
-
在 onLoad 中调用获取数据的方法
-
在 Methods 中定义获取数据的方法
export default {
  data() {
    return {
      // 1. 楼层的数据列表
      floorList: [],
    }
  },
  onLoad() {
    // 2. 在 onLoad 中调用获取楼层数据的方法
    this.getFloorList()
  },
  methods: {
    // 3. 定义获取楼层列表数据的方法
      async getFloorList() {
        const {data} = await uni.$http.get('/api/public/v1/home/floordata')
        if(data.meta.status === 200){
          // 获取数据成功
          this.floorList = data.message;
        }else{
          // 获取数据失败
          return uni.$showMsg()
        }
      },
  },
}
渲染楼层的标题
![]()
    <view class="floor-list">

      <view class="floor-item" v-for="(item,index) in floorList" :key="index">

        <image :src="item.floor_title.image_src" class="floor-title">image>
      view>
    view>
   .floor-title{
     height: 60rpx;
     width: 100%;
     display: flex;
   }
渲染楼层里的图片
    <view class="floor-list">

      <view class="floor-item" v-for="(item,index) in floorList" :key="index">

        <image :src="item.floor_title.image_src" class="floor-title">image>

        <view class="floor-img-box">

          <view class="left-img-box">
            <image :src="item.product_list[0].image_src" mode="widthFix"
              :style="{width:item.product_list[0].image_width + 'rpx'}">image>
          view>

          <view class="right-img-box">
            <view class="right-img-item" v-for="(item2,index2) in item.product_list" :key="index2" v-if="index2 !== 0">
              <image :src="item2.image_src" mode="widthFix" :style="{width:item2.image_width + 'rpx'}">image>
            view>
          view>
        view>
      view>
    view>
  .floor-list {
    margin-top: 5rpx;

    .floor-item {
      box-shadow: 5rpx 10rpx 10rpx 5rpx #dfdfdf;
      border-radius: 20rpx;
      margin: 20rpx 0;
    }

    .floor-title {
      height: 60rpx;
      width: 100%;
      display: flex;
    }

    .right-img-box {
      display: flex;
      flex-wrap: wrap;
      justify-content: space-around;
    }

    .floor-img-box {
      display: flex;
      padding-left: 10rpx;
    }
  }
点击楼层图片跳转到商品列表页
- 在
subpkg分包中,新建goods_list页面
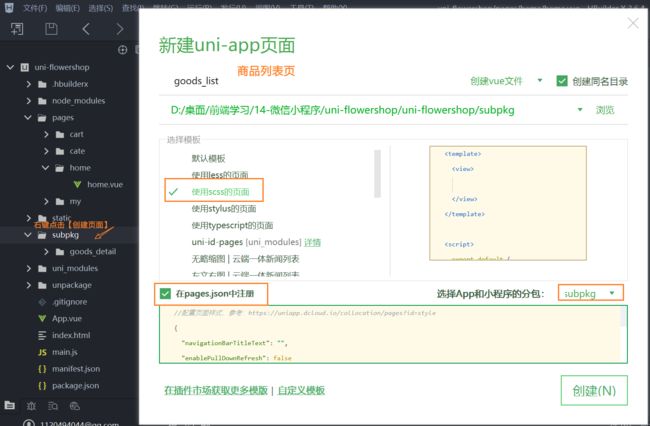
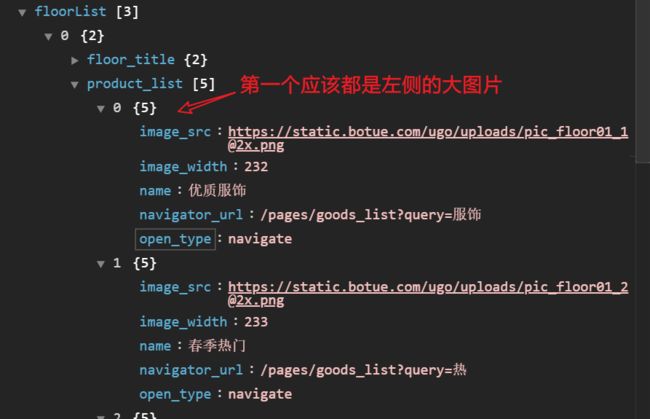
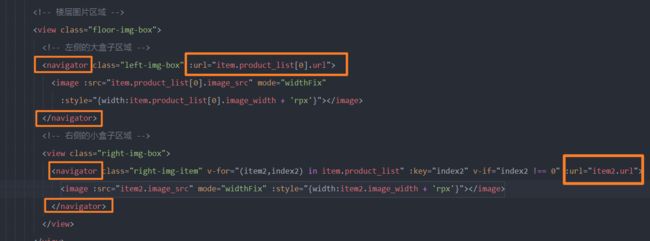
- 当我们要点击图片的时候,会进行页面跳转,跳转的链接在获取的数据里面
navigator_url,但是这个数据中的路径和我们分包的路径不一样,我们要进行改造 - 分包中的路径是
/subpkg/goods_list/goods_list?xxxx
因为navigator_url外面有太多包裹着,所以我们使用forEach双层循环来获得navigator_url,进行拼接字符串

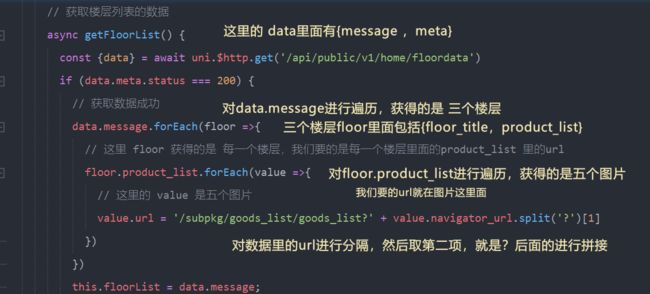
          // 获取数据成功
          data.message.forEach(floor =>{
            // 这里 floor 获得的是 每一个楼层,我们要的是每一个楼层里面的product_list 里的url
            floor.product_list.forEach(value =>{
              // 这里的 value 是五个图片
              value.url = '/subpkg/goods_list/goods_list?' + value.navigator_url.split('?')[1]
            })
          })
          this.floorList = data.message;
6. 分支的合并与提交
- 将本地的 home 分支进行本地的 commit 提交:
git add .
git commit -m "完成了 home 首页的开发" - 将本地的 home 分支推送到远程仓库进行保存:
git push -u origin home - 将本地的 home 分支合并到本地的 master 分支:
git checkout master
git merge home - 在home分支下重新推送代码代远程仓库
git push - 删除本地的 home 分支:
git branch -d home
分类
1. 创建 cate 分支
运行如下的命令,基于 master 分支在本地创建 cate 子分支,用来开发分类页面相关的功能:
git checkout -b cate
2. 渲染分类页面的基本结构
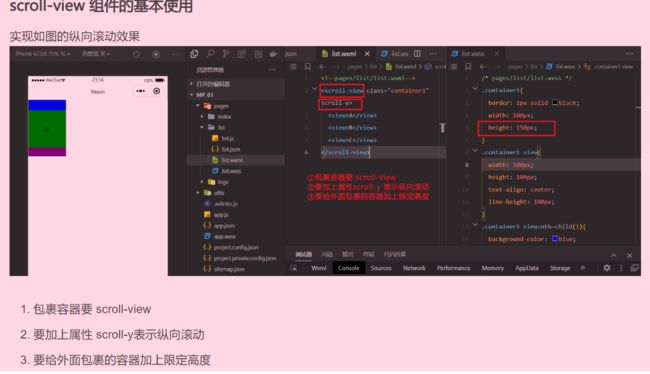
因为页面是左侧有滚动效果,右侧也有滚动效果,所以用到scroll-view组件
<template>
  <view>
    <view class="scroll-view-container">

      <scroll-view scroll-y="true" class="left-scroll-view" style="height:50px">
        <view class="left-scroll-view-item">xxxxview>
        <view class="left-scroll-view-item">xxxxview>
        <view class="left-scroll-view-item">xxxxview>
        <view class="left-scroll-view-item">xxxxview>
      scroll-view>

      <scroll-view scroll-y="true" class="right-scroll-view" style="height:200px">
          <view class="right-scroll-view-item">右侧view>
          <view class="right-scroll-view-item">右侧view>
          <view class="right-scroll-view-item">右侧view>
      scroll-view>
    view>
  view>
template>
动态计算窗口的剩余高度
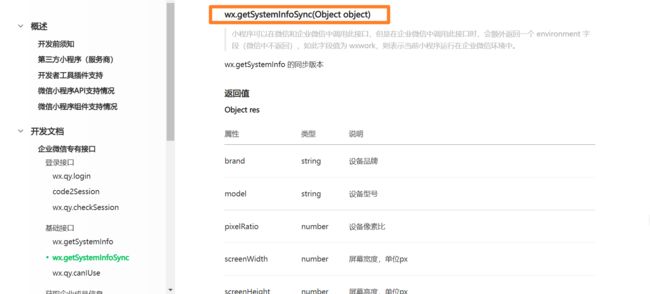
我们想要scroll-view的组件占满剩余的窗口,需要计算剩余窗口的高度
我们可以调用小程序的apiwx.getSysteminfoSync()
screenHeight指的是整个手机屏幕的高度windowHeight指的是手机屏幕 - navigationBar高度 - tabBar高度
<script>
  export default {
    data() {
      return {
        // 当前设备的可用高度
        windowHeigth: 0
      };
    },
    // 生命周期函数 ---页面刚加载的时候
    onLoad() {
      // 动态获取设备的剩余高度
      const sysInfo = uni.getSystemInfoSync()
      this.windowHeigth = sysInfo.windowHeight;
    },
  }
script>
美化页面结构
3. 获取分类数据
请求路径:[https://www.uinav.com] /api/public/v1/categories
请求方法:GET
无参数
实现思路:
-
定义 data 数据
-
在 onLoad 中调用获取分类数据的方法
-
在 methods 中定义获取分类数据的方法
  export default {
    data() {
      return {
        ...
        // 分类列表数据
        cateList:[],
      };
    },
    // 生命周期函数 ---页面刚加载的时候
    onLoad() {
		...
      // 调用获取分类列表数据的方法
      this.getCateList();
    },
    methods:{
     async getCateList(){
        // 发请求获取数据
       const {data} =await uni.$http.get('/api/public/v1/categories')
       if(data.meta.status === 200){
         // 获取数据成功
         this.cateList = data.message;
       }else{
         // 获取数据失败
         uni.$showMsg();
       }
      },
    }
  }
4. 动态渲染左侧的一级分类列表
循环渲染列表结构
      <scroll-view scroll-y="true" class="left-scroll-view" :style="{height:windowHeigth+'px'}">
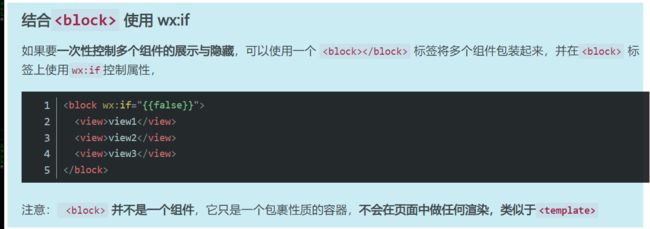
        <block v-for="(item) in cateList" :key="item.cat_id">
          <view class="left-scroll-view-item">{{item.cat_name}}view>
        block>
      scroll-view>
渲染当前选中项
- 如果当前选中项
active= 当前项的索引值cat_id,那就 添加active类名
⚠这里千万不能用 当前项的索引值
cat_id,后续渲染二级分类的时候会增加麻烦!!还是跟老师一样用遍历中的i
      <scroll-view scroll-y="true" class="left-scroll-view" :style="{height:windowHeigth+'px'}">
        <block v-for="(item) in cateList" :key="item.cat_id">
          <view :class="['left-scroll-view-item',item.cat_id === active ? 'active' :'']">{{item.cat_name}}view>
        block>
      scroll-view>
动态渲染多个类名
1. 首先渲染 left-scroll-view-item 类名
2. 然后用三元表达式开始渲染当前选中的 active 类名
:class="['left-scroll-view-item',item.cat_id === active ? 'active' :'']"
- 为一级分类的 Item 项绑定点击事件处理函数
activeChanged,传递id参数,如果点击该项,就让active等于 该项的id
      <scroll-view scroll-y="true" class="left-scroll-view" :style="{height:windowHeigth+'px'}">
        <block v-for="(item) in cateList" :key="item.cat_id">
          <view :class="['left-scroll-view-item',item.cat_id === active ? 'active' :'']" @click="activeChanged(item.cat_id)">{{item.cat_name}}view>
        block>
      scroll-view>
      // 修改当前 active 项
      activeChanged(id){
        this.active = id
      },
5. 动态渲染右侧的二级分类列表
- 二级列表是一级列表项 的children
- 在 data 中定义二级分类列表的数据节点:
data() {
  return {
    // 二级分类列表
    cateLevel2: []
  }
}
- 修改
getCateList方法,在请求到数据之后,为二级分类列表数据赋值,二级分类默认是索引号为 0 的
      // 获取分类列表数据
      async getCateList() {
        // 发请求获取数据
        const {data} = await uni.$http.get('/api/public/v1/categories')
        if (data.meta.status === 200) {
          // 获取数据成功
          this.cateList = data.message;
          // 为二级分类赋值,默认是索引为0的进行展示
          this.cateLevel2 = data.message[0].children;
        } else {
          // 获取数据失败
          uni.$showMsg();
        }
      },
- 修改
activeChanged方法,在一级分类选中项改变之后,为二级分类列表数据重新赋值,当切换分类的时候,我们就根据索引值重新为 二级分类赋值,进行展示
      // 修改当前 active 项
      activeChanged(i){
        this.active = i
        // 重新为 二级分类赋值
        this.cateLevel2 = this.cateList[i].children;
      },
⚠ 这里
activeChanged传的参数不是数据里面的id了,是遍历产生的索引值
- 循环渲染右侧二级分类列表的 UI 结构
      <scroll-view scroll-y="true" class="right-scroll-view" :style="{height:windowHeigth +'px'}">
        <view class="cate-lv2" v-for="(item2,i2) in cateLevel2" :key="i2">

          <view class="cate-lv2-title">/{{item2.cat_name}}/view>
        view>
      scroll-view>
    .right-scroll-view {

      // 渲染的二级标题
      .cate-lv2-title {
        font-size: 12px;
        font-weight: bold;
        text-align: center;
        padding: 15px 0;
        background: #f8d5e0;
        // 条纹相间
        background-image: repeating-linear-gradient(135deg, hsla(0, 0%, 100%, 0.5), hsla(0, 0%, 100%, 0.5) 15px, transparent 0, transparent 30px);
      }
    }
6. 动态渲染右侧的三级分类列表
        <view class="cate-lv2" v-for="(item2,i2) in cateLevel2" :key="i2">

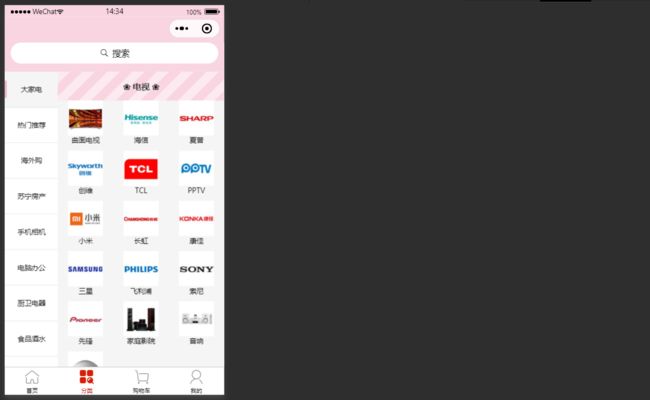
          <view class="cate-lv2-title">❀ {{item2.cat_name}} ❀view>

          <view class="cate-lv3-list">

            <view class="cate-lv3-item" v-for="(item3,i3) in item2.children" :key="i3">

              <image :src="item3.cat_icon.replace('api-ugo-dev','api-ugo-web')" mode="">image>

              <text>{{item3.cat_name}}text>
            view>
          view>
        view>
      // 三级分类的列表
      .cate-lv3-list{
        display: flex;
        flex-wrap: wrap;
        // item项
        .cate-lv3-item{
          // 每行三个item
          width: 33.33%;
          // 让里面的图片和文本纵向布局
          display: flex;
          flex-direction: column;
          justify-content: center;
          align-items: center;
          margin-bottom: 10px;

          image{
            width: 60px;
            height: 60px;
          }

          text{
            font-size: 12px;
          }
        }
      }
7. 切换一级分类后重置滚动条的位置
当我们切换一级分类的时候,会出现切换后滚动条没有置顶的情况
优化分类页面
我们的scroll-view的scroll-top可以动态指定滚动条的位置
当切换一级分类的时候,让scrollTop的值为 0 或 1
⚠ 滚动条赋值前后的值一样,是不会进行滚动条位置重置的!!
- 动态为右侧的
      <scroll-view scroll-y="true" class="right-scroll-view" :style="{height:windowHeigth +'px'}"
        :scroll-top="scrollTop">
        ...
	  scroll-view>
- 在 data 中定义 滚动条距离顶部的距离:
data() {
  return {
    // 滚动条距离顶部的距离
    scrollTop: 0
  }
}
- 切换一级分类时,动态设置
scrollTop的值:
      // 修改当前 active 项
      activeChanged(i) {
        this.active = i
        // 重新为 二级分类赋值
        this.cateLevel2 = this.cateList[i].children;
        // 动态设置scrollTop的值
        this.scrollTop = this.scrollTop === 0 ? 1 : 0
      },
8. 点击三级分类跳转到商品列表页面
<view class="cate-lv3-item" v-for="(item3,i3) in item2.children" :key="i3" @click="gotoGoodsList(item3)">view>
      // 跳转到列表详情页
      gotoGoodsList(item3){
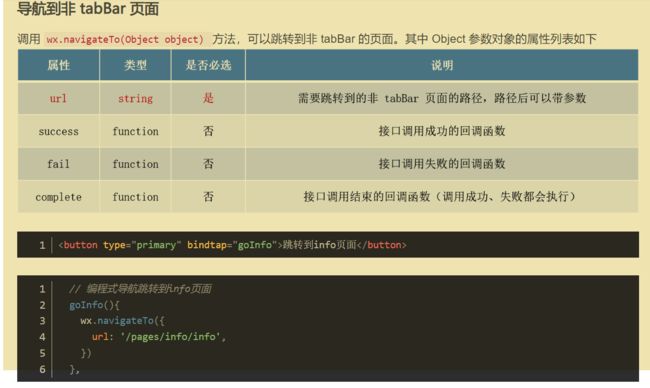
        uni.navigateTo({
          url:'/subpkg/goods_list/goods_list?cid=' + item3.cat_id
        })
      }
9. 分支的合并与提交
-
将 cate 分支进行本地提交:
git add .
git commit -m "完成了分类页面的开发" -
将本地的 cate 分支推送到码云:
git push -u origin cate -
将本地 cate 分支中的代码合并到 master 分支:
git checkout master
git merge cate
git push -
删除本地的 cate 分支:
git branch -d cate
搜索
1. 创建 search 分支
运行如下的命令,基于 master 分支在本地创建 search 子分支,用来开发搜索相关的功能:
git checkout -b search
2. 自定义搜索组件
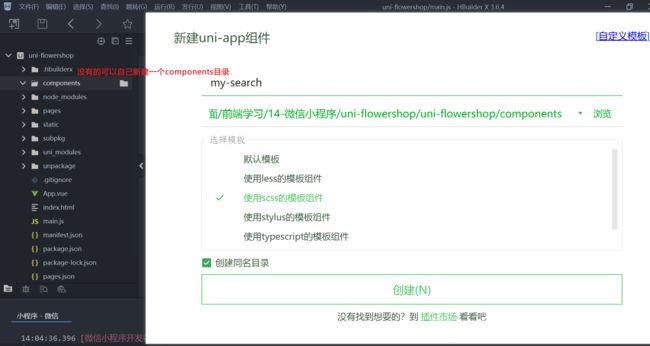
自定义 my-search 组件
<my-search>my-search>
- 定义 my-search 组件的 UI 结构如下
<template>
  <view class="my-search-container">

    <view class="my-search-box">
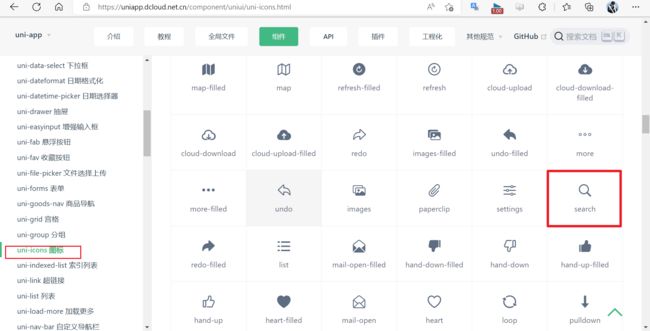
      <uni-icons type="search" size="17">uni-icons>
      <text class="placeholder">搜索text>
    view>
  view>
template>

<style lang="scss">
.my-search-container{
  background-color: #f8d5e0;
  height: 50px;
  padding: 0 10px;
  display: flex;
  // 上下居中
  align-items: center;


  .my-search-box{
    height: 36px;
    line-height: 36px;
    width: 100%;
    background-color: #ffffff;
    text-align: center;
    border-radius: 20px;
    color: black;

    .placeholder{
      font-size: 15px;
      margin-left: 5px;
    }
  }
}
style>
这里的搜索框并不是真正的input,是用
组件模拟的 ,当我们点击以后会跳转到搜索页面真正的搜索框
由于自定义的 my-search 组件高度为 50px,因此,需要重新计算分类页面窗口的可用高度:
// cate.vue
onLoad() {
  const sysInfo = uni.getSystemInfoSync()
  // 可用高度 = 屏幕高度 - navigationBar高度 - tabBar高度 - 自定义的search组件高度
  this.wh = sysInfo.windowHeight - 50
}
通过自定义属性增强组件的通用性
为了增强组件的通用性,我们允许使用者自定义搜索组件的 背景颜色 和 圆角尺寸
props属性
功能:让组件接收外部传过来的数据
- 通过
props定义 bgcolor 和 radius 两个属性,并指定值类型和属性默认值
    props: {
      // 背景颜色
      bgcolor: {
        type: String,
        default: '#f8d5e0'
      },
      // 圆角尺寸
      radius: {
        type: Number,
        default: 20 // px
      }
    },
- 通过属性绑定的形式,为
.my-search-container盒子和.my-search-box盒子动态绑定style属性
  <view class="my-search-container" :style="{'backgroundColor':bgcolor}">

    <view class="my-search-box" :style="{'border-radius':radius + 'px'}">
      <uni-icons type="search" size="17">uni-icons>
      <text class="placeholder">搜索text>
    view>
  view>
为自定义组件封装 click 事件
- 在
my-search自定义组件内部,给类名为.my-search-box的 view 绑定 click 事件处理函数
<view class="my-search-box" :style="{'border-radius': radius + 'px'}" @click="searchBoxHandler">
  <uni-icons type="search" size="20">uni-icons>
  <text class="placeholder">搜索text>
view>
- 在 my-search 自定义组件的 methods 节点中,声明事件处理函数如下
    methods:{
      searchBoxHandler(){
        // 会触发 my-search组件实例上的 click事件,然后会调用到gotoSearch函数
        this.$emit('click')
      },
    },
实现首页搜索组件的吸顶效果
吸顶效果:随着滑动主页,搜索组件并不会跟随页面的滚动而消失,会一直在顶部显示
在 home 首页定义如下的 UI 结构:
<view class="search-box">
  <my-search @click="gotoSearch">my-search>
view>
在 home 首页定义如下的事件处理函数:
gotoSearch() {
  uni.navigateTo({
    url: '/subpkg/search/search'
  })
}
通过如下的样式实现吸顶的效果
.search-box {
  // 设置定位效果为“吸顶”
  position: sticky;
  // 吸顶的“位置”
  top: 0;
  // 提高层级,防止被轮播图覆盖
  z-index: 999;
}


