使用iServer rest api如何实现构建巷道效果
作者:刘大
背景
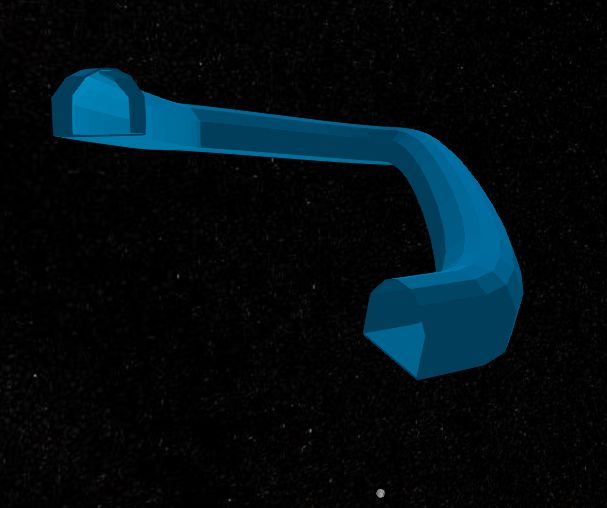
在实际生产环境中,特别是在采矿,公路建设项目上,我们往往会接触下图所示的巷道,那么在Web端如何快速通过线数据构建巷道模型呢?下面我们来详细说下
使用方式
第一步: 在iServer发布空间分析服务
第二步:调用 iServer空间分析服务loft放样接口
打开第一步发布的空间分析服务地址,依次点击spatialanalyst–geometry–geometryLoft进入loft放样接口,如下图所示:
由上图看出,我们需要传入待放样三维线对象和横截面对象
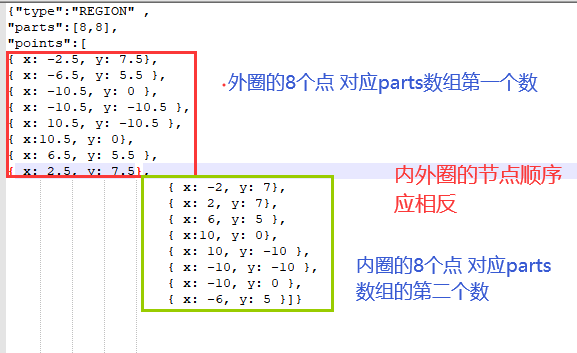
而构建巷道的关键之处在于横截面loftRgeion的传入,需要是导洞的形式,导洞具体的写法,我们举一个例子如下:

主要注意两点:
1.parts是个数组,数组的每一项依次取points里面的点串;
2.导洞的内外圈的节点顺序应相反
我们使用postman来构建如下:(请求?后面添加returnContent=true,是设置直接返回模型数据,无需在进行get请求获取资源)

这里,我们就已经构建好了巷道模型,那如何在web端进行呈现捏,这里我们需要使用SuperMap iClient3D for Cesium,11.0.1最新版下载地址(http://support.supermap.com.cn/DownloadCenter/DownloadPage.aspx?id=2246)
最后附上完整代码:
		<script type="text/javascript">
			function onload(Cesium) {
				var viewer = new Cesium.Viewer('cesiumContainer', {
					// timeline: true,
					infoBox: false,
				});
				var scene = viewer.scene;
				if (!scene.pickPositionSupported) {
					alert('不支持深度纹理,可视域分析功能无法使用(无法添加观测)!');
				}
				//添加体
				var s3mInstanceColc;
				s3mInstanceColc = new Cesium.S3MInstanceCollection(scene._context);
				scene.primitives.add(s3mInstanceColc);
				var queryData = JSON.stringify({
					"loftRegion": {
						"type": "REGION",
						"parts": [
							8,
							8
						],
						"points": [{
								"x": -2.5,
								"y": 7.5
							},
							{
								"x": -6.5,
								"y": 5.5
							},
							{
								"x": -10.5,
								"y": 0
							},
							{
								"x": -10.5,
								"y": -10.5
							},
							{
								"x": 10.5,
								"y": -10.5
							},
							{
								"x": 10.5,
								"y": 0
							},
							{
								"x": 6.5,
								"y": 5.5
							},
							{
								"x": 2.5,
								"y": 7.5
							},
							{
								"x": -2,
								"y": 7
							},
							{
								"x": 2,
								"y": 7
							},
							{
								"x": 6,
								"y": 5
							},
							{
								"x": 10,
								"y": 0
							},
							{
								"x": 10,
								"y": -10
							},
							{
								"x": -10,
								"y": -10
							},
							{
								"x": -10,
								"y": 0
							},
							{
								"x": -6,
								"y": 5
							}
						]
					},
					"loftLine": {
						"type": "LINE3D",
						"parts": [8],
						"points": [{
								"x": 106.647908425709,
								"y": 39.53615857754,
								"z": 1146.541
							},
							{
								"x": 106.647717466074,
								"y": 39.5362496987228,
								"z": 1146.541
							},
							{
								"x": 106.64730418415,
								"y": 39.5371864323,
								"z": 1136.36
							},
							{
								"x": 106.647305608425,
								"y": 39.5372768737642,
								"z": 1136.36
							}
						]
					},
					"chamfer": "50",
					"lonlat": "TRUE"

				});
				$.ajax({
					url: "http://172.16.14.25:8090/iserver/services/spatialanalyst-sample/restjsr/spatialanalyst/geometry/3d/loft.json?returnContent=true",
					async: true,
					data: queryData,
					method: "POST"
				}).done(function(data) {

					if (data.geometry === null) {
						return;
					}

					//添加巷道模型
					var u8 = new Uint8Array(data.geometry.model);
					var ab = u8.buffer;
					s3mInstanceColc.add("resultSkyline", {
						position: Cesium.Cartesian3.fromDegrees(data.geometry.position.x, data.geometry.position.y, data.geometry.position
							.z),
						hpr: new Cesium.HeadingPitchRoll(0, 0, 0),
						color: new Cesium.Color(0, 160 / 255, 233 / 255, 0.5)
					}, ab, false);

					scene.camera.setView({
						destination: Cesium.Cartesian3.fromDegrees(data.geometry.position.x, data.geometry.position.y, data.geometry.position
							.z),
						orientation: {
							heading: 1.260586371345841,
							pitch: -0.0176030403049122,
							roll: 0
						}
					});
				});
			}

			if (typeof Cesium !== 'undefined') {
				window.startupCalled = true;
				onload(Cesium);
			}
		</script>


