视频46 13.9. 语义分割和数据集 13.10转置卷积
#@save
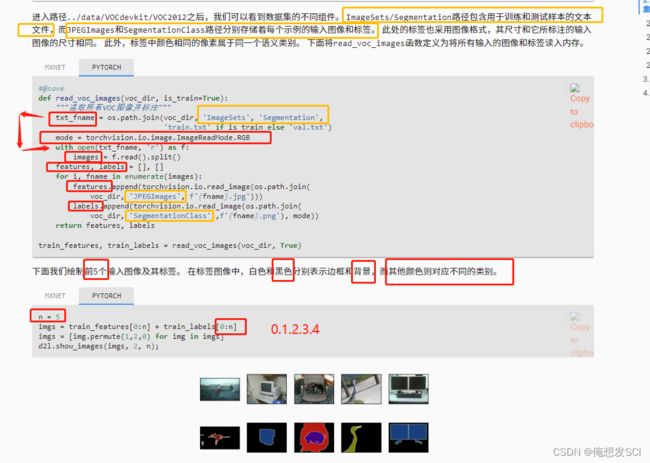
def read_voc_images(voc_dir, is_train=True):
    """读取所有VOC图像并标注"""
    txt_fname = os.path.join(voc_dir, 'ImageSets', 'Segmentation',
                             'train.txt' if is_train else 'val.txt')哪些是做训练 哪些做验证数据集
    mode = torchvision.io.image.ImageReadMode.RGB  彩色图片 rgb格式
    with open(txt_fname, 'r') as f:
        images = f.read().split()
    features, labels = [], []
    for i, fname in enumerate(images):
        features.append(torchvision.io.read_image(os.path.join(         读图片
            voc_dir, 'JPEGImages', f'{fname}.jpg')))   根文件下  有'JPEGImages' 读
        labels.append(torchvision.io.read_image(os.path.join(
            voc_dir, 'SegmentationClass' ,f'{fname}.png'), mode))
语义分割的label需要对每个像素有label 在SegmentationClass文件夹下 存的是没有压缩的png
    return features, labels

train_features, train_labels = read_voc_images(voc_dir, True)
n = 5 imgs = train_features[0:n] + train_labels[0:n] imgs = [img.permute(1,2,0) for img in imgs] permute 画的时候 吧channel放最后 d2l.show_images(imgs, 2, n);
#@save
VOC_COLORMAP = [[0, 0, 0], [128, 0, 0], [0, 128, 0], [128, 128, 0],
                [0, 0, 128], [128, 0, 128], [0, 128, 128], [128, 128, 128],
                [64, 0, 0], [192, 0, 0], [64, 128, 0], [192, 128, 0],
                [64, 0, 128], [192, 0, 128], [64, 128, 128], [192, 128, 128],
                [0, 64, 0], [128, 64, 0], [0, 192, 0], [128, 192, 0],
                [0, 64, 128]]

#@save
VOC_CLASSES = ['background', 'aeroplane', 'bicycle', 'bird', 'boat',
               'bottle', 'bus', 'car', 'cat', 'chair', 'cow',
               'diningtable', 'dog', 'horse', 'motorbike', 'person',
               'potted plant', 'sheep', 'sofa', 'train', 'tv/monitor']
rgb颜色对应飞机还是大鹅啊
#@save
def voc_colormap2label():
    """构建从RGB到VOC类别索引的映射"""

    colormap2label = torch.zeros(256 ** 3, dtype=torch.long)
    for i, colormap in enumerate(VOC_COLORMAP):
        colormap2label[
            (colormap[0] * 256 + colormap[1]) * 256 + colormap[2]] = i
#RGB换算整数
    return colormap2label

#@save
def voc_label_indices(colormap, colormap2label):
    """将VOC标签中的RGB值映射到它们的类别索引"""
图片RGB 标号对应的数值
    colormap = colormap.permute(1, 2, 0).numpy().astype('int32')      移动channel
    idx = ((colormap[:, :, 0] * 256 + colormap[:, :, 1]) * 256     rgb换算成下标
           + colormap[:, :, 2])
    return colormap2label[idx]                  拿到每个像素对应的标号的编号
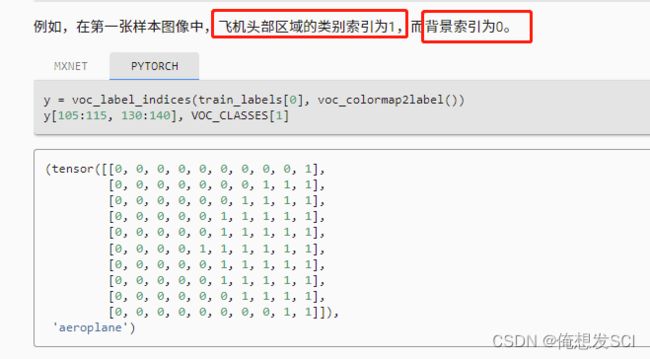
y = voc_label_indices(train_labels[0], voc_colormap2label())
第一个飞机图片 查找标号给y
y[105:115, 130:140], VOC_CLASSES[1]
吧105-115,130-140小区域画出来
标号读出来了y是个图片有三个channel 现在变成了每个像素对应的值
VOC_CLASSES = ['background', 'aeroplane',第二个是飞机
(tensor([[0, 0, 0, 0, 0, 0, 0, 0, 0, 1],
         [0, 0, 0, 0, 0, 0, 0, 1, 1, 1],
         [0, 0, 0, 0, 0, 0, 1, 1, 1, 1],
         [0, 0, 0, 0, 0, 1, 1, 1, 1, 1],
         [0, 0, 0, 0, 0, 1, 1, 1, 1, 1],
         [0, 0, 0, 0, 1, 1, 1, 1, 1, 1],
         [0, 0, 0, 0, 0, 1, 1, 1, 1, 1],
         [0, 0, 0, 0, 0, 1, 1, 1, 1, 1],
         [0, 0, 0, 0, 0, 0, 1, 1, 1, 1],
         [0, 0, 0, 0, 0, 0, 0, 0, 1, 1]]),
 'aeroplane')
增广用于语义分割:
#@save
def voc_rand_crop(feature, label, height, width):
    """随机裁剪特征和标签图像"""
    rect = torchvision.transforms.RandomCrop.get_params(
        feature, (height, width))
RandomCrop get_param 返回裁剪出的bodingbox
    feature = torchvision.transforms.functional.crop(feature, *rect)
    label = torchvision.transforms.functional.crop(label, *rect)
保证一个图片裁剪出一个框 对于标号也裁剪出来那个框 像素和像素一一对应
    return feature, label

imgs = []
for _ in range(n):
    imgs += voc_rand_crop(train_features[0], train_labels[0], 200, 300)

imgs = [img.permute(1, 2, 0) for img in imgs]
d2l.show_images(imgs[::2] + imgs[1::2], 2, n);
#@save
class VOCSegDataset(torch.utils.data.Dataset):
    """一个用于加载VOC数据集的自定义数据集"""

    def __init__(self, is_train, crop_size, voc_dir):
                #是不是训练集 crop多大 文件放哪
        self.transform = torchvision.transforms.Normalize(
            mean=[0.485, 0.456, 0.406], std=[0.229, 0.224, 0.225])
#rgb三个channel 均值方差
        self.crop_size = crop_size
        features, labels = read_voc_images(voc_dir, is_train=is_train)
        self.features = [self.normalize_image(feature)
                         for feature in self.filter(features)]
#去掉比我们想裁剪的图片还小的之后   normalize_image
        self.labels = self.filter(labels)
#标号也去掉
        self.colormap2label = voc_colormap2label()
#colormap-----label
        print('read ' + str(len(self.features)) + ' examples')

    def normalize_image(self, img):
        return self.transform(img.float() / 255)

    def filter(self, imgs):
        return [img for img in imgs if (
            img.shape[1] >= self.crop_size[0] and
            img.shape[2] >= self.crop_size[1])]


    def __getitem__(self, idx):
        feature, label = voc_rand_crop(self.features[idx], self.labels[idx],
                                       *self.crop_size)
        return (feature, voc_label_indices(label, self.colormap2label))

    def __len__(self):
        return len(self.features)
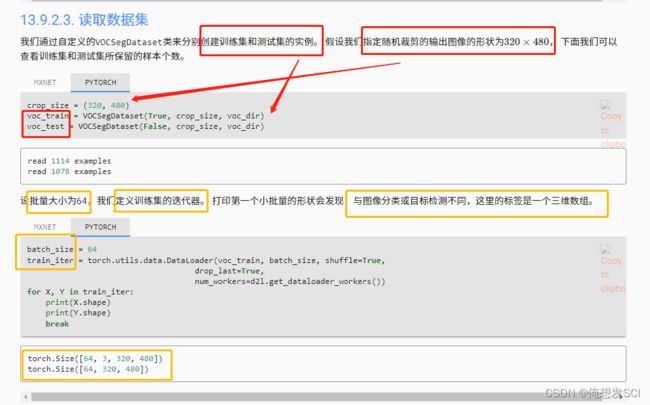
batch_size = 64
train_iter = torch.utils.data.DataLoader(voc_train, batch_size, shuffle=True,
                                    drop_last=True,
                                    num_workers=d2l.get_dataloader_workers())
for X, Y in train_iter:
    print(X.shape)
    print(Y.shape)
    break
torch.Size([64, 3, 320, 480])
torch.Size([64, 320, 480])
#@save
def load_data_voc(batch_size, crop_size):
    """加载VOC语义分割数据集"""
    voc_dir = d2l.download_extract('voc2012', os.path.join(
        'VOCdevkit', 'VOC2012'))
    num_workers = d2l.get_dataloader_workers()
    train_iter = torch.utils.data.DataLoader(
        VOCSegDataset(True, crop_size, voc_dir), batch_size,
        shuffle=True, drop_last=True, num_workers=num_workers)
    test_iter = torch.utils.data.DataLoader(
        VOCSegDataset(False, crop_size, voc_dir), batch_size,
        drop_last=True, num_workers=num_workers)
    return train_iter, test_iter
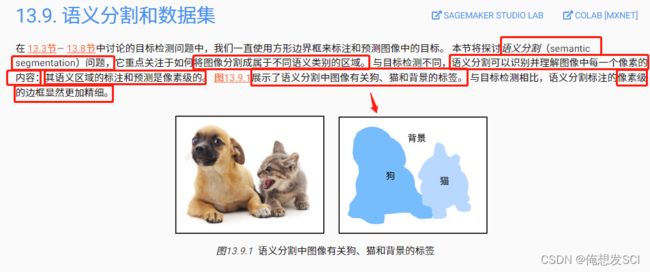
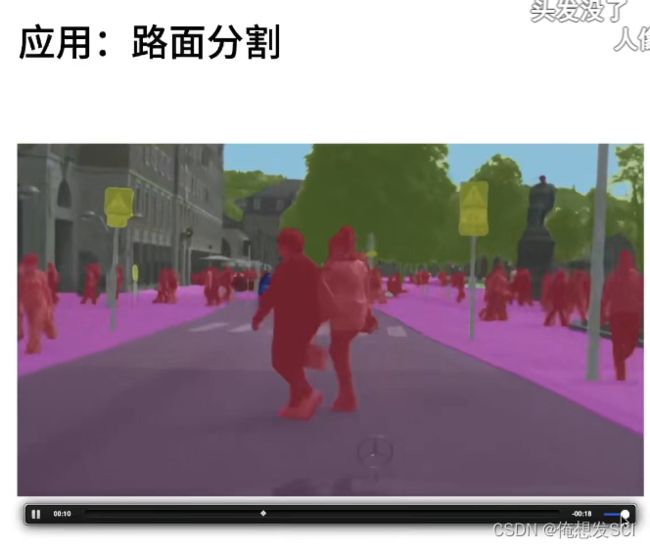
主要关心的还是语义分割
3. Q&A
标注工具?
labelme
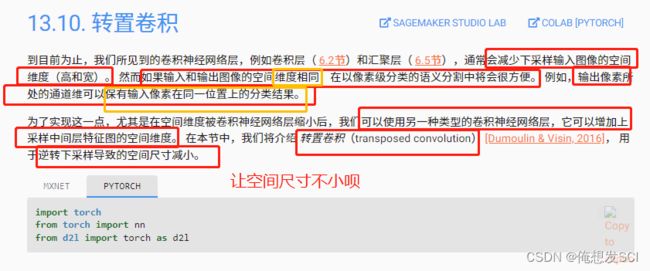
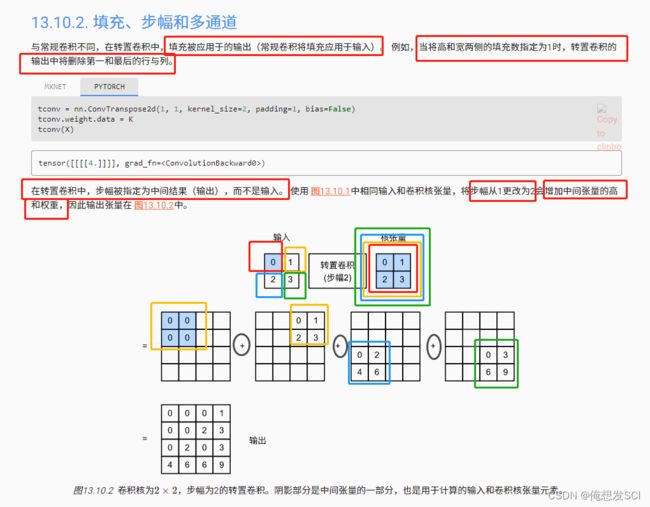
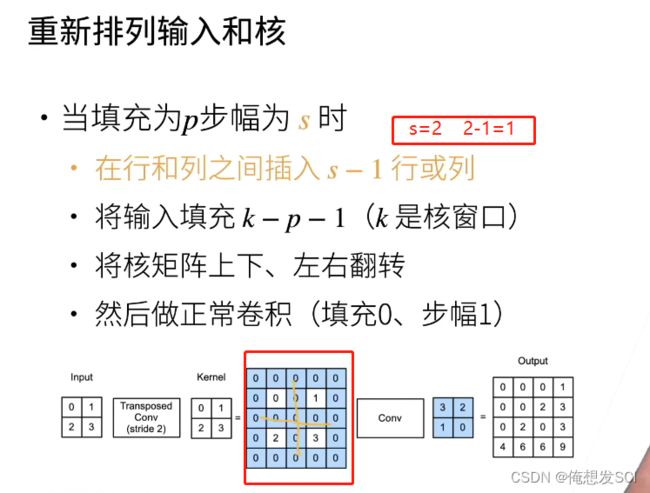
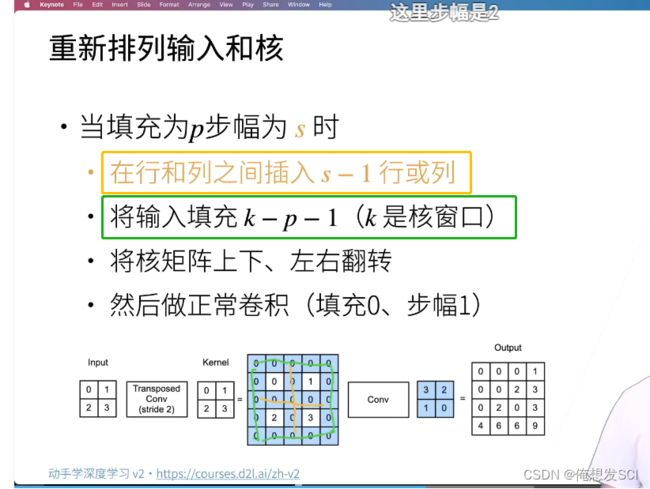
卷积就是一个一个小框对应和卷积核计算 然后变成一个数字
但是这个没有是吧重复位置进行增加啦 步幅为1 就多一个行一列
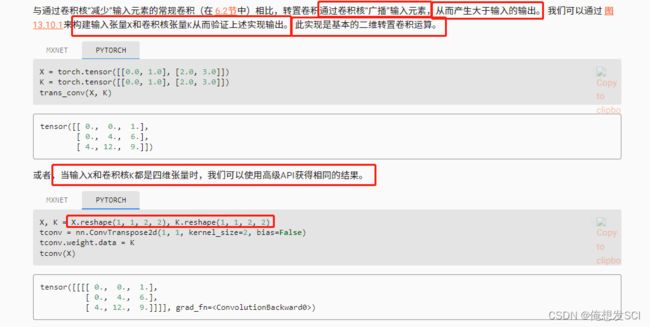
def trans_conv(X, K):
    h, w = K.shape
    Y = torch.zeros((X.shape[0] + h - 1, X.shape[1] + w - 1))
    for i in range(X.shape[0]):
        for j in range(X.shape[1]):
            Y[i: i + h, j: j + w] += X[i, j] * K
    return Y
X, K = X.reshape(1, 1, 2, 2), K.reshape(1, 1, 2, 2)
tconv = nn.ConvTranspose2d(1, 1, kernel_size=2, bias=False)
tconv.weight.data = K
tconv(X)
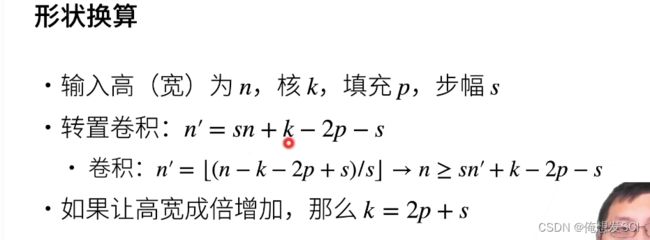
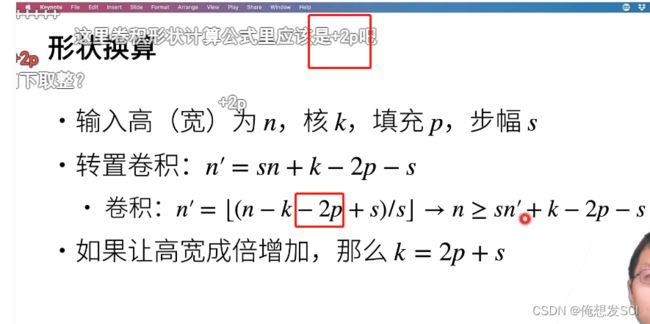
X = torch.rand(size=(1, 10, 16, 16))
#输入10
conv = nn.Conv2d(10, 20, kernel_size=5, padding=2, stride=3)
10-》20
tconv = nn.ConvTranspose2d(20, 10, kernel_size=5, padding=2, stride=3)
20-》10
tconv(conv(X)).shape == X.shape
#10=10
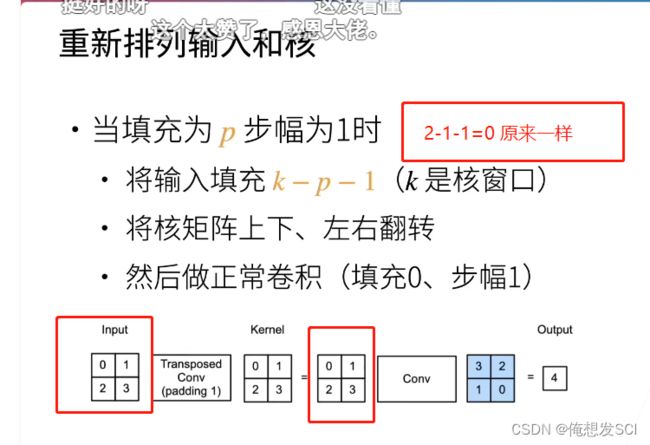
加了填充 输出变小了
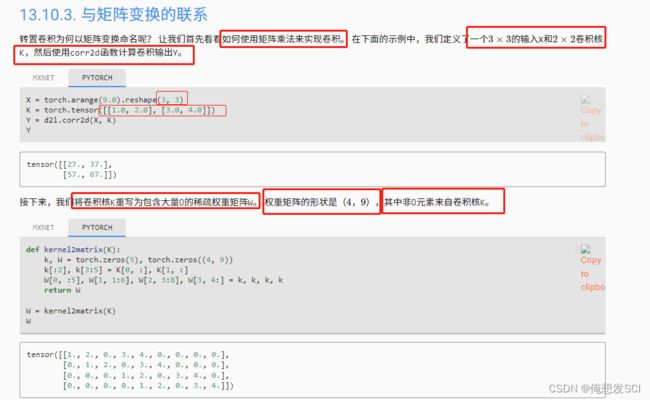
X = torch.arange(9.0).reshape(3, 3)    #3*3 0-9的值
K = torch.tensor([[1.0, 2.0], [3.0, 4.0]])
Y = d2l.corr2d(X, K)
Y
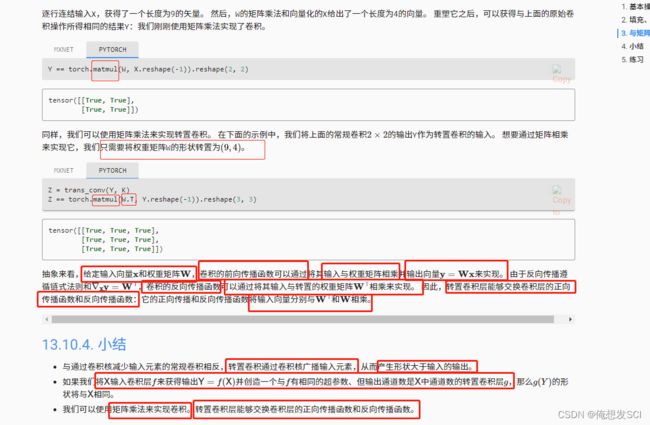
tensor([[27., 37.], [57., 67.]])def kernel2matrix(K): k, W = torch.zeros(5), torch.zeros((4, 9)) #输入3*3拉长=9 k[:2], k[3:5] = K[0, :], K[1, :] W[0, :5], W[1, 1:6], W[2, 3:8], W[3, 4:] = k, k, k, k return W W = kernel2matrix(K) Wtensor([[1., 2., 0., 3., 4., 0., 0., 0., 0.], [0., 1., 2., 0., 3., 4., 0., 0., 0.], [0., 0., 0., 1., 2., 0., 3., 4., 0.], [0., 0., 0., 0., 1., 2., 0., 3., 4.]])
47 转置卷积【动手学深度学习v2】_哔哩哔哩_bilibili动手学深度学习 v2 - 从零开始介绍深度学习算法和代码实现课程主页:https://courses.d2l.ai/zh-v2/教材:https://zh-v2.d2l.ai/, 视频播放量 30764、弹幕量 195、点赞数 629、投硬币枚数 400、收藏人数 240、转发人数 24, 视频作者 跟李沐学AI, 作者简介 ,相关视频:47.2 转置卷积是一种卷积【动手学深度学习v2】,48 全连接卷积神经网络 FCN【动手学深度学习v2】,04 数据操作 + 数据预处理【动手学深度学习v2】,PyTorch深度学习快速入门教程(绝对通俗易懂!)【小土堆】,Transformer中Self-Attention以及Multi-Head Attention详解,12 权重衰退【动手学深度学习v2】,(强推)李宏毅2021/2022春机器学习课程,三个月从零入门深度学习,保姆级学习路线图,从“卷积”、到“图像卷积操作”、再到“卷积神经网络”,“卷积”意义的3次改变,人工智能研究生现状 https://www.bilibili.com/video/BV17o4y1X7Jn?p=2&vd_source=eba877d881f216d635d2dfec9dc10379
47.2 转置卷积是一种卷积【动手学深度学习v2】_哔哩哔哩_bilibili动手学深度学习 v2 - 从零开始介绍深度学习算法和代码实现课程主页:https://courses.d2l.ai/zh-v2/教材:https://zh-v2.d2l.ai/, 视频播放量 19019、弹幕量 92、点赞数 622、投硬币枚数 380、收藏人数 241、转发人数 15, 视频作者 跟李沐学AI, 作者简介 ,相关视频:48 全连接卷积神经网络 FCN【动手学深度学习v2】,PyTorch深度学习快速入门教程(绝对通俗易懂!)【小土堆】,(强推)李宏毅2021/2022春机器学习课程,看清华学神尹成排名leetcode全站第一,从“卷积”、到“图像卷积操作”、再到“卷积神经网络”,“卷积”意义的3次改变,Pytorch 入门到精通全教程 卷积神经网络 循环神经网络,Transformer中Self-Attention以及Multi-Head Attention详解,【循环神经网络】5分钟搞懂RNN,3D动画深入浅出,实验室花12万买了个电脑,四块3090显卡,动静太大了。,(强推)2021吴恩达深度学习-卷积神经网络 https://www.bilibili.com/video/BV1CM4y1K7r7?spm_id_from=333.999.0.0&vd_source=eba877d881f216d635d2dfec9dc10379
