Pytorch 使用块的网络 VGG
Pytorch 使用块的网络 VGG
0. 环境介绍
环境使用 Kaggle 里免费建立的 Notebook
教程使用李沐老师的 动手学深度学习 网站和 视频讲解
小技巧:当遇到函数看不懂的时候可以按 Shift+Tab 查看函数详解。
1. VGG
1.1 简介
AlexNet 比 LeNet 更深更大,获得了更好的精度。
能不能更深更大?有以下选项:
- 更多的全连接层(太贵)
- 更多的卷积层
- 将卷积层组合成块
使用块的想法首先出现在牛津大学的视觉几何组(visualgeometry group)的 VGG 网络中。通过使用循环和子程序,可以很容易地在任何现代深度学习框架的代码中实现这些重复的架构。
VGG 论文地址:https://arxiv.org/abs/1409.1556
1.2 VGG 结构
VGG-16 结构,包含 13 13 13 个卷积层和 3 3 3 个全连接层:
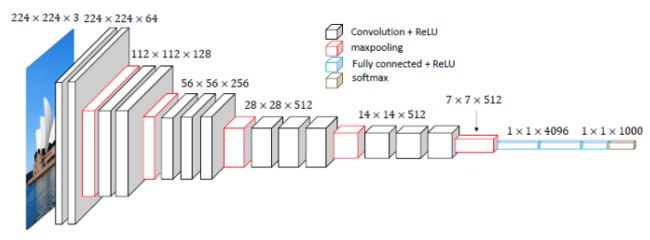
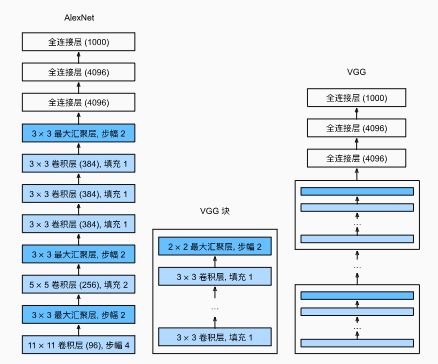
VGG 使用更深且窄的网络结构,用多层 3 × 3 3 \times 3 3×3 卷积核效果要比单一一个 5 × 5 5 \times 5 5×5 的卷积核效果要好。
VGG 可以看做更大更深的 AlexNet(重复的 VGG 块)。
2. 代码实现
2.1 VGG 块
!pip install -U d2l
import torch
from torch import nn
from d2l import torch as d2l


def vgg_block(num_convs, in_channels, out_channels):
    layers = []
    for _ in range(num_convs):
        layers.append(nn.Conv2d(in_channels, out_channels,
                                kernel_size=3, padding=1))
        layers.append(nn.ReLU())
        in_channels = out_channels
    layers.append(nn.MaxPool2d(kernel_size=2,stride=2))
    return nn.Sequential(*layers)
num_convs 为一个 VGG 块中 3 × 3 3 \times 3 3×3 卷积核的个数。
2.2 网络结构
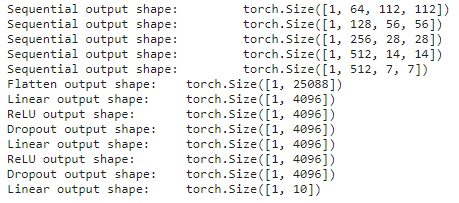
原始 VGG 网络有 5 5 5 个卷积块,其中前两个块各有一个卷积层,后三个块各包含两个卷积层。 第一个模块有 64 64 64 个输出通道,每个后续模块将输出通道数量翻倍,直到该数字达到 512 512 512。
由于该网络使用 8 8 8 个卷积层和 3 3 3 个全连接层,因此它通常被称为 VGG-11。
元组中的第一个数据为 VGG 块中卷积层的个数,第二个数据为输出通道数:
conv_arch = ((1, 64), (1, 128), (2, 256), (2, 512), (2, 512))
def vgg(conv_arch):
    conv_blks = []
    in_channels = 1
    # 卷积层部分
    for (num_convs, out_channels) in conv_arch:
        conv_blks.append(vgg_block(num_convs, in_channels, out_channels))
        in_channels = out_channels

    return nn.Sequential(
        *conv_blks, nn.Flatten(),
        # 全连接层部分
        nn.Linear(out_channels * 7 * 7, 4096), nn.ReLU(), nn.Dropout(0.5),
        nn.Linear(4096, 4096), nn.ReLU(), nn.Dropout(0.5),
        nn.Linear(4096, 10))

net = vgg(conv_arch)
查看每一层输出形状:
X = torch.randn(size=(1, 1, 224, 224))
for blk in net:
    X = blk(X)
    print(blk.__class__.__name__,'output shape:\t',X.shape)
注:
如果是彩色图片,只需要设置输入图像形状为: ( 1 × 3 × 224 × 224 ) (1 \times 3 \times 224 \times 224) (1×3×224×224)
vgg 函数中的 in_channels 需设置为 3 3 3。
2.3 训练
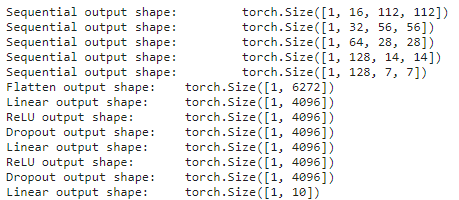
由于 VGG-11 比 AlexNet 计算量更大,因此我们构建了一个通道数较少的网络,足够用于训练Fashion-MNIST数据集。
每个卷积层输出通道变成其 1 / 4 1/4 1/4:
ratio = 4
small_conv_arch = [(pair[0], pair[1] // ratio) for pair in conv_arch]
net = vgg(small_conv_arch)

X = torch.randn(size=(1, 1, 224, 224))
for blk in net:
    X = blk(X)
    print(blk.__class__.__name__,'output shape:\t',X.shape)
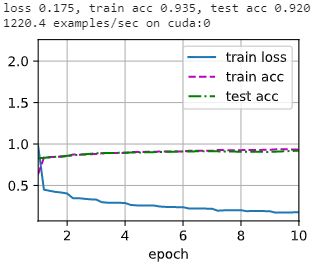
加载数据集并训练(训练之前记得在 kaggle 上打使用 GPU):
lr, num_epochs, batch_size = 0.05, 10, 128
train_iter, test_iter = d2l.load_data_fashion_mnist(batch_size, resize=224)
d2l.train_ch6(net, train_iter, test_iter, num_epochs, lr, d2l.try_gpu())
