Spring boot自动装配原理
Spring boot自动装配原理
@SpringBootApplication
public class DemoApplication {
    public static void main(String[] args) {
        SpringApplication.run(DemoApplication.class, args);
    }
}
从@SpringBootApplication开始,这是一个组合注解
@SpringBootApplication注解
@Target(ElementType.TYPE)
@Retention(RetentionPolicy.RUNTIME)
@Documented
@Inherited  //使用这个注解后,其他继承拥有这个注解的类的子类就自动继承父类的所有注解
@SpringBootConfiguration //就是一个springboot 封装的 @Configuration注解
@EnableAutoConfiguration //这个注解是开启自动配置的关键
@ComponentScan(excludeFilters = {
    @Filter(type = FilterType.CUSTOM, classes = TypeExcludeFilter.class),
@Filter(type = FilterType.CUSTOM, classes=AutoConfigurationExcludeFilter.class) })  //这个用于配置组件扫描指令,并未真正扫描,是@EnableAutoConfiguration完成的,声明扫描位置从拥有这个注解的类所在的包开始
public @interface SpringBootApplication {
    //省略
}
重点在@EnableAutoConfiguration注解上
@EnableAutoConfiguration注解
需要自动配置的类分为两类:一是用户自定义的类,即启动类所在包及其子包下的类;而是Spring Boot 认为需要自动配置的类;分别由@AutoConfigurationPackage注解和@Import注解完成
@Target(ElementType.TYPE)
@Retention(RetentionPolicy.RUNTIME)
@Documented
@Inherited
@AutoConfigurationPackage //这个是自动配置启动类所在包以及子包下的类
@Import(AutoConfigurationImportSelector.class) //自动配置系统认为需要的类
public @interface EnableAutoConfiguration {
    //省略
}
@AutoConfigurationPackage
@Target(ElementType.TYPE)
@Retention(RetentionPolicy.RUNTIME)
@Documented@Inherited
@Import(AutoConfigurationPackages.Registrar.class)
public @interface AutoConfigurationPackage {
    //省略
}
这个注解用于自动配置用户自定义的类,即启动类所在包及其子包下的类。源码如下:
static class Registrar implements ImportBeanDefinitionRegistrar, DeterminableImports {
    @Override
    public void registerBeanDefinitions(AnnotationMetadata metadata, BeanDefinitionRegistry registry) {
        register(registry, new PackageImports(metadata).getPackageNames().toArray(new String[0]));   }

//省略其他方法
}
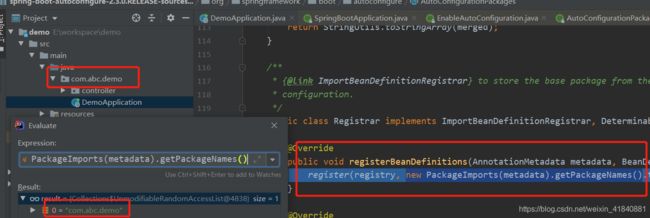
从源码看,它用@Import注解导入了一个Registrar类,进入这个类看到它完成了注册动作,我们在这里打一个断点,看到 new PackageImports(metadata).getPackageNames() 的值就是启动类所在的包名
@Import(AutoConfigurationImportSelector.class)
这个注解导入Spring Boot认为需要自动配置的AutoConfigurationImportSelector,看一下这个类的源码中的selectImports方法:
@Override
public String[] selectImports(AnnotationMetadata annotationMetadata) {
    if (!isEnabled(annotationMetadata)) {
        return NO_IMPORTS;
    }
    AutoConfigurationEntry autoConfigurationEntry = getAutoConfigurationEntry(annotationMetadata);
    return StringUtils.toStringArray(autoConfigurationEntry.getConfigurations());}
然后 getAutoConfigurationEntry -->getCandidateConfigurations :
protected List<String> getCandidateConfigurations(AnnotationMetadata metadata, AnnotationAttributes attributes) {
    List<String> configurations = SpringFactoriesLoader.loadFactoryNames(getSpringFactoriesLoaderFactoryClass(),         getBeanClassLoader());
    Assert.notEmpty(configurations, "No auto configuration classes found in META-INF/spring.factories. If you "         + "are using a custom packaging, make sure that file is correct.");
    return configurations;}
其实从断言就可以看出,我们要找的配置类就在spring-boot-autoconfiguration依赖下的 META-INF/spring.factories文件中;如果继续从loadFactoryNames方法跟下去,进入loadSpringFactories,源码如下:
private static Map<String, List<String>> loadSpringFactories(@Nullable ClassLoader classLoader) {
MultiValueMap<String, String> result = cache.get(classLoader);
    if (result != null) {
        return result;
    }
    try {
        Enumeration<URL> urls = (classLoader != null ?           classLoader.getResources(FACTORIES_RESOURCE_LOCATION) :            ClassLoader.getSystemResources(FACTORIES_RESOURCE_LOCATION));
        //下面省略
    }
    return result;
}
然后点进去看FACTORIES_RESOURCE_LOCATION常量,
public static final String FACTORIES_RESOURCE_LOCATION = "META-INF/spring.factories";
可以确定Spring Boot认为需要自动配置的类都在spring-boot-autoconfiguration依赖下 的META-INF/spring.factories文件中,看一下:
Spring Boot自动配置就是读取这个文件下的类,然后自动装配的。
yml文件加载
我们从启动类的run方法开始,一直点run方法,直到这里:
public ConfigurableApplicationContext run(String... args) {
    StopWatch stopWatch = new StopWatch();
    stopWatch.start();
    ConfigurableApplicationContext context = null;
    Collection<SpringBootExceptionReporter> exceptionReporters = new ArrayList<>();
    configureHeadlessProperty();
    SpringApplicationRunListeners listeners = getRunListeners(args);
    listeners.starting();
    try {
        ApplicationArguments applicationArguments = new DefaultApplicationArguments(args);
        ConfigurableEnvironment environment = prepareEnvironment(listeners, applicationArguments);
        configureIgnoreBeanInfo(environment);
        Banner printedBanner = printBanner(environment);
        //下面的省略
    }
}
进入prepareEnvironment–>listeners.environmentPrepared(监听)–>this.initialMulticaster.multicastEvent(广播)–>invokeListener(启用监听)–>doInvokeListener–>listener.onApplicationEvent
然后进入onApplicationEnvironmentPreparedEvent–>postProcessEnvironment
进入之后,addPropertySources–>load,一直点load,直到这里:
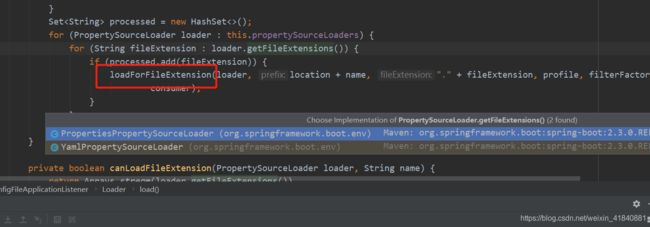
这里就有两种加载方式,一种加载property文件,一种加载ymal方式。我们先不管,进入loadForFileExtension方法,然后load–>loadDocuments–>loader.load
这里就是具体两种方式的实现了,进入第二个,看yml加载过程,源码如下:
@Override
public List<PropertySource<?>> load(String name, Resource resource) throws IOException {
    if (!ClassUtils.isPresent("org.yaml.snakeyaml.Yaml", null)) {
        throw new IllegalStateException(            "Attempted to load " + name + " but snakeyaml was not found on the classpath");
    }
    List<Map<String, Object>> loaded = new OriginTrackedYamlLoader(resource).load();
    if (loaded.isEmpty()) {
        return Collections.emptyList();
    }
    List<PropertySource<?>> propertySources = new ArrayList<>(loaded.size());
    for (int i = 0; i < loaded.size(); i++) {
        String documentNumber = (loaded.size() != 1) ? " (document #" + i + ")" : "";
        propertySources.add(new OriginTrackedMapPropertySource(name + documentNumber,            Collections.unmodifiableMap(loaded.get(i)), true));
    }
    return propertySources;
}
可以在返回propertySources 这里打一个断点,查看yml文件加载结果
Spring Boot如何完成自动装配的?
前面知道在 spring-boot-autoconfiguration依赖包下的METE-INF/spring.factories文件中存放所有需要自动装配的类,随便找一个,如org.springframework.boot.autoconfigure.data.redis.RedisAutoConfiguration,找到这个类:
@Configuration(proxyBeanMethods = false)
@ConditionalOnClass(RedisOperations.class)
@EnableConfigurationProperties(RedisProperties.class)
@Import({ LettuceConnectionConfiguration.class, JedisConnectionConfiguration.class })
public class RedisAutoConfiguration {

	@Bean
	@ConditionalOnMissingBean(name = "redisTemplate")
	public RedisTemplate<Object, Object> redisTemplate(RedisConnectionFactory redisConnectionFactory) throws UnknownHostException {
		RedisTemplate<Object, Object> template = new RedisTemplate<>();
		template.setConnectionFactory(redisConnectionFactory);
		return template;
	}
    //省略后面的代码
}
tionFactory) throws UnknownHostException {
RedisTemplate
template.setConnectionFactory(redisConnectionFactory);
return template;
}
//省略后面的代码
}
这个配置类最后返回了一个redisTemplate,并交由Spring 管理,我们在程序中开启它的自动配置就可以直接使用了。


