- 图论刷题计划与题解1(最短路问题)
cqust_qilin02811
#最短路与分层图图论算法深度优先
文章目录图论刷题计划与题解1(最短路问题)题目1:P1629邮递员送信(建反图做两次dijkstra)题目2:P1144最短路计数题目3:P1828[USACO3.2]香甜的黄油SweetButter题目4:P1576最小花费题目5:P5767[NOI1997]最优乘车题目6:P5764[CQOI2005]新年好图论刷题计划与题解1(最短路问题)题目1:P1629邮递员送信(建反图做两次dijks
- Unity(游戏)中五种数据存储的方法
别皱眉inging
unity3d游戏存储存储方式
Unity(游戏)中五种数据存储的方法一、PlayerPrefsunity3d提供了一个用于本地持久化保存与读取的类-------PlayerPrefs.工作原理很简单,以键值对的形式将数据保存在文件中,然后程序可以根据这个名称取出上次保存的数值(注:PlayerPrefs运用起来很方便,随时都可以存取与读取)。Playerprefs类支持3中数据类型的保存和读取,分别是浮点型、整型和字符串型:P
- Apache Lucene 详解及示例
微笑听雨。
java进阶教程apachelucenejava全文检索
ApacheLucene详解及示例1.简介ApacheLucene是一个开源的高性能全文搜索引擎库,广泛应用于构建各种搜索系统和信息检索应用。Lucene提供了丰富的API来进行索引和搜索,支持高效的文本处理和查询。本文将深入解析Lucene的核心概念和主要功能,并通过示例代码演示其使用方法。2.核心概念2.1倒排索引倒排索引(InvertedIndex)是Lucene的核心数据结构。它将文档中的
- Python连接SQL SEVER数据库全流程
m0_74824865
面试学习路线阿里巴巴数据库pythonsql
背景介绍在数据分析领域,经常需要从数据库中获取数据进行分析和处理。而SQLServer是一种常用的关系型数据库管理系统,因此学习如何使用Python连接SQLServer数据库并获取数据是非常有用的。以下是Python使用pymssql连接SQLServer数据库的全流程:安装pymssql库本地账号设置脚本连接数据导入函数实现一、安装pymssqlpymssql是Python连接SQLServe
- 解释SQL和NoSQL数据库的区别,各自的适用场景是什么?
破碎的天堂鸟
学习教程nosql数据库
SQL与NoSQL数据库的深度对比及适用场景分析一、核心定义与数据模型差异1:SQL数据库结构化数据模型:基于关系型模型,数据以表格(行和列)形式存储,表之间通过外键建立关联。例如,客户表与订单表通过客户ID关联,形成严格的逻辑结构。预定义模式(Schema):需提前定义表结构(字段类型、主键、外键等),修改结构需通过ALTER等命令,灵活性较低。标准化查询语言:使用SQL(StructuredQ
- 网络安全工具 AWVS 与 Nmap:原理、使用及代码示例
阿贾克斯的黎明
网络安全安全web安全网络
目录网络安全工具AWVS与Nmap:原理、使用及代码示例AWVS:Web漏洞扫描的利器1.工具概述2.工作原理3.使用方法4.代码示例(Python调用AWVSAPI进行扫描)Nmap:网络探测与端口扫描的神器1.工具概述2.工作原理3.使用方法4.代码示例(Python调用Nmap进行扫描)总结在网络安全领域,AWVS(AcunetixWebVulnerabilityScanner)和Nmap是
- 深入剖析 Weblogic、ThinkPHP、Jboss、Struct2 历史漏洞
阿贾克斯的黎明
网络安全web安全
目录深入剖析Weblogic、ThinkPHP、Jboss、Struct2历史漏洞一、Weblogic漏洞(一)漏洞原理(二)漏洞利用代码(Python示例)(三)防范措施二、ThinkPHP漏洞(一)漏洞原理(二)漏洞利用代码(示例,假设存在漏洞的代码片段)(三)防范措施三、Jboss漏洞(一)漏洞原理(二)漏洞利用代码(Java示例,用于构造恶意序列化数据)(三)防范措施四、Struct2漏洞
- 深入剖析 Java 反序列化:FASTjson 漏洞与 Shiro 漏洞
阿贾克斯的黎明
网络安全phpweb安全开发语言
目录深入剖析Java反序列化:FASTjson漏洞与Shiro漏洞引言Java反序列化原理示例代码FASTjson漏洞分析漏洞成因示例代码防护措施Shiro漏洞分析漏洞成因示例代码(模拟攻击场景)防护措施总结引言在Java应用开发中,反序列化是一项重要的技术,但同时也隐藏着巨大的安全风险。FASTjson和Shiro作为Java开发中常用的工具和框架,其反序列化漏洞曾引发了广泛关注。本文将深入探讨
- 冒泡排序原理及C++的实现方法
小鹏编程
c++排序算法算法
冒泡排序是一种简单的排序算法,通过重复遍历列表并交换相邻元素来排序。一、算法原理核心思想:每次遍历将当前未排序部分的最大元素"冒泡"到正确位置。操作方式:比较相邻元素顺序错误则交换位置每轮遍历减少一次比较次数二、模拟示例以下用4个数据的数组[4,3,2,1]详细演示冒泡排序过程:初始数组[4,3,2,1]第一轮遍历(确定最大值)目标:将最大的数移动到最右侧比较与交换:比较4和3→交换→[3,4,2
- HC32F460_SCI驱动(一)
嵌入式老牛
HC32F460驱动库HC32F460C语言嵌入式硬件驱动库串口
在开始介绍HC32F460的SCI驱动之前,先重点说明一下功能组与串口相关参数,以便于更好的描述SCI驱动。1.功能组1.1基本概念HC32F460的引脚功能复用机制通过Func_Grp(功能组)实现,其灵活性显著高于传统单片机(如STM32系列)。每个引脚支持多种外设功能,具体功能通过选择对应的Func_Grp编号配置。该方案的灵活度极高,户可自由分配外设到指定引脚,无需遵循固定映射规则,极大提
- 前端开发中的常见问题与疑惑:解析与应对策略
lina_mua
javascriptvue.jshtml前端es6
1.引言1.1前端开发的复杂性前端开发涉及HTML、CSS、JavaScript等多种技术,同时还需要考虑性能优化、跨浏览器兼容性、用户体验等问题。随着前端技术的快速发展,开发者面临的挑战也越来越多。1.2本文的目标本文旨在总结前端开发中常见的问题与疑惑,并提供相应的解决方案和应对策略,帮助开发者更好地应对挑战。2.HTML/CSS常见问题2.1布局问题:如何实现复杂的页面布局?问题描述:实现复杂
- Transformer 代码剖析2 - 模型训练 (pytorch实现)
lczdyx
Transformer代码剖析transformerpytorch深度学习人工智能python
一、模型初始化模块参考:项目代码1.1参数统计函数defcount_parameters(model):returnsum(p.numel()forpinmodel.parameters()ifp.requires_grad)遍历模型参数筛选可训练参数统计参数数量返回总数技术解析:numel()方法计算张量元素总数requires_grad筛选需要梯度更新的参数统计结果反映模型复杂度,典型Tran
- 【Python专栏】Python的发展历程
雾岛心情
Python入门到精通python开发语言
Python的创始人为吉多·范罗苏姆(GuidovanRossum),人称龟叔1989年,为了打发圣诞节假期,Guido开始写Python语言的编译器。Python这个名字,来自Guido所挚爱的电视剧MontyPython’sFlyingCircus。他希望这个新的叫做Python的语言,能符合他的理想:创造一种C和shell之间,功能全面,易学易用,可拓展的语言。Python的具体发展历史和版
- Stable diffusion 3.5本地运行环境配置记录
寸先生的牛马庄园
扩散模型stablediffusion
1.环境配置创建虚环境condacreate-nsd3.5python=3.10Pytorch(>2.0)condainstallpytorch==2.2.2torchvision==0.17.2torchaudio==2.2.2pytorch-cuda=12.1-cpytorch-cnvidiaJupyter能使用Anaconda虚环境condainstallipykernelpython-mi
- 阿里巴巴DIN模型原理与Python实现
eso1983
python开发语言算法推荐算法
阿里巴巴的DeepInterestNetwork(DIN)是一种用于点击率预测(CTR)的深度学习模型,特别针对电商场景中用户兴趣多样化和动态变化的特性设计。其核心思想是通过注意力机制动态捕捉用户历史行为中与当前候选商品相关的兴趣。1.DIN模型原理1.核心问题传统推荐模型(如Embedding+MLP)将用户历史行为视为固定长度的向量,忽略了用户兴趣的多样性。例如,用户历史行为中可能包含多个互不
- 游戏开放经济系统的部分思考
ArimaMisaki
大数据人工智能
游戏内的经济系统设计确实与现实中的宏观经济调控有相似逻辑,而现实中的对抗“非法经济组织”(如黑市、洗钱集团、垄断企业)的策略,经过适当改造后可以迁移到游戏内对抗工作室。下文是具体对比与可借鉴方案:一、现实中的“工作室”类比与应对手段1.打击非法金融活动(类比游戏内黑市交易)现实手段:央行监控大额资金流动(如反洗钱系统)。对异常账户冻结调查(如频繁跨行转账、多账户资金归集)。游戏借鉴:交易链路追踪:
- 文心一言产品拆解调研报告
Charlues.k
AI产品经理文心一言ai
目录一、产品概述二、目标用户与市场定位三、核心功能分析1.功能列表2.功能使用流程3.交互体验四、用户体验评估1.用户视角1.1学习曲线1.2操作流畅度1.3用户心理预期满足程度2.情感设计2.1细节设计与用户情感体验2.2界面与交互符合用户预期3.使用场景3.1高频场景下的操作体验3.2低频或紧急场景下的操作便利性总结五、数据和技术分析1.技术架构1.1技术架构概述1.2核心功能支持与稳定性1.
- 第14天:C++异常处理实战指南 - 构建安全的文件解析系统
JuicyActiveGilbert
C++教程c++安全开发语言
第14天:C++异常处理实战指南-构建安全的文件解析系统一、今日学习目标掌握C++异常处理的核心语法与流程️理解RAII在资源管理中的关键作用创建自定义文件解析异常体系实现安全的文件解析器原型二、C++异常处理核心机制1.异常处理基础语法#include#include#includevoidparseConfiguration(conststd::string&path){std::ifstre
- Java微服务的注册中心Nacos
铁锤学代码
微服务java微服务开发语言
文章目录Nacos的主要作用Nacos实现动态配置更新的技术Nacos实现CAPNacos实现CAP原理Nacos使用Distro和Raft分别干什么用?ZAB与Raft的区别Nacos的主要作用配置中心:可以将微服务中的一些配置信息放到Nacos进行统一管理,也可以通过Nacos实现动态配置管理。也可以将不同环境的配置放在不同的Namespace下的group下,实现动态选择配置发布部署。服务注
- Spark技术系列(一):初识Apache Spark——大数据处理的统一分析引擎
数据大包哥
#Spark大数据
Spark技术系列(一):初识ApacheSpark——大数据处理的统一分析引擎1.背景与核心价值1.1大数据时代的技术演进MapReduce的局限性:磁盘迭代计算、中间结果落盘导致的性能瓶颈Spark诞生背景:UCBerkeleyAMPLab实验室为解决复杂迭代计算需求研发(2010年开源)技术定位:基于内存的通用分布式计算框架(支持批处理、流计算、机器学习、图计算等)1.2Spark内置模块S
- 主成分回归(PCR)与特征值因子筛选:从理论到MATLAB实战
青橘MATLAB学习
多元分析回归matlab线性代数数学建模算法
内容摘要:本文深入解析主成分回归(PCR)的原理与MATLAB实现,结合Hald水泥数据案例对比PCR与普通回归的性能差异。详细讲解特征值筛选策略(累积贡献率、交叉验证),并提供单参数估计优化方法。通过完整代码与可视化结果,助力读者掌握高维数据建模与多重共线性处理技巧。关键词:主成分回归特征值筛选多重共线性MATLAB实现交叉验证—1.主成分回归(PCR)概述主成分回归(PrincipalComp
- 国内短剧系统源码部署小程序体验测评讲解
南阳迈特网络科技
短剧源码短剧小程序短剧系统小程序系统架构php
在移动互联网飞速发展的今天,短剧作为一种新兴的娱乐形式,凭借其短小精悍、内容丰富的特点,迅速赢得了大量用户的青睐。作为一名软件测试人员,我有幸深入体验了一款功能全面、设计精良的短剧小程序。本文将从前端设计、后端功能、用户体验以及服务支持等多个角度,对这款小程序进行详细评测。如果您也感兴趣欢迎点我了解一起探讨一下吧一、前端设计:灵活与美观的完美融合1.运营方自由DIY:个性化定制的极致体验这款小程序
- ArrayList 源码分析
2401_85327573
java开发语言
ArrayList简介ArrayList的底层是数组队列,相当于动态数组。与Java中的数组相比,它的容量能动态增长。在添加大量元素前,应用程序可以使用ensureCapacity操作来增加ArrayList实例的容量。这可以减少递增式再分配的数量。ArrayList继承于AbstractList,实现了List,RandomAccess,Cloneable,java.io.Serializabl
- C++ 游戏开发入门
安年CJ
C++游戏c++开发语言c#游戏
一、为什么选择C++进行游戏开发C++在游戏开发领域具有独特的地位。它兼具高效性与对底层硬件的良好控制能力,这使得它非常适合开发对性能要求极高的游戏核心引擎部分。许多知名的大型游戏,如《使命召唤》系列、《虚幻竞技场》等,其底层架构都是基于C++构建的。C++能够直接操作内存,在处理复杂的游戏逻辑、大规模数据运算(如物理模拟、图形渲染中的大量计算)以及优化游戏性能方面有着卓越的表现。同时,丰富的类库
- javaweb文件上传:@MultipartConfig注解与Apache Commons FileUpload对比
yuren_xia
后端技术apachejavatomcat
在JavaWeb应用中处理文件上传时,可以选择使用@MultipartConfig注解或第三方库如ApacheCommonsFileUpload(通常简称为fileupload)。以下是两者的比较和建议:使用@MultipartConfig注解简介:@MultipartConfig是JavaServlet规范中用于处理multipart/form-data请求(通常是文件上传)的注解。它简化了在S
- pytorch基础-比较矩阵是否相等
yuweififi
pytorch人工智能
1、使用NumPy库NumPy是Python中用于科学计算的常用库,它提供了array_equal和allclose函数来判断矩阵是否相等。array_equal用于精确比较,allclose用于考虑一定误差范围的近似比较,适合浮点数矩阵。importnumpyasnp#创建示例矩阵matrix_a=np.array([[1,2,3],[4,5,6]])matrix_b=np.array([[1,
- Exception:data did not match any variant of untagged enum PyPreTokenizerTypeWrapper at line 69 解决方案
爱编程的喵喵
Python基础课程pythontokenizerPyPreTokenizer解决方案
大家好,我是爱编程的喵喵。双985硕士毕业,现担任全栈工程师一职,热衷于将数据思维应用到工作与生活中。从事机器学习以及相关的前后端开发工作。曾在阿里云、科大讯飞、CCF等比赛获得多次Top名次。现为CSDN博客专家、人工智能领域优质创作者。喜欢通过博客创作的方式对所学的知识进行总结与归纳,不仅形成深入且独到的理解,而且能够帮助新手快速入门。 本文主要介绍了Exception:datadidn
- 一学就会:A*算法详细介绍(Python)
不去幼儿园
人工智能(AI)#启发式算法算法python人工智能机器学习开发语言
本篇文章是博主人工智能学习以及算法研究时,用于个人学习、研究或者欣赏使用,并基于博主对相关等领域的一些理解而记录的学习摘录和笔记,若有不当和侵权之处,指出后将会立即改正,还望谅解。文章分类在启发式算法专栏:【人工智能】-【启发式算法】(6)---《一学就会:A*算法详细介绍(Python)》一学就会:A*算法详细介绍(Python)目录A*算法介绍A*算法的核心概念A*算法的特点A*算法示例:迷宫
- C++游戏开发系列教程之第二篇:面向对象编程与游戏架构设计
放氮气的蜗牛
深度博客游戏
大家好,欢迎回到C++游戏开发系列教程!在第一篇中,我们介绍了C++游戏开发的基本概念和如何搭建一个简单的游戏循环,为新手打开了C++游戏开发的大门。本篇博客将深入讲解面向对象编程(OOP)在游戏开发中的重要性,以及如何设计一个简单而有效的游戏架构。通过本篇文章,你将学到如何利用C++的类与继承构建游戏中的各个对象(如玩家、敌人等),并结合游戏循环实现一个基础的游戏状态管理系统。所有代码均附有详细
- RPC 服务分组:优化分布式系统架构的关键策略与代码实践
阿贾克斯的黎明
qt开发语言
目录RPC服务分组:优化分布式系统架构的关键策略与代码实践一、RPC服务分组的概念与作用二、实现RPC服务分组的步骤与代码示例(一)项目结构规划(二)编写proto文件(三)生成代码(四)编写服务逻辑(五)配置服务(六)启动服务组(七)服务调用在构建复杂的分布式系统时,RPC服务分组是一种有效的管理和组织方式,有助于提高系统的可维护性和扩展性。本文将详细介绍RPC服务分组的概念、作用,并通过实际步
- java观察者模式
3213213333332132
java设计模式游戏观察者模式
观察者模式——顾名思义,就是一个对象观察另一个对象,当被观察的对象发生变化时,观察者也会跟着变化。
在日常中,我们配java环境变量时,设置一个JAVAHOME变量,这就是被观察者,使用了JAVAHOME变量的对象都是观察者,一旦JAVAHOME的路径改动,其他的也会跟着改动。
这样的例子很多,我想用小时候玩的老鹰捉小鸡游戏来简单的描绘观察者模式。
老鹰会变成观察者,母鸡和小鸡是
- TFS RESTful API 模拟上传测试
ronin47
TFS RESTful API 模拟上传测试。
细节参看这里:https://github.com/alibaba/nginx-tfs/blob/master/TFS_RESTful_API.markdown
模拟POST上传一个图片:
curl --data-binary @/opt/tfs.png http
- PHP常用设计模式单例, 工厂, 观察者, 责任链, 装饰, 策略,适配,桥接模式
dcj3sjt126com
设计模式PHP
// 多态, 在JAVA中是这样用的, 其实在PHP当中可以自然消除, 因为参数是动态的, 你传什么过来都可以, 不限制类型, 直接调用类的方法
abstract class Tiger {
public abstract function climb();
}
class XTiger extends Tiger {
public function climb()
- hibernate
171815164
Hibernate
main,save
Configuration conf =new Configuration().configure();
SessionFactory sf=conf.buildSessionFactory();
Session sess=sf.openSession();
Transaction tx=sess.beginTransaction();
News a=new
- Ant实例分析
g21121
ant
下面是一个Ant构建文件的实例,通过这个实例我们可以很清楚的理顺构建一个项目的顺序及依赖关系,从而编写出更加合理的构建文件。
下面是build.xml的代码:
<?xml version="1
- [简单]工作记录_接口返回405原因
53873039oycg
工作
最近调接口时候一直报错,错误信息是:
responseCode:405
responseMsg:Method Not Allowed
接口请求方式Post.
- 关于java.lang.ClassNotFoundException 和 java.lang.NoClassDefFoundError 的区别
程序员是怎么炼成的
真正完成类的加载工作是通过调用 defineClass来实现的;
而启动类的加载过程是通过调用 loadClass来实现的;
就是类加载器分为加载和定义
protected Class<?> findClass(String name) throws ClassNotFoundExcept
- JDBC学习笔记-JDBC详细的操作流程
aijuans
jdbc
所有的JDBC应用程序都具有下面的基本流程: 1、加载数据库驱动并建立到数据库的连接。 2、执行SQL语句。 3、处理结果。 4、从数据库断开连接释放资源。
下面我们就来仔细看一看每一个步骤:
其实按照上面所说每个阶段都可得单独拿出来写成一个独立的类方法文件。共别的应用来调用。
1、加载数据库驱动并建立到数据库的连接:
Html代码
St
- rome创建rss
antonyup_2006
tomcatcmsxmlstrutsOpera
引用
1.RSS标准
RSS标准比较混乱,主要有以下3个系列
RSS 0.9x / 2.0 : RSS技术诞生于1999年的网景公司(Netscape),其发布了一个0.9版本的规范。2001年,RSS技术标准的发展工作被Userland Software公司的戴夫 温那(Dave Winer)所接手。陆续发布了0.9x的系列版本。当W3C小组发布RSS 1.0后,Dave W
- html表格和表单基础
百合不是茶
html表格表单meta锚点
第一次用html来写东西,感觉压力山大,每次看见别人发的都是比较牛逼的 再看看自己什么都还不会,
html是一种标记语言,其实很简单都是固定的格式
_----------------------------------------表格和表单
表格是html的重要组成部分,表格用在body里面的
主要用法如下;
<table>
&
- ibatis如何传入完整的sql语句
bijian1013
javasqlibatis
ibatis如何传入完整的sql语句?进一步说,String str ="select * from test_table",我想把str传入ibatis中执行,是传递整条sql语句。
解决办法:
<
- 精通Oracle10编程SQL(14)开发动态SQL
bijian1013
oracle数据库plsql
/*
*开发动态SQL
*/
--使用EXECUTE IMMEDIATE处理DDL操作
CREATE OR REPLACE PROCEDURE drop_table(table_name varchar2)
is
sql_statement varchar2(100);
begin
sql_statement:='DROP TABLE '||table_name;
- 【Linux命令】Linux工作中常用命令
bit1129
linux命令
不断的总结工作中常用的Linux命令
1.查看端口被哪个进程占用
通过这个命令可以得到占用8085端口的进程号,然后通过ps -ef|grep 进程号得到进程的详细信息
netstat -anp | grep 8085
察看进程ID对应的进程占用的端口号
netstat -anp | grep 进程ID
&
- 优秀网站和文档收集
白糖_
网站
集成 Flex, Spring, Hibernate 构建应用程序
性能测试工具-JMeter
Hmtl5-IOCN网站
Oracle精简版教程网站
鸟哥的linux私房菜
Jetty中文文档
50个jquery必备代码片段
swfobject.js检测flash版本号工具
- angular.extend
boyitech
AngularJSangular.extendAngularJS API
angular.extend 复制src对象中的属性去dst对象中. 支持多个src对象. 如果你不想改变一个对象,你可以把dst设为空对象{}: var object = angular.extend({}, object1, object2). 注意: angular.extend不支持递归复制. 使用方法: angular.extend(dst, src); 参数:
- java-谷歌面试题-设计方便提取中数的数据结构
bylijinnan
java
网上找了一下这道题的解答,但都是提供思路,没有提供具体实现。其中使用大小堆这个思路看似简单,但实现起来要考虑很多。
以下分别用排序数组和大小堆来实现。
使用大小堆:
import java.util.Arrays;
public class MedianInHeap {
/**
* 题目:设计方便提取中数的数据结构
* 设计一个数据结构,其中包含两个函数,1.插
- ajaxFileUpload 针对 ie jquery 1.7+不能使用问题修复版本
Chen.H
ajaxFileUploadie6ie7ie8ie9
jQuery.extend({
handleError: function( s, xhr, status, e ) {
// If a local callback was specified, fire it
if ( s.error ) {
s.error.call( s.context || s, xhr, status, e );
}
- [机器人制造原则]机器人的电池和存储器必须可以替换
comsci
制造
机器人的身体随时随地可能被外来力量所破坏,但是如果机器人的存储器和电池可以更换,那么这个机器人的思维和记忆力就可以保存下来,即使身体受到伤害,在把存储器取下来安装到一个新的身体上之后,原有的性格和能力都可以继续维持.....
另外,如果一
- Oracle Multitable INSERT 的用法
daizj
oracle
转载Oracle笔记-Multitable INSERT 的用法
http://blog.chinaunix.net/uid-8504518-id-3310531.html
一、Insert基础用法
语法:
Insert Into 表名 (字段1,字段2,字段3...)
Values (值1,
- 专访黑客历史学家George Dyson
datamachine
on
20世纪最具威力的两项发明——核弹和计算机出自同一时代、同一群年青人。可是,与大名鼎鼎的曼哈顿计划(第二次世界大战中美国原子弹研究计划)相 比,计算机的起源显得默默无闻。出身计算机世家的历史学家George Dyson在其新书《图灵大教堂》(Turing’s Cathedral)中讲述了阿兰·图灵、约翰·冯·诺依曼等一帮子天才小子创造计算机及预见计算机未来
- 小学6年级英语单词背诵第一课
dcj3sjt126com
englishword
always 总是
rice 水稻,米饭
before 在...之前
live 生活,居住
usual 通常的
early 早的
begin 开始
month 月份
year 年
last 最后的
east 东方的
high 高的
far 远的
window 窗户
world 世界
than 比...更
- 在线IT教育和在线IT高端教育
dcj3sjt126com
教育
codecademy
http://www.codecademy.com codeschool
https://www.codeschool.com teamtreehouse
http://teamtreehouse.com lynda
http://www.lynda.com/ Coursera
https://www.coursera.
- Struts2 xml校验框架所定义的校验文件
蕃薯耀
Struts2 xml校验Struts2 xml校验框架Struts2校验
>>>>>>>>>>>>>>>>>>>>>>>>>>>>>>>>>>>>>>
蕃薯耀 2015年7月11日 15:54:59 星期六
http://fa
- mac下安装rar和unrar命令
hanqunfeng
mac
1.下载:http://www.rarlab.com/download.htm 选择
RAR 5.21 for Mac OS X 2.解压下载后的文件 tar -zxvf rarosx-5.2.1.tar 3.cd rar sudo install -c -o $USER unrar /bin #输入当前用户登录密码 sudo install -c -o $USER rar
- 三种将list转换为map的方法
jackyrong
list
在本文中,介绍三种将list转换为map的方法:
1) 传统方法
假设有某个类如下
class Movie {
private Integer rank;
private String description;
public Movie(Integer rank, String des
- 年轻程序员需要学习的5大经验
lampcy
工作PHP程序员
在过去的7年半时间里,我带过的软件实习生超过一打,也看到过数以百计的学生和毕业生的档案。我发现很多事情他们都需要学习。或许你会说,我说的不就是某种特定的技术、算法、数学,或者其他特定形式的知识吗?没错,这的确是需要学习的,但却并不是最重要的事情。他们需要学习的最重要的东西是“自我规范”。这些规范就是:尽可能地写出最简洁的代码;如果代码后期会因为改动而变得凌乱不堪就得重构;尽量删除没用的代码,并添加
- 评“女孩遭野蛮引产致终身不育 60万赔偿款1分未得”医腐深入骨髓
nannan408
先来看南方网的一则报道:
再正常不过的结婚、生子,对于29岁的郑畅来说,却是一个永远也无法实现的梦想。从2010年到2015年,从24岁到29岁,一张张新旧不一的诊断书记录了她病情的同时,也清晰地记下了她人生的悲哀。
粗暴手术让人发寒
2010年7月,在酒店做服务员的郑畅发现自己怀孕了,可男朋友却联系不上。在没有和家人商量的情况下,她决定堕胎。
12月5日,
- 使用jQuery为input输入框绑定回车键事件 VS 为a标签绑定click事件
Everyday都不同
jspinput回车键绑定clickenter
假设如题所示的事件为同一个,必须先把该js函数抽离出来,该函数定义了监听的处理:
function search() {
//监听函数略......
}
为input框绑定回车事件,当用户在文本框中输入搜索关键字时,按回车键,即可触发search():
//回车绑定
$(".search").keydown(fun
- EXT学习记录
tntxia
ext
1. 准备
(1) 官网:http://www.sencha.com/
里面有源代码和API文档下载。
EXT的域名已经从www.extjs.com改成了www.sencha.com ,但extjs这个域名会自动转到sencha上。
(2)帮助文档:
想要查看EXT的官方文档的话,可以去这里h
- mybatis3的mapper文件报Referenced file contains errors
xingguangsixian
mybatis
最近使用mybatis.3.1.0时无意中碰到一个问题:
The errors below were detected when validating the file "mybatis-3-mapper.dtd" via the file "account-mapper.xml". In most cases these errors can be d
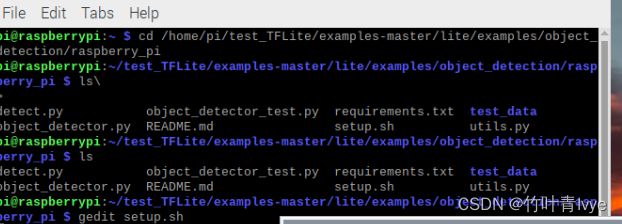
![]() https://github.com/tensorflow/examples/tree/master/lite/examples/image_classification/raspberry_pi下载完毕后,将examples-master整个文件夹上传到树莓派上,然后终端cd到如下目录下(结合自己的路径)
https://github.com/tensorflow/examples/tree/master/lite/examples/image_classification/raspberry_pi下载完毕后,将examples-master整个文件夹上传到树莓派上,然后终端cd到如下目录下(结合自己的路径)![]() https://github.com/tensorflow/examples/tree/master/lite/examples/object_detection/raspberry_pi参考上面官网进行配置,cd到目标检测目录下
https://github.com/tensorflow/examples/tree/master/lite/examples/object_detection/raspberry_pi参考上面官网进行配置,cd到目标检测目录下


