基于TensorRt的TensorFlow模型前向推理过程
目录
1. 安装TensorRt
2. 模型保存
2.1 显存分配
3. 模型转换
4. 模型推理测试
环境:
系统:ubuntu 18.04
cuda: 10.0
cudnn: 7.4
Tensorflow: 2.0.0
TensorRt: 6.1
1. 安装TensorRt
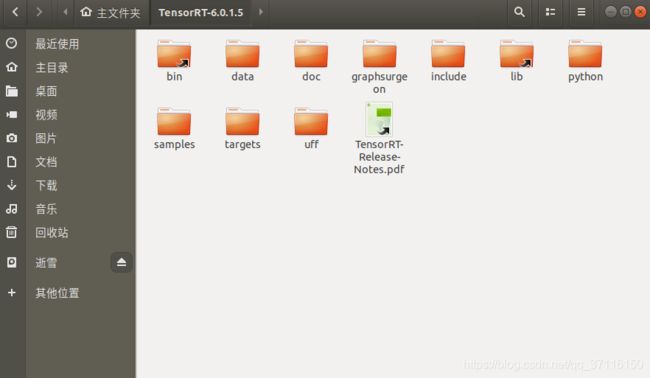
1. 下载TensorRt 安装包:https://developer.nvidia.com/tensorrt
点击Download Now即可选择不同的版本下载,选择版本时需要根据你的系统版本与cuda版本。如果是第一次下载,需要注册一个账户,然后填一个调查问卷,挺简单的。尽量下载.tar压缩文件,和GA版本,GA表示稳定版,RC表示发行测试版。下载的速度可能会比较慢,请科学上网,方能玩转深度学习。
2. 安装
尽量选择一个python虚拟环境(使用conda创建)来安装,而且该环境已经安装了tensorflow-gpu版本,这是前置条件。
2.1 系统路径设置
将lib加入系统路径中:
sudo gedit ~/.bashrc将下面的语句复制到文件的最后面
export LD_LIBRARY_PATH=/home/snow/TensorRT-6.0.1.5/lib:$LD_LIBRARY_PATH更新一哈
source ~/.bashrc2.2 安装tensorrt
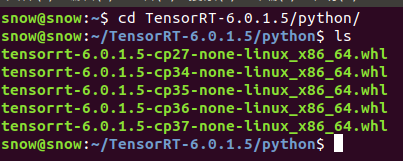
打开终端,cd进TensorRT/python文件夹下:
根据你的python版本来选择不同的安装文件
note: 如果环境中有pip, pip2, pip3, 安装python2包使用pip2, 安装python3的包使用pip3; 如果只有一个pip, 就无所谓拉,直接使用pip。
tensorrt导入没有错误,则安装成功
在Pycharm中如果导入失败,在终端导入成功,可以将lib下的库全部复制到 /usr/lib下,基本就可以拉。
2.3 安装uff, graphsurgeon:
不知道是不是我的tensorflow版本过高的问题,uff可以安装成功,导入就是不能成功,有点郁闷,也没事,本文暂时用不到uff模块,如果哪位小伙伴知道为什么导入失败,请在下方评论,谢谢。
uff 测试方法与tensorrt一样,
>>>import uff
不出错就没有问题啦,我的Import失败,不知道你们能不能成功,我在另一台电脑,ubuntu16.04, tf1.x,是可以导入成功的。
graphsurgeon不用测试,提示安装成功就可以啦。
2. 模型保存
以mnist数据集为例:
# -*- coding: utf-8 -*-
import os
os.environ['TF_CPP_MIN_LOG_LEVEL'] = '2'
import tensorflow as tf
from tensorflow.keras import datasets, optimizers
# from tensorflow.python.compiler.tensorrt import trt_convert

def preprocess(x, y):
    """
    x is a simple image, not a batch
    """
    x = tf.expand_dims(x, axis=-1)
    x = tf.cast(x, dtype=tf.float32) / 255.
    # x = tf.reshape(x, [28 * 28])
    y = tf.cast(y, dtype=tf.int32)
    y = tf.one_hot(y, depth=10)
    return x, y


batchsz = 128

def train():
    # 可以直接使用datasets.mnist.load_data(),如果网络好,可以连接外网,
    # 如果下载不了,可以自己先下载文件
    (x, y), (x_val, y_val) = datasets.mnist.load_data('/home/snow/picture/mnist.npz')
    print('datasets:', x.shape, y.shape, x.min(), x.max())

    db = tf.data.Dataset.from_tensor_slices((x, y))
    db = db.map(preprocess).shuffle(10000).batch(batchsz)
    ds_val = tf.data.Dataset.from_tensor_slices((x_val, y_val))
    ds_val = ds_val.map(preprocess).batch(batchsz)

    # sample = next(iter(db))
    # print(sample[0].shape, sample[1].shape)
    inputs = tf.keras.Input(shape=(28,28,1), name='input')
    # [28, 28, 1] => [28, 28, 64]
    input = tf.keras.layers.Flatten(name="flatten")(inputs)
    fc_1 = tf.keras.layers.Dense(512, activation='relu', name='fc_1')(input)
    fc_2 = tf.keras.layers.Dense(256, activation='relu', name='fc_2')(fc_1)
    pred = tf.keras.layers.Dense(10, activation='softmax', name='output')(fc_2)

    model = tf.keras.Model(inputs=inputs, outputs=pred, name='mnist')
    model.summary()
    Loss = []
    Acc = []
    optimizer = optimizers.Adam(0.001)
    # epoches = 5
    for epoch in range(1):
        # 创建用于测试精度的参数
        total_num = 0
        total_correct = 0
        for step, (x,y) in enumerate(db):
            with tf.GradientTape() as tape:

                pred = model(x)
                loss = tf.keras.losses.categorical_crossentropy(y_pred=pred,
                                                                y_true=y,
                                                                from_logits=False)
                loss = tf.reduce_mean(loss)
                grades = tape.gradient(loss, model.trainable_variables)
                optimizer.apply_gradients(zip(grades, model.trainable_variables))
                # 输出loss值
            if step % 10 == 0:
                print("epoch: ", epoch, "step: ", step, "loss: ", loss.numpy())
                Loss.append(loss)

        # 计算精度,将全连接层的输出转化为概率值输出
        for step, (x_val, y_val) in enumerate(ds_val):
            # 预测测试集的输出

            pred = model(x_val)
            # pred = tf.nn.softmax(pred, axis=1)
            pred = tf.argmax(pred, axis=1)
            pred = tf.cast(pred, tf.int32)
            y_val = tf.argmax(y_val, axis=1)
            y_val = tf.cast(y_val, tf.int32)
            correct = tf.equal(pred, y_val)
            correct = tf.cast(correct, tf.int32)
            correct = tf.reduce_sum(correct)
            total_correct += int(correct)
            total_num += x_val.shape[0]
            if step % 20 == 0:
                acc_step = total_correct / total_num
                print("第" + str(step) + "步的阶段精度是:", acc_step)
                Acc.append(float(acc_step))

        acc = total_correct / total_num
        print("epoch %d test acc: " % epoch, acc)
    # 方式1:
    model.save('./model/tf_savedmodel', save_format='tf')
    # 方式2:
    # tf.saved_model.save(obj=model, export_dir="./model/")

if __name__ == "__main__":
    train()
所有代码中,应该注意的是model.save() ,它前面的代码是训练代码,可以根据自己的网络修改,最后的保存方式是重点:
model.save('./model/tf_savedmodel', save_format='tf'),第一个参数是保存路径,第二个参数是保存格式,不能修改。
2.1 显存分配
在ubuntu系统下,非常容易出现显存不足的情况,可以加上下面指令,可以有效分配显存,当然,如果显存很大,可以略过。
方式1:
import os
os.environ["TF_FORCE_GPU_ALLOW_GROWTH"] = "true"
方式2:
# 写在头文件下面
# physical_devices = tf.config.experimental.list_physical_devices('GPU')
# assert len(physical_devices) > 0, "Not enough GPU hardware devices available"
# tf.config.experimental.set_memory_growth(physical_devices[0], True)
3. 模型转换
# -*- coding: utf-8 -*-
import os
os.environ['TF_CPP_MIN_LOG_LEVEL'] = '2'
from tensorflow.python.compiler.tensorrt import trt_convert as trt
params = trt.DEFAULT_TRT_CONVERSION_PARAMS
params._replace(precision_mode=trt.TrtPrecisionMode.FP32)
converter = trt.TrtGraphConverterV2(input_saved_model_dir="./model/yolo_tf_model", conversion_params=params)
# 完成转换,但是此时没有进行优化,优化在执行推理时完成
converter.convert()
converter.save('./model/trt_savedmodel')
这一步也会生成一个.pb文件,这个文件则是tensorrt文件
4. 模型推理测试
# -*- coding: utf-8 -*-
import os
os.environ['TF_CPP_MIN_LOG_LEVEL'] = '2'
os.environ["TF_FORCE_GPU_ALLOW_GROWTH"] = "true"
import tensorflow as tf
from tensorflow.python.compiler.tensorrt import trt_convert as trt
from tensorflow.keras.datasets import mnist
import time
import cv2
import numpy as np

# physical_devices = tf.config.experimental.list_physical_devices('GPU')
# assert len(physical_devices) > 0, "Not enough GPU hardware devices available"
# tf.config.experimental.set_memory_growth(physical_devices[0], True)

(x_train, y_train), (x_test, y_test) = mnist.load_data('/home/snow/picture/mnist.npz')
x_test = x_test.astype('float32')
# x_test = x_test.reshape(10000, 784)
x_test /= 255

# 读取模型
saved_model_loaded = tf.saved_model.load("./model/trt_savedmodel", tags=[trt.tag_constants.SERVING])
# 获取推理函数,也可以使用saved_model_loaded.signatures['serving_default']
graph_func = saved_model_loaded.signatures[trt.signature_constants.DEFAULT_SERVING_SIGNATURE_DEF_KEY]
# 将模型中的变量变成常量,这一步可以省略,直接调用graph_func也行
frozen_func = trt.convert_to_constants.convert_variables_to_constants_v2(graph_func)

count = 20
for x,y in zip(x_test, y_test):
    x = tf.cast(x, tf.float32)
    start = time.time()
    # frozen_func(x)返回值是个列表
    # 列表中含有一个元素,就是输出tensor,使用.numpy()将其转化为numpy格式
    output = frozen_func(x)[0].numpy()
    end = time.time()
    times = (end - start) * 1000.0
    print("tensorrt times: ", times, " ms")
    result = np.argmax(output, 1)
    print("prediction result: ", result, "  |  ", "true result: ", y)

    if count == 0:
        break
    count -= 1
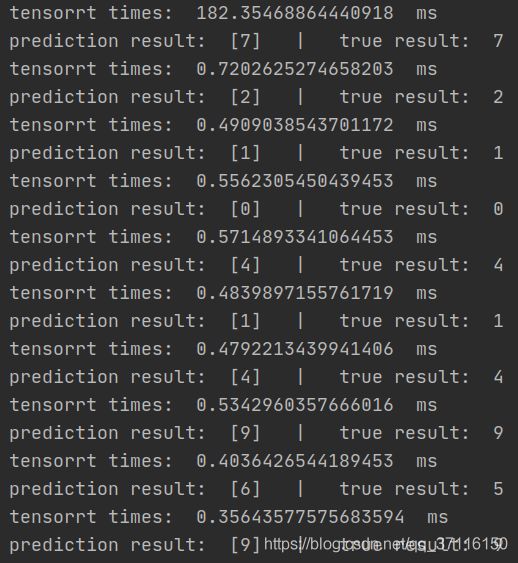
输出结果展示:
总共循环了20次,第一次较慢,后面就开始趋于正常,一张图片预测只花费了0.4ms左右,超过2000fps/s,简直恐怖,而且我的显卡也不好,MX150。当然网络小是主要原因。
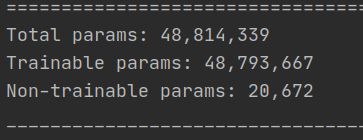
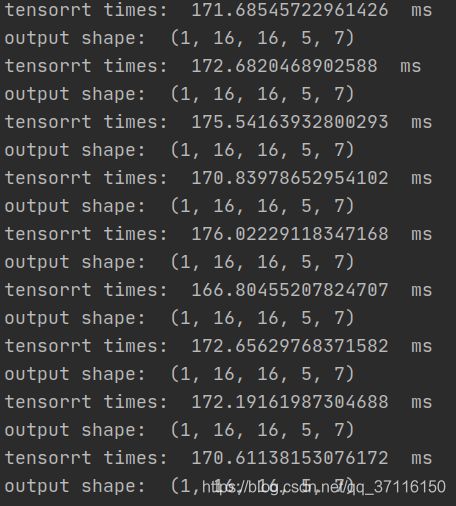
现在用YOLOV2来测试一波,YOLOV2有23层网络,4000多万的参数量:
来看看它的速度:
平均172ms,速度还是极为快的,而且,在未转化为tensorRt模型之前的原模型,在我电脑上都跑不动,显存不足。

