SpringBoot工作开发场景实践
SpringBoot开发
- 前言
- 1.springBoot入门案例
- 2.springBoot配置文件
-
- 2.1 springBoot配置文件简介
- 2.1 如何获取配置文件中配置的值
- 2.3 springBoot配置文件优先级
- 2.4 多环境配置文件
- 2.5 配置文件抽离
- 2.6 引入原生配置文件
- 3.springBoot自动配置原理
- 4.SpringBootweb开发
-
- 4.1 静态资源访问
- 4.2 请求映射
- 4.3 请求参数映射
- 4.4 集成thymeleaf
- 4.5 springBoot定时任务
- 4.6 全局异常处理
-
- 4.1 设计一个友好的异常体系
- 4.2 异常统一处理
- 4.7 日志记录处理
- 4.8 springBoot文件上传和下载
-
- 4.8.1 文件上传
- 4.8.2 文件下载
- 4.9 发送邮件
- 4.10 配置跨域和静态资源
- 4.11 配置拦截器
- 5.数据访问开发
-
- 5.1 SpringBoot默认数据源
- 5.2 整合mybatis
- 5.3 整合mybatis-plus
-
- 5.3.1 简单增删改查
- 5.3.2 自动填充策略
- 5.3.3 mybatis-plus分页查询
- 5.4 springDataJPA
- 5.5 springboot多数据源
- 6.5 集成Redis
-
- 6.1 集成Redis环境
- 6.2 redis分布式锁
- 6.3 使用redis完成排行榜
- 7 springboot日志处理
-
- 7.1 springboot日志描述
- 7.2 自定义日志配置
- 8 springboot文档配置
-
- 8.1 swagger集成
- 8.2 springboot集成smartdoc
前言
结合自己的工作经验和日常的使用springboot的熟练度整合的一篇文章,写这篇文章也是花了一个星期左右,干货满满,希望不要错过。
springboot的特性主要有
- 简化 Spring 应用程序的创建和开发过程
- 抛弃了繁琐的 xml 配置过程,采用大量的默认配置简化以及注解反射
- 直接使用 java main 方法启动内嵌的 Tomcat 服务器运行 Spring Boot 程序,不需要部署 war 包文件
四大核心分别为自动配置、起步依赖、Actuator和命令行界面
Spring Boot 是由 Pivotal 团队提供的全新框架,其设计目的是用来简化新 Spring 应用的初始搭建以及开发过程。
学习顺序挺重要的,建议不要一上手就学 Spring Boot,只有先学习下自己整合框架的方法,才能帮你理解 SpringBoot 解决的问题,感受到它的方便和高效。
说明:在后面的内容中使用的是idea开发工具,需要使用到lombok,idea需要额外安装lombok插件,并且需要在pom文件中引入lombok依赖,idea插件安装不再赘述,这个网上一搜一大把,maven坐标如下:
        <dependency>
            <groupId>org.projectlombokgroupId>
            <artifactId>lombokartifactId>
            <optional>trueoptional>
        dependency>
1.springBoot入门案例
使用springBoot非常方便,引入对应的stater即可,不在像使用ssm一样需要做很多的配置文件,只需要引入依赖添加相关注解即可。
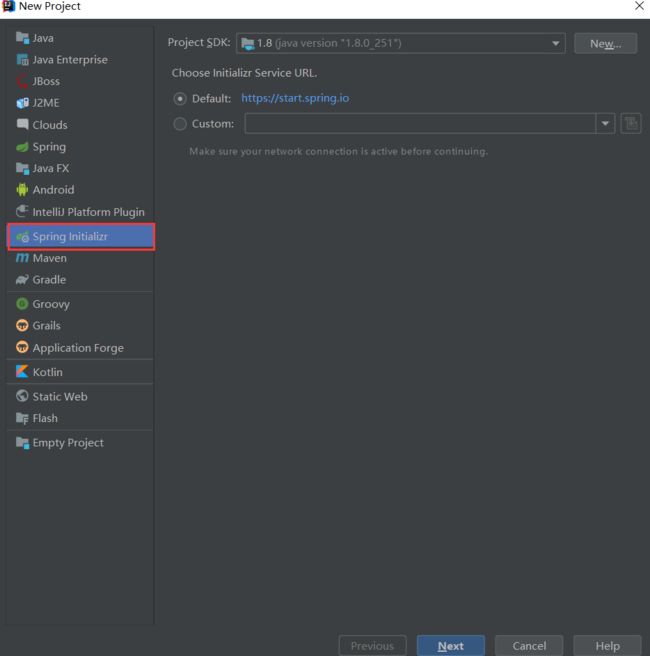
1.直接使用 idea 创建一个spring initalizr项目即可
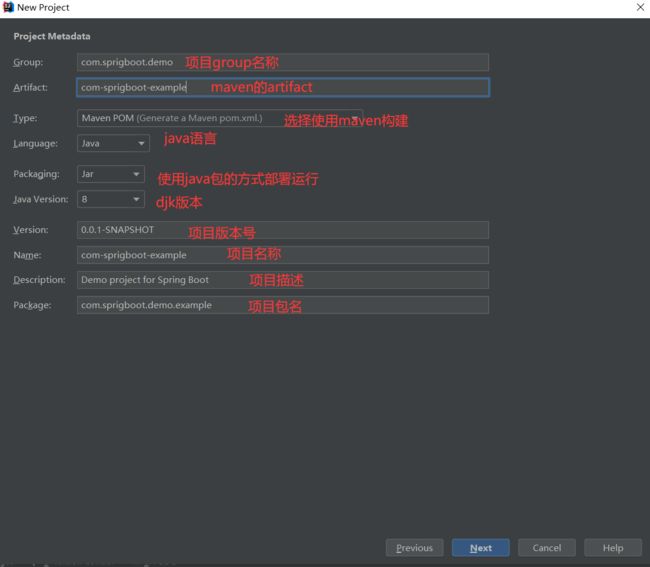
2.项目基本信息配置
3.项目依赖选择
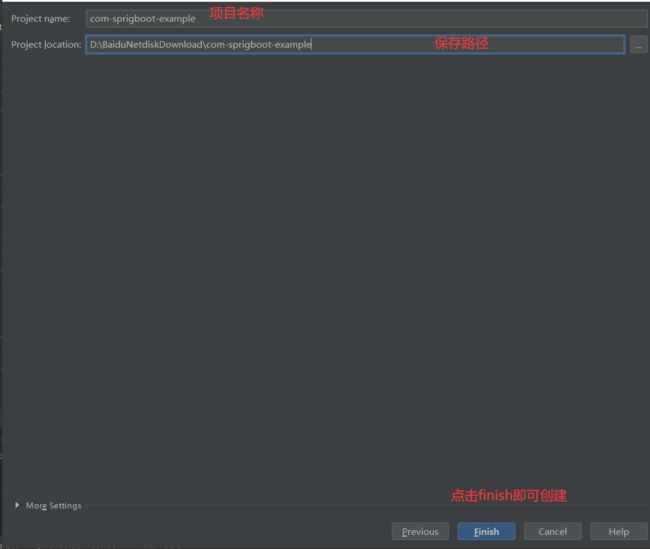
4.选择项目保存路径
5.创建完毕,等待maven依赖下载完毕后,就可以得到下面这样一个干净的项目
6.在application.properties中配置项目启动端口号
server.port=8800
然后在maven依赖中添加web相关依赖,以及后所需的公用依赖
        <dependency>
            <groupId>org.springframework.bootgroupId>
            <artifactId>spring-boot-starter-webartifactId>
        dependency>
       <dependency>
            <groupId>org.apache.commonsgroupId>
            <artifactId>commons-lang3artifactId>
            <version>3.1version>
        dependency>
      <dependency>
            <groupId>cn.hutoolgroupId>
            <artifactId>hutool-allartifactId>
            <version>5.3.8version>
        dependency>
    <dependency>
            <groupId>org.springframework.bootgroupId>
            <artifactId>spring-boot-starter-aopartifactId>
        dependency>

		<dependency>
            <groupId>org.apache.httpcomponentsgroupId>
            <artifactId>httpclientartifactId>
            <version>4.5.13version>
        dependency>
在com.springboot.example 下新建一个包叫controller,在此包下新增如下类:TestController
package com.springboot.example.controller;

import org.springframework.web.bind.annotation.GetMapping;
import org.springframework.web.bind.annotation.RequestMapping;
import org.springframework.web.bind.annotation.RestController;

@RestController
@RequestMapping("/example/test")
public class TestController {

    @GetMapping("/hello")
    public String hello(){
        return "Welcome to SpringBoot App ";
    }
}
// 主启动类默认会扫描 com.springboot.example包下所有的类
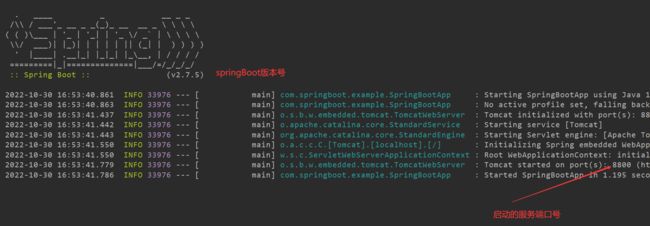
可以看到服务启动成功:
在浏览器中输入访问:http://localhost:8800/example/test/hello 即可得到我们我们返回的信息:Welcome to SpringBoot App
到这里入门就算完毕了,可以看到,开发速度非常快,springBoot是一个java程序开发脚手架,大大减少配置量。
2.springBoot配置文件
2.1 springBoot配置文件简介
SpringBoot项目是一个标准的Maven项目,它的配置文件需要放在src/main/resources/下,其文件名必须为application,其存在两种文件形式,分别是properties和yaml(或者yml)文件。
| properties | yaml | |
|---|---|---|
| 语法结构 | key=value |
key: value(:和value之间需要空格) |
| 文件后缀 | .properties |
.yaml或者.yml |
我们现在把 application.properties 换成 application.yml ,内容如下:
server:
  port: 8800
config:
  host: 127.0.0.1
  password: admin
  maxConnect: 20
2.1 如何获取配置文件中配置的值
第一种: 使用spring的El表达式直接注入:在TestController中添加如下内容
import org.springframework.beans.factory.annotation.Value;
import org.springframework.web.bind.annotation.GetMapping;
import org.springframework.web.bind.annotation.RequestMapping;
import org.springframework.web.bind.annotation.RestController;

import java.util.HashMap;
import java.util.Map;

@RestController
@RequestMapping("/example/test")
public class TestController {

    @Value("${config.host}")
    private String host;

    @Value("${config.host}")
    private String password;

    @Value("${config.host}")
    private String maxConnect;

    @GetMapping("/configYaml")
    public Map<String,String> configYaml(){
        HashMap<String, String> hashMap = new HashMap<>();
        hashMap.put("host",host);
        hashMap.put("password",password);
        hashMap.put("maxConnect",maxConnect);
        return hashMap;
    }
}
访问:http://localhost:8800/example/test/configYaml 即可得到: {“password”:“127.0.0.1”,“host”:“127.0.0.1”,“maxConnect”:“127.0.0.1”}
第二种: 使用ConfigurationProperties注解注入:新建一个包 config,在该包中新建一个类:RedisConfigBean
内如如下:
import lombok.Data;
import org.springframework.boot.context.properties.ConfigurationProperties;
import org.springframework.boot.context.properties.EnableConfigurationProperties;
import org.springframework.stereotype.Component;

@Data
//将当前类对象放在IOC容器中
@Component
//表示与配置文件中前缀为student的数据相对应
@ConfigurationProperties(prefix = "config")
public class RedisConfigBean {
    private String host;
    private String password;
    private String maxConnect;
}
然后在maven中引入
<dependency>
    <groupId>org.springframework.bootgroupId>
    <artifactId>spring-boot-configuration-processorartifactId>
    <optional>trueoptional>
dependency>
然后在TestController中添加如下内容即可:
import com.springboot.example.config.RedisConfigBean;
import org.springframework.beans.factory.annotation.Value;
import org.springframework.web.bind.annotation.GetMapping;
import org.springframework.web.bind.annotation.RequestMapping;
import org.springframework.web.bind.annotation.RestController;

import javax.annotation.Resource;
import java.util.HashMap;
import java.util.Map;

@RestController
@RequestMapping("/example/test")
public class TestController {


    @Resource
    private RedisConfigBean redisConfigBean;


    @GetMapping("/configYamlEntity")
    public RedisConfigBean configYamlEntity(){
        return redisConfigBean;
    }
}
浏览器访问: http://localhost:8800/example/test/configYamlEntity 即可得到:{“host”:“127.0.0.1”,“password”:“admin”,“maxConnect”:“20”}
需要注意的是使用yml以实体类注入的时候 key不用使用驼峰的命名方式,比如把config换成 redisConfigBean 这样会报错
第三种: 就是可以这个配置类的实体,是第三方依赖里面的,写了配置文件的读取规则,但是没有注入到容器中,我们可以使用,@EnableConfigurationProperties + @ConfigureationProperties来进行导入
我们先在:application-api.yml中配置内容如下:
invoke:
  returnType: com.springboot.example.bean.UserInfo
  invokeId: 52d09385190d4c5bb05c43639fd4630d
  methodName: getUserInfoById
  params:
    - '101'
    - '2'
  paramsType:
    - 'java.lang.String'
    - 'java.lang.String'
然后老规矩,在 com.springboot.example.config 包下新建一个类 InvokeConfigBean
import lombok.Data;
import org.springframework.boot.context.properties.ConfigurationProperties;

import java.util.List;

@Data
@ConfigurationProperties(prefix = "invoke")
public class InvokeConfigBean {
    private String returnType;
    private String invokeId;
    private String methodName;
    private List<Object> params;
    private List<String> paramsType;
}
然后在 com.springboot.example.config 包下新建一个配置类 WebAppConfig
import org.springframework.boot.context.properties.EnableConfigurationProperties;
import org.springframework.context.annotation.Configuration;

@Configuration
@EnableConfigurationProperties(InvokeConfigBean.class)
public class WebAppConfig {
}
最后我们在TestController中添加如下内容进行测试
import com.springboot.example.config.ApiConfigBean;
import com.springboot.example.config.InvokeConfigBean;
import com.springboot.example.config.RedisConfigBean;
import org.springframework.beans.factory.annotation.Value;
import org.springframework.web.bind.annotation.GetMapping;
import org.springframework.web.bind.annotation.RequestMapping;
import org.springframework.web.bind.annotation.RestController;

import javax.annotation.Resource;
import java.util.HashMap;
import java.util.Map;

@RestController
@RequestMapping("/example/test")
public class TestController {


    @Resource
    private InvokeConfigBean invokeConfigBean;


    @GetMapping("/getInvokeConfigBeanContent")
    public InvokeConfigBean getInvokeConfigBeanContent(){
        return invokeConfigBean;
    }
}
访问接口: http://localhost:8800/example/test/getInvokeConfigBeanContent 即可得到如下内容
{
    "returnType": "com.springboot.example.bean.UserInfo",
    "invokeId": "52d09385190d4c5bb05c43639fd4630d",
    "methodName": "getUserInfoById",
    "params": [
        "101",
        "2"
    ],
    "paramsType": [
        "java.lang.String",
        "java.lang.String"
    ]
}
2.3 springBoot配置文件优先级
项目外部配置文件:
(1)命令行参数:
在命令行中通过 java -jar 命令启动项目时,可以使用连续的两个减号 – 对配置文件中的属性值进行赋值,则命令行设置的属性会覆盖配置文件中属性的值。
java -jar xx.jar --server.port=8081,会覆盖配置文件中的端口。
(2)外置配置文件:
还可以指定配置文件的路径或者目录,则系统会使用指定的配置文件,或者目录下所有的配置文件。
java -jar xxx.jar --spring.config.location=/opt/servicex/config/application.yml
java -jar xxx.jar --spring.config.location=/opt/servicex/config/
项目内部配置文件:
(1)在同一级目录下(除后缀外其他部分都相同)配置文件的优先级:properties(最高) > yml > yaml(最低), 优先级高的配置会覆盖优先级低的配置。
(2)项目中优先级如下(从上往下优先级逐级降低,优先级高的配置会覆盖优先级低的配置):
项目名/config/XXX配置文件 (优先级最高)
项目名/XXX配置文件
项目名/src/main/resources/config/XXX配置文件
项目名/src/main/resources/XXX配置文件 (优先级最低)
配置文件
在 Spring Boot 中有两种上下文,一种是 bootstrap另外一种是 application, bootstrap 是应用程序的父上下文,bootstrap用于应用程序上下文的引导阶段,由父Spring ApplicationContext加载。bootstrap 的加载优先于 applicaton,所以优先级从大到小如下:
bootstrap.properties -> bootstrap.yml -> application.properties -> application.yml
2.4 多环境配置文件
在 application.yml 中添加如下内如:表示我们激活的是 pro这个配置文件
spring:
  profiles:
    active: pro
在resources目录下新建2个配置文件:
application-dev.yml内容:
server:
  port: 8800
config:
  host: 127.0.0.1
  password: admin
  maxConnect: 20
  environment: dev

application-pro.yml内容:
server:
  port: 8800
config:
  host: 127.0.0.1
  password: admin
  maxConnect: 20
  environment: dev
然后在RedisConfigBean中添加属性 environment
然后我们访问: http://localhost:8888/example/test/configYamlEntity 就可以得到 {“host”:“127.0.0.1”,“password”:“admin”,“maxConnect”:“20”,“environment”:“pro”},可以看到我们的配置生效了。
他的一个多环境配置生效了。使用规则 : application-环境名称.ym
2.5 配置文件抽离
我们总不能把所有配置文件都写在一个配置文件里面,这样的话未免看起来复杂了,而且不太好阅读,配置多了以后都不太好找。写在我们单独写一个配置文件,然后在 application.yml 导入即可
比如我们现在需要配置一个调用第三方接口的配置文件 application-api.yml ,这个配置文件中,专门调用第三方接口的一个配置文件,内容如下:
inventory:
  module: order
  businessType: query
  serviceCode: f09543d4c8284aa1858def3da9aec1bd
  interfaceDesc: 根据商品id查询订单服务库存剩余量
还是同样的配方,我们在 config包下新建一个 类叫做 ApiConfigBean,内容如下
import lombok.Data;
import org.springframework.boot.context.properties.ConfigurationProperties;
import org.springframework.boot.context.properties.EnableConfigurationProperties;
import org.springframework.stereotype.Component;

@Data
//将当前类对象放在IOC容器中
@Component
//表示与配置文件中前缀为student的数据相对应
@ConfigurationProperties(prefix = "inventory")
public class ApiConfigBean {

    private String module;
    private String businessType;
    private String serviceCode;
    private String interfaceDesc;
}
然后在TestController中添加测试接口,内容如下
import com.springboot.example.config.ApiConfigBean;
import com.springboot.example.config.RedisConfigBean;
import org.springframework.beans.factory.annotation.Value;
import org.springframework.web.bind.annotation.GetMapping;
import org.springframework.web.bind.annotation.RequestMapping;
import org.springframework.web.bind.annotation.RestController;

import javax.annotation.Resource;
import java.util.HashMap;
import java.util.Map;

@RestController
@RequestMapping("/example/test")
public class TestController {


    @Resource
    private ApiConfigBean apiConfigBean;


    @GetMapping("/getApiConfigContent")
    public ApiConfigBean getApiConfigContent(){
        return apiConfigBean;
    }
}
最后我们只需要在 application.yml 中把刚刚的配置文件导入进去就行:如果需要导入多个,请使用英文逗号进行分割
server:
  port: 8800
spring:
  profiles:
    active: pro
    include: api
config:
  host: 127.0.0.1
  password: admin
  maxConnect: 20
访问接口: http://localhost:8888/example/test/getApiConfigContent
即可获得如下内容:
{
    "module": "order",
    "businessType": "query",
    "serviceCode": "f09543d4c8284aa1858def3da9aec1bd",
    "interfaceDesc": "根据商品id查询订单服务库存剩余量"
}
2.6 引入原生配置文件
有时候我们做项目升级的时候,原先是用xml配置文件配置的bean,我们可以直接导入该配置文件,然后将这些bean注入到springBoot的容器中。
在 com.springboot.example.bean 包下新建一个类 UserInfo,内如如下
@Data
public class UserInfo {
    private String id;
    private String username;
    private String password;
    private String phone;
    private String email;
    private String sex;
    private String userType;
}
然后在 resources 下 新建一个 beans.xml 内如如下
<beans xmlns="http://www.springframework.org/schema/beans"
       xmlns:xsi="http://www.w3.org/2001/XMLSchema-instance"
       xmlns:context="http://www.springframework.org/schema/context"
       xsi:schemaLocation="http://www.springframework.org/schema/beans http://www.springframework.org/schema/beans/spring-beans.xsd http://www.springframework.org/schema/context https://www.springframework.org/schema/context/spring-context.xsd">

    <bean id="userInfo" class="com.springboot.example.bean.UserInfo">
        <property name="id" value="101">property>
        <property name="username" value="admin">property>
        <property name="password" value="admin123">property>
        <property name="userType" value="system">property>
        <property name="email" value="[email protected]">property>
        <property name="phone" value="10086">property>
    bean>

beans>
在启动类或配置类上加上 @ImportResource(“classpath:beans.xml”) 即可,此案例加在启动类上,然后从容器中尝试获取。
import com.springboot.example.bean.UserInfo;
import org.springframework.boot.SpringApplication;
import org.springframework.boot.autoconfigure.SpringBootApplication;
import org.springframework.context.ConfigurableApplicationContext;
import org.springframework.context.annotation.ImportResource;

@ImportResource("classpath:beans.xml")
@SpringBootApplication
public class SpringBootApp {

    public static void main(String[] args) {
        ConfigurableApplicationContext app = SpringApplication.run(SpringBootApp.class, args);
        UserInfo userInfo = app.getBean("userInfo", UserInfo.class);
        System.out.println(userInfo);
    }

}
在spring容器启动后,我们可以看到控制台打印的userInfo这个bean
3.springBoot自动配置原理
springBoot自动注入原理请参考该文章,这里不在进行赘述: springBoot自动注入原理
4.SpringBootweb开发
4.1 静态资源访问
WebMvcAutoConfiguration 类自动为我们注册了如下目录为静态资源目录,也就是说直接可访问到资源的目录。
classpath:/META-INF/resources/        //  /src/java/resources/META-INF/resources/
classpath:/resources/    //  /src/java/resources/resources/
classpath:/static/     //  /src/java/resources/static
classpath:/public/    //  /src/java/resources/public/
/:项目根路径    //不常用
classpath:/META-INF/resources/>classpath:/resources/>classpath:/static/>classpath:/public/>/:项目根路径
源码分析:
// staticPathPattern是/**
String staticPathPattern = this.mvcProperties.getStaticPathPattern();
if (!registry.hasMappingForPattern(staticPathPattern)) {
    customizeResourceHandlerRegistration(
            registry.addResourceHandler(staticPathPattern)
                    .addResourceLocations(
                            this.resourceProperties.getStaticLocations())
            .setCachePeriod(cachePeriod));
}
this.resourceProperties.getStaticLocations()
========>
ResourceProperties
public String[] getStaticLocations() {
    return this.staticLocations;
}
========>
private String[] staticLocations = RESOURCE_LOCATIONS;
========>
private static final String[] RESOURCE_LOCATIONS;
private static final String[] SERVLET_RESOURCE_LOCATIONS = { "/" };
private static final String[] CLASSPATH_RESOURCE_LOCATIONS = {
            "classpath:/META-INF/resources/", "classpath:/resources/",
            "classpath:/static/", "classpath:/public/" };
========>
static {
    // 可以看到如下是对上面两个数组进行复制操作到一个新数组上,也就是合并。
    RESOURCE_LOCATIONS = new String[CLASSPATH_RESOURCE_LOCATIONS.length
            + SERVLET_RESOURCE_LOCATIONS.length];
    System.arraycopy(SERVLET_RESOURCE_LOCATIONS, 0, RESOURCE_LOCATIONS, 0,
            SERVLET_RESOURCE_LOCATIONS.length);
    System.arraycopy(CLASSPATH_RESOURCE_LOCATIONS, 0, RESOURCE_LOCATIONS,
            SERVLET_RESOURCE_LOCATIONS.length, CLASSPATH_RESOURCE_LOCATIONS.length);
}


// 上述代码可以翻译为如下:
registry.addResourceHandler("/**").addResourceLocations(
    "classpath:/META-INF/resources/", "classpath:/resources/",
            "classpath:/static/", "classpath:/public/", "/")
    // 设置缓存时间
    .setCachePeriod(cachePeriod));
默认首页:
默认首页就是直接输入 “ip:port/应用上下文路径” 默认进入的页面。
WebMvcAutoConfiguration 类自动为我们注册了如下文件为默认首页。
classpath:/META-INF/resources/index.html
classpath:/resources/index.html
classpath:/static/index.html
classpath:/public/index.html
/index.html
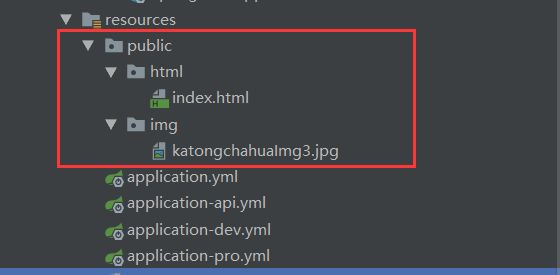
我们在 resources目录下新建一个public目录,然后里面存放静态资源
访问html:http://localhost:8888/html/index.html
访问图片: http://localhost:8888/img/katongchahuaImg3.jpg
接下来我们自己配置一个springBoot欢迎页面:在resources的public下新建一个欢迎的html,直接ip+端口号访问的就是这个页面
自定义过滤规则和静态资源位置:
SpringBoot 默认会指定静态资源的位置(5个位置:classpath:/META-INF/resources/ classpath:/resources/ 、classpath:/static/、classpath:/public/ 、/)。
我们可以根据需求进行自定义静态资源位置和访问路径规则。
根据代码的方式配置:
@Configuration
public class ImageMvcConfig implements WebMvcConfigurer {
    @Override
    public void addResourceHandlers(ResourceHandlerRegistry registry) {
        registry.addResourceHandler("/image/**")
                .addResourceLocations("classpath:/images/");
    }
  }
配置文件方式(application.properties): 如果是yml按照yml的格式去配置即可
spring.resources.static-locations=classpath:/static/	// 静态资源位置为 classpath:/static/
spring.mvc.static-path-pattern=/static/**    // 路径规则为/static/**

重启项目,输入ip:port/项目路径/static/xxx才能访问静态资源。
4.2 请求映射
@RequestMapping 标注在controller的方法上,不知道请求方式的话,默认所有请求都是可以处理的,可以增加 method 属性表示处理指定类型的请求,有RequestMethod这个枚举类来表示他所有支持的请求方式。
**REST使用风格:**常用的5个
- @GetMapping 从服务器获取资源(一个资源或资源集合)
- @PostMapping 在服务器新建一个资源(也可以用于更新资源)
- @DeleteMapping 从服务器删除资源。
- @PutMapping 在服务器更新资源(客户端提供改变后的完整资源)。
- @PatchMapping 在服务器更新资源(客户端提供改变的部分)
GET、HEAD、PUT、DELETE方法是幂等方法 (对于同一个内容的请求,发出n次的效果与发出1次的效果相同)。
GET、HEAD方法是 安全方法 (不会造成服务器上资源的改变)。
PATCH不一定是幂等的。PATCH的实现方式有可能是”提供一个用来替换的数据”,也有可能是”提供一个更新数据的方法”(比如 data++ )。如果是后者,那么PATCH不是幂等的。
| Method | 安全性 | 幂等性 |
|---|---|---|
| GET | √ | √ |
| HEAD | √ | √ |
| POST | × | × |
| PUT | × | √ |
| PATCH | × | × |
| DELETE | × | √ |
我们一般在controller类上 使用 @RequestMapping(value = “/example/request”) 这种方式表明是属于那个模块,然后在具体的方法上标注对应的注解,最后合并成一个完整的URL请求路径
4.3 请求参数映射
我们在controller下新建一个 RequestController类来演示这个案例
为了演示方便,我们在 bean 新建一个 ResponseResult 类来封装返回结果集合,我这里只写了2个方法一个是成功与失败,大家可以根据自己的业务逻辑来进行重写方法,达到自己的一个预期要求
/**
 * 封装响应结果
 * @author compass
 * @date 2022-11-01
 * @since 1.0
 **/
@Data
public class ResponseResult<T>   {
    // code 200 表示请求成功
    private Integer code;
    // 存放系统异常消息
    private String message;
    // 存放业务提示信息
    private String subMessage;
    // subCode 0 表示业务逻辑处理成功 -1表示业务逻辑处理失败
    private Integer subCode;
    // 存放数据
    private T data;

    private ResponseResult() {
    }

    private ResponseResult(Integer code, String message, String subMessage, Integer subCode, T data) {
        this.code = code;
        this.message = message;
        this.subMessage = subMessage;
        this.subCode = subCode;
        this.data = data;
    }

    // 构造一个响应结果对象

    public static <E> ResponseResult<E>  build(Integer code, String message, String subMessage, Integer subCode, E data) {
        return  new ResponseResult<>(code, message, subMessage, subCode, data);
    }

    // 简单的成功响应
    public static  <E> ResponseResult<E>  success( E data){
        return build(200,"请求成功","",0,data);
    }
    // 简单的失败响应
    public static  <E> ResponseResult<E>  error( String subMessage){
        return build(200,"请求失败",subMessage,-1,null);
    }
}
@PathVariable : 可以在请求路径中携带参数,然后使用@PathVariable来接收参数绑定
package com.springboot.example.controller;

import com.springboot.example.bean.UserInfo;
import org.springframework.web.bind.annotation.*;

@RestController
@RequestMapping(value = "/example/request")
public class RequestController {


    private static UserInfo getUserInfoEntity() {
        UserInfo userInfo = new UserInfo();
        userInfo.setId("101");
        userInfo.setUsername("admin");
        userInfo.setPassword("123456");
        userInfo.setPhone("10086");
        userInfo.setEmail("[email protected]");
        userInfo.setSex("男");
        userInfo.setUserType("system");
        return userInfo;
    }

    /**
     * 获取前端传递过来的userId,获取到userInfo对象中
     * @param userId 用户id
     * @return java.lang.Object
     * @author compass
     * @date 2022/11/1 10:06
     * @since 1.0.0
     **/
    @GetMapping("/getUserInfo/{userId}")
    public ResponseResult<UserInfo> getUserInfo(@PathVariable("userId") String userId) {
        UserInfo userInfo = getUserInfoEntity();
        userInfo.setId(userId);
        return ResponseResult.success(userInfo);
    }

}
访问 http://localhost:8888/example/request/getUserInfo/155456151 即可得到测试结果
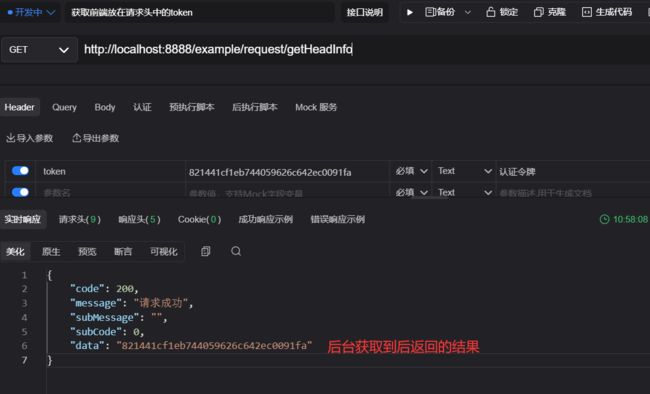
@RequestHeader : 用于获取请求头中的值
在 RequestController 中新增一个方法测试
    /**
     * 获取前端放在请求头中的token
     * @param token 前端在head中传递token参数
     * @return java.lang.String
     * @author compass
     * @date 2022/11/1 10:15
     * @since 1.0.0
     **/
    @GetMapping("/getHeadInfo")
    public ResponseResult<String> getHeadInfo(@RequestHeader("token") String token) {
        return ResponseResult.success(token);
    }
使用API POST测试:
**@RequestParam:**将请求参数绑定到你控制器的方法参数上(是springmvc中接收普通参数的注解)
@CookieValue的作用 : 用来获取Cookie中的值 @CookieValue参数
1、value:参数名称
2、required:是否必须
3、defaultValue:默认值
    /**
     * 获取前端传递的cookie
     * @param cookie
     * @return com.springboot.example.bean.ResponseResult
     * @author compass
     * @date 2022/11/1 10:15
     * @since 1.0.0
     **/
    @GetMapping("/getCookieInfo")
    public ResponseResult<String> getCookieInfo(@CookieValue("sidebarStatus") String cookie) {
        return ResponseResult.success(cookie);
    }
@RequestBody: 用于接收前端传递的json格式数据,必须是psot请求方式,而且必须只有一个@RequestBody注解
 /**
     * 添加一个userInfo
     * @param userInfo
     * @return com.springboot.example.bean.ResponseResult
     * @author compass
     * @date 2022/11/1 10:15
     * @since 1.0.0
     **/
    @GetMapping("/addUserInfo")
    public ResponseResult<UserInfo> addUserInfo(@RequestBody UserInfo userInfo) {
        return ResponseResult.success(userInfo);
    }
@RequestPart: 用于将multipart/form-data类型数据映射到控制器处理方法的参数中。除了@RequestPart注解外,@RequestParam同样可以用于此类操作。
    /**
     * RequestPart测试
     * @param file 前端传递的文件
     * @return com.springboot.example.bean.ResponseResult
     * @author compass
     * @date 2022/11/1 10:15
     * @since 1.0.0
     **/
    @GetMapping("/testRequestPart")
    public ResponseResult<String> testRequestPart (@RequestPart MultipartFile file) {
        return ResponseResult.success("success");
    }
@ModelAttribute:
- 注解在方法的参数上,调用方法时,模型的值会被注入,这在实际使用将,表单属性映射到模型对象
/**
 * ModelAttribute测试
 * @param userInfo 用户信息
 * @return com.springboot.example.bean.ResponseResult
 * @author compass
 * @date 2022/11/1 10:15
 * @since 1.0.0
 **/
@GetMapping("/testModelAttribute")
public ResponseResult<UserInfo> testModelAttribute (@ModelAttribute UserInfo userInfo) {
    return ResponseResult.success(userInfo);
}
- 应用在方法上 controller类上的 @RestController注解 需要换成@Controller注解,在需要返回JSON格式的方法上加上 @ResponseBody
地址栏输入地址回车后,Spring MVC 会先执行 beforeMethod 方法,将 username的值存入到 Model 中。然后执行 afterMethod方法,这样 name 的值就被带到了 model 方法中。也就是将封装model和返回view分开独立的方法进行
 /**
     * ModelAttribute测试
     * @param model 视图模型对象
     * @return com.springboot.example.bean.ResponseResult
     * @author compass
     * @date 2022/11/1 10:15
     * @since 1.0.0
     **/
    @ModelAttribute
    @GetMapping("/testMode")
    public void testMode ( Model model) {
       model.addAttribute("username","admin");
    }
@MatrixVariable : 获取矩阵变量 (这个用的比较少,这里就不再赘述,请仔细百度)
4.4 集成thymeleaf
1.引入依赖
        <dependency>
            <groupId>org.springframework.bootgroupId>
            <artifactId>spring-boot-starter-thymeleafartifactId>
        dependency>

        <dependency>
            <groupId>org.springframework.bootgroupId>
            <artifactId>spring-boot-devtoolsartifactId>
            <optional>trueoptional>
            <scope>runtimescope>
        dependency>
2.设置更新类路径资源,在开发时方便,因为不设置,修改html的时候,页面不会动态刷新
3.在application.yml中加入如下配置
spring:
  profiles:
    active: pro
    include: api
  thymeleaf:
    prefix: classpath:/templates/
    suffix: .html
    encoding: utf-8
    mode: HTML5
    cache: false
  devtools:
    restart:
      enabled: true  #设置开启热部署
      additional-paths: src/main/java #重启目录
      exclude: WEB-INF/**
    freemarker:
      cache: false    #页面不加载缓存,修改即时生效
4.编写一个 ThymeleafController 处理跳转控制器即可
import org.springframework.stereotype.Controller;
import org.springframework.web.bind.annotation.GetMapping;
import org.springframework.web.bind.annotation.RequestMapping;

/**
 * @author compass
 * @date 2022-11-01
 * @since 1.0
 **/
@Controller
@RequestMapping("/example/thymeleaf")
public class ThymeleafController {

    @GetMapping("/toHomeIndex")
    public String toHomeIndex(){
        return "/home/index";
    }

    @GetMapping("/toMeIndex")
    public String toMeIndex(){
        return "/me/index";
    }
}
5.在resources目录下新建一个templates目录,里面存放页面
此处集成就算完毕了,因为之前有写过一篇关于thymeleaf的文章,具体使用方法请看:Thymeleaf模板(全程案例详解)
4.5 springBoot定时任务
1.静态:基于注解:
我们新建一个包叫 task 然后,新建一个定时任务类 StaticScheduleTask 内容如下
package com.springboot.example.task;

import org.springframework.context.annotation.Configuration;
import org.springframework.scheduling.annotation.EnableScheduling;
import org.springframework.scheduling.annotation.Scheduled;

import java.text.SimpleDateFormat;
import java.util.Date;

/**
 * @author compass
 * @date 2022-11-01
 * @since 1.0
 **/
@Configuration      //主要用于标记配置类,兼备Component的效果。
@EnableScheduling   // 开启定时任务
public class StaticScheduleTask {
    //3.添加定时任务[每2秒执行一次]
    @Scheduled(cron = "0/2 * * * * ?")
    //或直接指定时间间隔,例如:5秒
    //@Scheduled(fixedRate=5000)
    private void configureTasks() {
        SimpleDateFormat format = new SimpleDateFormat("yyyy-MM-dd HH:mm");
        String dateNow = format.format(new Date());
        System.err.println("执行静态定时任务时间: " + dateNow);
    }
}
cron表达式不再赘述,因为这个百度即可了解,而且还有在线生成的core表达式网站
cron表达式在线生成网站: https://www.matools.com/cron
2.基于 SchedulingConfigurer接口
我们在 task包下新建一个 DynamicScheduleTask 类 并且实现 SchedulingConfigurer ,内如如下:
package com.springboot.example.task;

import org.springframework.context.annotation.Configuration;
import org.springframework.scheduling.annotation.EnableScheduling;
import org.springframework.scheduling.annotation.SchedulingConfigurer;
import org.springframework.scheduling.config.ScheduledTaskRegistrar;
import org.springframework.scheduling.support.CronTrigger;

import java.text.SimpleDateFormat;
import java.util.Date;

/**
 * @author compass
 * @date 2022-11-01
 * @since 1.0
 **/
@Configuration      //1.主要用于标记配置类,兼备Component的效果。
@EnableScheduling   // 2.开启定时任务
public class DynamicScheduleTask implements SchedulingConfigurer {

    private static final String  cron = "0/2 * * * * ?";

    @Override
    public void configureTasks(ScheduledTaskRegistrar taskRegistrar) {
        taskRegistrar.addTriggerTask(
                //1.添加任务内容(Runnable)
                () ->{
                    SimpleDateFormat format = new SimpleDateFormat("yyyy-MM-dd HH:mm");
                    String dateNow = format.format(new Date());
                    System.err.println("执行静态定时任务时间[DynamicScheduleTask]: " + dateNow);
                },
                //2.设置执行周期(Trigger)
                triggerContext -> {
                    CronTrigger cronTrigger = new CronTrigger(cron);
                    return cronTrigger.nextExecutionTime(triggerContext);
                }
        );
    }

}
3.开启多线程执行定时任务
同样的我们在 task包下新增一个 MultiThreadScheduleTask 类,使用多线程的方式来执行异步任务
import org.springframework.scheduling.annotation.Async;
import org.springframework.scheduling.annotation.EnableAsync;
import org.springframework.scheduling.annotation.EnableScheduling;
import org.springframework.scheduling.annotation.Scheduled;
import org.springframework.stereotype.Component;

import java.text.SimpleDateFormat;
import java.util.Date;

/**
 * @author compass
 * @date 2022-11-01
 * @since 1.0
 **/
@Component
@EnableScheduling   // 1.开启定时任务
@EnableAsync        // 2.开启多线程
public class MultiThreadScheduleTask {
    @Async
    @Scheduled(fixedDelay = 2000)  //间隔1秒
    public void first() throws InterruptedException {
        SimpleDateFormat format = new SimpleDateFormat("yyyy-MM-dd HH:mm");
        String dateNow = format.format(new Date());
        System.err.println("执行静态定时任务时间[MultiThreadScheduleTask]: " + dateNow+"执行任务的当前线程:"+Thread.currentThread().getName());
    }

}
关于SpringBoot动态定时任务请参考我之前写的一篇文章: SpringBoot动态定时任务
4.6 全局异常处理
在程序的运行中,出现异常是不可避免的,异常的顶级类是Throwable ,异常主要分为2大类,一类是Error,还有一类是Exception,
Error是系统运行中出现的错误,无法被程序员所解决和控制,比如堆栈溢出的错误程序员不可控,还有一类是我们可控的异常,比如对象调用的时候对象为空,出现空指针异常,或者是我们的业务流程出错的时候,是因为用户操作不当,我们应该给客户返回一个友好的提示信息。
4.1 设计一个友好的异常体系
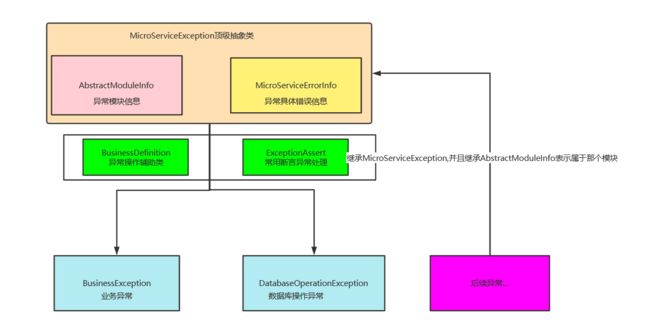
我们此次设计的异常是应对与微服务,或者是多模块的项目的模式进行设计的。这样可以清除定位是异常出现在那个服务,是那个业务出现问题。
首先先写一个接口: bean需要被序列化的bean需要实现该接口
/**
 * bean需要被序列化的bean需要实现该接口
 * @author compass
 * @date 2022-11-03
 * @since 1.0
 **/
public interface ValueObject extends Serializable {
}
异常工具类,可以得到具体的异常堆栈信息
/**
 * 异常信息处理工具类
 *
 * @date 2022-11-02
 * @since 1.0
 **/
public class ExceptionUtils {

    /**
     * 获取异常信息详细堆栈
     * @param ex 异常对象
     * @return java.lang.String
     * @author compass
     * @date 2022/11/2 12:36
     * @since 1.0.0
     **/
    public static String getExceptionDetail(Exception ex) {
        String ret = null;
        try {
            ByteArrayOutputStream out = new ByteArrayOutputStream();
            PrintStream pout = new PrintStream(out);
            ex.printStackTrace(pout);
            ret = new String(out.toByteArray());
            pout.close();
            out.close();
        } catch (Exception e) {
        }
        return ret;
    }
}
定义抽象类 模块信息表示
/**
 * 异常模块定义信息
 * @author compass
 * @date 2022-11-02
 * @since 1.0
 **/
public abstract class AbstractModuleInfo implements ValueObject {

    private static final long serialVersionUID = 8293003439901765349L;

    /**
     * 获取项目编号
     * @return java.lang.String
     * @author compass
     * @date 2022/11/2 10:09
     * @since 1.0.0
     **/
  public abstract String getProjectCode();

    /**
     * 获取模块编号
     * @return java.lang.String
     * @author comapss
     * @date 2022/11/2 10:09
     * @since 1.0.0
     **/
    public abstract String getModuleCode();
}
微服务异常详细信息类
/**
 * 微服务异常详细信息类
 *
 * @author compass
 * @date 2022-11-02
 * @since 1.0
 **/
public class MicroServiceErrorInfo implements ValueObject {

    private static final long serialVersionUID = 6041281029499982938L;
    /**
     * 异常代码
     **/
    private String code;
    /**
     * 异常信息
     **/
    private String message;
    /**
     * 异常具体原因
     **/
    private String details;


    public MicroServiceErrorInfo() {
    }

    public MicroServiceErrorInfo(String code, String message,String details) {
        this.code = code;
        this.message = message;
        this.details = details;
    }

    public static MicroServiceErrorInfo build(String code, String message,String details){
        return new MicroServiceErrorInfo(code,message,details);
    }

    public String getCode() {
        return code;
    }

    public void setCode(String code) {
        this.code = code;
    }

    public String getMessage() {
        return message;
    }

    public void setMessage(String message) {
        this.message = message;
    }

    public String getDetails() {
        return details;
    }

    public void setDetails(String details) {
        this.details = details;
    }

    @Override
    public String toString() {
        return "MicroServiceErrorInfo{" +
                "code='" + code + '\'' +
                ", message='" + message + '\'' +
                '}';
    }
}
定义异常类
/**
 * 微服务顶级异常类
 * @author compass
 * @date 2022-11-02
 * @since 1.0
 **/
@Slf4j
public abstract class MicroServiceException extends RuntimeException implements ValueObject {

    private static final long serialVersionUID = 1106039973387747701L;

    /**
     * 异常信息分隔符
     **/
    public final static String CODE_MESSAGE_SPLIT = "$$";
    /**
     * 模块信息
     **/
    protected AbstractModuleInfo moduleInfo;
    /**
     * 获取模块信息
     **/
    public AbstractModuleInfo getModuleInfo() {
        return moduleInfo;
    }

    /**
     * 异常错误信息
     **/
    private MicroServiceErrorInfo microServiceErrorInfo;
    public <M extends AbstractModuleInfo> MicroServiceException(M moduleInfo, String seqCode, String msg, String details) {
        this(moduleInfo.getProjectCode(), moduleInfo.getModuleCode(), seqCode, msg,details);
    }

    public MicroServiceException(String projectCode, String modulesCode, String seqCode, String msg,String details) {
        this.microServiceErrorInfo = buildMicroServiceErrorInfo(projectCode, modulesCode, seqCode, msg,details);
    }

    public MicroServiceException(String projectCode, String modulesCode, String seqCode,String details) {
        this(projectCode, modulesCode, seqCode, null,details);
    }

    public MicroServiceException(MicroServiceErrorInfo errorMessage) {
        this.microServiceErrorInfo = errorMessage;
    }

    /**
     * 生成微服务异常信息.
     *
     * @param projectCode 项目代码.
     * @param modulesCode 模块代码.
     * @param seqCode     异常序列代码.
     * @param msg         异常信息.
     * @return com.springboot.example.exception.core.MicroServiceErrorInfo 生成微服务异常信息.
     * @author compass
     * @date 2021/9/7 00:35
     * @since 1.0.0
     **/
    private MicroServiceErrorInfo buildMicroServiceErrorInfo(String projectCode, String modulesCode, String seqCode, String msg,String details) {
        String errorCode = buildErrorCode(projectCode, modulesCode, seqCode);
        return new MicroServiceErrorInfo(errorCode, msg,details);
    }


    /**
     * 获取异常分类
     * @return java.lang.String
     * @author compass
     * @date 2022/11/2 10:09
     * @since 1.0.0
     **/
    public abstract String getExceptionType();

    /**
     * 获取异常分类代码
     * @return java.lang.String
     * @author comapss
     * @date 2022/11/2 10:09
     * @since 1.0.0
     **/
    public abstract String getExceptionCode();

    /**
     *
     * 生成错误代码:
     * 异常代码命名:项目名+错误代码(12位)
     * 错误代码规则:模块/微服务分类(2位) +异常分类(2位)+ 保留位(4位)+ 序号位(4位)
     * @param projectCode 工程代码.
     * @param modulesCode 项目模块代码.
     * @param seqCode     异常序列号.
     * @return java.lang.String
     * @author compass
     * @date 2022-11-02 12:26
     * @since 1.0.0
     **/
    private String buildErrorCode(String projectCode, String modulesCode, String seqCode) {
        // 异常代码命名:项目名+错误代码(12位)
        // 错误代码规则:模块/微服务分类(2位) +异常分类(2位)+ 保留位(4位)+ 序号位(4位)
        return String.format("%s-%s%s0000%s", projectCode, modulesCode, getExceptionCode(), seqCode);
    }
    /**
     * 取出字符串错误信息,没有就返回null或空串
     * @return java.lang.String
     * @author compass
     * @date 2022/11/2 10:44
     * @since 1.0.0
     **/
    public String toNatureString() {
        if (microServiceErrorInfo == null) {
            return "";
        }
        return String.format("%s%s%s", microServiceErrorInfo.getCode(), CODE_MESSAGE_SPLIT, microServiceErrorInfo.getMessage());
    }

    @Override
    public void printStackTrace() {
        log.error("MicroServiceException[{}]:{}", this.getClass().getSimpleName(), toNatureString());
    }

    @Override
    public String getMessage() {
        return toNatureString();
    }

    public MicroServiceErrorInfo getMicroServiceErrorInfo() {
        return microServiceErrorInfo;
    }

    public void setMicroServiceErrorInfo(MicroServiceErrorInfo microServiceErrorInfo) {
        this.microServiceErrorInfo = microServiceErrorInfo;
    }
}
定义完抽象的对象,我们就可以来定义我们自己的业务有关的处理类
比如我们现在定义一个是 SPRING_BOOT_EXAMPLE 系统的处理类
/**
 * SpringBootExample模块异常
 * @author compass
 * @date 2022-11-02
 * @since 1.0
 **/
public class SpringBootExample  extends AbstractModuleInfo {

    private static final long serialVersionUID = -2734897411632205179L;

    private static class SpringBootExampleHolder {

        private static final SpringBootExample INSTANCE = new SpringBootExample();
    }

    public static SpringBootExample getInstance() {
        return SpringBootExampleHolder.INSTANCE;
    }

    @Override
    public String getProjectCode() {
        return "SPRING_BOOT_EXAMPLE";
    }

    @Override
    public String getModuleCode() {
        return "01";
    }
}
接下来定义一个业务异常处理
/**
 * 自定义业务异常
 *
 * @author compass
 * @date 2022/11/1 22:08
 * @since 1.0.0
 **/
public class BusinessException extends MicroServiceException {
    private static final long serialVersionUID = 4545088056459744219L;
    public  <M extends AbstractModuleInfo> BusinessException(M moduleInfo, String seqCode, String msg, String details) {
        super(moduleInfo, seqCode, msg,details);
        this.moduleInfo = moduleInfo;
    }

    public BusinessException(String projectCode, String modulesCode, String seqCode, String msg,String details) {
        super(projectCode, modulesCode, seqCode, msg,details);
        this.moduleInfo = new AbstractModuleInfo() {
            private static final long serialVersionUID = 5298184605099921361L;
            @Override
            public String getProjectCode() {
                return projectCode;
            }

            @Override
            public String getModuleCode() {
                return modulesCode;
            }
        };
    }

    public BusinessException(String projectCode, String modulesCode, String seqCode,String details) {
        super(projectCode, modulesCode, seqCode,details);
        this.moduleInfo = new AbstractModuleInfo() {
            private static final long serialVersionUID = 5298184605099921361L;
            @Override
            public String getProjectCode() {
                return projectCode;
            }

            @Override
            public String getModuleCode() {
                return modulesCode;
            }
        };
    }

    @Override
    public String getExceptionType() {
        return "业务异常";
    }

    @Override
    public String getExceptionCode() {
        return "01";
    }

    public BusinessException(MicroServiceErrorInfo errorMessage) {
        super(errorMessage);
    }

    public static BusinessException buildBusinessException(String code,String message,String details) {
        return new BusinessException(MicroServiceErrorInfo.build(code, message,details));
    }
    public static BusinessException buildBusinessException(String code,String message ) {
        return new BusinessException(MicroServiceErrorInfo.build(code, message,""));
    }
    public static BusinessException buildError(String message) {
        String randomCode = UUID.randomUUID().toString().replaceAll("-", "");
        return new BusinessException(MicroServiceErrorInfo.build(randomCode, message,""));
    }

}
接下来定义异常可能出现情况的场景
/**
 * 业务异常定义
 *
 * @author comoass
 * @date 2022-11-02
 * @since 1.0
 **/
public interface BusinessDefinition {

    /**
     * 客户端缺少必要参数异常
     * @param details 详细信息
     * @return com.springboot.example.exception.definition.BusinessException
     * @author comapss
     * @date 2022/11/2 13:49
     * @since 1.0.0
     **/
    static BusinessException paramsLock(String details) {
        return new BusinessException(SpringBootExample.getInstance(), "01", "客户端缺少必要参数异常", details);
    }

}
定义一个常用异常断言工具接口,默认实现常用的异常情况,如果需要使用的话,直接 ExceptionAssert.defaultAssert就可以,也可以直接,实现该接口,自定义处理逻辑
/**
 * 常用异常断言工具类
 *
 * @author compass
 * @date 2022-11-02
 * @since 1.0
 **/
public interface ExceptionAssert {

    // 获取默认校验对象
    ExceptionAssert defaultAssert = ExceptionAssertHolder.INSTANCE;

    class ExceptionAssertHolder{
       private static final ExceptionAssert INSTANCE = new ExceptionAssertDefaultImpl();
    }

    String EMPTY = "";

    /**
     * 断言对象是否为空,为空抛出异常
     * @param o 需要断言的对象
     * @param details 详细信息[可选参数只能传递一个值]
     * @return void
     * @author compass
     * @date 2022/11/2 13:53
     * @since 1.0.0
     **/
    default void assertObjectNotNull(Object o,String... details) {
        if (o == null) {
            throw BusinessDefinition.paramsLock(details!=null&&details.length>0?details[0]:EMPTY);
        }
    }

    /**
     * 断言字符串是否为空,为空抛出异常
     * @param str 需要断言的字符串
     * @param details 详细信息[可选参数只能传递一个值]
     * @return void
     * @author compass
     * @date 2022/11/2 13:53
     * @since 1.0.0
     **/
    default void assertStringNotEmpty(String str,String... details) {
        if (!StringUtils.hasLength(str)) {
            throw BusinessDefinition.paramsLock(details!=null&&details.length>0?details[0]:EMPTY);
        }
    }

    /**
     * 断言集合是否为空,为空抛出异常
     * @param collection 需要断言的集合
     * @param details 详细信息[可选参数只能传递一个值]
     * @return void
     * @author compass
     * @date 2022/11/2 13:53
     * @since 1.0.0
     **/
    default  void assertCollectionNotEmpty(Collection collection, String... details) {
        if (CollectionUtils.isEmpty(collection)) {
            throw BusinessDefinition.paramsLock(details!=null&&details.length>0?details[0]:EMPTY);
        }
    }

    /**
     * 断言集合是否为空,为空抛出异常
     * @param log 日志注解对象
     * @param details 详细信息[可选参数只能传递一个值]
     * @return void
     * @author compass
     * @date 2022/11/2 13:53
     * @since 1.0.0
     **/
    default  void assertLogIsnull(Log log, String... details) {
        if (log == null) {
            throw BusinessDefinition.logIsNull(details!=null&&details.length>0?details[0]:EMPTY);
        }
    }

}
给断言工具类一个默认实现 ExceptionAssertDefaultImpl
/**
 * 异常断言工具类实现
 * @author compass
 * @date 2022-11-02
 * @since 1.0
 **/
@Component
public class ExceptionAssertDefaultImpl implements ExceptionAssert {
}
4.2 异常统一处理
我们有时候开发是多人配合开发,就需要指定一个返回结果,而且出现异常要统一处理,不然出现问题很难定位。
我们在 bean 包下新建一个具体的返回固定结构的bean
/**
 * 封装响应结果
 *
 * @author compass
 * @date 2022-11-01
 * @since 1.0
 **/
@Data
public class ResponseResult<T> implements ValueObject {
    private static final long serialVersionUID = 5337617615451873318L;
    // code 200 表示业务处理成功,-200表示业务处理失败
    private String code;
    //  存放业务提示信息
    private String message;
    // subCode 10000 表示10000请求成功 -10000表示请求处理失败
    private String subCode;
    //  存放系统异常消息
    private String subMessage;
    //  存放系统异常具体错误详情
    private String errorDetails;
    // 响应时间
    private String responseTime;
    // 出错的服务mac地址
    private String mac;
    // 预留处理字段
    private Object option;
    // 存放数据
    private T data;

    private static final String UNKNOWN_ERROR_CODE = "9999";

    private static final String SUCCESS_CODE = "10000";
    private static final String ERROR_CODE = "00001";

    private static final String BUSINESS_SUCCESS = "200";
    private static final String BUSINESS_ERROR = "001";

    private static final String SYSTEM_ERROR_MESSAGE = "系统异常,请联系管理员处理";
    private static final String SYSTEM_SUCCESS_MESSAGE = "服务调用成功";
    private static final String UNKNOWN_ERROR_MESSAGE = "未知异常";


    private ResponseResult() {
    }

    private ResponseResult(String code, String message, String subMessage, String subCode, T data, String errorDetails) {
        this.code = code;
        this.message = message;
        this.subMessage = subMessage;
        this.subCode = subCode;
        this.data = data;
        this.errorDetails = errorDetails;
        this.responseTime = DateTools.format(new Date(), DateTools.DEFAULT_DATETIME_FORMAT);
        String mac =  SysTemUtil.getLocalMacAddress(null);
        this.mac = StringUtils.hasLength(mac)?mac.replaceAll("-",""):"";
    }

    // 构造一个响应结果对象
    public static <E> ResponseResult<E> build(String code, String message, String subMessage, String subCode, E data, String errorDetails) {
        return new ResponseResult<>(code, message, subMessage, subCode, data, errorDetails);

    }

    // 简单的成功响应
    public static <E> ResponseResult<E> success(E data) {
        return build(BUSINESS_SUCCESS, "", SYSTEM_SUCCESS_MESSAGE, SUCCESS_CODE, data, "");
    }

    // 简单的成功响应,携带提示信息
    public static <E> ResponseResult<E> success(String message, E data) {
        return build(BUSINESS_SUCCESS, message, SYSTEM_SUCCESS_MESSAGE, SUCCESS_CODE, data, "");
    }

    // 简单的失败响应
    public static <E> ResponseResult<E> error(String subMessage) {
        return build(BUSINESS_ERROR, subMessage, SYSTEM_SUCCESS_MESSAGE, SUCCESS_CODE, null, "");
    }

    // 系统异常的失败响应
    public static <E> ResponseResult<E> systemError(String errorDetails) {
        return build(BUSINESS_ERROR, SYSTEM_SUCCESS_MESSAGE, SYSTEM_ERROR_MESSAGE, SUCCESS_CODE, null, errorDetails);
    }

    // 失败响应写的异常原因
    public static <E> ResponseResult<E> error(String message, String subMessage) {
        return build(BUSINESS_ERROR, message, subMessage, ERROR_CODE, null, "");
    }

    // 响应失败,携带数据和提示信息
    public static <E> ResponseResult<E> error(String message, E data) {
        return build(BUSINESS_ERROR, message, SYSTEM_SUCCESS_MESSAGE, ERROR_CODE, data, "");
    }

    // 微服务异常处理响应失败
    public static <E> ResponseResult<E> microServiceError(MicroServiceErrorInfo microServiceErrorInfo) {
        String message = microServiceErrorInfo.getMessage();
        String code = microServiceErrorInfo.getCode();
        String details = microServiceErrorInfo.getDetails();
        return build(BUSINESS_ERROR, message, SYSTEM_SUCCESS_MESSAGE, code, null, details);
    }

    // 微服务异常处理响应未知失败
    public static <E> ResponseResult<E> microServiceUnknownError(MicroServiceException e) {
        return build(BUSINESS_ERROR, UNKNOWN_ERROR_MESSAGE, SYSTEM_SUCCESS_MESSAGE, UNKNOWN_ERROR_CODE, null, e.getMessage());
    }

}
接下来定义一个com.springboot.example.exception.handler.ExceptionHandlerCase 的异常统一处理即可
/**
 * 全局异常处理[包括自定义异常处理]
 *
 * @author compass
 * @date 2022/11/1 22:08
 * @since 1.0.0
 **/
@RestControllerAdvice
public class ExceptionHandlerCase {

    /**
     * @param e 需要处理的异常 e可以换成是自定义异常,由范围小到大,实在处理不了才由Exception处理
     * @return com.springboot.example.bean.ResponseResult
     * @author compass
     * @date 2022/11/1 22:08
     * @since 1.0.0
     **/
    @ExceptionHandler(RuntimeException.class)
    @ResponseBody
    public ResponseResult error(RuntimeException e) {
        e.printStackTrace();
        String message = e.getMessage();
        return ResponseResult.systemError(StringUtils.hasLength(message)?message: ExceptionUtils.getExceptionDetail(e));
    }


    /**
     * @param e 微服务异常处理
     * @return com.springboot.example.bean.ResponseResult
     * @author compass
     * @date 2022/11/1 22:08
     * @since 1.0.0
     **/
    @ExceptionHandler(value = {BusinessException.class, DatabaseOperationException.class})
    @ResponseBody
    public ResponseResult businessError(MicroServiceException e) {
        e.printStackTrace();
        MicroServiceErrorInfo errorInfo = e.getMicroServiceErrorInfo();
        if (errorInfo!=null){
            return ResponseResult.microServiceError(errorInfo);
        }else {
            return ResponseResult.microServiceUnknownError(e);
        }
    }


}
到这里异常处理就结束了,这里深刻体现了什么是面向接口编程,什么是抽象化编程,这样的好处就是耦合度低,易于扩展。当然这里可能设计还有所待优化,但是总的来说,规范了异常的处理方式,已经结果返回的结果,这样前端人员在判断业务的时候,也便于处理,而且系统出现异常也便于处理,为什么一个简单的异常会设计的怎么复杂?有时候你的代码在你本地环境的时候跑的好好的,但是一到生产环境就出错,你也不太好定位,因为不能远程debug,虽说idea可以远程debug,但是真在公司开发,一般都不允许你怎么干,所以我们得需要一个良好的异常处理机制,搞的怎么复杂,就是为了接下来的日志记录做准备,因为出现异常的时候,我们可以把异常信息记录下来,然后保存到数据库,然后我们可以分享异常出现的原因,可以更快的定位到系统问题出在哪儿,具体是那一台服务,具体是那个业务出现异常。
4.7 日志记录处理
先在 Webconfig类中标注 @EnableAspectJAutoProxy(exposeProxy = true)注解
1.我们先写一个注解,用于标注在controller的方法上,然后去判断,是否需要采集日志,以及采集日志的一些条件,然后我们使用aop切入进去。
/**
 * @author compass
 * @date 2022-11-02
 * @since 1.0
 **/
@Target({ElementType.PARAMETER,ElementType.METHOD})
@Retention(RetentionPolicy.RUNTIME)
@Documented
public @interface Log {

    /**
     * 模块
     */
    String title() default "";

    /**
     * 功能
     */
    BusinessType businessType() default BusinessType.OTHER;

    /**
     * 操作人类别
     */
    OperatorType operatorType() default OperatorType.MANAGE;

    /**
     * 是否保存请求的参数
     */
    boolean isSaveRequestData() default true;

    /**
     * 是否保存响应的参数
     */
    boolean isSaveResponseData() default true;
    /**
     * 是否只有出现异常的时候才记录到数据库
     */
    boolean  isOnlyAppearError() default false;
}
2.定义2个枚举类,分别表示操作人员类型和客户端类型
/**
 * 操作人类别
 */
public enum OperatorType {
    /**
     * 其它
     */
    OTHER,

    /**
     * 后台用户
     */
    MANAGE,

    /**
     * 手机端用户
     */
    MOBILE
}
/**
 * 操作类型
 */
public enum BusinessType {
    /**
     * 其它
     */
    OTHER,

    /**
     * 新增
     */
    INSERT,

    /**
     * 修改
     */
    UPDATE,

    /**
     * 删除
     */
    DELETE,

    /**
     * 授权
     */
    ASSGIN,

    /**
     * 导出
     */
    EXPORT,

    /**
     * 导入
     */
    IMPORT,

    /**
     * 强退
     */
    FORCE,

    /**
     * 更新状态
     */
    STATUS,

    /**
     * 清空数据
     */
    CLEAN,
}
3.然后我们新建一个异常处理的AOP切面,他的主要作用就是切入指定包下面的所有controller,然后记录相关参数
/**
 * AOP切面
 * @author compass
 * @date 2022-11-02
 * @since 1.0
 **/

@Aspect()
@Component
public class LogAspect {

    @Autowired
    private LogInfoService logInfoService;

    //公共切入点抽取
    @Pointcut(value = "execution(* com.springboot.example.controller.*.*(..))")
    public void pointcut() {

    }

    /**
     * 日志记录aop切面,环绕通知,在controller方法执行之前,和执行之后都进行切入
     * @param joinPoint 切入点
     * @return java.lang.Object
     * @author compass
     * @date 2022/11/3 11:12
     * @since 1.0.0
     **/
    @Around(value = "pointcut()")
    public Object doAfter(ProceedingJoinPoint joinPoint) throws Throwable {
        // TODO 可以通过request从head中获取token解析后取出写入 UserId和operationName
        MethodSignature signature = (MethodSignature) joinPoint.getSignature();
        Method method = signature.getMethod();

        boolean isLogRecord = method.isAnnotationPresent(Log.class);
        Object invokeResult = null;
        Object[] params = joinPoint.getArgs();
        if (isLogRecord) {
            SystemLog systemLog = new SystemLog();
            Log log = method.getAnnotation(Log.class);
            try {
                invokeResult = joinPoint.proceed(params);
                systemLog = logAspectUtil.resolveLogAnnotation(systemLog, joinPoint, log, invokeResult, null);
                return invokeResult;
            } catch (Throwable throwable) {
                throwable.printStackTrace();
                systemLog = logAspectUtil.resolveLogAnnotation(systemLog, joinPoint, log, invokeResult, throwable);
                throw throwable;
            } finally {
                if (!log.isOnlyAppearError()) {
                    handleLogSave(systemLog);
                }
            }
        } else {
            try {
                return joinPoint.proceed(params);
            } catch (Throwable throwable) {
                throwable.printStackTrace();
                // 把异常抛出去,由全局异常处理器处理
                throw throwable;
            }
        }

    }

    private void handleLogSave(SystemLog systemLog) {
        try {
            logInfoService.saveLogInfo(systemLog);
        } catch (Exception e) {
            throw BusinessDefinition.inertError(e.getMessage());
        }
    }

}
4.然后我们新建一个注解解析工具类,避免复杂的逻辑都写在这个切面中了,导致切面逻辑混乱
/**
 * 注解解析工具类
 * @author comoass
 * @date 2022-11-02
 * @since 1.0
 **/
public class logAspectUtil {

    /**
     * 解析log日志对象
     * @param systemLog 记录到数据库的日志对象
     * @param joinPoint 切入点
     * @param log 日志注解对象
     * @param jsonResult 返回的json数据
     * @return com.springboot.example.bean.SystemLog
     * @author compass
     * @date 2022/11/2 22:54
     * @since 1.0.0
     **/
    public static SystemLog resolveLogAnnotation( SystemLog systemLog,JoinPoint joinPoint, Log log, Object jsonResult,Throwable throwable)   {
        String errorMessage;
        systemLog.setRequestStartTime(new Date());
        systemLog.setIsDelete(0);
        systemLog.setId(IdUtil.getSnowflake().nextIdStr());

        MethodSignature signature = (MethodSignature) joinPoint.getSignature();
        Method method = signature.getMethod();
        String methodName = method.getName();
        systemLog.setMethod(methodName);

        RequestAttributes ra = RequestContextHolder.getRequestAttributes();
        ServletRequestAttributes sra = (ServletRequestAttributes) ra;
        HttpServletRequest request = sra.getRequest();

        String ipAddress = HttpUtils.getIpAddress(request);
        String requestURI = request.getRequestURI();
        String requestMethod = request.getMethod();

        systemLog.setRequestMethod(requestMethod);
        systemLog.setOperationIp(ipAddress);
        systemLog.setOperationUrl(requestURI);

        // 默认是成功,失败的时候再设置回0
        systemLog.setStatus(1);
        // 设置action动作
        systemLog.setBusinessType(log.businessType().name());
        // 设置标题
        systemLog.setTitle(log.title());
        // 设置操作人类别
        systemLog.setOperationType(log.operatorType().name());
        // 是否需要保存request,参数和值
        if (log.isSaveRequestData()) {
            // 获取参数的信息,传入到数据库中。
            Object[] params = joinPoint.getArgs();
            LocalVariableTableParameterNameDiscoverer u = new LocalVariableTableParameterNameDiscoverer();
            String[] paramNames = u.getParameterNames(method);
            if (params != null && paramNames != null && paramNames.length == params.length) {
                HashMap<Object, Object> paramsMap = new HashMap<>();
                for (int i = 0; i < paramNames.length; i++) {
                    Object paramValue = params[i];
                    Object paramName = paramNames[i];
                    if (paramValue!=null && !isFilterObject(paramValue)){
                        paramsMap.put(paramName,paramValue);
                    }
                }
                systemLog.setOperationParam(JSONUtil.toJsonStr(paramsMap));
            }
        }
        // 是否需要保存response,参数和值
        if (log.isSaveResponseData() && !StringUtils.isEmpty(jsonResult)) {
            systemLog.setJsonResult(JSONUtil.toJsonStr(jsonResult));
        }
        // 如果出现异常
        if (throwable!=null){
            if (throwable instanceof MicroServiceException){
                MicroServiceException serviceException = (MicroServiceException) throwable;
                MicroServiceErrorInfo errorInfo = serviceException.getMicroServiceErrorInfo();
                AbstractModuleInfo moduleInfo = serviceException.getModuleInfo();
                systemLog.setModuleCode(moduleInfo.getModuleCode());
                systemLog.setProjectCode(moduleInfo.getProjectCode());
                systemLog.setExceptionType(serviceException.getExceptionType());
                systemLog.setExceptionCode(serviceException.getExceptionCode());

                errorMessage = JSONUtil.toJsonStr(errorInfo);
            }else {
                errorMessage = throwable.getMessage();
            }

            systemLog.setErrorMsg(errorMessage);
            systemLog.setStatus(0);
        }
        systemLog.setRequestEndTime(new Date());
        return systemLog;

    }


    /**
     * 判断是否需要过滤的对象。
     *
     * @param o 对象信息。
     * @return 如果是需要过滤的对象,则返回true;否则返回false。
     */
    @SuppressWarnings("rawtypes")
    public static boolean isFilterObject(final Object o) {
        Class<?> clazz = o.getClass();
        if (clazz.isArray()) {
            return clazz.getComponentType().isAssignableFrom(MultipartFile.class);
        } else if (Collection.class.isAssignableFrom(clazz)) {
            Collection collection = (Collection) o;
            for (Object value : collection) {
                return value instanceof MultipartFile;
            }
        } else if (Map.class.isAssignableFrom(clazz)) {
            Map map = (Map) o;
            for (Object value : map.entrySet()) {
                Map.Entry entry = (Map.Entry) value;
                return entry.getValue() instanceof MultipartFile;
            }
        }
        return o instanceof MultipartFile || o instanceof HttpServletRequest || o instanceof HttpServletResponse || o instanceof BindingResult;
    }
}
5.接下来就是去操作数据库了,然后把日志记录对象保存到数据库中,如果对mybatis不太熟悉的,请先观看第5章数据访问处理,如果属性那请直接观看也无妨。
日志记录mapper
/**
 * 日志记录
 * @author compass
 * @date 2022-11-02
 * @since 1.0
 **/
@Repository
public interface LogInfoMapper {

    LogRecord selectLogInfoById(@Param("id") String id);

    Integer saveLogInfo(@Param("systemLog") SystemLog systemLog);
}
// 对应的mapperSQL
    <insert id="saveLogInfo">
        INSERT INTO t_system_log
        (
         id,
         user_id,
         title,
         business_type,
         method,
         request_method,
         operation_type,
         operation_url,
         operation_name,
         operation_ip,
         operation_param,
         json_result,
         status,
         error_msg,
         request_start_time,
         request_end_time,
         update_time,
         exception_type,
         exception_code,
         module_code,
         project_code,
         is_delete
         )
            VALUE
            (
               #{systemLog.id},
               #{systemLog.userId},
               #{systemLog.title},
               #{systemLog.businessType},
               #{systemLog.method},
               #{systemLog.requestMethod},
               #{systemLog.operationType},
               #{systemLog.operationUrl},
               #{systemLog.operationName},
               #{systemLog.operationIp},
               #{systemLog.operationParam},
               #{systemLog.jsonResult},
               #{systemLog.status},
               #{systemLog.errorMsg},
               #{systemLog.requestStartTime},
               #{systemLog.requestEndTime},
               #{systemLog.updateTime},
               #{systemLog.exceptionType},
               #{systemLog.exceptionCode},
               #{systemLog.moduleCode},
               #{systemLog.projectCode},
               #{systemLog.isDelete}
            );
    </insert>
6.日志记录service
/**
 * 日志记录service
 * @author compass
 * @date 2022-11-02
 * @since 1.0
 **/
public interface LogInfoService {
    /**
     * 根据主键查询日志记录
     * @param id 日志记录主键
     * @return com.springboot.example.bean.LogRecord
     * @author compass
     * @date 2022/11/2 16:58
     * @since 1.0.0
     **/
    SystemLog selectLogInfoById(String id);

    /**
     * 添加一条日志记录
     * @param  systemLog 日志记录
     * @return java.lang.Integer
     * @author compass
     * @date 2022/11/2 16:58
     * @since 1.0.0
     **/
    Integer saveLogInfo(SystemLog systemLog);

}
7.日志记录service实现
/**
 * 日志记录
 *
 * @author compass
 * @date 2022-11-02
 * @since 1.0
 **/
@Service
public class LogInfoServiceImpl implements LogInfoService {
    @Resource
    private LogInfoMapper logInfoMapper;

    /**
     * 根据主键查询日志记录
     * @param id 日志记录主键
     * @return com.springboot.example.bean.LogRecord
     * @author compass
     * @date 2022/11/2 16:58
     * @since 1.0.0
     **/
    @Override
    public SystemLog selectLogInfoById(String id) {
        return logInfoMapper.selectLogInfoById(id);
    }

    /**
     * 添加一条日志记录
     * @param  systemLog 日志记录
     * @return java.lang.Integer
     * @author compass
     * @date 2022/11/2 16:58
     * @since 1.0.0
     **/
    @Override
    public Integer saveLogInfo(SystemLog systemLog) {
        return logInfoMapper.saveLogInfo(systemLog);
    }

}
获取用户ip的方法
 /**
     * 根据请求地址获取真实ip地址
     * @param request
     * @return java.lang.String
     * @author compass
     * @date 2022/11/2 23:36
     * @since 1.0.0
     **/
    public static String getIpAddress(HttpServletRequest request) {
        String ipAddress = null;
        try {
            ipAddress = request.getHeader("x-forwarded-for");
            if (ipAddress == null || ipAddress.length() == 0 || "unknown".equalsIgnoreCase(ipAddress)) {
                ipAddress = request.getHeader("Proxy-Client-IP");
            }
            if (ipAddress == null || ipAddress.length() == 0 || "unknown".equalsIgnoreCase(ipAddress)) {
                ipAddress = request.getHeader("WL-Proxy-Client-IP");
            }
            if (ipAddress == null || ipAddress.length() == 0 || "unknown".equalsIgnoreCase(ipAddress)) {
                ipAddress = request.getRemoteAddr();
                if (ipAddress.equals("127.0.0.1")) {
                    // 根据网卡取本机配置的IP
                    InetAddress inet = null;
                    try {
                        inet = InetAddress.getLocalHost();
                    } catch (UnknownHostException e) {
                        e.printStackTrace();
                    }
                    ipAddress = inet.getHostAddress();
                }
            }
            // 对于通过多个代理的情况,第一个IP为客户端真实IP,多个IP按照','分割
            if (ipAddress != null && ipAddress.length() > 15) { // "***.***.***.***".length()
                // = 15
                if (ipAddress.indexOf(",") > 0) {
                    ipAddress = ipAddress.substring(0, ipAddress.indexOf(","));
                }
            }
        } catch (Exception e) {
            ipAddress = "";
        }
        return ipAddress;
    }
4.8 springBoot文件上传和下载
我们有时候需要文件上传和下载,文件上传和下载,无非就是输入流输出流,或者是二进制流等方式,要么就是把项目中的文件下载给客户端,要么就是客户端把文件上传到服务器,服务端的文件存放操作路径可以是项目路径,也可以是ftp或者是其他的资源服务器,我们这里采用在类路径下面的方式操作文件上传和下载,别的方式都是大同小异的。
4.8.1 文件上传
1.我们先建立一个 exception 包,然后新建一个异常处理类 ExceptionHandlerCase 他负责处理所有的业务异常以及系统异常,我们这里先用,后面子详细讲解
package com.springboot.example.bean;

import lombok.Data;

/**
 * 封装响应结果
 * @author compass
 * @date 2022-11-01
 * @since 1.0
 **/
@Data
public class ResponseResult<T>   {
    // code 200 表示业务处理成功,-200表示业务处理失败
    private Integer code;
    //  存放业务提示信息
    private String message;
    // subCode 10000 表示10000请求成功 -10000表示请求处理失败
    private Integer subCode;
    //  存放系统异常消息
    private String subMessage;

    // 存放数据
    private T data;

    private static  final  Integer SUCCESS_CODE = 10000;
    private static  final  Integer ERROR_CODE = -10000;

    private static  final  Integer BUSINESS_SUCCESS = 200;
    private static  final  Integer BUSINESS_ERROR = -200;

    private static final String SYSTEM_ERROR_MESSAGE = "系统异常,请联系管理员处理";
    private static final String SYSTEM_SUCCESS_MESSAGE = "服务调用成功";


    private ResponseResult() {
    }

    private ResponseResult(Integer code, String message, String subMessage, Integer subCode, T data) {
        this.code = code;
        this.message = message;
        this.subMessage = subMessage;
        this.subCode = subCode;
        this.data = data;
    }

    // 构造一个响应结果对象
    public static <E> ResponseResult<E>  build(Integer code, String message, String subMessage, Integer subCode, E data) {
        return  new ResponseResult<>(code, message, subMessage, subCode, data);
    }

    // 简单的成功响应
    public static  <E> ResponseResult<E>  success( E data){
        return build(SUCCESS_CODE,"",SYSTEM_SUCCESS_MESSAGE,BUSINESS_SUCCESS,data);
    }
    // 简单的成功响应,携带提示信息
    public static  <E> ResponseResult<E>  success(String message, E data){
        return build(SUCCESS_CODE,message,SYSTEM_SUCCESS_MESSAGE,BUSINESS_SUCCESS,data);
    }

    // 简单的失败响应
    public static  <E> ResponseResult<E>  error( String message){
        return build(SUCCESS_CODE, message,SYSTEM_SUCCESS_MESSAGE,BUSINESS_ERROR,null);
    }
    // 失败响应写的异常原因
    public static  <E> ResponseResult<E>  error(String message, String subMessage){
        return build(SUCCESS_CODE,message,subMessage,BUSINESS_ERROR,null);
    }
    // 响应失败,携带数据
    public static  <E> ResponseResult<E>  error( String message,E data){
        return build(SUCCESS_CODE,message,SYSTEM_SUCCESS_MESSAGE,BUSINESS_ERROR,data);
    }

}
然后我们定义个属于自己的业务异常
/**
 * 自定义业务异常
 *
 * @author compass
 * @date 2022/11/1 22:08
 * @since 1.0.0
 **/
public class BusinessException extends RuntimeException {
    private static final long serialVersionUID = 7494936627417152440L;
    private BusinessException(String message) {
        super(message);
    }

    // 构建一个简单的业务异常
    public static BusinessException buildError(String errorMessage){
        return new BusinessException(errorMessage);
    }
}
2.在controller中新建一个FileController
package com.springboot.example.controller;

import com.springboot.example.bean.ResponseResult;
import com.springboot.example.utils.FileTypeUtils;
import com.springboot.example.utils.FileUtils;
import org.springframework.stereotype.Controller;
import org.springframework.web.bind.annotation.PostMapping;
import org.springframework.web.bind.annotation.RequestMapping;
import org.springframework.web.bind.annotation.RequestPart;
import org.springframework.web.bind.annotation.ResponseBody;
import org.springframework.web.multipart.MultipartFile;

import javax.servlet.http.HttpServletRequest;
import javax.servlet.http.HttpServletResponse;
import java.io.File;
import java.io.IOException;
import java.io.InputStream;
import java.net.URL;
import java.util.UUID;

/**
 * @author compass
 * @date 2022-11-01
 * @since 1.0
 **/
@Slf4j
@Controller
@RequestMapping(value = "/example/fileTest")
public class FileController {

   @ResponseBody
    @PostMapping("/fileUpload")
    public ResponseResult<String> fileUpload(@RequestPart("file") MultipartFile file, HttpServletRequest request) {
        // 获取文件原始名称[不过我们一般不采用这种方式,我们需要自定义名称,避免文件名重复覆盖的情况]
        // String filename = file.getOriginalFilename();
        String filename;
        try {
            // 获取上传文件的输入流
            InputStream stream = file.getInputStream();
            // 1.先构建出文件名
            byte[] bytes = FileUtils.inputStreamToBytes(stream);
            String fileType = FileTypeUtils.getFileExtendName(bytes);
            filename = UUID.randomUUID().toString().replaceAll("-", "") + "." + fileType;
            // 接下来构建文件保存的路径[这种方式如果是空串获取的是当前类所在的绝对类路径,如果是/获取的是classes路径]

            String filePath = FileUtils.getFileSaveDir("upload") + filename;
            // 参数准备完毕调用文件写入工具类
            FileUtils.bytesSaveFilePath(bytes, filePath);

            log.info("文件上传保存路径为:{}", filePath);
            // 最后再去判断文件保存成功没有
            boolean saveIsSuccess = new File(filePath).exists();
            if (!saveIsSuccess) {
                throw new RuntimeException("文件上传写入失败");
            }


        } catch (IOException e) {
            e.printStackTrace();
            return ResponseResult.error("文件写入异常");
        }
        // 代码能执行到这里说明文件已经保存成功
        return ResponseResult.success(filename);

    }


}
3.新建一个utils包,以后相关的工具类都放在这个包下
获取文件类型的工具类:FileUtils
为什么要使用这个工具类?为什么不使用文件名后缀判断文件类型,因为文件名可以随意更改,但是文件内容是不容易更改的,如果根据文件名判断,上传上去的文件如果需要指定校验文件类型,那么就会校验通过,以后下载,或者是业务系统处理的时候就会出现异常。
import org.springframework.util.StringUtils;

import java.io.*;

/**
 * @author compass
 * @date 2022-08-18
 * @since 1.0
 **/
public class FileUtils {

    /**
     * 根据输入流,将文件保存到指定路径
     *
     * @param bytes 文件byte数组
     * @param filePath    文件路径
     * @return java.lang.String
     * @author compass
     * @date 2022/11/1 21:10
     * @since 1.0.0
     **/
    public static void bytesSaveFilePath(byte[] bytes, String filePath) {

        if (bytes == null || bytes.length<=0) {
            throw new RuntimeException("bytes不能为null");

        }
        if (!StringUtils.hasLength(filePath)) {
            throw new RuntimeException("filePath不能为空");

        }

        File file = new File(filePath);
        if (file.exists()) {
            throw new RuntimeException("文件已存在,避免文件被覆盖,系统抛出异常");
        }
        try (FileOutputStream out = new FileOutputStream(file)) {
            out.write(bytes);
            out.flush();
        } catch (IOException e) {
            e.printStackTrace();
        }
    }

    /**
     * 输入流转byte数组
     * @param inputStream 输入流
     * @return byte[]
     * @author compass
     * @date 2022/11/1 21:28
     * @since 1.0.0
     **/
    public static byte[] inputStreamToBytes(InputStream inputStream ) throws IOException {
        try {
            ByteArrayOutputStream os = new ByteArrayOutputStream();
            byte[] buffer = new byte[1024];
            int num = 0;
            while ((num = inputStream.read(buffer)) != -1) {
                os.write(buffer, 0, num);
            }
            os.flush();
            return os.toByteArray();
        } finally {
            if (inputStream != null  ) {
                inputStream.close();
            }
        }
    }


}
文件操作工具类:FileUtils
package com.springboot.example.utils;


import com.springboot.example.controller.FileController;
import org.springframework.util.StringUtils;

import java.io.*;
import java.net.URL;

/**
 * @author compass
 * @date 2022-08-18
 * @since 1.0
 **/
public class FileUtils {

    /**
     * 根据输入流,将文件保存到指定路径
     *
     * @param bytes    文件byte数组
     * @param filePath 文件路径
     * @return java.lang.String
     * @author compass
     * @date 2022/11/1 21:10
     * @since 1.0.0
     **/
    public static void bytesSaveFilePath(byte[] bytes, String filePath) {

        if (bytes == null || bytes.length <= 0) {
            throw new RuntimeException("bytes不能为null");

        }
        if (!StringUtils.hasLength(filePath)) {
            throw new RuntimeException("filePath不能为空");

        }

        File file = new File(filePath);
        if (file.exists()) {
            throw new RuntimeException("文件已存在,避免文件被覆盖,系统抛出异常");
        }
        try (FileOutputStream out = new FileOutputStream(file)) {
            out.write(bytes);
            out.flush();
        } catch (IOException e) {
            e.printStackTrace();
        }
    }

    /**
     * 输入流转byte数组
     *
     * @param inputStream 输入流
     * @return byte[]
     * @author compass
     * @date 2022/11/1 21:28
     * @since 1.0.0
     **/
    public static byte[] inputStreamToBytes(InputStream inputStream) throws IOException {
        try {
            ByteArrayOutputStream os = new ByteArrayOutputStream();
            byte[] buffer = new byte[1024];
            int num = 0;
            while ((num = inputStream.read(buffer)) != -1) {
                os.write(buffer, 0, num);
            }
            os.flush();
            return os.toByteArray();
        } finally {
            if (inputStream != null) {
                inputStream.close();
            }
        }
    }

    /***
     *
     * findFilePath 查找某个目录下的具体文件位置 【深层递归】
     *
     * @param fileDir 需要查询的目录
     * @param fileName 需要查询的文件名
     * @return java.lang.String
     * @author hy
     * @date 2022/4/23 21:28
     * @since 1.0.0
     **/
    public static String findFilePath(String fileDir, String fileName) {

        File file = new File(fileDir);
        if (!file.exists()) {
            throw new RuntimeException("指定目录不存在");
        }
        File[] files = file.listFiles();
        for (int i = 0; i < files.length; i++) {
            if (files[i].isFile()) {
                if (files[i].getName().equals(fileName)) {
                    return files[i].getAbsolutePath();
                }

            } else {
                findFilePath(files[i].getAbsolutePath(), fileName);
            }
        }
        return null;
    }

    /**
     * 获取到文件的保存路径
     * @param fileDirName 类路径下的上传下载目录名称
     * @return java.lang.String
     * @author comapss
     * @date 2022/11/1 22:36
     * @since 1.0.0
     **/
    public static String getFileSaveDir(String fileDirName) {
        URL resource = FileController.class.getResource("/");
        String classPath = resource.getPath();
        String fileDir = classPath + "/"+fileDirName+"/";
        File saveDir = new File(fileDir);
        // 如果文件路径不存在,先递归创建
        if (!saveDir.exists()) {
            saveDir.mkdirs();
        }
        return fileDir;
    }
}
最后使用 API POST 工具进行测试即可 ,这个工具免费的非常好用,可以百度自行下载,如果成功,data会返回上传后的文件名,失败的话,会抛出异常信息,如果找不到保存路径的朋友,可以看控制台输出
4.8.2 文件下载
下载文件的话 稍微要简单一些不那么复杂,接下来看代码
    /**
     * 根据文件名到上传的目录中将文件下载下来
     *
     * @param fileName 文件名
     * @return void
     * @author comapss
     * @date 2022/11/1 22:34
     * @since 1.0.0
     **/
    @GetMapping("/fileDownload")
    public void fileDownload(@RequestParam("fileName") String fileName, HttpServletResponse response) {
        String filePath = FileUtils.getFileSaveDir("upload") + fileName;
        try {
            FileInputStream inputStream = new FileInputStream(filePath);
            byte[] bytes = FileUtils.inputStreamToBytes(inputStream);
            //保存的文件名,必须和页面编码一致,否则乱码,响应参数一定要在write之前设置
            response.setContentType("application/octet-stream;charset=utf-8");
            fileName = response.encodeURL(new String(fileName.getBytes(), "iso8859-1"));
            response.addHeader("Content-Disposition", "attachment;filename=" + fileName);
            response.setContentLength(bytes.length);
            ServletOutputStream outputStream = response.getOutputStream();
            outputStream.write(bytes);
            outputStream.flush();
            // 这最好是写  Exception 如果写的是 IoException,那么出现其他异常就不会被捕捉到,
            //  异常处理handler会以RuntimeException的方式进行处理
        } catch (IOException ie) {
            ie.printStackTrace();
            throw BusinessException.buildError("文件下载异常");
        } catch (Exception e) {
            throw BusinessException.buildError(e.getMessage());

        }

    }
浏览器直接访问该地址 http://localhost:8888/example/fileTest/fileDownload?fileName=8e70328b9b0c4c21aa44eb4bf3cc102d.JPG,然后跟上刚刚上传的文件名,即可下载下来
4.9 发送邮件
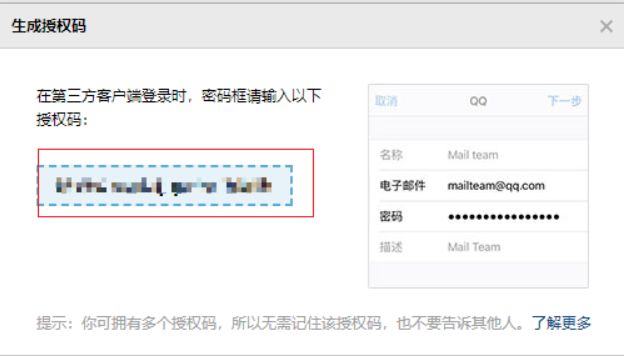
如何获取授权码?
以QQ邮箱为例,页面首部找到设置
开启POP3/SMTP服务
获取授权码
1.首先在pom中添加依赖
        <dependency>
            <groupId>org.springframework.bootgroupId>
            <artifactId>spring-boot-starter-mailartifactId>
        dependency>
2.新建一个配置文件 application-email.yml 然后在 application.yml中引入即可
spring:
  mail:
    host:  #SMTP服务器地址
    username:  #登陆账号
    password: #登陆密码(或授权码)
    properties:
      from:  #邮件发信人(即真实邮箱)
3.在bean包下新建一个 MailVo
@Data
public class MailVo implements ValueObject {
    private static final long serialVersionUID = -4171680130370849839L;
    private String id;
    // 发件人账号
    private String from;
    // 收件人账号
    private String to;
    // 发送的主题
    private String subject;
    // 发送的内容
    private String text;
    // 发送时间
    private Date sentDate;
    // 需要抄送的人
    private String cc;
    // 需要密送的人
    private String bcc;
    // 需要附带的附件,附件请保证一定要存在,否则将会被忽略掉
    @JsonIgnore
    private MultipartFile[] multipartFiles;
}
4.在service包中新建一个 EmailService接口
/**
 * 邮件发送服务
 *
 * @author compass
 * @date 2022-11-02
 * @since 1.0
 **/
@Service
public interface EmailService {

    /**
     * 发送email
     * @param mailVo email参数相关对象
     * @return com.springboot.example.bean.ResponseResult
     * @author compass
     * @date 2022/11/2 0:23
     * @since 1.0.0
     **/
    ResponseResult sendMail(MailVo mailVo)  ;
}
然后对EmailSrvice进行实现即可
/**
 * @author compass
 * @date 2022-11-02
 * @since 1.0
 **/
@Slf4j
@Service
public class EmailServiceImpl  implements EmailService {

    @Resource
    private MailSender mailSender;

    /**
     * 发送email
     * @param mailVo email参数相关对象
     * @return com.springboot.example.bean.ResponseResult
     * @author compass
     * @date 2022/11/2 0:23
     * @since 1.0.0
     **/
    @Override
    public ResponseResult sendMail(MailVo mailVo)   {

        JavaMailSenderImpl javaMailSender = null;
        if (mailSender != null && mailSender instanceof JavaMailSenderImpl){
            javaMailSender =  (JavaMailSenderImpl) mailSender;
        }else {
            throw BusinessException.buildError("未找到mailSender的实现类[JavaMailSenderImpl],类型转换失败");
        }
        MimeMessage mimeMessage = javaMailSender.createMimeMessage();
        if (!StringUtils.hasLength(mailVo.getTo())) {
            throw new RuntimeException("邮件收信人不能为空");
        }
        if (!StringUtils.hasLength(mailVo.getSubject())) {
            throw new RuntimeException("邮件主题不能为空");
        }
        if (!StringUtils.hasLength(mailVo.getText())) {
            throw new RuntimeException("邮件内容不能为空");
        }

        try {
            MimeMessageHelper messageHelper = new MimeMessageHelper(mimeMessage, true);
            String from =  mailVo.getFrom();
            mailVo.setFrom(from);
            messageHelper.setFrom(mailVo.getFrom());
            messageHelper.setTo(mailVo.getTo().split(","));
            messageHelper.setSubject(mailVo.getSubject());
            messageHelper.setText(mailVo.getText());
            if (StringUtils.hasLength(mailVo.getCc())) {
                messageHelper.setCc(mailVo.getCc().split(","));
            }

            if (mailVo.getMultipartFiles() != null) {
                for (MultipartFile multipartFile : mailVo.getMultipartFiles()) {
                    messageHelper.addAttachment(multipartFile.getOriginalFilename(), multipartFile);
                }
            }
            if (mailVo.getSentDate()==null) {
                mailVo.setSentDate(new Date());
                messageHelper.setSentDate(mailVo.getSentDate());
            }
            javaMailSender.send(messageHelper.getMimeMessage());
            log.info("发送邮件成功:{}->{}", mailVo.getFrom(), mailVo.getTo());
            return ResponseResult.success("邮件发送成功",mailVo);
        } catch (Exception e) {
            throw new RuntimeException(e.getMessage());
        }
    }
}
5.写一个EmailController进行测试,使用apiPost进行测试即可
@Slf4j
@Controller
@RequestMapping(value = "/example/email")
public class EmailController {

    @Resource
    private EmailService emailService;

    // 跳转到邮件发送页面
    @GetMapping("/toEmailIndex")
    public String toEmailIndex(){
        return "/email/index";
    }

    // 调用service相关方法发送邮件
    @ResponseBody
    @PostMapping("/sendEmail")
    public ResponseResult sendMail( MailVo mailVo, @RequestPart("files") MultipartFile[] files) {
        mailVo.setMultipartFiles(files);
        return emailService.sendMail(mailVo);
    }
}
4.10 配置跨域和静态资源
在 WebAppConfig 中添加如下内容
@Configuration // 标识这是配置类
@EnableAspectJAutoProxy(exposeProxy = true)  //开启Aspect生成代理对象
@EnableConfigurationProperties(InvokeConfigBean.class) // 导入 InvokeConfigBean
public class WebAppConfig  implements WebMvcConfigurer {

    // 配置静态资源访问
    @Override
    public void addResourceHandlers(ResourceHandlerRegistry registry) {
        registry.addResourceHandler("/**").addResourceLocations("classpath:/static/");
        registry.addResourceHandler("doc.html").addResourceLocations("classpath:/META-INF/resources/");
        registry.addResourceHandler("/webjars/**").addResourceLocations("classpath:/META-INF/resources/webjars/");
        registry.addResourceHandler("swagger-ui.html").addResourceLocations("classpath:/META-INF/resources/");
    }

    // 配置跨域
    @Override
    public void addCorsMappings(CorsRegistry registry) {
        registry.addMapping("/**")
                .allowedOrigins("*")
                .allowedMethods("*")
                .allowCredentials(true);
    }

}
4.11 配置拦截器
@Slf4j
public class DefinitionInterceptorHandler implements HandlerInterceptor {

    // preHandle:在业务处理器处理请求之前被调用。预处理,可以进行编码、安全控制、权限校验等处理;
    @Override
    public boolean preHandle(HttpServletRequest request, HttpServletResponse response, Object handler) throws Exception {
      log.error("----- preHandle LoginInterceptorHandler-----");
        return true;
    }


    // postHandle:在业务处理器处理请求执行完成后,生成视图之前执行。后处理(调用了Service并返回ModelAndView,但未进行页面渲染),有机会修改ModelAndView
    @Override
    public void postHandle(HttpServletRequest request, HttpServletResponse response, Object handler, ModelAndView modelAndView) throws Exception {
        log.error("----- ----- postHandle LoginInterceptorHandler-----");

    }

    // afterCompletion:在DispatcherServlet完全处理完请求后被调用,可用于清理资源等。返回处理(已经渲染了页面);
    @Override
    public void afterCompletion(HttpServletRequest request, HttpServletResponse response, Object handler, Exception ex) throws Exception {
        log.error("----- ----- afterCompletion LoginInterceptorHandler-----");

    }
}
在WebAppConfig中注册进去
@Configuration // 标识这是配置类
@EnableAspectJAutoProxy(exposeProxy = true)  //开启Aspect生成代理对象
@EnableConfigurationProperties(InvokeConfigBean.class) // 导入 InvokeConfigBean
public class WebAppConfig  implements WebMvcConfigurer {

    private static final String[]  INTERCEPTORS_EXCLUDE_URL={"/doc.html","/webjars/**","/swagger-ui.html","/static","/system/login"};

    // 配置静态资源访问
    @Override
    public void addResourceHandlers(ResourceHandlerRegistry registry) {
        registry.addResourceHandler("/**").addResourceLocations("classpath:/static/");
        registry.addResourceHandler("doc.html").addResourceLocations("classpath:/META-INF/resources/");
        registry.addResourceHandler("/webjars/**").addResourceLocations("classpath:/META-INF/resources/webjars/");
        registry.addResourceHandler("swagger-ui.html").addResourceLocations("classpath:/META-INF/resources/");
    }

    @Override
    public void addInterceptors(InterceptorRegistry registry) {
        // 添加一个实现HandlerInterceptor接口的拦截器实例
        registry.addInterceptor(new DefinitionInterceptorHandler())
                // 用于设置拦截器的过滤路径规则
                .addPathPatterns("/**")
                // 用于设置不需要拦截的过滤规则
                .excludePathPatterns(Arrays.asList(INTERCEPTORS_EXCLUDE_URL));
    }

    // 配置跨域
    @Override
    public void addCorsMappings(CorsRegistry registry) {
        registry.addMapping("/**")
                .allowedOrigins("*")
                .allowedMethods("*")
                .allowCredentials(true);
    }

}
5.数据访问开发
5.1 SpringBoot默认数据源
SpringBoot默认使用的数据源是HikariDataSource,并且创建的bean是datasource
1.我们在 application-database.yml 配置文件中添加如下属性,并且在application.yml中引入进去
spring:
  datasource:
    driver-class-name: com.mysql.cj.jdbc.Driver
    username: root
    password: 2732195202
    url: jdbc:mysql://127.0.0.1:3306/springboot?serverTimezone=GMT%2B8
    hikari:
      minimum-idle: 2
      idle-timeout: 180000
      maximum-pool-size: 10
      auto-commit: false
      pool-name: MyHikariCP
      max-lifetime: 1800000
      connection-timeout: 30000
      connection-test-query: SELECT 1 from dual
2.然后在测试类中注入 JdbcTemplate 即可直接操作数据库,使用JdbcTemplate完成数据库的操作
@SpringBootTest
public class LogInfoMapperTest {


    @Resource
    JdbcTemplate jdbcTemplate;


    @Test
    void  selectLogInfoByIdJdbcTemplate(){
        List<SystemLog> logs = jdbcTemplate.query("select * from  t_system_log where id = '2075338867023810560' ", 			new BeanPropertyRowMapper<>(SystemLog.class));
        System.out.println(logs);
    }

}
当然我们也可以直接自己往容器中自定义一个数据源,spring其实就是一个容器,你把指定的对象仍进去就行,其余的操作你不需要管,那些框架会想办法从容器中获取这个bean,如果获取不到会抛异常。
我们新建一个 application-hikari.yml
custom:
  datasource:
    driver-class-name: com.mysql.cj.jdbc.Driver
    username: root
    password: root
    jdbc-url: jdbc:mysql://127.0.0.1:3306/springboot?serverTimezone=GMT%2B8
    minimum-idle: 2
    idle-timeout: 180000
    maximum-pool-size: 10
    auto-commit: false
    pool-name: MyHikariCP
    max-lifetime: 1800000
    connection-timeout: 30000
    connection-test-query: SELECT 1 from dual
然后把他读取到一个bean中去
@Data
@Configuration
@PropertySource("classpath:application-hikari.yml") //指定yml文件位置
@ConfigurationProperties(prefix = "custom.datasource")
public class HikariConfigBean {

    private String driverClassName;
    private String username;
    private String password;
    private String jdbcUrl;
    private Integer minimumIdle;
    private Long idleTimeout;
    private Integer maximumPoolSize;
    private Boolean autoCommit;
    private String poolName;
    private Integer maxLifetime;
    private Long connectionTimeout;
    private String connectionTestQuery;
}
最后写一个配置类把数据源注入进去就行
/**
 * 数据源配置类
 * @author compass
 * @date 2022-11-04
 * @since 1.0
 **/
@Configuration
public class CustomDataSourceConfig {
    // 将配置文件中的属性读取进来
    @Resource
    private HikariConfigBean hikariConfigBean;


    @Primary
    @Bean("customDataSource")
    public DataSource dataSource( ) {
        // 转为一个map,最后封装称为一个properties,
        // 通过properties初始化HikariConfig,最后得到HikariDataSource
        Map<String, Object> map = BeanUtil.beanToMap(hikariConfigBean);
        Properties properties = new Properties();
        for (Object key : map.keySet()) {
            Object value = map.get(key);
            // 过滤掉 hikariConfigBean 中的$$beanFactory属性
            if (!"$$beanFactory".equals(key)) {
                properties.put(key, value);
            }
        }
        // 具体可以配置那些属性,请参考 HikariConfig里面的属性
        return new HikariDataSource(new HikariConfig(properties));
    }

}
如果是 DruidDataSource 也是差不多的,第一步就行先new 一个 HikariDataSource或DruidDataSource ,然后这个数据源肯定需要连接所需参数,然后看看有什么方式给他注入进去,搞进去之后,DataSource就可以在容器启动的时候就创建好这个对象,然后等你需要使用的时候直接获取就行。
5.2 整合mybatis
1.引入相关依赖
        <dependency>
            <groupId>org.mybatis.spring.bootgroupId>
            <artifactId>mybatis-spring-boot-starterartifactId>
            <version>2.1.3version>
        dependency>
        <dependency>
            <groupId>org.springframework.bootgroupId>
            <artifactId>spring-boot-starter-jdbcartifactId>
        dependency>
        <dependency>
            <groupId>mysqlgroupId>
            <artifactId>mysql-connector-javaartifactId>
            <version>8.0.21version>
        dependency>
2.在pom中的build标签中添加如下内容,主要是为了把mapper文件编译到类路径下,避免mapper绑定失败
     <resources>
            <resource>
                <directory>src/main/javadirectory>
                <includes>
                    <include>**/*.xmlinclude>
                includes>
            resource>
            <resource>
                <directory>src/main/resourcesdirectory>
            resource>
        resources>
3.在config包下的WebAppConfig中配置如下
@Configuration // 标识这是配置类
@EnableAspectJAutoProxy(exposeProxy = true)  //开启Aspect生成代理对象
@EnableConfigurationProperties(InvokeConfigBean.class) // 导入 InvokeConfigBean
@MapperScan(basePackages = "com.springboot.example.mapper") // 指定mapper扫描路径
public class WebAppConfig {
}
4.在 resources下新建一个配置文件 application-database.yml 记得springboot这个库要建立,否则连接不上
spring:
  datasource:
    driver-class-name: com.mysql.cj.jdbc.Driver
    username: username
    password: password
    url: jdbc:mysql://127.0.0.1:3306/springboot?serverTimezone=GMT%2B8
    hikari:
      minimum-idle: 2
      idle-timeout: 180000
      maximum-pool-size: 10
      auto-commit: false
      pool-name: MyHikariCP
      max-lifetime: 1800000
      connection-timeout: 30000
      connection-test-query: SELECT 1 from dual
mybatis:
  # 指定mapper扫描路径
  mapper-locations: com/springboot/example/mapper/xml/*.xml
  # 包别名路径
  type-aliases-package: com.springboot.example.bean
  # 开启驼峰转换
  configuration:
    map-underscore-to-camel-case: true
# 开SQL日志输出
logging:
  level:
    com.springboot.example.mapper: debug
其实搞完这些配置,差不多就可以操作数据库了,我们接下来使用一个4.7日志记录的表做一个测试,我们按照日志记录id查询,数据库中的记录
在mapper包下的LogInfoMapper中添加如下内容
/**
 * 日志记录
 * @author compass
 * @date 2022-11-02
 * @since 1.0
 **/
@Repository
public interface LogInfoMapper {

     /**
     * 根据日志id查询日志记录
     * @param id 日志id
     * @return com.springboot.example.bean.SystemLog
     * @author compass
     * @date 2022/11/3 14:40
     * @since 1.0.0
     **/
    SystemLog selectLogInfoById(@Param("id") String id);

}
在mapper包下的xml包中对应的Mapper.xml添加内容如下
DOCTYPE mapper PUBLIC "-//mybatis.org//DTD Mapper 3.0//EN" "http://mybatis.org/dtd/mybatis-3-mapper.dtd">
<mapper namespace="com.springboot.example.mapper.LogInfoMapper">

    <select id="selectLogInfoById" resultType="com.springboot.example.bean.SystemLog">
        SELECT *
        FROM t_system_log
        where id = #{id}
    select>

mapper>
其实到这里我们就结束了,我们可以直接在测试类中注入 LogInfoMapper 即可进行测试,我们也可以把这个对象接入到service中然后再进行测试,我们这里就不再进行赘述,什么在日志记录的时候有提到,我们这里直接在测试类中进行注入,然后测试即可
我们在 test包下新建一个 LogInfoMapperTest 即可进行测试,因为我们引入了springBoot测试模块。所以测试起来非常轻松。
@SpringBootTest
public class LogInfoMapperTest {

    @Resource
    private LogInfoMapper logInfoMapper;

    @Test
    void  selectLogInfoById(){
        SystemLog systemLog = logInfoMapper.selectLogInfoById("2075338867023810560");
        System.out.println(JSONUtil.toJsonStr(systemLog));
    }
}
最终可以看到控制台输出如下内容,说明查询成功:
5.3 整合mybatis-plus
5.3.1 简单增删改查
我们有了前面的经验,我们再来整合mybatis-plus就会轻松很多,mybatis-plus是mybatis的升级版,他在毫不影响mybatis原有的功能下,对mybatis进行了增强,简化了具体写SQL的过程,比如一些简单的查询,插入,修改,删除,等我们都可以不用写SQL,直接用mybatis-plus的响应mapper即可,特别是那些实体类有几十个字段的,如果做插入,或者修改,那么写起SQL来真的是头疼,还容易出错,所以选择mybatis-plus简化开发是一个很不错的选择。
1.首先我们在pom文件中去掉mybatis的依赖 注释掉即可
        <dependency>
            <groupId>org.mybatis.spring.bootgroupId>
            <artifactId>mybatis-spring-boot-starterartifactId>
            <version>2.1.3version>
        dependency>
        <dependency>
            <groupId>org.springframework.bootgroupId>
            <artifactId>spring-boot-starter-jdbcartifactId>
        dependency>
然后引入 mybatis-plus-boot-starter
        <dependency>
            <groupId>com.baomidougroupId>
            <artifactId>mybatis-plus-boot-starterartifactId>
            <version>3.5.0version>
        dependency>
- CustomDataSourceConfig 这个配置类上的 @Configuration 注解注释掉,不加入到容器中
- application.yml 的include中,选择我们值包含 api,email 两个配置文件
2.新增一个配置文件 application-mybatisPlus.yml 记得在 application.yml 的include中引入
3.我们根据UserInfo来创建一个表,然后mybatis-plus中的相关内容就按照这个实体来演示
@Data
@TableName("t_user")
public class UserInfo  implements ValueObject{
    private static final long serialVersionUID = 4742937426114123355L;
    // 指定id类型
    // id类型生成策略请看: com.baomidou.mybatisplus.annotation.IdType 这个类
    @TableId(value = "id", type = IdType.ASSIGN_ID)
    private String id;
    // 指定java实体类属性和数据库指定名映射
    // 只要我们在配置文件中配置  map-underscore-to-camel-case: true
    // 就可以开启java是小驼峰,数据库使用下划线的方式进行映射,一般不用设置
    @TableField("username")
    private String username;
    private String password;
    private String phone;
    private String email;
    private String sex;
    private String userType;
    private Date updateTime;
    private Date createTime;
    // 表示这是逻辑删除的一个字段
    @TableLogic
    private Boolean isDelete;
}
UserInfo对应的t_user表SQL
CREATE TABLE `t_user` (
  `id` varchar(20) NOT NULL,
  `password` varchar(30) DEFAULT NULL,
  `email` varchar(100) DEFAULT NULL,
  `username` varchar(50) DEFAULT NULL,
  `phone` varchar(15) DEFAULT NULL,
  `sex` char(4) DEFAULT NULL,
  `userType` varchar(255) DEFAULT NULL,
  `create_time` datetime DEFAULT NULL,
  `update_time` datetime DEFAULT NULL,
  `is_delete` tinyint(4) DEFAULT NULL,
  PRIMARY KEY (`id`)
) ENGINE=InnoDB DEFAULT CHARSET=utf8mb4;
注意:如果我们是直接需要的是mybatis-plus项目,也不要忘记在 pom 的build中添加如下内容,避免mapper绑定失败
  <resources>
            <resource>
                <directory>src/main/javadirectory>
                <includes>
                    <include>**/*.xmlinclude>
                includes>
            resource>
            <resource>
                <directory>src/main/resourcesdirectory>
            resource>
        resources>
4.我们在mapper下新建一个 UserInfoMapper ,记住,如果需要使用mybatis-plus的增强方法,必须的继承BaseMapper
/**
 * @author compass
 * @date 2022-11-04
 * @since 1.0
 **/
public interface UserInfoMapper extends BaseMapper<UserInfo> {

}
然后我们可以在mapper包下的xml保险新建一个对应的 UserInfoMapper.xml ,对于这个 UserInfoMapper.xml 可有可无,但是为了规范我们还是写上,因为涉及到复杂的SQL,我还是比较喜欢原生的方式。
DOCTYPE mapper PUBLIC "-//mybatis.org//DTD Mapper 3.0//EN" "http://mybatis.org/dtd/mybatis-3-mapper.dtd">
<mapper namespace="com.springboot.example.mapper.UserInfoMapper">


mapper>
5.新建一个 application-log.yml 添加如下内容,可以在测试时看到sql日志
logging:
  level:
    root: info
    com.springboot.example: debug
    org.springframework.web: info
    org.springframework.transaction: info
    org.mybatis.spring.transaction: info
    org.apache.ibatis.session: info
  #配置日志输出类型
  pattern:
    console: "%highlight(%-5level) %d{HH:mm:ss} %highlight(%msg) - %boldGreen(%logger) %n"
    file: "%d{HH:mm:ss.SSS} [%-5level][%thread] %logger{36} - %msg%n"
6.写一个mapper测试类进行测试,一个完整的简单增删改查例子如下:
import com.baomidou.mybatisplus.core.conditions.query.QueryWrapper;
import com.springboot.example.bean.UserInfo;
import com.springboot.example.mapper.UserInfoMapper;
import org.junit.jupiter.api.Test;
import org.springframework.boot.test.context.SpringBootTest;

import javax.annotation.Resource;

@SpringBootTest
public class UserInfoMapperTest {

    @Resource
    private UserInfoMapper userInfoMapper;


    @Test
    void addUser(){
        UserInfo userInfo = new UserInfo();
        userInfo.setUsername("admin");
        userInfo.setPassword("123");
        userInfo.setPhone("[email protected]");
        userInfo.setEmail("[email protected]");
        userInfo.setSex("1");
        userInfo.setUserType("system");
        userInfo.setUpdateTime(new Date());
        userInfo.setCreateTime(new Date());
        userInfo.setIsDelete(false);
        int insert = userInfoMapper.insert(userInfo);
        // 小知识点:在添加成功后,此时的userInfo对象的id就被自动填充上了
        System.out.println(insert);
    }

    @Test
    void selectById(){
        // 执行的SQL :SELECT id,username,password,phone,email,sex,user_type,update_time,create_time,is_delete FROM t_user WHERE id=? AND is_delete=0
        // 自动带上:is_delete=0
        UserInfo userInfo = userInfoMapper.selectById("1588564995947442178");
        System.out.println(userInfo);
    }

    @Test
    void deleteById(){
        // 执行的其实是update语句 只是把 is_delete改为1而已,然后查询时候,带上AND is_delete=0的条件就行
        // 我们不用管,mybatis-plus会处理的,要我们我们在这个字段上标注了 @TableLogic注解
        // UPDATE t_user SET is_delete=1 WHERE id=? AND is_delete=0
        int delete = userInfoMapper.deleteById("1588564995947442178");
        System.out.println(delete);
    }

    @Test
    void updateUser(){
        UserInfo userInfo = new UserInfo();
        userInfo.setUsername("gust");
        userInfo.setPassword("456");
        userInfo.setPhone("1013131532");
        userInfo.setEmail("[email protected]");
        userInfo.setSex("1");
        userInfo.setUserType("user");
        userInfo.setUpdateTime(new Date());
        userInfo.setCreateTime(new Date());
        userInfo.setIsDelete(false);

        // 创建一个条件构造器,指定修改的条件
        QueryWrapper<UserInfo> wrapper = new QueryWrapper<>();
        wrapper.eq("id","1588564995947442178");
        // 执行的SQL
        int update = userInfoMapper.update(userInfo,wrapper );
        System.out.println(update);

    }
}
5.3.2 自动填充策略
我们新建一个包 handler 在里面新增一个类,我们想在插入的时候自动填充创建时间和修改时间为当前时间,然后在修改的时候,指定修改时间为当前时间
import com.baomidou.mybatisplus.core.handlers.MetaObjectHandler;
import org.apache.ibatis.reflection.MetaObject;
import org.springframework.stereotype.Component;

import java.util.Date;

@Component
public class MybatisMetaObjectHandler implements MetaObjectHandler {
    @Override
    public void insertFill(MetaObject metaObject) {
        //配置插入时候指定字段要填充的数据
        this.strictInsertFill(metaObject, "create_time", Date.class, new Date());
        this.strictUpdateFill(metaObject, "update_time", Date.class, new Date());
        //(要填充数据库的字段名称,数据类型,要填充的数据)
    }

    @Override
    public void updateFill(MetaObject metaObject) {
        //注意区分
        this.strictUpdateFill(metaObject, "update_time", Date.class, new Date());
        //修改和插入类似 只是更新的时候要更改的字段和数据
    }
}
然后在对应的字段上标注对应的策略就行
import com.baomidou.mybatisplus.annotation.*;
import lombok.Data;

import java.util.Date;

@Data
@TableName("t_user")
public class UserInfo  implements ValueObject{
    private static final long serialVersionUID = 4742937426114123355L;
    // 指定id类型
    @TableId(value = "id", type = IdType.ASSIGN_ID)
    private String id;
    // 指定java实体类属性和数据库指定名映射
    // 只要我们在配置文件中配置  map-underscore-to-camel-case: true
    // 就可以开启java是小驼峰,数据库使用下划线的方式进行映射,一般不用设置
    @TableField("username")
    private String username;
    private String password;
    private String phone;
    private String email;
    private String sex;
    private String userType;
    // 修改时自动填充策略
    @TableField(fill = FieldFill.UPDATE)
    private Date updateTime;
    // 插入时自动填充策略
    @TableField(fill = FieldFill.INSERT)
    private Date createTime;
    // 表示这是逻辑删除的一个字段
    @TableLogic
    private Boolean isDelete;
}
5.3.3 mybatis-plus分页查询
我们建立一个MybatisPlusConfig,然后往里面新增一个分页拦截器bean,顺带把之前配置在WebAppConfig类中的@MapperScan替换到该类中,其实都可以,只是为了规范
import com.baomidou.mybatisplus.annotation.DbType;
import com.baomidou.mybatisplus.extension.plugins.MybatisPlusInterceptor;
import com.baomidou.mybatisplus.extension.plugins.inner.PaginationInnerInterceptor;
import org.mybatis.spring.annotation.MapperScan;
import org.springframework.context.annotation.Bean;
import org.springframework.context.annotation.Configuration;

@Configuration
@MapperScan(basePackages = "com.springboot.example.mapper") // 指定mapper扫描路径
public class MybatisPlusConfig {

    /**
     * 新增分页拦截器,并设置数据库类型为mysql
     */
    @Bean
    public MybatisPlusInterceptor mybatisPlusInterceptor() {
        MybatisPlusInterceptor interceptor = new MybatisPlusInterceptor();
        interceptor.addInnerInterceptor(new PaginationInnerInterceptor(DbType.MYSQL));
        return interceptor;
    }

}
最后我们在mapper中新增一个测试方法测试即可
@Test
    void selectPage(){
        // 表示当前是第一页,每页大小是5条
        Page<UserInfo> page = new Page<>(1,5);
        QueryWrapper<UserInfo> wrapper = new QueryWrapper<>();
        Page<UserInfo> userInfoPage = userInfoMapper.selectPage(page, wrapper);
        System.out.println(userInfoPage.getRecords());
    }
mybatis-plus更多用法请参考:https://baomidou.com/
5.4 springDataJPA
springDataJpa和mybatis各有好处,最大的区别就是,mybatis是基于数据库模型进行编程,如果表结构变了,那么业务逻辑肯定也会收到影响,而springDataJpa是基于对象模型来进行编程。mybatis是基于数据库模型的话,有一个致命的缺点就是更换数据库的时候,可能会因为数据库语法差异,导致SQL不可用,而springDataJpa是基于对象查询语言进行转换为SQL,是基于对象模型的,即使更换数据库也无妨。因为我平时几乎不用springDataJpa,而用mybatis居多,工作中用的也是mybatis,所以springDataJpa就不再过多赘述,如果有兴趣的朋友请参考这个连接,这是我之前写的一个关于springDataJpa的文章: springDataJpa链接
5.5 springboot多数据源
有时候我们需要连接不同的数据库,就需要使用到多数据源,比如读写分离,因为之前有写过关于多数据源继承的文章,所以请参考:springboot多数据源传送门
6.5 集成Redis
6.1 集成Redis环境
1.在pom中引入依赖
        <dependency>
            <groupId>org.springframework.bootgroupId>
            <artifactId>spring-boot-starter-data-redisartifactId>
            <version>2.5.8version>
        dependency>
2.新增一个 application-cache.yml ,在配置文件中配置相关参数,记得在application.yml中引入
spring:
  redis:
    # 地址
    host: 127.0.0.1
    # 端口,默认为6379
    port: 6379
    # 数据库索引
    database: 0
    # 密码
    password: admin
    # 连接超时时间
    timeout: 10s
    lettuce:
      pool:
        # 连接池中的最小空闲连接
        min-idle: 0
        # 连接池中的最大空闲连接
        max-idle: 8
        # 连接池的最大数据库连接数
        max-active: 8
        # #连接池最大阻塞等待时间(使用负值表示没有限制)
        max-wait: -1ms
3.直接注入 RedisTemplate 即可使用,或者使用下面我封装的一个 RedisCache 工具类进行操作
import org.springframework.data.redis.core.*;
import org.springframework.stereotype.Component;

import javax.annotation.Resource;
import java.util.*;
import java.util.concurrent.TimeUnit;
import java.util.function.Supplier;
import java.util.stream.Collector;
import java.util.stream.Collectors;

@SuppressWarnings(value = {"unchecked", "rawtypes"})
@Component
public class RedisCache {

    @Resource
    public RedisTemplate redisTemplate;

    /**
     * 缓存基本的对象,Integer、String、实体类等
     *
     * @param key   缓存的键值
     * @param value 缓存的值
     */
    public void setCacheStr(final String key, final String value) {
        redisTemplate.opsForValue().set(key, value);
    }

    /**
     * 缓存基本的对象,Integer、String、实体类等
     *
     * @param key      缓存的键值
     * @param value    缓存的值
     * @param timeout  时间
     * @param timeUnit 时间颗粒度
     */
    public void setCacheStr(final String key, final String value, final Integer timeout, final TimeUnit timeUnit) {
        redisTemplate.opsForValue().set(key, value, timeout, timeUnit);
    }

    /**
     * 设置有效时间
     *
     * @param key     Redis键
     * @param timeout 超时时间
     * @return true=设置成功;false=设置失败
     */
    public boolean expire(final String key, final long timeout) {
        return expire(key, timeout, TimeUnit.SECONDS);
    }

    /**
     * 设置有效时间
     *
     * @param key     Redis键
     * @param timeout 超时时间
     * @param unit    时间单位
     * @return true=设置成功;false=设置失败
     */
    public boolean expire(final String key, final long timeout, final TimeUnit unit) {
        return redisTemplate.expire(key, timeout, unit);
    }

    /**
     * 获得缓存的基本对象。
     *
     * @param key 缓存键值
     * @return 缓存键值对应的数据
     */
    public <T> T getCacheStr(final T key) {
        ValueOperations<String, T> operation = redisTemplate.opsForValue();
        return operation.get(key);
    }

    /**
     * 删除单个对象
     *
     * @param key
     */
    public boolean deleteObject(final String key) {
        return redisTemplate.delete(key);
    }

    /**
     * 删除集合对象
     *
     * @param collection 多个对象
     * @return
     */
    public long deleteObject(final Collection collection) {
        return redisTemplate.delete(collection);
    }

    /**
     * 缓存List数据
     *
     * @param key      缓存的键值
     * @param dataList 待缓存的List数据
     * @return 缓存的对象
     */
    public <T> long setCacheList(final String key, final List<T> dataList) {
        Long count = redisTemplate.opsForList().rightPushAll(key, dataList);
        return count == null ? 0 : count;
    }

    /**
     * 获得缓存的list对象
     *
     * @param key 缓存的键值
     * @return 缓存键值对应的数据
     */
    public <T> List<T> getCacheList(final String key) {
        return redisTemplate.opsForList().range(key, 0, -1);
    }


    /**
     * 缓存Map
     *
     * @param key
     * @param dataMap
     */
    public <T> void setCacheMap(final String key, final Map<String, T> dataMap) {
        if (dataMap != null) {
            redisTemplate.opsForHash().putAll(key, dataMap);
        }
    }

    /**
     * 获得缓存的Map
     *
     * @param key
     * @return
     */
    public <T> Map<String, T> getCacheMap(final String key) {
        return redisTemplate.opsForHash().entries(key);
    }

    /**
     * 往Hash中存入数据
     *
     * @param key   Redis键
     * @param hKey  Hash键
     * @param value 值
     */
    public <T> void setCacheMapValue(final String key, final String hKey, final T value) {
        redisTemplate.opsForHash().put(key, hKey, value);
    }

    /**
     * 获取Hash中的数据
     *
     * @param key  Redis键
     * @param hKey Hash键
     * @return Hash中的对象
     */
    public <T> T getCacheMapValue(final String key, final String hKey) {
        HashOperations<String, String, T> opsForHash = redisTemplate.opsForHash();
        return opsForHash.get(key, hKey);
    }

    /**
     * 删除Hash中的数据
     *
     * @param key
     * @param hkey
     */
    public void delCacheMapValue(final String key, final String hkey) {
        HashOperations hashOperations = redisTemplate.opsForHash();
        hashOperations.delete(key, hkey);
    }

    /**
     * 获取多个Hash中的数据
     *
     * @param key   Redis键
     * @param hKeys Hash键集合
     * @return Hash对象集合
     */
    public <T> List<T> getMultiCacheMapValue(final String key, final Collection<Object> hKeys) {
        return redisTemplate.opsForHash().multiGet(key, hKeys);
    }

    /**
     * 获得缓存的基本对象列表
     *
     * @param pattern 字符串前缀
     * @return java.util.Collection
     */
    public Collection<String> keys(final String pattern) {
        return redisTemplate.keys(pattern);

    }


    /**
     * 往zset中添加元素
     *
     * @param key   key
     * @param value value
     * @param score 得分
     * @return java.lang.Boolean
     */
    public Boolean setZSet(Object key, Object value, Double score) {
        return redisTemplate.opsForZSet().add(key, value, score);
    }


    /**
     * 往zset中添加元素
     *
     * @param key key
     * @param set 需要放入的列表
     * @return java.lang.Long
     */
    public Long setZSetList(Object key, Set<DefaultTypedTuple<String>> set) {
        return redisTemplate.opsForZSet().add(key, set);
    }

    /**
     * 返回zset集合内的成员个数
     *
     * @param key key
     * @return java.lang.Long
     */
    public Long getZSetSize(Object key) {
        return redisTemplate.boundSetOps(key).size();
    }

    /**
     * 按照排名先后(从小到大)打印指定区间内的元素,
     *
     * @param key   key
     * @param start 开始范围
     * @param end   结束范围 -1为打印全部
     * @return java.util.Set
     */
    public Set getZSetRangeAsce(Object key, Integer start, Integer end) {
        return redisTemplate.boundZSetOps(key).range(start, end);
    }

    /**
     * 获得指定元素的分数
     *
     * @param key key
     * @param key value
     * @return java.lang.Double
     */
    public Double getZSetAssingItemScore(Object key, Object value) {
        return redisTemplate.boundZSetOps(key).score(value);
    }

    /**
     * 返回集合内指定分数范围的成员个数(Double类型)
     *
     * @param key        key
     * @param startScore 开始范围
     * @param endScore   结束范围
     * @return java.lang.Long
     */
    public Long getZSetAssingRangeScoreCount(Object key, Double startScore, Double endScore) {
        return redisTemplate.boundZSetOps(key).count(startScore, endScore);

    }

    /**
     * 返回指定成员的排名 从小到大
     *
     * @param key   key
     * @param value value
     * @return java.lang.Long
     */
    public Long getZSetMemberRank(Object key, Double value) {
        return redisTemplate.boundZSetOps(key).rank(value);

    }

    /**
     * 返回指定成员的排名 从大到小
     *
     * @param key   key
     * @param value value
     * @return java.lang.Long
     */
    public Long getZSetMemberReverseRank(Object key, Object value) {
        return redisTemplate.boundZSetOps(key).reverseRank(value);

    }

    /**
     * 返回指定成员的排名 从大到小
     *
     * @param key          key
     * @param minScore     最小分数
     * @param maxScore     最大分数
     * @param offset       偏移量
     * @param offsetNumber 个数
     * @return java.util.Set
     */
    public Set getZSetRangeWithScores(Object key, Double minScore, Double maxScore, Long offset, Long offsetNumber) {
        return redisTemplate.opsForZSet().rangeByScore(key, minScore, maxScore, offset, offsetNumber);

    }

    /**
     * 返回集合内元素的排名,以及分数(从小到大)
     *
     * @param key   key
     * @param start 开始范围
     * @param end   指定范围
     * @return java.util.Set
     */
    public Set getZSetGetScoreAsce(Object key, Long start, Long end) {
        return redisTemplate.opsForZSet().rangeWithScores(key, start, end);

    }

    /**
     * 返回集合内元素的排名,以及分数(从大到小)
     *
     * @param key   key
     * @param start 开始范围
     * @param end   指定范围
     * @return java.util.Set
     */
    public  Set getZSetGetScoreDesc(Object key, Long start, Long end) {
       return redisTemplate.opsForZSet().reverseRangeWithScores(key, start, end);
    }

    /**
     * 从集合中删除指定元素
     *
     * @param key   key
     * @param value value
     * @return java.lang.Long
     */
    public Long getZSetRemve(Object key, Object value) {
        return redisTemplate.boundZSetOps(key).remove(value);

    }

    /**
     * 删除指定索引范围的元素(Long类型)
     *
     * @param key   key
     * @param start 开始范围
     * @param end   指定范围
     * @return java.lang.Long
     */
    public Long delZSetRemoveRange(Object key, Long start, Long end) {
        return redisTemplate.boundZSetOps(key).removeRange(start, end);

    }

    /**
     * 删除指定索引范围的元素(Double类型)
     *
     * @param key   key
     * @param start 开始范围
     * @param end   指定范围
     * @return java.lang.Long
     */
    public Long delZSetRemoveRangeByScore(Object key, Double start, Double end) {
        return redisTemplate.boundZSetOps(key).removeRangeByScore(start, end);

    }

    /**
     * 删除指定索引范围的元素(Double类型)
     *
     * @param key   key
     * @param value 对应的value
     * @param score 分数
     * @return java.lang.Double
     */
    public Double delZSetRemoveRangeByScore(Object key, Object value, Double score) {
        return redisTemplate.boundZSetOps(key).incrementScore(value, score);

    }
}
6.2 redis分布式锁
1.分布式应该满足那些条件?
- 互斥:在任何给定时刻,只有一个客户端可以持有锁;
- 无死锁:任何时刻都有可能获得锁,即使获取锁的客户端崩溃;
- 容错:只要大多数
Redis的节点都已经启动,客户端就可以获取和释放锁。
2.加解锁代码位置有讲究
因为加锁后就意味着别的请求或线程无法进入到该逻辑中,所以一定要保证锁被释放,不然造成死锁,这个接口就废掉了。请看下面加锁伪代码
释放锁的代码一定要放在 finally{} 块中。
加锁的位置也有问题,放在 try 外面的话,如果执行 redisLock.lock() 加锁异常,但是实际指令已经发送到服务端并执行,只是客户端读取响应超时,就会导致没有机会执行解锁的代码。
public void doSomething() {
    try {
        // 上锁
        redisLock.lock();
        // 处理业务
        ...
    } catch (Exception e) {
        e.printStackTrace();
    } finally {
      // 释放锁
      redisLock.unlock();
    }
}
3.引入依赖
        <dependency>
            <groupId>org.redissongroupId>
            <artifactId>redisson-spring-boot-starterartifactId>
            <version>3.16.4version>
        dependency>
就这样在 Spring 容器中我们拥有以下几个 Bean 可以使用:
RedissonClientRedissonRxClientRedissonReactiveClientRedisTemplateReactiveRedisTemplate
常见的锁如下:
失败无限重试:
RLock lock = redisson.getLock("码哥字节");
try {

  // 1.最常用的第一种写法
  lock.lock();

  // 执行业务逻辑
  .....

} finally {
  lock.unlock();
}
拿锁失败时会不停的重试,具有 Watch Dog 自动延期机制,默认续 30s 每隔 30/3=10 秒续到 30s。
失败超时重试,自动续命:
//尝试拿锁10s后停止重试,获取失败返回false,具有Watch Dog 自动延期机制, 默认续30s
boolean flag = lock.tryLock(10, TimeUnit.SECONDS);
超时自动释放锁:
// 没有Watch Dog ,10s后自动释放,不需要调用 unlock 释放锁。
lock.lock(10, TimeUnit.SECONDS);
超时重试,自动解锁:
// 尝试加锁,最多等待100秒,上锁以后10秒自动解锁,没有 Watch dog
boolean res = lock.tryLock(100, 10, TimeUnit.SECONDS);
if (res) {
   try {
     ...
   } finally {
       lock.unlock();
   }
}
Watch Dog 自动延时:
如果获取分布式锁的节点宕机,且这个锁还处于锁定状态,就会出现死锁。
为了避免这个情况,我们都会给锁设置一个超时自动释放时间。
然而,还是会存在一个问题。
假设线程获取锁成功,并设置了 30 s 超时,但是在 30s 内任务还没执行完,锁超时释放了,就会导致其他线程获取不该获取的锁。
所以,Redisson 提供了 watch dog 自动延时机制,提供了一个监控锁的看门狗,它的作用是在 Redisson 实例被关闭前,不断的延长锁的有效期。
也就是说,如果一个拿到锁的线程一直没有完成逻辑,那么看门狗会帮助线程不断的延长锁超时时间,锁不会因为超时而被释放。
默认情况下,看门狗的续期时间是 30s,也可以通过修改 Config.lockWatchdogTimeout 来另行指定。
另外 Redisson 还提供了可以指定 leaseTime 参数的加锁方法来指定加锁的时间。
超过这个时间后锁便自动解开了,不会延长锁的有效期。
有两个点需要注意:
- watchDog 只有在未显示指定加锁超时时间(leaseTime)时才会生效。
- lockWatchdogTimeout 设定的时间不要太小 ,比如设置的是 100 毫秒,由于网络直接导致加锁完后,watchdog 去延期时,这个 key 在 redis 中已经被删除了。
4.写一个controller进行测试
@Slf4j
@RestController
@RequestMapping(value = "/example/redisson")
public class RedissonTestController {

    @Resource
    private RedissonClient redissonClient;

    @GetMapping("/putOrder")
    public ResponseResult<String> putOrder(@RequestParam  String orderId){
        RLock lock = redissonClient.getLock("putOrderLock");
        try {
            log.info("-----开始准备上锁-----");
            lock.lock();
           log.info("-----上锁成功-----");
            TimeUnit.SECONDS.sleep(10);
        }catch (Exception e){
            e.printStackTrace();
        }finally {
            log.info("-----释放锁-----");
            lock.unlock();
        }
        return  ResponseResult.success(String.format("orderId:%s,randomId:%s",orderId, IdUtil.getSnowflake().nextIdStr()));
    }
}
第一次请求上锁成功后,需要10秒后才释放锁,此时别的请求再进来,就得不到锁,只有10秒后上一个请求释放锁之后,下一个请求才能上锁成功。
6.3 使用redis完成排行榜
比如我们玩游戏的时候,就有一个排行榜的功能,或者是购物,等场景,遇到排行榜的场景很多,我们就用reds的Zset集合完成这个排行榜的功能。
具体代码如下:
   // 排行榜
    @Test
    void rank() {

        // 假设我们有100名玩家,然后我们需要获取到排位积分最高的前10位玩家的id,通过这个id我们就能查询出玩家信息
        // 1.构建100个玩家,并且生成随机排位分数 1~10000分
        // 集合key
        String key = "gamePlayerSet";
        // 玩家集合
       Set<DefaultTypedTuple<String>> playerSet = new HashSet<>();
        Random random = new Random();
       log.info("-----------游戏开始---------");
        for (int i = 0; i < 100; i++) {
            // 玩家分数
            Double score = (double) random.nextInt(10000);
            // 玩家id
            String playerId = UUID.randomUUID().toString().replaceAll("-", "");
            // 构建一个玩家
            DefaultTypedTuple<String> player = new DefaultTypedTuple<>(playerId, score);
            playerSet.add(player);

            log.info("加入游戏:玩家id:"+playerId+":"+"玩家分数:"+score);

        }
        // 将玩家添加到集合中
        redisCache.setZSetList(key,playerSet);
        // 取出前分数最高的前10名玩家
        Set<ZSetOperations.TypedTuple> players = redisCache.getZSetGetScoreDesc("gamePlayerSet", 0L, 9L);
        log.info("-----------游戏结束---------");
        for (ZSetOperations.TypedTuple player : players) {
            Object playerId = player.getValue();
            Object score = player.getScore();
            log.info("游戏结算:玩家id:"+playerId+":"+"玩家分数:"+score);
        }

    }
7 springboot日志处理
7.1 springboot日志描述
log4j定义了8个级别的log(除去OFF和ALL,可以说分为6个级别)
优先级从高到低依次为:OFF、FATAL、ERROR、WARN、INFO、DEBUG、TRACE、 ALL
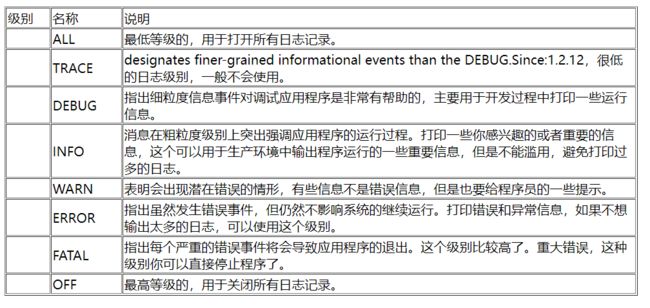
如果将log level设置在某一个级别上,那么比此级别优先级高的log都能打印出来。
例如,如果设置优先级为WARN,那么OFF、FATAL、ERROR、WARN 4个级别的log能正常 输出,而INFO、DEBUG、TRACE、 ALL级别的log则会被忽略。
Log4j建议只使用四个级别,优先级从高到低分别是ERROR、WARN、INFO、DEBUG。
7.2 自定义日志配置
通过系统属性和传统的Spring Boot外部配置文件依然可以很好的支持日志控制和管理。
根据不同的日志系统,你可以按如下规则组织配置文件名,就能被正确加载:
• Logback:logback-spring.xml, logback-spring.groovy, logback.xml, logback.groovy
• Log4j:log4j-spring.properties, log4j-spring.xml, log4j.properties, log4j.xml
• Log4j2:log4j2-spring.xml, log4j2.xml
• JDK (Java Util Logging):logging.properties
Spring Boot官方推荐优先使用带有-spring的文件名作为你的日志配置(如使用logback-spring.xml,而不是logback.xml),命名为logback-spring.xml的日志配置文件,spring boot可以为它添加一些spring boot特有的配置项。
如果你即想完全掌控日志配置,但又不想用logback.xml作为Logback配置的名字,可以通过logging.config属性指定自定义的名字:
logging.config=classpath:logging-config.xml
虽然一般并不需要改变配置文件的名字,但是如果你想针对不同运行时Profile使用不同的日志配置,这个功能会很有用。
下面是我自己经常使用的一个模板,把他放到 resources目录下即可 名称为:logback-spring.xml
<configuration scan="true" scanPeriod="60 seconds" debug="false">


    <property name="log.homeDir" value="./logs/tokenPocket"/>

    <property name="log.proName" value="tokenPocket"/>

    <property name="log.maxHistory" value="30"/>

    <property name="log.maxSize" value="1024MB"/>

    <property name="mapper.package" value="compass.token.pocket.com.mapper"/>


    <property name="CONSOLE_LOG_PATTERN"
              value="%yellow(%date{yyyy-MM-dd HH:mm:ss}) |%highlight(%-5level) |%blue(%thread) |%blue(%file:%line) |%green(%logger) |%cyan(%msg%n)"/>

    <property name="FILE_LOG_PATTERN"
              value="%d{yyyy-MM-dd HH:mm:ss.SSS} %-5level [%thread] %-5level %logger{50} - %msg%n"/>


    <appender name="CONSOLE" class="ch.qos.logback.core.ConsoleAppender">

        <encoder>

            <pattern>
                ${CONSOLE_LOG_PATTERN}
            pattern>
        encoder>

        <filter class="ch.qos.logback.classic.filter.ThresholdFilter">

            <level>INFOlevel>
        filter>
    appender>


    <appender name="WARN" class="ch.qos.logback.core.rolling.RollingFileAppender">


        <append>trueappend>

        <prudent>falseprudent>


        <filter class="ch.qos.logback.classic.filter.LevelFilter">

            <level>WARNlevel>

            <onMatch>ACCEPTonMatch>

            <onMismatch>DENYonMismatch>
        filter>

        <rollingPolicy class="ch.qos.logback.core.rolling.SizeAndTimeBasedRollingPolicy">

            <fileNamePattern>

                <fileNamePattern>${log.homeDir}/warn/%d{yyyy-MM-dd}/${log.proName}-%i.logfileNamePattern>
            fileNamePattern>

            <maxHistory>${log.maxHistory}maxHistory>

            <MaxFileSize>${log.maxSize}MaxFileSize>
        rollingPolicy>
        <encoder>
            <pattern>

                ${FILE_LOG_PATTERN}
            pattern>
        encoder>
    appender>


    <appender name="ERROR" class="ch.qos.logback.core.rolling.RollingFileAppender">
        <filter class="ch.qos.logback.classic.filter.LevelFilter">
            <level>ERRORlevel>
            <onMatch>ACCEPTonMatch>
            <onMismatch>DENYonMismatch>
        filter>
        <rollingPolicy class="ch.qos.logback.core.rolling.SizeAndTimeBasedRollingPolicy">
            <fileNamePattern>${log.homeDir}/error/%d{yyyy-MM-dd}/${log.proName}-%i.logfileNamePattern>
            <maxHistory>${log.maxHistory}maxHistory>

            <MaxFileSize>${log.maxSize}MaxFileSize>
        rollingPolicy>
        <encoder>
            <pattern>${FILE_LOG_PATTERN}pattern>
        encoder>
    appender>


    <appender name="INFO" class="ch.qos.logback.core.rolling.RollingFileAppender">
        <filter class="ch.qos.logback.classic.filter.LevelFilter">
            <level>INFOlevel>
            <onMatch>ACCEPTonMatch>
            <onMismatch>DENYonMismatch>
        filter>
        <rollingPolicy class="ch.qos.logback.core.rolling.SizeAndTimeBasedRollingPolicy">
            <fileNamePattern>${log.homeDir}/info/%d{yyyy-MM-dd}/${log.proName}-%i.logfileNamePattern>
            <maxHistory>${log.maxHistory}maxHistory>
            <MaxFileSize>${log.maxSize}MaxFileSize>
        rollingPolicy>
        <encoder>
            <pattern>${FILE_LOG_PATTERN}pattern>
        encoder>
    appender>


    <appender name="DEBUG" class="ch.qos.logback.core.rolling.RollingFileAppender">
        <filter class="ch.qos.logback.classic.filter.LevelFilter">
            <level>DEBUGlevel>
            <onMatch>ACCEPTonMatch>
            <onMismatch>DENYonMismatch>
        filter>
        <rollingPolicy class="ch.qos.logback.core.rolling.SizeAndTimeBasedRollingPolicy">
            <fileNamePattern>${log.homeDir}/debug/%d{yyyy-MM-dd}/${log.proName}-%i.logfileNamePattern>
            <maxHistory>${log.maxHistory}maxHistory>
            <MaxFileSize>${log.maxSize}MaxFileSize>
        rollingPolicy>
        <encoder>
            <pattern>${FILE_LOG_PATTERN}pattern>
        encoder>
    appender>


    <appender name="TRACE" class="ch.qos.logback.core.rolling.RollingFileAppender">
        <filter class="ch.qos.logback.classic.filter.LevelFilter">
            <level>TRACElevel>
            <onMatch>ACCEPTonMatch>
            <onMismatch>DENYonMismatch>
        filter>
        <rollingPolicy class="ch.qos.logback.core.rolling.SizeAndTimeBasedRollingPolicy">
            <fileNamePattern>${log.homeDir}/trace/%d{yyyy-MM-dd}/${log.proName}-%i.logfileNamePattern>
            <maxHistory>${log.maxHistory}maxHistory>
            <MaxFileSize>${log.maxSize}MaxFileSize>
        rollingPolicy>
        <encoder>
            <pattern>${FILE_LOG_PATTERN}pattern>
        encoder>
    appender>


    <appender name="APP" class="ch.qos.logback.core.rolling.RollingFileAppender">
        <rollingPolicy class="ch.qos.logback.core.rolling.SizeAndTimeBasedRollingPolicy">
            <fileNamePattern>${log.homeDir}/app/%d{yyyy-MM-dd}/${log.proName}-%i.logfileNamePattern>
            <maxHistory>${log.maxHistory}maxHistory>
            <MaxFileSize>${log.maxSize}MaxFileSize>
        rollingPolicy>
        <encoder>
            <pattern>${FILE_LOG_PATTERN}pattern>
        encoder>
    appender>


    <appender name="MyBatis" class="ch.qos.logback.core.ConsoleAppender">

        <filter class="ch.qos.logback.classic.filter.LevelFilter">
            <level>DEBUGlevel>
            <onMatch>ACCEPTonMatch>
            <onMismatch>DENYonMismatch>
        filter>

        <encoder>

            <pattern>${CONSOLE_LOG_PATTERN}pattern>

            <charset>UTF-8charset>
        encoder>
    appender>


    <logger name="compass.token.pocket.com.mapper" level="DEBUG">
        <appender-ref ref="MyBatis"/>
    logger>


    <logger name="org.springframework.web" additivity="false" level="INFO">
        <appender-ref ref="INFO"/>
    logger>


    <springProfile name="dev">

        <root level="INFO">
            <appender-ref ref="CONSOLE"/>

            <appender-ref ref="ERROR"/>
            <appender-ref ref="INFO"/>
            <appender-ref ref="WARN"/>
            <appender-ref ref="DEBUG"/>
            <appender-ref ref="TRACE"/>
            <appender-ref ref="APP"/>
        root>
    springProfile>


    <springProfile name="mg">
        <root level="INFO">

            <appender-ref ref="ERROR"/>
            <appender-ref ref="INFO"/>
            <appender-ref ref="WARN"/>
            <appender-ref ref="DEBUG"/>
            <appender-ref ref="APP"/>
        root>
    springProfile>


    <springProfile name="bd">
        <root level="INFO">

            <appender-ref ref="ERROR"/>
            <appender-ref ref="INFO"/>
            <appender-ref ref="WARN"/>
            <appender-ref ref="DEBUG"/>
            <appender-ref ref="APP"/>
        root>
    springProfile>
configuration>
然后项目启动后如果是dev会在项目路径下生成这样一个结构的文件,可以在 logback-spring.xml 中配置想要的日志级别
8 springboot文档配置
有时候我们需要写文档,作为后端你写完接口,在前后端分离的时候,你要写文档,给前端人员去看,他才明白需要传递那些参数,怎么传递,传统的方式是写world文档,我们后端人员写文档也是非常耗时的,有没有什么办法在写代码的时候就把文档写了呢?当然是有的,这里为大家推荐2框文档集成工具,swagger和smartdoc,两个各有好处。
8.1 swagger集成
knife4j是swagger的增强,这个感觉比swagger好使一些
1.在pom中引入
       <dependency>
            <groupId>com.github.xiaoymingroupId>
            <artifactId>knife4j-spring-boot-starterartifactId>
            <version>2.0.8version>
        dependency>
2.在config包下新建配置
import org.springframework.context.annotation.Bean;
import org.springframework.context.annotation.Configuration;
import springfox.documentation.builders.ApiInfoBuilder;
import springfox.documentation.builders.ParameterBuilder;
import springfox.documentation.builders.PathSelectors;
import springfox.documentation.builders.RequestHandlerSelectors;
import springfox.documentation.schema.ModelRef;
import springfox.documentation.service.ApiInfo;
import springfox.documentation.service.Contact;
import springfox.documentation.service.Parameter;
import springfox.documentation.spi.DocumentationType;
import springfox.documentation.spring.web.plugins.Docket;
import springfox.documentation.swagger2.annotations.EnableSwagger2WebMvc;

import java.util.ArrayList;
import java.util.List;

// http://localhost:8888/doc.html
//swagger2配置类
@Configuration
@EnableSwagger2WebMvc
public class Knife4jConfig {

    @Bean
    public Docket adminApiConfig(){
        List<Parameter> pars = new ArrayList<>();
        ParameterBuilder tokenPar = new ParameterBuilder();
        tokenPar.name("token")
                .description("用户令牌")
                .defaultValue("")
                .modelRef(new ModelRef("string"))
                .parameterType("header")
                .required(false)
                .build();
        pars.add(tokenPar.build());
        //添加head参数end

        Docket adminApi = new Docket(DocumentationType.SWAGGER_2)
                .groupName("adminApi")
                .apiInfo(adminApiInfo())
                .select()
                //只显示admin路径下的页面
                .apis(RequestHandlerSelectors.basePackage("com.springboot.example.controller"))
                .paths(PathSelectors.regex("/example/.*"))
                .build()
                .globalOperationParameters(pars);
        return adminApi;
    }

    private ApiInfo adminApiInfo(){

        return new ApiInfoBuilder()
                .title("com-springboot-example系统-API文档")
                .description("本文档描述了后台管理系统微服务接口定义")
                .version("1.0")
                .contact(new Contact("compass", "http://compass.cq.com", "[email protected]"))
                .build();
    }

}
3.WebAppConfig中放行对应的请求路径
@Configuration // 标识这是配置类
@EnableAspectJAutoProxy(exposeProxy = true)  //开启Aspect生成代理对象
@EnableConfigurationProperties(InvokeConfigBean.class) // 导入 InvokeConfigBean
public class WebAppConfig extends WebMvcConfigurationSupport {


    @Override
    public void addResourceHandlers(ResourceHandlerRegistry registry) {
        registry.addResourceHandler("/**").addResourceLocations("classpath:/static/");
        registry.addResourceHandler("doc.html").addResourceLocations("classpath:/META-INF/resources/");
        registry.addResourceHandler("/webjars/**").addResourceLocations("classpath:/META-INF/resources/webjars/");
        registry.addResourceHandler("swagger-ui.html").addResourceLocations("classpath:/META-INF/resources/");
    }

}
4.我们就以email发送controller为例
controller代码:
import com.springboot.example.bean.MailVo;
import com.springboot.example.bean.ResponseResult;
import com.springboot.example.service.EmailService;
import io.swagger.annotations.Api;
import io.swagger.annotations.ApiOperation;
import io.swagger.annotations.ApiParam;
import lombok.extern.slf4j.Slf4j;
import org.springframework.beans.factory.annotation.Autowired;
import org.springframework.stereotype.Controller;
import org.springframework.web.bind.annotation.*;
import org.springframework.web.multipart.MultipartFile;

import javax.annotation.Resource;

/**
 * @author compass
 * @date 2022-11-02
 * @since 1.0
 **/
@Api(tags = "邮件发送")
@Slf4j
@Controller
@RequestMapping(value = "/example/email")
public class EmailController {

    @Resource
    private EmailService emailService;

    @ApiOperation("去到邮件发送页面")
    @GetMapping("/toEmailIndex")
    public String toEmailIndex(){
        return "/email/index";
    }

    @ApiOperation("邮件发送接口")
    @ResponseBody
    @PostMapping("/sendEmail")
    public ResponseResult sendMail( MailVo mailVo,@ApiParam("附件") @RequestPart("files") MultipartFile[] files) {
        mailVo.setMultipartFiles(files);
        return emailService.sendMail(mailVo);
    }
}
MailVo:
/**
 * @author compass
 * @date 2022-11-02
 * @since 1.0
 **/
@Data
public class MailVo implements ValueObject {
    private static final long serialVersionUID = -4171680130370849839L;
    @ApiModelProperty(value = "邮件id")
    private String id;
    @ApiModelProperty(value = "发件人账号")
    private String from;
    @ApiModelProperty(value = "收件人账号 ")
    private String to;
    @ApiModelProperty(value = "发送的主题 ")
    private String subject;
    @ApiModelProperty(value = "发送的内容 ")
    private String text;
    @ApiModelProperty(value = "发送时间 ")
    private Date sentDate;
    @ApiModelProperty(value = "需要抄送的人")
    private String cc;
    @ApiModelProperty(value = "需要密送的人")
    private String bcc;
    @JsonIgnore
    @ApiModelProperty(hidden = true) // 表示被忽略的字段
    private MultipartFile[] multipartFiles;
}
最后访问 http://localhost:8888/doc.html 即可
最后就可以得到一个可以访问的api地址,可以查看接口信息,可以直接进行调试,避免了花大部分时间和前端进行沟通,和自己写文档的时间
8.2 springboot集成smartdoc
smartdoc是基于maven插件的一个文档继承,他只需要你写好规范的注释就可以生成文档,而且文档可以是多种类型的文件,比起swagger他要简介的多。这也是我比较喜欢的一个插件
官网地址: https://smart-doc-group.github.io/#/zh-cn/
1.首先在pom中配置 plugins中配置一个 plugin
   <plugin>
                <groupId>com.github.shalousungroupId>
                <artifactId>smart-doc-maven-pluginartifactId>
                <version>2.4.4version>
                <configuration>

                    <configFile>./src/main/resources/smart-doc.jsonconfigFile>

                    <projectName>SpringbootExampleprojectName>

                    <excludes>


                    excludes>


                    <includes>


                    includes>
                configuration>
                <executions>
                    <execution>

                        <phase>compilephase>
                        <goals>

                            <goal>markdowngoal>
                        goals>
                    execution>
                executions>
            plugin>
2.在resources目录下新建这样一个配置文件 smart-doc.json
{
  "serverUrl": "http://127.0.0.1:888",
  "outPath": "src/main/resources/static/doc",
  "isStrict": false,
  "allInOne": true,
  "createDebugPage": true,
  "packageFilters": "com.springboot.example.controller.FileController.*",
  "style": "xt256",
  "projectName": "SpringbootExample",
  "showAuthor": true,
  "allInOneDocFileName": "SpringbootExample.md",
  "revisionLogs": [
    {
      "version": "version-0.1",
      "revisionTime": "2022/11/07 16:30",
      "status": "修正",
      "author": "compass",
      "remarks": "初始化SpringbootExample文档信息"
    }
  ],
  "requestHeaders": [
    {
      "name": "token",
      "value": "qwJ0eXAiOiJKV1QiTN5dEHSz6Irkx",
      "type": "string",
      "desc": "认证令牌",
      "required": true,
      "since": "-",
      "pathPatterns": "",
      "excludePathPatterns": ""
    }
  ]
}
做完以上配置,我们只需要在项目中的 FileController 中写好注释,按照规范些,就能一键生成文档,当然了不是说只可以指定某个controller类,你也可以完全指定某个包下面的controller
接下来,我们就贴出规范的注释代码,然后进行生成测试,大家可以参照官网进行详细设置: https://smart-doc-group.github.io/#/zh-cn/
FileController 方法体我就省略了,只要注释按照规范就可以生成,如果不规范,生成处理的文档会乱掉,这也养成了我们写代码的一个规范性
package com.springboot.example.controller;


/**
 * 文件上传下载
 *
 * @author compass
 * @date 2022-11-01
 * @since 1.0
 **/
@Slf4j
@Controller
@RequestMapping(value = "/example/fileTest")
public class FileController {

    /**
     * 上传文件到服务器
     * @param file 需要上传的的文件
     * @return com.springboot.example.bean.ResponseResult
     * @author compas
     * @date 2022/11/6 12:38
     * @since 1.0.0
     **/
    @ResponseBody
    @PostMapping("/fileUpload")
    public ResponseResult<String> fileUpload(@RequestPart("file") MultipartFile file, HttpServletRequest request) {
        /*...*/

    }

    /**
     * 根据文件名到上传的目录中将文件下载下来
     * @param fileName 文件名
     * @return void
     * @author comapss
     * @date 2022/11/1 22:34
     * @since 1.0.0
     **/
    @GetMapping("/fileDownload")
    public void fileDownload(@RequestParam("fileName") String fileName, HttpServletResponse response) {
        /*...*/
    }


}
ResponseResult实体:返回JSON格式的字段,一定要使用文档注释的方式进行注释说明,不然,不能正确的生成对应的描述信息
/**
 * 封装响应结果
 *
 * @author compass
 * @date 2022-11-01
 * @since 1.0
 **/
@Data
public class ResponseResult<T> implements ValueObject {
    private static final long serialVersionUID = 5337617615451873318L;
    /**
     * code 200 表示业务处理成功,-200表示业务处理失败
     *
     * @since 1.0
     **/
    private String code;
    /**
     * 存放业务提示信息
     *
     * @since 1.0
     **/
    private String message;
    /**
     * subCode 10000 表示10000请求成功 -10000表示请求处理失败
     *
     * @since 1.0
     **/

    private String subCode;
    /**
     * 存放系统异常消息
     *
     * @since 1.0
     **/
    private String subMessage;
    /**
     * 存放系统异常具体错误详情
     *
     * @since 1.0
     **/
    private String errorDetails;
    /**
     * 响应时间
     *
     * @since 1.0
     **/
    private String responseTime;
    /**
     * 出错的服务mac地址
     *
     * @since 1.0
     **/
    private String mac;
    /**
     * 预留处理字段
     *
     * @since 1.0
     **/
    private Object option;
    /**
     * 响应数据
     *
     * @since 1.0
     **/
    private T data;


}
集成调试:集成调试的方式有很多种具体请参照官网,我这里使用的是 导出postman.json文件的方式到apipost进行测试
集成的方式有三种:smart-doc调试页面,Postman导入调试,swagger UI集成,所以说,我更倾向于smartdoc这个文档生成的方式,他生成的方式多种,灵活,而且在你写代码规范的同时,就把文档给写了,非常方便。
构建完毕后,导入到apipost或者postman中就可以,非常的方便
至此springboot相关的开发就介绍到这里,希望能帮助到大家,如果觉得还不错,请一键三连,并且分享给身边的朋友吧,这个可能后续会持续维护这个文章,把常用的一些场景整合进来。
