编译原理lab3-cminus_compiler-2022-fall
LAB3实验
0. 前言
本次实验作为Lab4的前驱实验,独立于Lab1、Lab2。
本次实验的目的是让大家熟悉Lab4所需要的相关知识: LLVM IR、 LightIR(LLVM IR的轻量级C++接口)和 Visitor Pattern(访问者模式)。
在开始实验之前,如果你使用的不是助教提供的虚拟机镜像,请根据之前的环境准备确保LLVM的版本为10.0.1,且PATH环境变量配置正确。可以通过lli --version命令是否可以输出10.0.1的版本信息来验证。
主要工作
-
第一部分: 了解LLVM IR。通过clang生成的.ll,了解LLVM IR与c代码的对应关系。完成1.3
-
第二部分: 了解LightIR。通过助教提供的c++例子,了解LightIR的c++接口及实现。完成2.3
-
第三部分: 理解Visitor Pattern。
-
实验报告:在report.md中回答3个问题。
1. LLVM IR部分
1.1 LLVM IR介绍
根据维基百科的介绍,LLVM是一个自由软件项目,它是一种编译器基础设施,以C++写成,包含一系列模块化的编译器组件和工具链,用来开发编译器前端和后端。IR的全称是Intermediate Representation,即中间表示。LLVM IR是一种类似于汇编的底层语言。
LLVM IR的具体指令可以参考Reference Manual。但是你会发现其内容庞杂。虽然助教认为,高效地查阅官方文档及手册是非常必要的一项技能,但是由于其手册过于复杂,因此助教筛选了后续实验中将要用到的子集,总结为了精简的IR Reference手册。
作为一开始的参考,你可以先阅读其中IR Features和IR Format两节,后续有需要再反复参考。实验的最后,你需要在report.md中回答问题3。
1.2 gcd例子: 利用clang生成的.ll
阅读tests/lab3/ta_gcd/gcd_array.c。
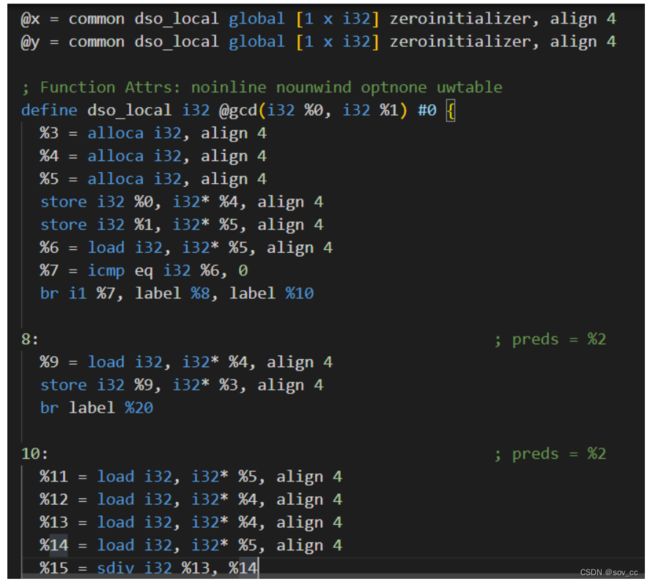
根据clang -S -emit-llvm gcd_array.c指令,你可以得到对应的gcd_array.ll文件.你需要结合gcd_array.c阅读gcd_array.ll,理解其中每条LLVM IR指令与c代码的对应情况。
通过lli gcd_array.ll; echo $?指令,你可以测试gcd_array.ll执行结果的正确性。其中,
lli会运行*.ll文件$?的内容是上一条命令所返回的结果,而echo $?可以将其输出到终端中
后续你会经常用到这两条指令。
1.3 你的提交1: 手动编写.ll
助教提供了四个简单的c程序,分别是tests/lab3/c_cases/目录下的assign.c、fun.c、if.c和while.c.你需要在tests/lab3/stu_ll/目录中,手工完成自己的assign_hand.ll、fun_hand.ll、if_handf.ll和while_hand.ll,以实现与上述四个C程序相同的逻辑功能.你需要添加必要的注释..ll文件的注释是以";"开头的。
必要的情况下,你可以参考clang -S -emit-llvm的输出,但是你提交的结果必须避免同此输出一字不差。
助教会用lli检查你结果的正确性,并用肉眼检查你的注释。
2. LightIR部分
2.1 LightIR - LLVM IR的C++接口
由于LLVM IR官方的C++接口的文档同样过于冗长,助教提供了LightIR这一C++接口库。你需要阅读LightIR核心类的介绍。
lab4部分会要求大家通过LightIR根据AST构建生成LLVM IR。所以你需要仔细阅读文档了解其接口的设计。
2.2 gcd例子: 利用LightIR + cpp 生成.ll
为了让大家更直观地感受并学会LightIR接口的使用,助教提供了tests/lab3/ta_gcd/gcd_array_generator.cpp。该cpp程序会生成与gcd_array.c逻辑相同的LLVM IR文件。助教提供了非常详尽的注释,一定要好好利用!
该程序的编译与运行请参考4.2节。
2.3 你的提交2: 利用LightIR + cpp编写生成.ll的程序
你需要在tests/lab3/stu_cpp/目录中,编写assign_generator.cpp、fun_generator.cpp、if_generator.cpp和while_generator.cpp,以生成与1.3节的四个C程序相同逻辑功能的.ll文件。你需要添加必要的注释。你需要在report.md中回答问题1。
3. Lab4的准备
3.1 了解Visitor Pattern
Visitor Pattern(访问者模式)是一种在LLVM项目源码中被广泛使用的设计模式。在遍历某个数据结构(比如树)时,如果我们需要对每个节点做一些额外的特定操作,Visitor Pattern就是个不错的思路。
Visitor Pattern是为了解决稳定的数据结构和易变的操作耦合问题而产生的一种设计模式。解决方法就是在被访问的类里面加一个对外提供接待访问者的接口,其关键在于在数据基础类里面有一个方法接受访问者,将自身引用传入访问者。这里举一个应用实例来帮助理解访问者模式: 您在朋友家做客,您是访问者;朋友接受您的访问,您通过朋友的描述,然后对朋友的描述做出一个判断,这就是访问者模式。
有关 Visitor Pattern 的含义、模式和特点,有梯子的同学可参考维基百科。
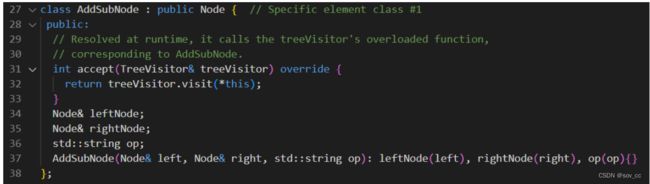
下面的例子可以清晰地展示Visitor Pattern的运作方式。这是助教编写的计算表达式 4 * 2 - 2 / 4 + 5 结果的C++程序。
其中较为重要的一点原则在于,C++中对函数重载特性的支持。在代码treeVisitor.visit(node)中,根据node对象具体类型的不同,编译器会在visit(AddSubNode& node)、visit(NumberNode& node)、visit(MulDivNode& node)三者中,选择对应的实现进行调用。你需要理解下面这个例子中tree是如何被遍历的。请在report.md中回答问题2。
该文件的执行结果如下:
$ g++ visitor.cpp -std=c++14; ./a.out
4 * 2 - 2 / 4 + 5 evaluates: 13
4. 实验要求
4.1 目录结构
除了下面指明你所要修改或提交的文件,其他文件请勿修改。
.
├── CMakeLists.txt
├── Documentations
│   ├── ...
|   ├── common                          <- LightIR 相关文档
│   └── lab3
│       └── README.md                   <- lab3实验文档说明(你在这里)
├── include                             <- 实验所需的头文件
│   ├── ...
│   ├── lightir
├── README.md
├── Reports
│   ├── ...
│   └── lab3
│       └── report.md                   <- lab3所需提交的实验报告,含3个问题(你要交)
├── src
│   ├── ...
│   └── lightir
└── tests
    ├── CMakeLists.txt
    ├── ...
    └── lab3                            <- lab3文件夹
        ├── c_cases                     <- 4个c程序
        │   ├── assign.c
        │   ├── fun.c
        │   ├── if.c
        │   └── while.c
        ├── CMakeLists.txt              <- 你在2.3节需要去掉注释(我们不收,你要改)
        ├── stu_cpp                     <- lab3所需提交的cpp目录(你要交)
        │   ├── assign_generator.cpp
        │   ├── fun_generator.cpp
        │   ├── if_generator.cpp
        │   └── while_generator.cpp
        ├── stu_ll                      <- lab3所需提交的.ll目录(你要交)
        │   ├── assign_hand.ll
        │   ├── fun_hand.ll
        │   ├── if_hand.ll
        │   └── while_hand.ll
        └── ta_gcd
            ├── gcd_array.c
            └── gcd_array_generator.cpp <- 助教提供的生成gcd_array.ll的cpp
4.2 编译、运行和验证
-
编译与运行 在
${WORKSPACE}/build/下执行:
# 如果存在 CMakeCache.txt 要先删除
# rm CMakeCache.txt
cmake ..
make
make install
你可以得到对应
gcd_array_generator.cpp的可执行文件。
在完成2.3时,在
${WORKSPACE}/tests/lab3/CMakeLists.txt中去掉对应的注释,再在
${WORKSPACE}/build/下执行
cmake ..与
make指令,即可得到对应的可执行文件。
-
验证
本次试验测试案例只有${WORKSPACE}/tests/lab3/c_cases中的4个样例。请大家自行验证。
助教会执行你们的代码,并使用diff命令进行验证。
实验报告
实验设计
准备与测试工作
1、用lli --version检查LLVM的版本

是10.0.0,与10.0.1有差别,但是问题不大
2、利用clang -S -emit-llvm gcd_array.c和lli gcd_array.ll; echo $?
gcc -o gcd_array gcd_array.c和./gcd_array;echo $?
根据精简的IR Reference手册(Documentations/common/LightIR.md · coral2291/cminus_compiler-2022-fall - Gitee.com)学习后,对照查看.c文件和.ll文件
![]()

.ll文件跑出来的结果:

.c文件跑出来的结果:
![]()
可以看到,输出结果均为18。因此,可以验证 gcd_array.ll 文件正确地对应了 gcd_array.c 文件。
3、回到主目录中的build文件夹,使用如下命令
// 如果存在 CMakeCache.txt 要先删除
// rm CMakeCache.txt
cmake ..
make
make install


可以得到对应gcd_array_generator.cpp的可执行文件,再使用./gcd_array_generator,输出的便是gcd_array_generator.ll
后续为了方便可以用./gcd_array_generator >gcd_array_generator.ll

提交一:手动编写.ll
assign(20)
查看assign.c文件
int main(){
  int a[10];
  a[0] = 10;
  a[1] = a[0] * 2;
  return a[1];
}
对应写出assign_hand.ll文件

结果验证

fun(220)
查看fun.c文件
int callee(int a){
  return 2 * a;
}
int main(){
  return callee(110);
}
对应写出fun_hand.ll文件

结果验证

if(233)
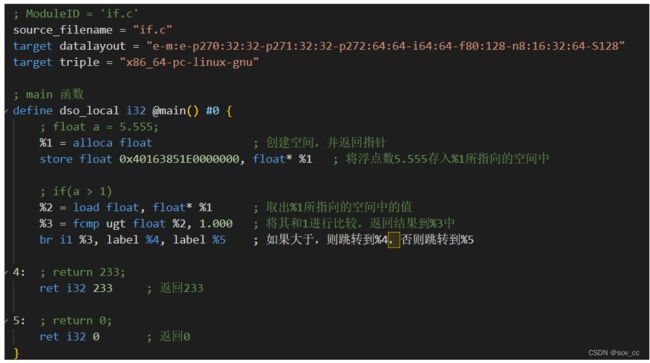
查看if.c文件
int main(){
  float a = 5.555;
  if(a > 1)
    return 233;
  return 0;
}
写出对应if_hand.ll文件
结果验证

while(65)
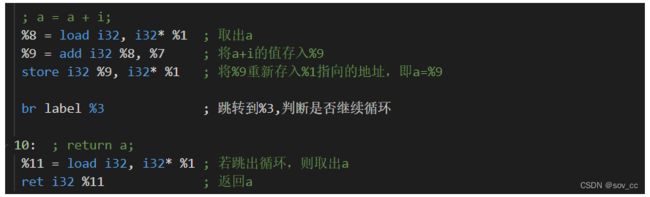
查看while.c文件
int main(){
  int a;
  int i;
  a = 10;
  i = 0;
  while(i < 10){
    i = i + 1;
    a = a + i;
  }
  return a;
}
写出对应的while_hand.ll文件

结果验证

提交二:利用LightIR + cpp编写生成.ll的程序
根据gcd_array的例子来写。注意后续测试的时候需要在${WORKSPACE}/tests/lab3/CMakeLists.txt中去掉对应的注释,再在${WORKSPACE}/build/下执行cmake ..与make指令,即可得到对应的可执行文件。
assign
编写cpp文件
#include "BasicBlock.h"
#include "Constant.h"
#include "Function.h"
#include "IRBuilder.h"
#include "Module.h"
#include "Type.h"

#include
#include

#ifdef DEBUG                                             // 用于调试信息,大家可以在编译过程中通过" -DDEBUG"来开启这一选项
#define DEBUG_OUTPUT std::cout << __LINE__ << std::endl; // 输出行号的简单示例
#else
#define DEBUG_OUTPUT
#endif

#define CONST_INT(num) \
    ConstantInt::get(num, module)

#define CONST_FP(num) \
    ConstantFP::get(num, module) // 得到常数值的表示,方便后面多次用到

int main()
{
    auto module = new Module("Cminus code");       // module name是什么无关紧要
    auto builder = new IRBuilder(nullptr, module); // 创建IRBuilder
    Type *Int32Type = Type::get_int32_type(module);

    // main函数
    auto mainFun = Function::create(FunctionType::get(Int32Type, {}), /* 创建 main 函数 */
                                    "main", module);
    auto bb = BasicBlock::create(module, "entry", mainFun); /* 创建基本块 */
    // BasicBlock的名字在生成中无所谓,但是可以方便阅读
    builder->set_insert_point(bb); /* 将基本块加入到builder中 */

    auto retAlloca = builder->create_alloca(Int32Type); /* 创建返回默认量 */
    builder->create_store(CONST_INT(0), retAlloca);     /* 给默认量赋0,表示默认ret 0 */

    auto *arrayType = ArrayType::get(Int32Type, 10); /* 申请10个int的内存空间,将地址指针存入arrayType中 */

    auto aAlloca = builder->create_alloca(arrayType); /* 创建aAlloca数组,即a[10] */

    auto a0 = builder->create_gep(aAlloca, {CONST_INT(0), CONST_INT(0)}); /* 用变量a0存指向a[0]的指针 */
    builder->create_store(CONST_INT(10), a0);                             /* 将10存入a[0] */

    auto tmp = builder->create_load(a0);                                  /* 取出a[0]的值存入变量tmp */
    auto mul = builder->create_imul(tmp, CONST_INT(2));                   /* 将值乘以2存入变量mul中 */
    auto a1 = builder->create_gep(aAlloca, {CONST_INT(0), CONST_INT(1)}); /* 用变量a1存指向a[1]的指针 */
    builder->create_store(mul, a1);                                       /* 将结果mul存入a[1]中 */

    auto res = builder->create_load(a1); /* 取出a[1]中的值作为返回结果,存到变量res中 */
    builder->create_ret(res);            /* 创建返回,将res返回 */

    std::cout << module->print();
    delete module;

    return 0;
}
通过命令./stu_assign_generator >assign.ll得到assign.ll
再通过lli assign.ll; echo $?进行验证,结果显示正确
![]()
fun(220)
编写cpp文件
#include "BasicBlock.h"
#include "Constant.h"
#include "Function.h"
#include "IRBuilder.h"
#include "Module.h"
#include "Type.h"

#include
#include

#ifdef DEBUG                                             // 用于调试信息,大家可以在编译过程中通过" -DDEBUG"来开启这一选项
#define DEBUG_OUTPUT std::cout << __LINE__ << std::endl; // 输出行号的简单示例
#else
#define DEBUG_OUTPUT
#endif

#define CONST_INT(num) \
    ConstantInt::get(num, module)

#define CONST_FP(num) \
    ConstantFP::get(num, module) // 得到常数值的表示,方便后面多次用到

int main()
{
    auto module = new Module("Cminus code");       // module name是什么无关紧要
    auto builder = new IRBuilder(nullptr, module); // 创建IRBuilder
    Type *Int32Type = Type::get_int32_type(module);

    // callee函数,创建函数
    std::vector Ints(1, Int32Type);                /* 函数参数类型的vector,内含1个int类型 */
    auto calleeFunTy = FunctionType::get(Int32Type, Ints); /* 通过返回值类型与参数类型列表得到函数类型 */
    auto calleeFun = Function::create(calleeFunTy,         /* 由函数类型得到函数 */
                                      "callee", module);
    auto bb = BasicBlock::create(module, "fun", calleeFun); /* 创建基本块,命名为fun */
    builder->set_insert_point(bb);                          /* 将基本块插入builder中 */
    // 传参
    auto aAlloca = builder->create_alloca(Int32Type); /* 在内存中分配参数a的位置 */
    std::vector args;                        /* 获取callee函数的形参,通过Function中的iterator */
    for (auto arg = calleeFun->arg_begin(); arg != calleeFun->arg_end(); arg++)
    {
        args.push_back(*arg); // * 号运算符是从迭代器中取出迭代器当前指向的元素
    }
    builder->create_store(args[0], aAlloca); /* 存储参数a */
    // 具体执行
    auto aLoad = builder->create_load(aAlloca);           /* 将参数a存到变量aLoad中 */
    auto res = builder->create_imul(aLoad, CONST_INT(2)); /* 将值乘以2存入变量res中 */
    builder->create_ret(res);                             /* 创建返回,将res返回 */

    // main函数
    auto mainFun = Function::create(FunctionType::get(Int32Type, {}), /* 创建 main 函数 */
                                    "main", module);
    bb = BasicBlock::create(module, "main", mainFun); /* 创建基本块,命名为main */
    builder->set_insert_point(bb);                    /* 将基本块加入到builder中 */
    // 设置默认返回
    auto retAlloca = builder->create_alloca(Int32Type); /* 创建返回默认量 */
    builder->create_store(CONST_INT(0), retAlloca);     /* 给默认量赋0,表示默认ret 0 */
    // 具体执行
    auto call = builder->create_call(calleeFun, {CONST_INT(110)}); /* 调用函数calleeFun,将结果存到变量call中 */
    builder->create_ret(call);                                     /* 返回结果值 */

    std::cout << module->print();
    delete module;

    return 0;
}
通过命令./stu_fun_generator >fun.ll得到fun.ll

再通过lli fun.ll; echo $?进行验证,结果显示正确
![]()
if
编写cpp文件
#include "BasicBlock.h"
#include "Constant.h"
#include "Function.h"
#include "IRBuilder.h"
#include "Module.h"
#include "Type.h"

#include
#include

#ifdef DEBUG  // 用于调试信息,大家可以在编译过程中通过" -DDEBUG"来开启这一选项
#define DEBUG_OUTPUT std::cout << __LINE__ << std::endl;  // 输出行号的简单示例
#else
#define DEBUG_OUTPUT
#endif

#define CONST_INT(num) \
 ConstantInt::get(num, module)

#define CONST_FP(num) \
 ConstantFP::get(num, module) // 得到常数值的表示,方便后面多次用到

int main() {
 auto module = new Module("Cminus code");            // module name是什么无关紧要
 auto builder = new IRBuilder(nullptr, module);      // 创建IRBuilder
 Type* Int32Type = Type::get_int32_type(module);

 // main函数
 auto mainFun = Function::create(FunctionType::get(Int32Type, {}),   /* 创建 main 函数 */
     "main", module);
 auto bb = BasicBlock::create(module, "main", mainFun);              /* 创建基本块,命名为main */
 builder->set_insert_point(bb);                              /* 将基本块加入到builder中 */
 // 设置默认返回
 auto retAlloca = builder->create_alloca(Int32Type);         /* 创建返回默认量 */
 builder->create_store(CONST_INT(0), retAlloca);             /* 给默认量赋0,表示默认ret 0 */
 // 具体执行
 Type* FloatType = Type::get_float_type(module);             /* 获取单个float类型的指针 */
 auto aAlloca = builder->create_alloca(FloatType);           /* 根据float类型的指针,申请一个float变量空间 */
 builder->create_store(CONST_FP(5.555), aAlloca);            /* 将值5.555存入该变量空间 */

 auto a = builder->create_load(aAlloca);                     /* 取出该变量空间内的值,即a的值 */
 auto fcmp = builder->create_fcmp_gt(a, CONST_FP(1.00));     /* 将其和1.00进行比较,返回结果存到fcmp中 */

 auto trueBB = BasicBlock::create(module, "trueBB", mainFun);/* 符合if条件的分支 */
 auto falseBB = BasicBlock::create(module, "falseBB", mainFun);  /* 不符合if条件的分支 */
 builder->create_cond_br(fcmp, trueBB, falseBB);             /* 根据fcmp创建跳转语句 */

 builder->set_insert_point(trueBB);      // if true; 分支的开始需要SetInsertPoint设置
 builder->create_ret(CONST_INT(233));    /* 创建返回,将值233返回 */

 builder->set_insert_point(falseBB);     // if false; 分支的开始需要SetInsertPoint设置
 builder->create_ret(CONST_INT(0));      /* 创建返回,将值0返回 */

 std::cout << module->print();
 delete module;

 return 0;
}
通过命令./stu_if_generator >if.ll得到if.ll

再通过lli if.ll; echo $?进行验证,结果显示正确
![]()
while
编写cpp文件
#include "BasicBlock.h"
#include "Constant.h"
#include "Function.h"
#include "IRBuilder.h"
#include "Module.h"
#include "Type.h"

#include
#include

#ifdef DEBUG  // 用于调试信息,大家可以在编译过程中通过" -DDEBUG"来开启这一选项
#define DEBUG_OUTPUT std::cout << __LINE__ << std::endl;  // 输出行号的简单示例
#else
#define DEBUG_OUTPUT
#endif

#define CONST_INT(num) \
 ConstantInt::get(num, module)

#define CONST_FP(num) \
 ConstantFP::get(num, module) // 得到常数值的表示,方便后面多次用到

int main() {
 auto module = new Module("Cminus code");            // module name是什么无关紧要
 auto builder = new IRBuilder(nullptr, module);      // 创建IRBuilder
 Type* Int32Type = Type::get_int32_type(module);

 // main函数
 auto mainFun = Function::create(FunctionType::get(Int32Type, {}),   /* 创建 main 函数 */
     "main", module);
 auto bb = BasicBlock::create(module, "main", mainFun);      /* 创建基本块,命名为main */
 builder->set_insert_point(bb);                              /* 将基本块加入到builder中 */
 // 设置默认返回
 auto retAlloca = builder->create_alloca(Int32Type);         /* 创建返回默认量 */
 builder->create_store(CONST_INT(0), retAlloca);             /* 给默认量赋0,表示默认ret 0 */
 // 创建基本块
 auto whileBB = BasicBlock::create(module, "whileBB", mainFun);  /* 进行while判断的基本块 */
 auto trueBB = BasicBlock::create(module, "trueBB", mainFun);    /* 符合判断条件的基本块分支 */
 auto falseBB = BasicBlock::create(module, "falseBB", mainFun);  /* 不符合判断条件的基本块分支 */
 // 具体执行
 auto aAlloca = builder->create_alloca(Int32Type);       /* 申请存a的空间,将地址赋值给指针aAlloca */
 auto iAlloca = builder->create_alloca(Int32Type);       /* 申请存i的空间,将地址赋值给指针iAlloca */
 builder->create_store(CONST_INT(10), aAlloca);          /* 将值10存入a的空间 */
 builder->create_store(CONST_INT(0), iAlloca);           /* 将值0存入i的空间 */
 builder->create_br(whileBB);                            /* 跳转到while循环条件判断,判断是否进入循环 */

 builder->set_insert_point(whileBB);                     /* while条件判断,设置SetInsertPoint */
 auto i = builder->create_load(iAlloca);                 /* 取出i */
 auto icmp = builder->create_icmp_lt(i, CONST_INT(10));  /* 判断i是否小于10,并将判断结果存到icmp中 */
 builder->create_cond_br(icmp, trueBB, falseBB);         /* 根据icmp创建跳转语句 */

 builder->set_insert_point(trueBB);                  // if true; 分支的开始需要SetInsertPoint设置
 i = builder->create_load(iAlloca);                  /* 取出i */
 auto tmp = builder->create_iadd(i, CONST_INT(1));   /* 将i加1,存到暂存变量tmp中,tmp=i+1 */
 builder->create_store(tmp, iAlloca);                /* 将tmp的值存到i中,i=tmp*/
 auto a = builder->create_load(aAlloca);             /* 取出a */
 i = builder->create_load(iAlloca);                  /* 取出i */
 tmp = builder->create_iadd(a, i);                   /* 将a加i的值存到tmp中,tmp=i+a */
 builder->create_store(tmp, aAlloca);                /* 将tmp存到a中,a=tmp */
 builder->create_br(whileBB);                        /* 跳转到while循环条件判断,判断是否继续循环 */

 builder->set_insert_point(falseBB);                 // if false; 分支的开始需要SetInsertPoint设置
 auto res = builder->create_load(aAlloca);           /* 取出a的值,存到res中,res=a */
 builder->create_ret(res);                           /* 将res返回,即return res */

 std::cout << module->print();
 delete module;

 return 0;
}
通过命令./stu_while_generator >while.ll得到while.ll

再通过lli while.ll; echo $?进行验证,结果显示正确
![]()
回答问题
问题1: cpp与.ll的对应
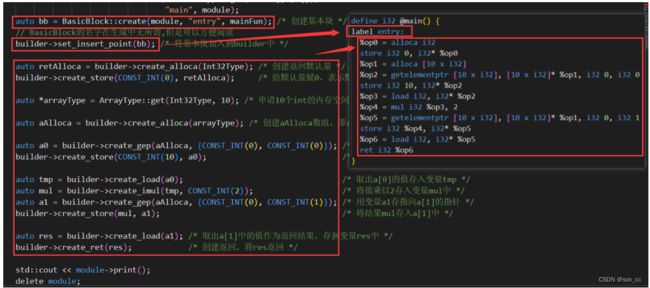
请描述你的cpp代码片段和.ll的每个BasicBlock的对应关系。描述中请附上两者代码。
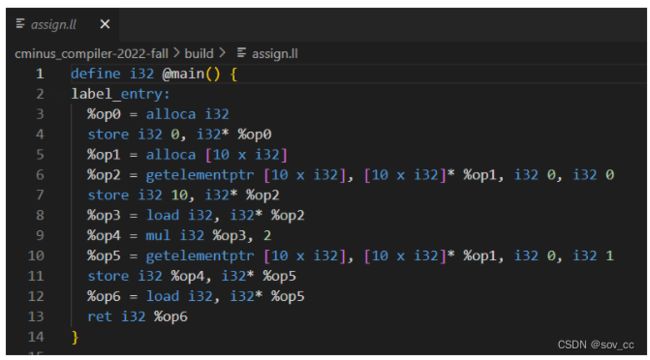
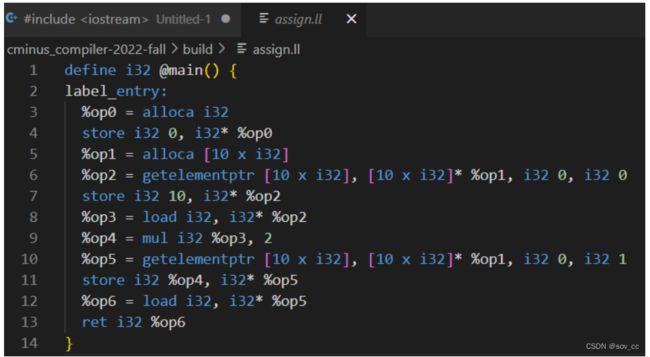
代码auto bb = BasicBlock::create(module, “entry”, mainFun);创建名为entry的基本块,并将其存到变量bb中(在打印输出时,名字实际为laebl_entry)
代码builder->set_insert_point(bb);用于进行SetInsertPoint设置,即将bb加入builder中。
而之后的代码,则是具体的基本块中的所需执行的语句。
以assign_generator.cpp和生成的assign.ll为例:
而在基本块之间的跳转时,用代码builder->create_br(whileBB);进行直接跳转到名为whileBB的基本块;
用代码builder->create_cond_br(icmp, trueBB, falseBB);进行按条件icmp跳转到trueBB基本块或是falseBB基本块。
样例(while)如下:

问题2: Visitor Pattern
请指出visitor.cpp中,treeVisitor.visit(exprRoot)执行时,以下几个Node的遍历序列:numberA、numberB、exprC、exprD、exprE、numberF、exprRoot。
序列请按如下格式指明:
exprRoot->numberF->exprE->numberA->exprD
对于加减结点,按照“左中右”的顺序为:左操作数(子结点),中间符号(当前结点),右操作数(子结点)。

对于数字结点,仅自身。

对于乘除结点,按照“左中右”的顺序为:左操作数(子结点),中间符号(当前结点),右操作数(子结点)。
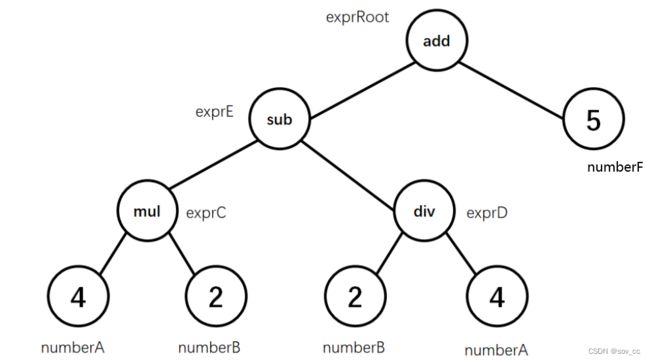
因此,结合 main 函数中的代码:

可以看出,其创建了这样一颗计算树:

通过查看 visit 代码,可以看出:
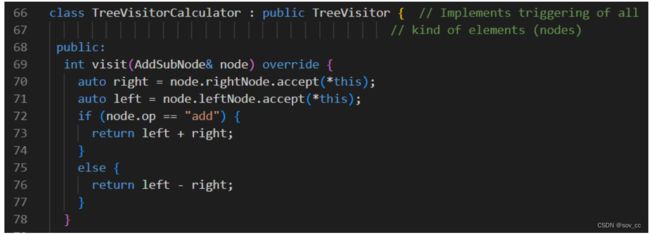
在表示加减操作的结点,其先访问右分支,再访问左分支。

对于数字结点,直接返回。

在表示乘除的结点,先访问左分支,再访问右分支。
遍历序列为:
exprRoot->numberF->exprE->exprD->numberB->numberA->exprC->numberA->exprB
问题3: getelementptr
请给出IR.md中提到的两种getelementptr用法的区别,并稍加解释:
%2 = getelementptr [10 x i32], [10 x i32]* %1, i32 0, i32 %0%2 = getelementptr i32, i32* %1 i32 %0
GetElementPtr指令用于获取聚合数据结构的子元素的地址。它仅执行地址计算,不访问内存。
是一条指针计算语句,本身并不进行任何数据的访问或修改,只进行指针的计算。
第一种方法:数组在C中会分割指针,但在LLVM IR中,它只能确定数组类型的大小然后强制转换为指针,但不会分割它们。%1是我们的基址,有两个索引0和%0。因为它是数组,但是我们是通过指针访问它,所以我们需要两个索引:第一个用于分割指针(因为用的指针是[10 x i32],但是我们返回的是一个i32的,所以需要分割),第二个用于索引数组本身(即偏移量)。该方法适用的数组为int nums[] = {1, 2, 3};或者int a[10],例如在assign.ll中定义数组a[10]后获取a[0],a[1]用的是这个方式。
第二种方法:%1做为我们的基址地址,%0做为我们的索引(偏移量),并把计算出来的地址给%2。该方法适用的数组为int *nums = {1, 2, 3};
实验难点
1、最开始仿照gcd_array.c编写gcd_array.ll的时候,感觉还是十分有迹可循的。等到编写.cpp文件的时候就明显感觉到比较困难,搜集了多方资料才写出来。
2、编写好.cpp文件后,需要make验证。这个时候千万不能忘记删掉原有的CMakeCache.txt,以及后续测试的时候在${WORKSPACE}/tests/lab3/CMakeLists.txt中去掉对应的注释。(感觉这点很容易忘掉)
3、在填写if_hand.ll文件时,有一句C语句是float a = 5.555;即要给浮点数a赋值为5.555,样例gcd_array.c并没有使用浮点数类型,所以就模仿整数赋值方式,得到了如下语句store float 5.555, float* %1。但是编译运行时报错了,后面查找资料后才知道不能这样写,因为5.555转化成二进制是无限循环的(只能近似表示),而编译器只接受精确的小数,所以需要换一种表示,即store float 0x40163851E0000000, float* %1。

实验反馈
1、因为是做完lab2之后连着做lab3,忽然又变成了全新的知识确实是有被难到T T
个人觉得最难的就是补充.cpp文件然后生成.ll再验证,这个部分耗了不少时间
2、还有就是需要回答的问题二和三也好难。回答问题2的时候最开始没找到visitor.cpp,后来才发现在网页

参考链接
https://blog.csdn.net/qq_45890970/article/details/123792234
https://blog.csdn.net/m0_51975364/article/details/123237696