macOS安装配置oh-my-zsh
最近升级了mac硬盘,因为原有系统有些混乱了,所以舍弃了time machine备份,重新设置整个系统,所以这里记录一下oh-my-zsh的安装和配置过程。
本文应和另外一篇一起食用。
1. 切换shell到zsh
chsh -s /bin/zsh
2. 安装oh-my-zsh
可以通过curl或者wget安装
2.1 curl安装
- github
sh -c "$(curl -fsSL https://raw.github.com/robbyrussell/oh-my-zsh/master/tools/install.sh)"
- gitee
sh -c "$(curl -fsSL https://gitee.com/mirrors/oh-my-zsh/raw/master/tools/install.sh)"
2.2 wget安装
sh -c "$(wget https://raw.github.com/robbyrussell/oh-my-zsh/master/tools/install.sh -O -)"
sh -c "$(wget -O- https://gitee.com/pocmon/mirrors/raw/master/tools/install.sh)"
3. 设置主题
编辑~/.zshrc,找到ZSH_THEME,修改为"agnoster"。
ZSH_THEME="agnoster"
4. 修改字体
Agnoster 主题提示符里的三角形,需要 Powerline 字体库的支持。
4.1 下载和设置Solarized配色方案
因为下面的字体需要在新的配色主题中更改,所以需要先安装Solarized配色方案。
git clone https://github.com/altercation/solarized
进入目录solarized/iterm2-colors-solarized,双击Solarized Dark.itermcolors和Solarized Light.itermcolors导入主题(可能会提示安全性问题,进入系统偏好设置-安全性与隐私-通用 里面确认安装);
4.1.1 iTerm2的设置:
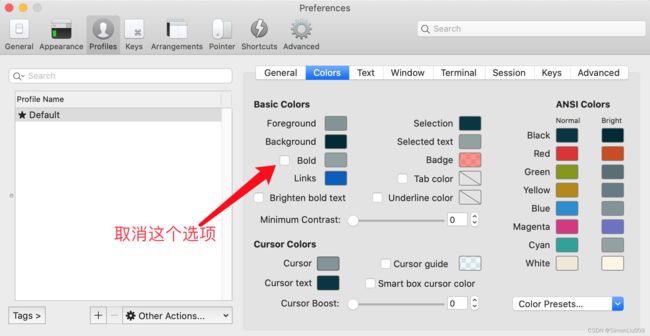
iTerm2设置->Profiles->Colors->Color Presets…,在下拉菜单中选择Solarized Dark
注意:
默认情况下,Solarized Dark显示目录的时候,会用Bold加粗显示,而非颜色显示。如果你需要目录显示颜色,那么就需要取消上图中的Bold选项。
4.1.2 macOS自带终端设置:
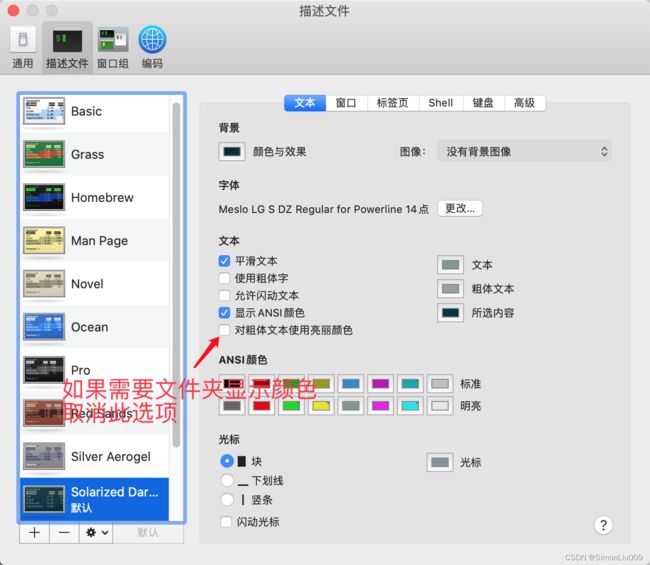
打开 终端 - 偏好设置 - 描述文件,双击 Solarized Dark xterm-256color ,并且点击右下方的“默认”,设置它为默认配色方案。
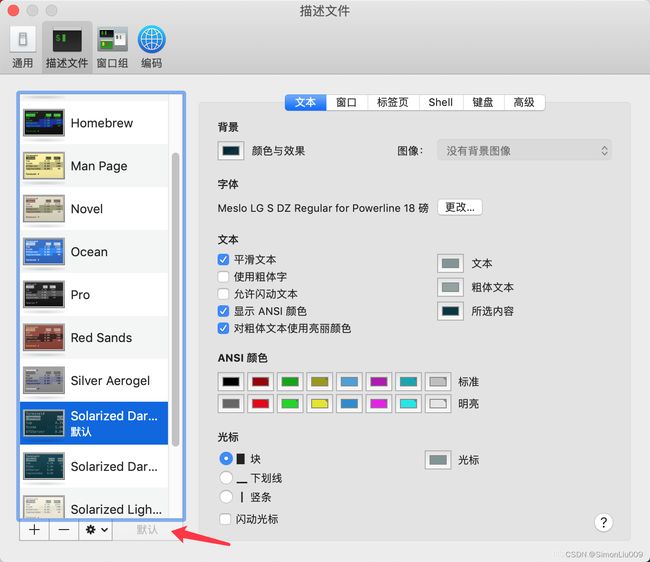
注意:我这里默认情况下字符背景不好看(上面的图是我修改过的),需要更改如下图中的两个颜色,点击它使用吸管工具,拾取iTerm2的相应位置颜色即可。

同样的,如果你需要ls的时候,文件夹显示颜色,那么需要取消对粗体文本使用高亮颜色的选项。
4.2 安装Powerline字体
- github
git clone https://github.com/powerline/fonts.git
cd fonts
./install.sh
- 我在gitee拉取的镜像
git clone https://gitee.com/simonliu009/powerlinefonts.git
cd fonts
./install.sh
4.3 修改终端字体
4.3.1 修改自带终端字体
Mac 终端
进入:终端 > 偏好设置 > 字体修改为 :Meslo LG S DZ Regular for Powerline
4.3.2 修改 iTerm2 字体
iTerm2
进入:iTerm2 > Profiles > Text > Font,修改字体为:Meslo LG S DZ Regular for Powerline
5. 安装和配置插件
5.1 zsh-autosuggestions插件
非常好用的一个插件,会记录你之前输入过的所有命令,并且自动匹配你可能想要输入命令,然后按→补全
- github安装
git clone https://github.com/zsh-users/zsh-autosuggestions ${ZSH_CUSTOM:-~/.oh-my-zsh/custom}/plugins/zsh-autosuggestions
- gitee安装
git clone https://gitee.com/bright_007_admin/zsh-autosuggestions.git ${ZSH_CUSTOM:-~/.oh-my-zsh/custom}/plugins/zsh-autosuggestions
如果感觉 → 补全不方便,还可以自定义补全的快捷键,比如逗号补全,只需要在 .zshrc 文件添加如下语句(** 但是不建议,因为我后来遇到一种情况,就是python脚本命令行需要输入list或者tuple作为参数,结果逗号死活打不出来,想了好久才想起来这个设置,虽然那天我用了不下几十次逗号补全…**):
# 不建议!
bindkey ',' autosuggest-accept
5.2 zsh-syntax-highlighting插件
这个插件直接在命令输入过程中会通过颜色提示你,当前命令是否正确,错误红色,正确绿色。
- github安装
git clone https://github.com/zsh-users/zsh-syntax-highlighting.git ${ZSH_CUSTOM:-~/.oh-my-zsh/custom}/plugins/zsh-syntax-highlighting
echo "source ${(q-)PWD}/zsh-syntax-highlighting/zsh-syntax-highlighting.zsh" >> ${ZDOTDIR:-$HOME}/.zshrc
- gitee安装
git clone https://gitee.com/bright_007_admin/zsh-syntax-highlighting ${ZSH_CUSTOM:-~/.oh-my-zsh/custom}/plugins/zsh-syntax-highlighting
echo "source ${(q-)PWD}/zsh-syntax-highlighting/zsh-syntax-highlighting.zsh" >> ${ZDOTDIR:-$HOME}/.zshrc
5.3 安装git-open插件
它提供一个 git-open 命令,在浏览器中打开当前所在 git 项目的远程仓库地址。
5.4 启用插件
在~/.zshrc中进行如下修改
plugins=(
    z
    git
    sudo
    extract
    thefuck
    gitignore
    last-working-dir
    zsh-autosuggestions
    zsh-syntax-highlighting
)
source $ZSH/oh-my-zsh.sh
source ~/.oh-my-zsh/custom/plugins/zsh-syntax-highlighting/zsh-syntax-highlighting.zsh
bindkey ',' autosuggest-accept
eval $(thefuck --alias)
5.5 一些自带插件的介绍
以上启用了一些自带的插件,无需安装,依次做一下介绍。
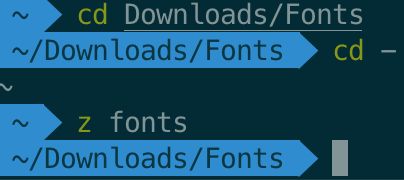
z -x 不要的路径
更多参数:
| 参数 | 描述 |
|---|---|
| -c | 在当前目录下进行子目录匹配 |
| -e | echo最合适的匹配和对应的rank,但是不执行cd操作 |
| -h | 显示帮助信息 |
| -l | echo所有匹配的目录和对应的rank,但是不执行cd操作 |
| -r | 进入所匹配目录列表中rank值最高的那个目录 |
| -t | 进入所匹配目录列表中最近访问的那个目录 |
| -x | 在.z缓存中清除当前目录的记录 |
| 例子 | |
| z download 进入到最匹配的download关键字的目录 | |
| z download fonts 进入层级匹配,先匹配download关键字,再匹配fonts关键字的目录 | |
| z -r download 进入匹配download关键字目录列表中rank值最高的目录 | |
| z -t download 进入匹配download关键字目录列表中最近访问的目录 | |
| z -l download 列出所有匹配download关键字的目录列表 |
- git 插件
定义了有关 git 的 alias。常用的有
gaa = git add --all
gcmsg = git commit -m
ga = git add
gst = git status
gp = git push
查看所有 git 命令缩写
cat ~/.oh-my-zsh/plugins/git/git.plugin.zsh
- sudo插件
输入某个命令忘记加sudo,双击ESC,就会在命令行头部加上sudo - extract插件
所有压缩类型的文件(tar, gz, zip, rar)解压一个命令x全搞定,再也不需要记参数了 - thefuck插件
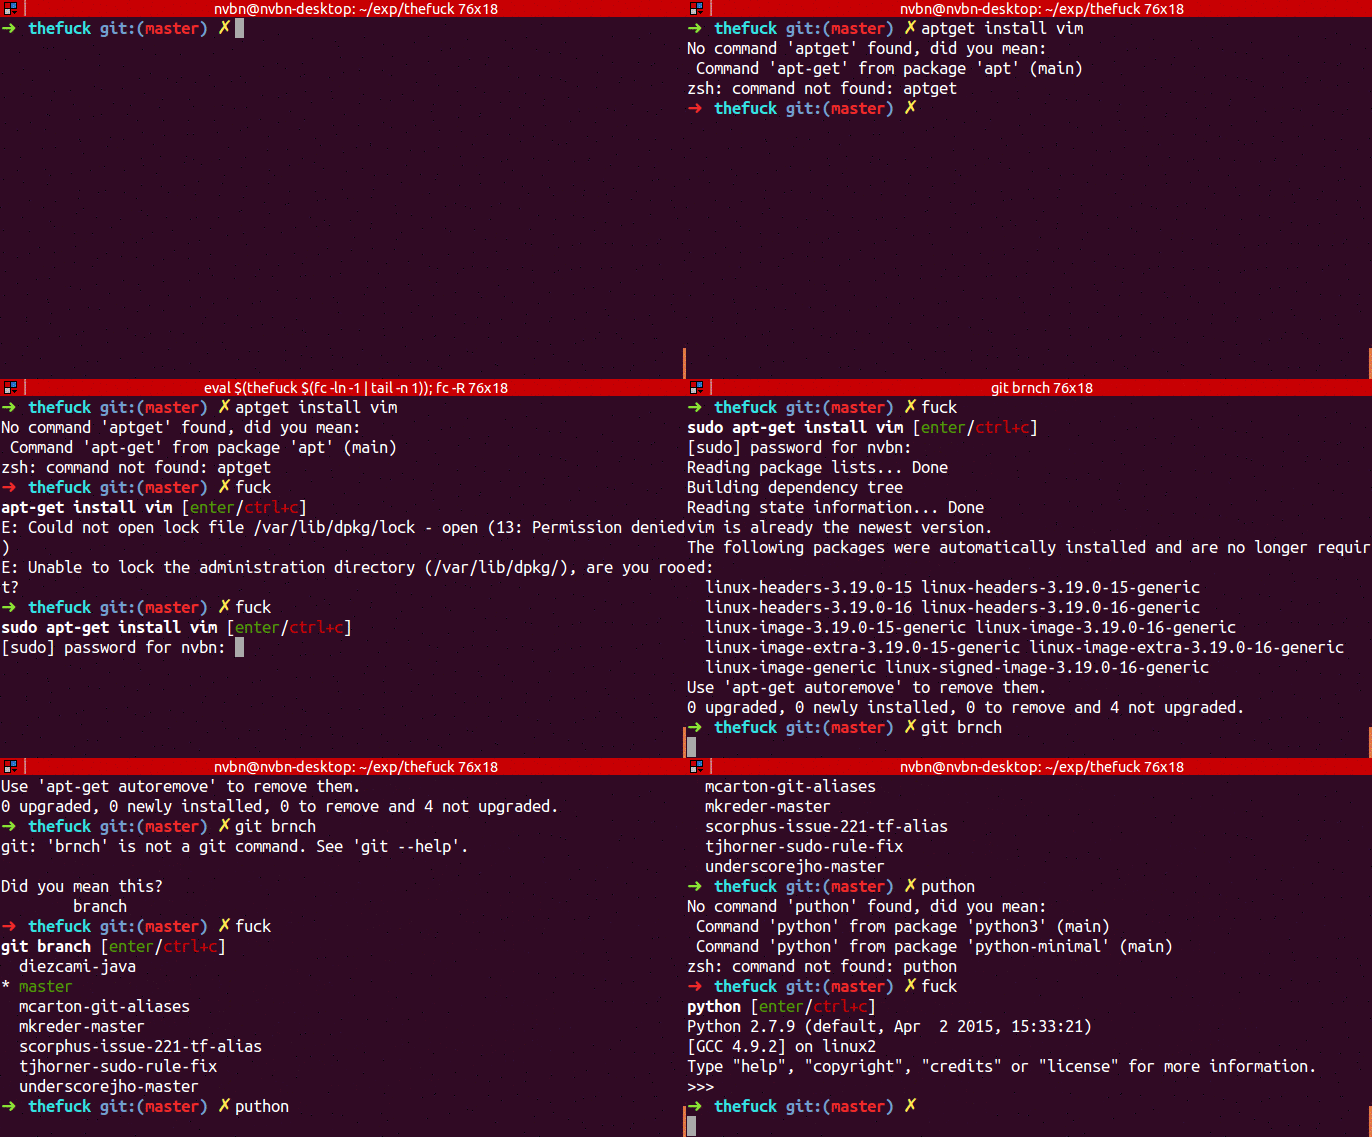
它可以在你输入命令错误的时候,告诉你可能的命令是啥
在mac下安装:
brew install thefuck
然后在~/.zshrc中添加
eval $(thefuck --alias)
#如果觉得fxxk不雅,可以使用其他alias:
eval $(thefuck --alias wtf)
用法动图来自官方:
- gitignore插件
提供一条 gi 命令,用来下载来自gitignore.io的gitignore模板。比如你新建了一个 python项目,就可以用
gi python > .gitignore
来生成一份适用于python项目的 .gitignore 文件。
完整模板列表点击这里。
用法
gi list: List all the currently supported gitignore.io templates.
gi [TEMPLATENAME]: Show git-ignore output on the command line, e.g. gi java to exclude class and package files.
gi [TEMPLATENAME] >> .gitignore: Appending programming language settings to your projects .gitignore.
gi也可以独立于oh-my-zsh作为一个命令行的函数存在。点击这里查看安装方法。
-
last-working-dir插件
记录上一次退出命令行时候的所在路径,下一次启动命令行的时候自动恢复到该路径,全部都是自动完成的。只需要在.zshrc文件中将插件开启即可。 -
zsh_reload插件
提供一个src命令,重载 zsh。但是基本我不用这个插件,我直接创建了一个alias:
alias src="source ~/.zshrc"
5.6 升级oh-my-zsh
cd ~/.oh-my-zsh/
omz update
