centos7下编译tensorflow1.15 GPU版本(cuda11)
因为最近要把cuda10.0升级到cuda11,但是cuda11都不支持tensorflow1.1x版本,所以尝试从源码编译,目前tensorflow官方给出了ubuntu版本的编译方法,nvidia也提供了一款基于ubuntu的nvidia-tensorflow,直接安装在centos上,期间出现了各种问题,因此本文记录了在centos上编译tensorflow-gpu1.15版本的过程,仅供大家参考。
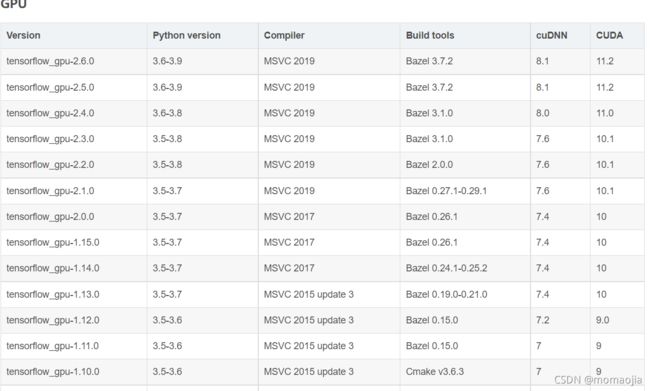
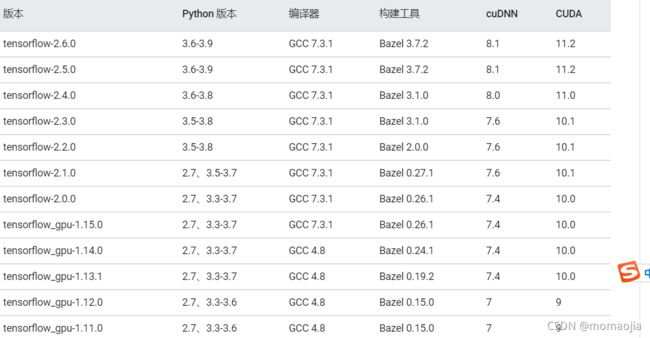
下表展示了tensoflow和cuda、gcc之间的对应关系
查看centos版本号
cat /etc/redhat-release
需要说明的是此次编译操作全部在docker中进行
一、拉取cuda11镜像(可选择)
为了防止编译错误,此步骤在docker中进行,devel:通过添加编译器工具链,调试工具, header 和静态库来扩展运行时镜像。
使用此镜像可从源代码编译CUDA应用程序
拉取cuda11镜像,网址为:
https://hub.docker.com/r/nvidia/cuda/tags?page=1&ordering=last_updated&name=centos7
1、拉取镜像
docker pull nvidia/cuda:11.0.3-cudnn8-devel-centos7
2、基于镜像创建容器
docker run -it --runtime=nvidia -v /home/lp/:/home/enviment --name tf_cuda11_test cd3d /bin/bash
二、安装python3.6.8
1、下载python3.6.8.tgz 包
2、解压  tar -xvf Python-3.6.8.tgz
3、进入python3.6.5目录,进行编译
./configure --prefix=/usr/local/python3 # # 指定安装目录/usr/local/python3

如果报错no acceptable C compiler found in $PATH
缺少C编译器(Python的安装依赖此文件)
yum install gcc

如果报错 make: command not found
yum -y install gcc automake autoconf libtool make
4、make && make install
如果报错
zipimport.ZipImportError: can't decompress data; zlib not available make: *** [install] Error 1
这是由于缺少依赖环境造成的
yum install zlib-devel

5、此外也需要安装Python3.6的dev包,否则会出现找不到Python.h的错误:
sudo yum install python3-devel

6、ln -s /usr/local/python3/bin/python3 /usr/bin/python3
ln -s /usr/local/python3/bin/pip3 /usr/bin/pip3
三、安装相关依赖包
3.1 安装JDK1.8
yum install java-1.8.0-openjdk
3.2 pip相关包(编译需要)
pip3 install numpy==1.18 -i https://mirrors.aliyun.com/pypi/simple
pip3 install wheel -i https://mirrors.aliyun.com/pypi/simple
pip3 install keras_preprocessing --no-deps -i https://mirrors.aliyun.com/pypi/simple
3.3 yum相关包
yum install -y unzip zip
yum -y install wget
yum install -y git
yum install pkg-config  g++ zlib1g-dev
yum install which #r如果不安装which,会导致安装bazel失败
升级gcc,g++
Centos 7默认gcc版本为4.8,因为编译tensorflow-1.15需要7.3的gcc,所以需要升级
yum install centos-release-scl
yum install devtoolset-7
scl enable devtoolset-7 bash
此时,通过 gcc --version查看版本时,显示如下:
gcc (GCC) 7.3.1 20180303 (Red Hat 7.3.1-5)
说明已经成功了,但是,重新进入容器后还是会变回原来的4.8版本,此时需要替换原来的gcc
which gcc #查看路径
/opt/rh/devtoolset-7/root/usr/bin/gcc
重新设置软链接,该问题解决。
mv /usr/bin/gcc /usr/bin/gcc-4.8.5
ln -s /opt/rh/devtoolset-7/root/usr/bin/gcc /usr/bin/gcc
mv /usr/bin/g++ /usr/bin/g++-4.8.5
ln -s /opt/rh/devtoolset-7/root/usr/bin/g++ /usr/bin/g++
获取源代码
因为是针对cuda11版本的编译,官方没有针对11的编译方法,所以选择对nvidia-tensorflow进行编译,首先下载对应分支的tensorflow,本文选择的是20.6的分支,对应的tf为1.15.2版本,直接去官网下载即可。
安装bazel
1、下载
wget https://github.com/bazelbuild/bazel/releases/download/0.26.1/bazel-0.26.1-installer-linux-x86_64.sh
2、安装
bash bazel-0.26.1-installer-linux-x86_64.sh
期间遇到的问题
unzip command not found
**解决方法:**安装unzip之后还是报错,后来发现是没有安装which的原因
安装成功显示如下:
配置 build
通过运行 TensorFlow 源代码树根目录下的 ./configure 配置系统 build。这一步也是遇到了各种坑啊,本人编译的是python3.6.8版本的,所以要改下python的默认路径
1、解压
    unzip -d tensorflow-nv20 tensorflow-r1.15.2-nv20.06.zip
2、 cd tensorflow-nv20/tensorflow-r1.15.2-nv20.06
3、./configure  #./configure 配置系统 build。此脚本会提示您指定 TensorFlow 依赖项的位置,并要求指定其他构建配置选项

显示如下:
Please specify the location of python. [Default is /usr/bin/python]: /usr/bin/python3


Found possible Python library paths:
  /usr/lib/python3.6/site-packages
  /usr/lib64/python3.6/site-packages
  /usr/local/lib/python3.6/site-packages
  /usr/local/lib64/python3.6/site-packages
Please input the desired Python library path to use.  Default is [/usr/lib/python3.6/site-packages]

Do you wish to build TensorFlow with XLA JIT support? [Y/n]: y
XLA JIT support will be enabled for TensorFlow.

Do you wish to build TensorFlow with OpenCL SYCL support? [y/N]: n
No OpenCL SYCL support will be enabled for TensorFlow.

Do you wish to build TensorFlow with ROCm support? [y/N]: n
No ROCm support will be enabled for TensorFlow.

Do you wish to build TensorFlow with CUDA support? [y/N]: y   #编译cuda版本,有GPU
CUDA support will be enabled for TensorFlow.

Do you wish to build TensorFlow with TensorRT support? [y/N]: n
No TensorRT support will be enabled for TensorFlow.

Found CUDA 11.0 in:
    /usr/local/cuda/lib64
    /usr/local/cuda/include
Found cuDNN 8 in:
    /usr/lib64
    /usr/include


Please specify a list of comma-separated CUDA compute capabilities you want to build with.
You can find the compute capability of your device at: https://developer.nvidia.com/cuda-gpus.
Please note that each additional compute capability significantly increases your build time and binary size, and that TensorFlow only supports compute capabilities >= 3.5 [Default is: 3.5,7.0]:


Do you want to use clang as CUDA compiler? [y/N]: n
nvcc will be used as CUDA compiler.

Please specify which gcc should be used by nvcc as the host compiler. [Default is /usr/bin/gcc]:


Do you wish to build TensorFlow with MPI support? [y/N]: n
No MPI support will be enabled for TensorFlow.

Please specify optimization flags to use during compilation when bazel option "--config=opt" is specified [Default is -march=native -Wno-sign-compare]:


Would you like to interactively configure ./WORKSPACE for Android builds? [y/N]: n
Not configuring the WORKSPACE for Android builds.

Preconfigured Bazel build configs. You can use any of the below by adding "--config=<>" to your build command. See .bazelrc for more details.
        --config=mkl            # Build with MKL support.
        --config=monolithic     # Config for mostly static monolithic build.
        --config=gdr            # Build with GDR support.
        --config=verbs          # Build with libverbs support.
        --config=ngraph         # Build with Intel nGraph support.
        --config=numa           # Build with NUMA support.
        --config=dynamic_kernels        # (Experimental) Build kernels into separate shared objects.
        --config=v2             # Build TensorFlow 2.x instead of 1.x.
Preconfigured Bazel build configs to DISABLE default on features:
        --config=noaws          # Disable AWS S3 filesystem support.
        --config=nogcp          # Disable GCP support.
        --config=nohdfs         # Disable HDFS support.
        --config=noignite       # Disable Apache Ignite support.
        --config=nokafka        # Disable Apache Kafka support.
        --config=nonccl         # Disable NVIDIA NCCL support.
Preconfigured Bazel build configs to DISABLE default on features:
        --config=noaws          # Disable AWS S3 filesystem support.
        --config=nogcp          # Disable GCP support.
        --config=nohdfs         # Disable HDFS support.
        --config=noignite       # Disable Apacha Ignite support.
        --config=nokafka        # Disable Apache Kafka support.
        --config=nonccl         # Disable NVIDIA NCCL support.
Configuration finished
期间遇到的问题
1、Illegal ambiguous match on configurable attribute “deps” in
**解决方法:**这个是参考了https://stackoverflow.com/questions/45644606/illegal-ambiguous-match-on-configurable-attribute-deps-in-tensorflow-core-gr,其实就是把Do you want to use clang as CUDA compiler? [y/N]:设置为n,不采用clang编译。
编译
执行编译命令
bazel build --config=cuda -c opt //tensorflow/tools/pip_package:build_pip_package
bazel build使用方法: bazel build //main:hello-world*
注意target中的//main:是BUILD文件相对于WORKSPACE文件的位置,hello-world则是我们在BUILD文件中命名好的target的名字
这一步骤遇到的问题最多,查了各种资料…
1、ERROR: An error occurred during the fetch of repository 'io_bazel_rules_docker
这个问题是git访问失败,无法下载对应的包,一开始以为是因为要梯子的原因,后来发现是centos自带的git版 本太低,所以导致访问失败,解决方法就是升级git版本
解决方法:
  ```
  centos自带的git版本太多,重新升级
  yum install epel-release
  # 卸载老版本
  yum remove git
  sudo yum -y install https://packages.endpoint.com/rhel/7/os/x86_64/endpoint-repo-1.7-1.x86_64.rpm
  sudo yum install git

  ```
2、提示下载某个包失败:
解决方法:直接在浏览器中下载这个包,然后docker cp到指定路径,然后退出容器,重新进入就好了
比如:docker cp /iyunwen/lp/llvm-7a7e03f906aada0cf4b749b51213fe5784eeff84.tar.gz 9407675a296b:/root/.cache/bazel/_bazel_root/dfa369b239b25d60263c0dc743bd98fb/external/llvm/
3、unrecognized command line option ‘-std=c++14’
解决方法:这个问题,就是升级gcc,前面已经说过了,升级后应该就不会有问题
打包
./bazel-bin/tensorflow/tools/pip_package/build_pip_package /tmp/tensorflow_pkg
此时在在/tmp/tensorflow_pkg下就能找到编译好的tensorflow-1.15.2+nv-cp36-cp36m-linux_x86_64.whl,用pip3 install就可以了。
测试
python3 -c 'import tensorflow as tf; print(tf.__version__)'
python3 -c 'import tensorflow as tf; print(tf.test.is_gpu_available())'
写在最后:
如果有人想要本人编译后的tensorlfow,后面会把链接放出来


