吴恩达《机器学习》——Logistic多分类与神经网络
Logistic多分类与神经网络
- 1. MINIST数据集与Logistic多分类
-
- MINIST简介
-
- 数据集可视化
- Logistic如何实现多分类?
-
- One-Hot向量
- Python实现
- 2. 神经网络(Neural Network, NN)
-
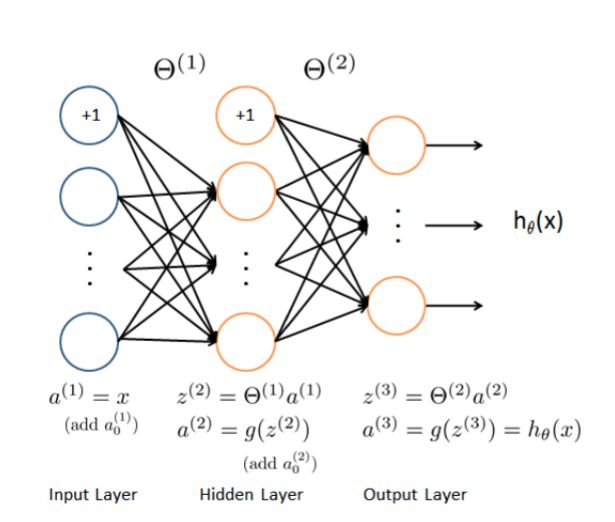
- 神经网络
- 前馈传播
- Python实现
- 3. 基于PyTorch框架的网络搭建
数据集、源文件可以在Github项目中获得
链接: https://github.com/Raymond-Yang-2001/AndrewNg-Machine-Learing-Homework
1. MINIST数据集与Logistic多分类
在本文中,我们将实现通过Logistic回归对Minist数据集的均匀采样子数据集进行多分类的任务。
MINIST简介
MINST数据集(Modified National Institute of Standards and Technology),是一个大型手写数字数据库,通常用于训练各种图像处理系统,包含60,000个示例的训练集以及10,000个示例的测试集。
MINIST数据集最早在1998年被LeCun大佬使用,后来被包括线性分类,SVM,KNN,NN等在内的各种机器学习算法广泛使用,已经成为评价算法性能的通用数据库。
Y. LeCun, L. Bottou, Y. Bengio, and P. Haffner. “Gradient-based learning applied to document recognition.” Proceedings of the IEEE, 86(11):2278-2324, November 1998.
本文使用到数据集是MINIST的一个均匀采样的子集,包括5000个0~9九个数字,以MATLAB文件.mat格式给出。由于MATLAB不支持0索引,所以数字0的标签以“10”代替。随后我们会对这一部分进行详细的解释和操作。
数据集可视化
import scipy.io as scio
import numpy as np
import matplotlib.pyplot as plt
import matplotlib
由于数字"0"的标签为“10”,我们可以用"0"来替换原标签。
data = scio.loadmat('ex3data1.mat')
x = data.get('X')
y = data.get('y')
y = np.expand_dims(np.where(y[:,0]==10,0,y[:,0]), axis=1)
此时x和y的形状分别是 ( 5000 , 40 ) (5000,40) (5000,40)和 ( 5000 , 1 ) (5000,1) (5000,1)。接下来随机挑选25张图像进行可视化展示。
def plot_image(img):
    """
    assume the image is square
    img: (5000, 400)
    """
    sample_idx = np.random.choice(np.arange(img.shape[0]), 25)  # 100*400
    sample_images = img[sample_idx, :]

    fig, ax_array = plt.subplots(nrows=5, ncols=5, sharey=True, sharex=True, figsize=(5, 5))

    for r in range(5):
        for c in range(5):
            ax_array[r, c].matshow(sample_images[5 * r + c].reshape((20, 20)).T,
                                   cmap=matplotlib.cm.binary)
            plt.xticks(np.array([]))
            plt.yticks(np.array([]))


plot_image(x)
Logistic如何实现多分类?
回顾前文,我们知道在伯努利分布的理论基础上,Logistic回归只能实现对样本的二分类(即输出一个伯努利分布)。但是显然,对于多分类,我们的输出要符合一个多项式分布,即 p i ≥ 0 ( 1 ≤ i ≤ n ) , ∑ i = 1 n p i = 1 p_{i}\ge0\quad (1\le i \le n), \sum_{i=1}^{n}{p_{i}}=1 pi≥0(1≤i≤n),∑i=1npi=1。其中 p i p_i pi代表了样本被分为第 i i i类的概率。
从另一个角度来思考,对一个样本进行多分类,相当于对其进行 n n n次二分类( n n n为类别数目),每一次二分类输出的positive的预测概率,都可以看做多项式分布的一项。当然,这里的说法并不严谨,因为多项式分布要求 ∑ i = 1 n p i = 1 \sum_{i=1}^{n}{p_{i}}=1 ∑i=1npi=1。不过,对于预测分类来说,我们只关心概率最大的一项,和是否为1并没有很大的影响,在后面我们还将看到如何使得输出的分布符合一个多项式分布的要求。
按照这个思路,我们可以训练十个分类器,分别对应0~9的类别分类。对于每一个要分类的样本,我们同时将其送入十个分类器中,取positive分类概率最高的类为预测输出。
One-Hot向量
在数字电路和机器学习中,one-hot向量(独热向量)是常常使用的一种概念。在one-hot向量中,只有一位为“高位”,即1;其余位均为“低位”,即0。其表示如下所示:
[ 0 ⋯ 1 ⋯ 0 ] \left[ \begin{array} {c c c} 0 & \cdots & 1 & \cdots & 0 \end{array} \right] [0⋯1⋯0]
显然,这非常适合作为多分类任务的标签。在二分类任务中,因为只存在两种状态,所以用1为的“0”或“1”就足以表示类别。在多分类任务中,one-hot向量将真实类的位置设为“1”,其余类为“0”,不仅能有效表示类别,同时这也符合我们之前提到的多项式分布的要求。
def onehot_encode(label):
    """
    Onehot编码
    :param label: (n,1)
    :return: onehot label (n, n_cls); cls (n,)
    """
    # cls (n_cls,)
    cls = np.unique(label)
    y_matrix = []
    for cls_idx in cls:
        y_matrix.append((label == cls_idx).astype(int))
    one_hot = np.array(y_matrix).T.squeeze()
    return one_hot, cls

y_onehot, cls = onehot_encode(y)
得到了one-hot编码的标签"y_onehot"和类别索引"cls"
Python实现
LogisticRegression类来自上一篇博文的代码实现 Logistic回归
classifier_list = []
for cls_idx in cls:
    classifier = LogisticRegression(x=train_x,y=train_y_ex[:,:,cls_idx], val_x=val_x, val_y=val_y_ex[:,:,cls_idx], epoch=epochs,lr=alpha,normalize=normalize, regularize="L2", scale=2, show=False)
    classifier.train()
    classifier_list.append(classifier)

print("Total Classifiers: {}".format(len(classifier_list)))
Total Classifiers: 10
划分训练集和验证集
from sklearn.model_selection import train_test_split
train_x, val_x, train_y, val_y = train_test_split(x, y_onehot, test_size=0.2)
for cls_idx in cls:
    train_sample_n = np.where(train_y[:,cls_idx]==1)[0].shape[0]
    val_sample_n = np.where(val_y[:,cls_idx]==1)[0].shape[0]
    print("Class {}:\t{} train samples\t{} val samples".format(cls_idx, train_sample_n, val_sample_n))
print("Total train samples: {}\n"
      "Total val samples: {}".format(train_y.shape[0],val_y.shape[0]))
Class 0:	406 train samples	94 val samples
Class 1:	401 train samples	99 val samples
Class 2:	389 train samples	111 val samples
Class 3:	393 train samples	107 val samples
Class 4:	395 train samples	105 val samples
Class 5:	416 train samples	84 val samples
Class 6:	406 train samples	94 val samples
Class 7:	394 train samples	106 val samples
Class 8:	397 train samples	103 val samples
Class 9:	403 train samples	97 val samples
Total train samples: 4000
Total val samples: 1000
查看分类性能,这里直接使用sklearn库的方法查看分类性能。
# (cls_n, sample_n, 1)
prob_list = [classifier_i.get_prob(val_x) for classifier_i in classifier_list]
# (sample_n, cls_n)
prob_arr = np.array(prob_list).squeeze().T
# (sample_n,)
multi_pred = np.argmax(prob_arr,axis=1)

from sklearn.metrics import classification_report
report = classification_report(multi_pred, np.argmax(val_y, axis=1), digits=4)
print(report)
          precision    recall  f1-score   support

       0     0.9574    0.9184    0.9375        98
       1     0.9495    0.8468    0.8952       111
       2     0.8378    0.9118    0.8732       102
       3     0.8505    0.8667    0.8585       105
       4     0.8952    0.8785    0.8868       107
       5     0.6905    0.9062    0.7838        64
       6     0.8830    0.8737    0.8783        95
       7     0.8962    0.9048    0.9005       105
       8     0.8738    0.7965    0.8333       113
       9     0.8351    0.8100    0.8223       100

    accuracy                         0.8690      1000
   macro avg     0.8669    0.8713    0.8669      1000
weighted avg     0.8742    0.8690    0.8699      1000
平均精度为86.99%。
2. 神经网络(Neural Network, NN)
接下来我们将使用一种全新的机器学习算法:神经网络,来进行图像分类。
神经网络
虽然现在有很多流行的说法阐释神经网络与人脑系统之间的关系,但是两者的关联微乎其微。除去示意图的计算单元与人脑的神经元有些相似以外,神经网络是基于数学和信息论的严谨的数学模型。
在Logistic回归中,我们有以下计算公式:
h ( x ; θ ) = σ ( θ x ⊤ ) h(\boldsymbol{x};\boldsymbol{\theta})=\sigma(\boldsymbol{\theta x^{\top}}) h(x;θ)=σ(θx⊤)
其中, σ \sigma σ代表了sigmoid运算,也可以叫做激励函数。事实上,除去sigmoid以外,我们还可以使用很多激励函数,最常见的如ReLU,SiLU,tanh函数等。
前馈传播
在神经网络中,我们简单的将模型分为输入层、隐藏层、输出层三个部分。
在输入层, a ( 1 ) = x a^{(1)}=x a(1)=x,添加 a 0 ( 1 ) = 0 a^{(1)}_{0}=0 a0(1)=0,使得偏置项的计算更加方便。
在隐藏层, z ( 2 ) = θ ( 1 ) a ( 1 ) z^{(2)}=\theta^{(1)}a^{(1)} z(2)=θ(1)a(1), a ( 2 ) = σ ( z ( 2 ) ) a^{(2)}=\sigma(z^{(2)}) a(2)=σ(z(2)),这相当于做了一次线性运算,并使用激励函数进行非线性的变换。(如果没有激励函数的话,无论多么复杂的神经网络,都相当于对输入进行线性运算,网络容量会变得极其有限。)同时,也在这里添加 a 0 ( 2 ) = 0 a^{(2)}_{0}=0 a0(2)=0。
在输出层, z ( 3 ) = θ ( 2 ) a ( 2 ) z^{(3)}=\theta^{(2)}a^{(2)} z(3)=θ(2)a(2), a ( 3 ) = σ ( z ( 3 ) ) = h ( θ ; x ) a^{(3)}=\sigma(z^{(3)})=h(\theta;x) a(3)=σ(z(3))=h(θ;x)。
Python实现
这里使用训练好的参数直接进行前馈传播,关于神经网络如何训练和优化,将在之后的文章中进行讲解。
class ForwardModel:
    def __init__(self):
        self.theta1 = None
        self.theta2 = None

    def load_parameters(self, parameters):
        self.theta1 = parameters[0]
        self.theta2 = parameters[1]

    def __call__(self, x, *args, **kwargs):
        # x (n,d)
        t = np.ones(shape=(x.shape[0], 1))
        # x (n,d+1)
        a1 = np.concatenate((t, x), axis=1)
        # a2 (n, hidden_size)
        a2 = sigmoid(np.matmul(a1, self.theta1))
        # a2 (n, hidden_size + 1)
        a2 = np.concatenate((t, a2), axis=1)
        # a3 (n, cls_n)
        a3 = sigmoid(np.matmul(a2, self.theta2))
        return a3
model = ForwardModel()
model.load_parameters([theta1, theta2])
pred_prob = model(x)
# pred_prob = np.concatenate([np.expand_dims(pred_prob[:,-1],axis=1), pred_prob[:,:-1]], axis=1)

pred = np.argmax(pred_prob,axis=1) + 1
from sklearn.metrics import classification_report
report = classification_report(pred, y, digits=4)
print(report)
查看分类性能
              precision    recall  f1-score   support

           1     0.9820    0.9684    0.9752       507
           2     0.9700    0.9818    0.9759       494
           3     0.9600    0.9776    0.9687       491
           4     0.9680    0.9699    0.9690       499
           5     0.9840    0.9723    0.9781       506
           6     0.9860    0.9782    0.9821       504
           7     0.9700    0.9778    0.9739       496
           8     0.9820    0.9781    0.9800       502
           9     0.9580    0.9657    0.9618       496
          10     0.9920    0.9822    0.9871       505

    accuracy                         0.9752      5000
   macro avg     0.9752    0.9752    0.9752      5000
weighted avg     0.9753    0.9752    0.9752      5000
平均精度为97.52。
3. 基于PyTorch框架的网络搭建
PyTorch是Facebook开源的深度学习框架,除去手工搭建神经网络,我们还可以使用PyTorch框架进行神经网络的搭建。关于PyTorch安装的相关知识,可以参考B站up主小土堆的教程。
from torch import nn

class PytorchForward(nn.Module):
    def __init__(self):
        super(PytorchForward, self).__init__()
        self.layer1 = nn.Linear(in_features=400, out_features=25)
        self.layer2 = nn.Linear(in_features=25, out_features=10)

    def forward(self, x):
        x = self.layer1(x)
        x = self.layer2(x)
        return x

model = PytorchForward()
for name, parameters in model.named_parameters():
    print(name,':',parameters.size())
可以看到参数的大小:
layer1.weight : torch.Size([25, 400])
layer1.bias : torch.Size([25])
layer2.weight : torch.Size([10, 25])
layer2.bias : torch.Size([10])

