Android 4.0 input touch解析(一)
前言
在网上看到好多关于android input device流程分析,但是都不全,有的只是从linux内核那边分析,有的从android上层分析,而且分析的代码也比较老,都是在android2.3以下,最近在做android4.0下的多点触摸以及校准程序,多点触摸的驱动很好写,在linux内核里面都有现成的例子,照着改就可以了。但是android下的校准程序比较复杂,一种是在android Framework层进行,一种是在linux 内核层进行。
对于校准程序来说,需要全屏校准。但是在android4.0下面,下面的导航栏是system ui画的,无法去掉,因此在校准程序里面通过display际的小得到分辨率高度比实,差的那部分就是导航栏的高度。如果以小的高度进行校准,但使用实际的高度进行触摸坐标到屏幕坐标转换,就会导致触摸点偏下的问题。
为了解决这个问题,在网上找了很多资料,第一种就是想办法在校准程序里面得到整个屏幕的分辨率,进而让校准程序全屏显示,即把导航栏隐藏,在网上看到又网友用下面例子实现:
1 //for phone
2 getWindow().getDecorView().setSystemUiVisibility(View.SYSTEM_UI_FLAG_HIDE_NAVIGATION);
3 //for pad View.SYSTEM_UI_FLAG_SHOW_FULLSCREEN= 4
4 getWindow().getDecorView().setSystemUiVisibility(View.SYSTEM_UI_FLAG_SHOW_FULLSCREEN);
经过自己实验,这两个都无法隐藏下面的导航栏,而且在最新的sdk里面也没有 SYSTEM_UI_FLAG_SHOW_FULLSCREEN 的定义。第二种就是在jni种通过fb0得到系统的分辨率,这个是真实的分辨率,这种方法需要apk有root或者graphics组权限,才能打开fb0,而且android4.0根据触摸屏类型是否使用外部显示分辨率,如果使用外部display的话,那么就不能用fb0的分辨率。为了解决这个问题,把整个input touch流程都看了一边。废话少说,进入正题。
1、Android input touch 流程
Android inout touch流程分两部分,一部分是从android framework开始,如何读取touch设备的事件并分发。一部分是从linux 内核开始,如何从触摸屏读取触摸坐标并送给touch设备。
2、Android framework 层
2.1、文件结构
首先看看Event Input文件结构吧,在frameworks/base/services/input之下
2.2、模块介绍
- EventHub
它是系统中所有事件的中央处理站。它管理所有系统中可以识别的输入设备的输入事件,此外,当设备增加或删除时,EventHub将产生相应的输入事件给系统。EventHub通过getEvents函数,给系统提供一个输入事件流。它也支持查询输入设备当前的状态(如哪些键当前被按下)。而且EventHub还跟踪每个输入调入的能力,比如输入设备的类别,输入设备支持哪些按键。
-
InputReader
InputReader从EventHub中读取原始事件数据(RawEvent),并由各个InputMapper处理之后输入对应的input listener.InputReader拥有一个InputMapper集合。它做的大部分工作在InputReader线程中完成,但是InputReader可以接受任意线程的查询。为了可管理性,InputReader使用一个简单的Mutex来保护它的状态。InputReader拥有一个EventHub对象,但这个对象不是它创建的,而是在创建InputReader时作为参数传入的。
-
InputDispatcher
InputDispatcher负责把事件分发给输入目标,其中的一些功能(如识别输入目标)由独立的policy对象控制。
-
InputManager
InputManager是系统事件处理的核心,它虽然不做具体的事,但管理工作还是要做的,比如接受我们客户的投诉和索赔要求,或者老板的出气筒。
InputManager使用两个线程:
1)InputReaderThread叫做"InputReader"线程,它负责读取并预处理RawEvent,applies policy并且把消息送入DispatcherThead管理的队列中。
2)InputDispatcherThread叫做"InputDispatcher"线程,它在队列上等待新的输入事件,并且异步地把这些事件分发给应用程序。
InputReaderThread类与InputDispatcherThread类不共享内部状态,所有的通信都是单向的,从InputReaderThread到InputDispatcherThread。两个类可以通过InputDispatchPolicy进行交互。
InputManager类从不与Java交互,而InputDispatchPolicy负责执行所有与系统的外部交互,包括调用DVM业务。
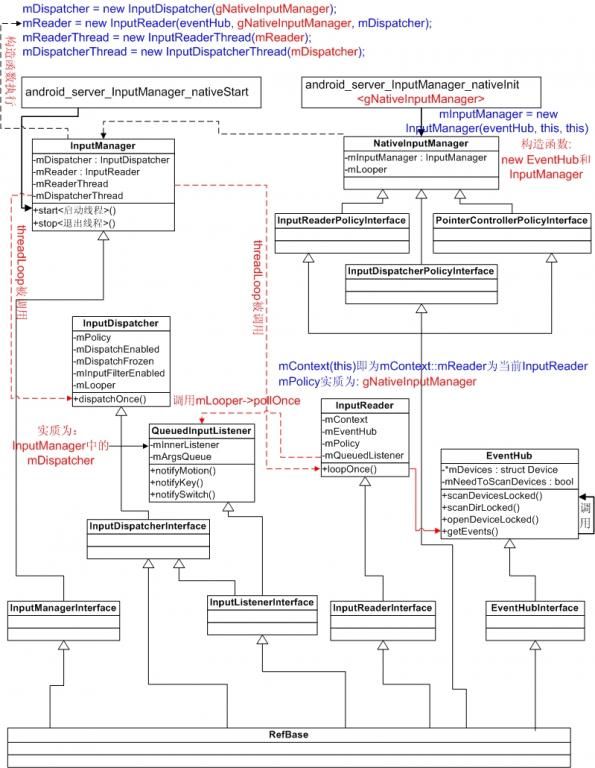
看看下图理解input下面几个模块的关系
2.3、线程创建
SystemServer大家熟悉吧,它是android init进程启动的,它的任务就是启动android里面很多服务,并管理起来,如果大家不熟悉,请参考andorid启动流程分析
SystemServer.java (frameworks\base\services\java\com\android\server)里面ServerThread::run调用
1 Slog.i(TAG, "Window Manager");
2 wm = WindowManagerService.main(context, power,
3             factoryTest != SystemServer.FACTORY_TEST_LOW_LEVEL,
4             !firstBoot);
5 ServiceManager.addService(Context.WINDOW_SERVICE, wm);
WindowManagerService.java (frameworks\base\services\java\com\android\server\wm) 里面 WindowManagerService main调用
1 WMThread thr = new WMThread(context, pm, haveInputMethods, allowBootMsgs);
2 thr.start();
接着调用WMThread:: run调用
1 WindowManagerService s = new WindowManagerService(mContext, mPM,
2         mHaveInputMethods, mAllowBootMessages);
接着在WindowManagerService里面调用
1 mInputManager = new InputManager(context, this);
至此我们创建了一个java层input设备管理器。
InputManager.java (frameworks\base\services\java\com\android\server\wm) 里面InputManager调用
1 nativeInit(mContext, mCallbacks, looper.getQueue());
从下面开始就进入native空间
com_android_server_InputManager.cpp (frameworks\base\services\jni)里面nativeInit对应android_server_InputManager_nativeInit调用
1 gNativeInputManager = new NativeInputManager(contextObj, callbacksObj, looper);
在NativeInputManager里面调用
1 sp<EventHub> eventHub = new EventHub();
2 mInputManager = new InputManager(eventHub, this, this);
这个函数创建一个EventHub对象,然后把它作为参数来创建InputManager对象。特别注意,InputManager是在C++里,具体在InputManager.cpp里。EventHub类在EventHub.cpp里,这个类和input事件获取有关。
至此我们创建了一个native层input设备管理器,具体作用见上面说明。
首先是去InputManager.cpp (frameworks\base\services\input) 文件里面InputManager::InputManager调用
1 mDispatcher = new InputDispatcher(dispatcherPolicy);
2 mReader = new InputReader(eventHub, readerPolicy, mDispatcher);
3 initialize();
它创建了InputDispatcher对象,同时也创建了InputReader对象。并分别暂存于mDispatcher和mReader变量中。注意eventHub和mDispatcher都作为参数创建InputReader对象。后面还用initialize来初始化。下面是initialize函数的定义:
1 void InputManager::initialize() {
2     mReaderThread = new InputReaderThread(mReader);
3     mDispatcherThread = new InputDispatcherThread(mDispatcher);
4 }
它创建两个线程对象,一个是InputReaderThread线程对象,负责input事件的获取;另一个是InputDispatcherThread线程对象,负责input消息的发送。
(注:以上两个线程对象都有自己的threadLoop函数,它将在Thread::_threadLoop中被调用,这个Thread::_threadLoop是线程入口函数,线程在Thread::run中被真正地创建)
InputDispatcher.cpp (frameworks\base\services\input) 里面InputDispatcher::InputDispatcher做一些准备工作。
InputReader.cpp (frameworks\base\services\input)里面InputReader::InputReader做一些准备工作。
2.4、线程启动
在上面讲到在WindowManagerService里面调用
1 mInputManager = new InputManager(context, this);
创建input 管理器,紧接着调用
1 mInputManager.start();
InputManager.java (frameworks\base\services\java\com\android\server\wm) 里面start调用
1 Slog.i(TAG, "Starting input manager");
2 nativeStart();
从下面开始就进入native空间
com_android_server_InputManager.cpp (frameworks\base\services\jni)里面nativeStart对应android_server_InputManager_nativeStart调用
1 status_t result = gNativeInputManager->getInputManager()->start();
InputManager.cpp (frameworks\base\services\input) 文件里面InputManager::start调用
1 status_t result = mDispatcherThread->run("InputDispatcher", PRIORITY_URGENT_DISPLAY);
2 result = mReaderThread->run("InputReader", PRIORITY_URGENT_DISPLAY);
上面两个线程对象是Thread子类,于是继承它的run方法,在Thread::run中,调用createThreadEtc函数,并以Thread::_threadLoop作为入口函数,以上面的mDispatcherThread或mReaderThread作为userdata创建线程,然后会调用threadLoop(),在Thread类中它是虚函数,得由子类来复写。
因此会调用InputReader.cpp (frameworks\base\services\input)里面的threadLoopInputReaderThread::threadLoop调用
1 mReader->loopOnce();
mReader就是上面创建的inputreader对象,作为参数传给mReaderThread
InputReader::loopOnce调用
1 count = mEventHub->getEvents(timeoutMillis, mEventBuffer, EVENT_BUFFER_SIZE);
得到input 输入事件, processEventsLocked处理input输入事件
因此会调用InputDispatcher.cpp (frameworks\base\services\input)里面的threadLoopInputDispatcherThread::threadLoop调用
1 mDispatcher->dispatchOnce ();
mDispatcher就是上面创建的InputDispatcher对象,作为参数传给mDispatcherThread。
InputDispatcher::dispatchOnce调用dispatchOnceInnerLocked(&nextWakeupTime)
dispatchOnceInnerLocked函数处理input输入消息,mLooper->pollOnce是等待下一次输入事件。
1 mLooper->pollOnce(timeoutMillis):
这个请看Looper.cpp文件中的Looper::pollOnce()函数。Looper里主要通过linux管道方式实现进程间通信,通过epoll机制实现外界事件请求作出响应。
至此整个android input event框架已经运转起来了,好像到现在还没有提到touch,别着急,且看下面的分析。
2.5、event初始化
还记得android_server_InputManager_nativeInit里面创建sp<EventHub> eventHub = new EventHub();
EventHub.cpp (frameworks\base\services\input) 里面
 1 EventHub::EventHub(void) :
 2         mBuiltInKeyboardId(-1),
 3         mNextDeviceId(1),
 4         mOpeningDevices(0), //表示需要打开的设备链表,为NULL
 5         mClosingDevices(0), //表示需要关闭的设备链表,为NULL
 6         mNeedToSendFinishedDeviceScan(false), //表示需要发送设备扫描完成,默认为0
 7         mNeedToReopenDevices(false),  //表示需要重新打开设备,默认为0
 8         mNeedToScanDevices(true), //表示需要扫描设备,默认为1
 9         mNeedToSendHeadPhoneEvent(false),
10         mNeedToSendMicroPhoneEvent(false),
11         mHeadsetDeviceId(-1),
12         mPendingEventCount(0), //表示需要处理event个数,默认为0
13         mPendingEventIndex(0),  //表示当前需要处理event的索引,默认为0
14         mPendingINotify(false) { //表示需要处理的通知,默认为0
15     acquire_wake_lock(PARTIAL_WAKE_LOCK, WAKE_LOCK_ID);
16
17     mNumCpus = sysconf(_SC_NPROCESSORS_ONLN);
18
19     mEpollFd = epoll_create(EPOLL_SIZE_HINT); //epoll实例,在EventHub::EventHub中初始化此例,所有输入事件通过epoll_wait来获取
20     //创建mINotifyFd,用于监控/dev/input目录下删除和创建设备节点的事件
21     mINotifyFd = inotify_init();
22     int result = inotify_add_watch(mINotifyFd, DEVICE_PATH, IN_DELETE | IN_CREATE);
23
24     struct epoll_event eventItem;
25     memset(&eventItem, 0, sizeof(eventItem));
26     eventItem.events = EPOLLIN;
27     eventItem.data.u32 = EPOLL_ID_INOTIFY;
28     result = epoll_ctl(mEpollFd, EPOLL_CTL_ADD, mINotifyFd, &eventItem); //将mINotifyFd注册到mEpollFd里面,通过epoll来监听mINotifyFd的变化
29     // 创建唤醒管道,并设置为非阻塞,如果向mWakeWritePipeFd写,那么mWakeReadPipeFd就会有变化
30     int wakeFds[2];
31     result = pipe(wakeFds);
32     mWakeReadPipeFd = wakeFds[0];
33     mWakeWritePipeFd = wakeFds[1];
34     result = fcntl(mWakeReadPipeFd, F_SETFL, O_NONBLOCK);
35     result = fcntl(mWakeWritePipeFd, F_SETFL, O_NONBLOCK);
36     //将mWakeReadPipeFd注册到mEpollFd里面,通过epoll来监听mWakeReadPipeFd的变化
37     eventItem.data.u32 = EPOLL_ID_WAKE;
38     result = epoll_ctl(mEpollFd, EPOLL_CTL_ADD, mWakeReadPipeFd, &eventItem);
39 }
40
至此EventHub对象以及构造完成了,mEpollFd监听mINotifyFd和mWakeReadPipeFd的变化。
2.6、读取事件
在上面2.4节最后我们看到InputReaderThread线程里面会循环调用InputReader::loopOnce 接着调用
1 count = mEventHub->getEvents(timeoutMillis, mEventBuffer, EVENT_BUFFER_SIZE);
这里的mEventHub就是上节实例化的eventhub,我们来看getEvents
EventHub.cpp (frameworks\base\services\input) 里面EventHub::getEvents
 1   for (;;) {
 2         nsecs_t now = systemTime(SYSTEM_TIME_MONOTONIC);
 3         // Reopen input devices if needed.
 4         // 检查mNeedToReopenDevices是否为ture,如果为true,在closeAllDevicesLocked里面关闭所有打开的硬件设备描述符,并把需要删除的设备放在
      mClosingDevices链表里面,如果这个设备是在mOpeningDevices里面,就忽略跳过,并删除eventhub层的device对象。然后设置mNeedToScanDevices为true,
      因为mNeedToReopenDevices默认为false,所以不会执行这段代码
 5         if (mNeedToReopenDevices) {
 6             mNeedToReopenDevices = false;
 7             LOGI("Reopening all input devices due to a configuration change.");
 8             closeAllDevicesLocked();
 9             mNeedToScanDevices = true;
10             break; // return to the caller before we actually rescan
11         }
12
13         // Report any devices that had last been added/removed.
14         // 检查mClosingDevices链表是否存在,如果存在,循环把需要删除的设备信息放在event里面,同时设置event type为DEVICE_REMOVED,
      并删除eventhub层的device对象。设置mNeedToSendFinishedDeviceScan为true。每循环一次,capacity减1,capacity等于0,就退出for循环,
      表明这次getEvents已经取得256个event事件了,返回给inputreader处理。因为一开始mClosingDevices不存在,所以不会执行这段代码,
      只有上面的closeAllDevicesLocked执行了,才会执行这段代码。
15         while (mClosingDevices) {
16             Device* device = mClosingDevices;
17             LOGV("Reporting device closed: id=%d, name=%s\n",
18                  device->id, device->path.string());
19             mClosingDevices = device->next;
20             event->when = now;
21             event->deviceId = device->id == mBuiltInKeyboardId ? 0 : device->id;
22             event->type = DEVICE_REMOVED;
23             event += 1;
24             delete device;
25             mNeedToSendFinishedDeviceScan = true;
26             if (--capacity == 0) {
27                 break;
28             }
29         }
30
31         // 检查mNeedToScanDevices是否为true,如果为true,就执行设备扫描。在scanDevicesLocked里面,会打开/dev/input目录,并把循环调用
      openDeviceLocked,在openDeviceLocked里面int fd = open(devicePath, O_RDWR)打开一个input 设备
32          if (mNeedToScanDevices) {
33             mNeedToScanDevices = false;
34             scanDevicesLocked();
35             mNeedToSendFinishedDeviceScan = true;
36         }
37
38         // Check to see if the device is on our excluded list
39         // 判断这个设备是否已经存在,如果存在,就关闭退出。
40         for (size_t i = 0; i < mExcludedDevices.size(); i++) {
41             const String8& item = mExcludedDevices.itemAt(i);
42             if (identifier.name == item) {
43                 LOGI("ignoring event id %s driver %s\n", devicePath, item.string());
44                 close(fd);
45                 return -1;
46             }
47       }
下面得到设备一系列信息。
 1 // 创建一个eventhub层的device对象
 2   Device* device = new Device(fd, deviceId, String8(devicePath), identifier);
 3
 4 // Load the configuration file for the device.
 5 // 得到设备的idc配置文件,这就是为什么android4.0需要idc文件
 6     loadConfigurationLocked(device);
 7
 8 // Figure out the kinds of events the device reports.
 9     ioctl(fd, EVIOCGBIT(EV_KEY, sizeof(device->keyBitmask)), device->keyBitmask);
10     ioctl(fd, EVIOCGBIT(EV_ABS, sizeof(device->absBitmask)), device->absBitmask);
11     ioctl(fd, EVIOCGBIT(EV_REL, sizeof(device->relBitmask)), device->relBitmask);
12     ioctl(fd, EVIOCGBIT(EV_SW, sizeof(device->swBitmask)), device->swBitmask);
13     ioctl(fd, EVIOCGBIT(EV_LED, sizeof(device->ledBitmask)), device->ledBitmask);
14     ioctl(fd, EVIOCGPROP(sizeof(device->propBitmask)), device->propBitmask);
得到设备各种配置,接下设置device的class,就设备的类型
 1     // See if this is a touch pad.
 2     // Is this a new modern multi-touch driver?
 3     if (test_bit(ABS_MT_POSITION_X, device->absBitmask)
 4             && test_bit(ABS_MT_POSITION_Y, device->absBitmask)) {
 5         // Some joysticks such as the PS3 controller report axes that conflict
 6         // with the ABS_MT range.  Try to confirm that the device really is
 7         // a touch screen.
 8         if (test_bit(BTN_TOUCH, device->keyBitmask) || !haveGamepadButtons) {
 9             device->classes |= INPUT_DEVICE_CLASS_TOUCH | INPUT_DEVICE_CLASS_TOUCH_MT;
10         }
11     // Is this an old style single-touch driver?
12     } else if (test_bit(BTN_TOUCH, device->keyBitmask)
13             && test_bit(ABS_X, device->absBitmask)
14             && test_bit(ABS_Y, device->absBitmask)) {
15         device->classes |= INPUT_DEVICE_CLASS_TOUCH;
16     }
上面就是根据驱动程序里面的设置来判断input device是多点触摸还是单点触摸,现在是不是看到和触摸屏有点关系了。
1     // Determine whether the device is external or internal.
2     if (isExternalDeviceLocked(device)) {
3         device->classes |= INPUT_DEVICE_CLASS_EXTERNAL;
4     }
判断是不是外部设备,根据两个条件判断,一是在idc文件里面如果有“device.internal”存在,就是内部设备,否则是外部设备。如果没有这个域存在,根据硬件设备的总线判断,如果是usb和bluetooth bus,就是外部设备。这个留着后面有作用。
1     if (epoll_ctl(mEpollFd, EPOLL_CTL_ADD, fd, &eventItem))
2     // 将设备加入到mEpollFd监控里面
3
4     device->next = mOpeningDevices;
5     mOpeningDevices = device;
6     // 将设备加入需要打开设备链表里面
至此,/dev/input/下面所有的设备对于linux层都已经打开,并且都添加到了mEpollFd监控里面,但是android层面的device还没有添加和初始化,只是放在需要打开设备链表里面。接着设置mNeedToSendFinishedDeviceScan为true。因为mNeedToScanDevices初始化为true,因此第一次进入getEvents就会执行这部分代码。
 1       while (mOpeningDevices != NULL) {
 2             Device* device = mOpeningDevices;
 3             LOGV("Reporting device opened: id=%d, name=%s\n",
 4                  device->id, device->path.string());
 5             mOpeningDevices = device->next;
 6             event->when = now;
 7             event->deviceId = device->id == mBuiltInKeyboardId ? 0 : device->id;
 8             event->type = DEVICE_ADDED;
 9             event += 1;
10             mNeedToSendFinishedDeviceScan = true;
11             if (--capacity == 0) {
12                 break;
13             }
14         }
检查mOpeningDevices链表是否存在,如果存在,循环把需要添加的设备信息放在event里面,同时设置event type为DEVICE_ADDED。设置mNeedToSendFinishedDeviceScan为true。每循环一次,capacity减1,capacity等于0,就退出for循环,表明这次getEvents已经取得256个event事件了,返回给inputreader处理。因为一开始会执行mNeedToScanDevices 代码,只要/dev/input下面有设备节点存在,mOpeningDevices也会存在,所以开始就会执行这段代码。
1         if (mNeedToSendFinishedDeviceScan) {
2             mNeedToSendFinishedDeviceScan = false;
3             event->when = now;
4             event->type = FINISHED_DEVICE_SCAN;
5             event += 1;
6             if (--capacity == 0) {
7                 break;
8             }
9         }
如果mNeedToSendFinishedDeviceScan为true,就把FINISHED_DEVICE_SCAN信息放在event里面,同时capacity减1,capacity等于0,就退出for循环,表明这次getEvents已经取得256个event事件了,返回给inputreader处理。

