spring回顾系列——快速了解spring,使用spring开发
文章目录
-
- spring 回顾系列——快速认识spring,使用spring 开发
-
- spring 是什么?✔
- spring 的模块展示✌
- spring 项目的搭建开发
-
- 不使用maven工具搭建spring项目
- 使用maven搭建spring 项目
- spring 的核心认识❤
-
- IoC原理和IoC容器:
- Aop面向切面编程
- DI依赖注入
- spring xml中的对象定义:
-
- 依赖关系的对象定义,注入(内部类,外部类)
- 继承关系的对象注入
- spring 的作用域,生命周期
-
- 作用域:
- 生命周期:
- spring 自动装配,包括注解开发✨
-
- 自动装配:
- 注解装配:
- spring 小结
-
-
- 参考文件一:手写ApplicationContext类
- 参考文件二:手写ZSYBeanDefinitionReader类
-
spring 回顾系列——快速认识spring,使用spring 开发
spring 是什么?✔
Spring框架是一个开放源代码的J2EE应用程序框架,由[Rod Johnson](https://baike.baidu.com/item/Rod Johnson/1423612?fromModule=lemma_inlink)发起,是针对bean的生命周期进行管理的轻量级容器(lightweight container)。 Spring解决了开发者在J2EE开发中遇到的许多常见的问题,提供了功能强大IOC、AOP及Web MVC等功能。Spring可以单独应用于构筑应用程序,也可以和Struts、Webwork、Tapestry等众多Web框架组合使用,并且可以与 Swing等桌面应用程序AP组合。因此, Spring不仅仅能应用于J2EE应用程序之中,也可以应用于桌面应用程序以及小应用程序之中。Spring框架主要由七部分组成,分别是 Spring Core、 Spring AOP、 Spring ORM、 Spring DAO、Spring Context、 Spring Web和 Spring Web MVC。
上述介绍来自百度百科:spring(由Rod Johnson创建的一个开源框架)_百度百科 (baidu.com)
简单的说:spring 就是一个为了加快开发的java应用框架,解决了应用程序的解耦合工作,以及大大加快了开发速度
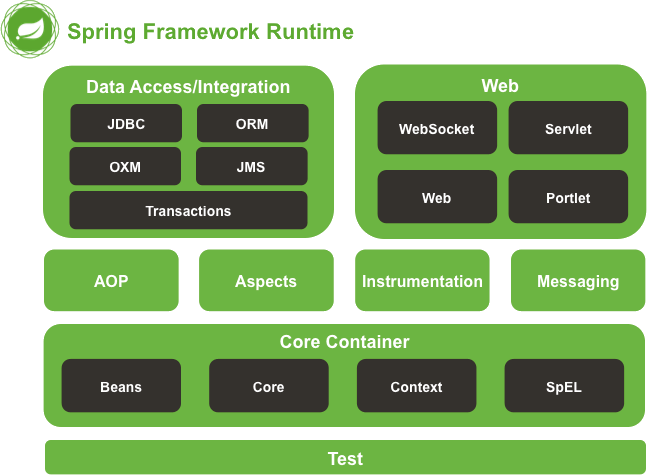
spring 的模块展示✌
spring-aop      spring-context-indexer  spring-instrument  spring-orm    spring-web
spring-aspects  spring-context-support  spring-jcl         spring-oxm    spring-webflux
spring-beans    spring-core             spring-jdbc        spring-r2dbc  spring-webmvc
spring-context  spring-expression       spring-jms         spring-test   spring-websocket
spring-messaging   spring-tx
‘’上述序号无实际意义“
引自:Spring体系结构 (biancheng.net)
其中包括有beans ,core ,context , exception ,aop 等主要核心模块
上层应用都是分别属于持久层和表示层的应用支持!
spring 项目的搭建开发
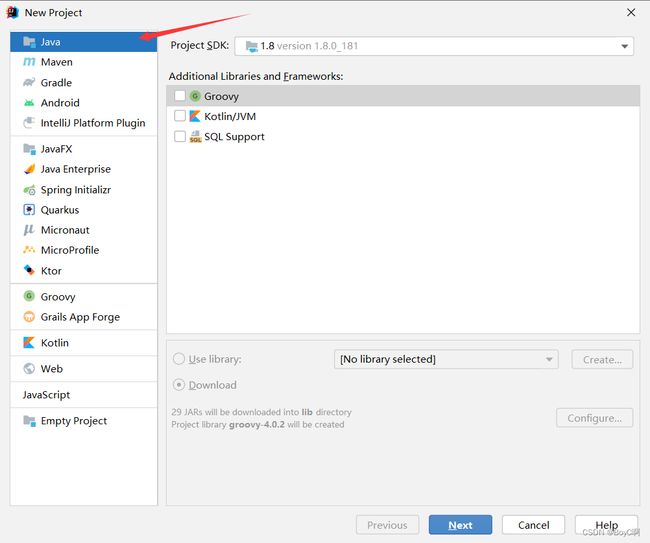
这里使用的开发工具使用IDEA ,根据个人需要也可以使用其他开发工具
- 搭建一个基本的java项目,包括但不限于使用手动导包和maven自动管理依赖来加入spring框架
不使用maven工具搭建spring项目
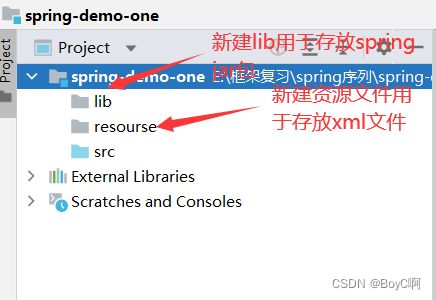
搭建完项目就是上述的情况
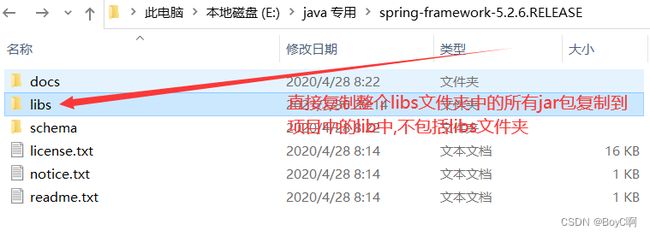
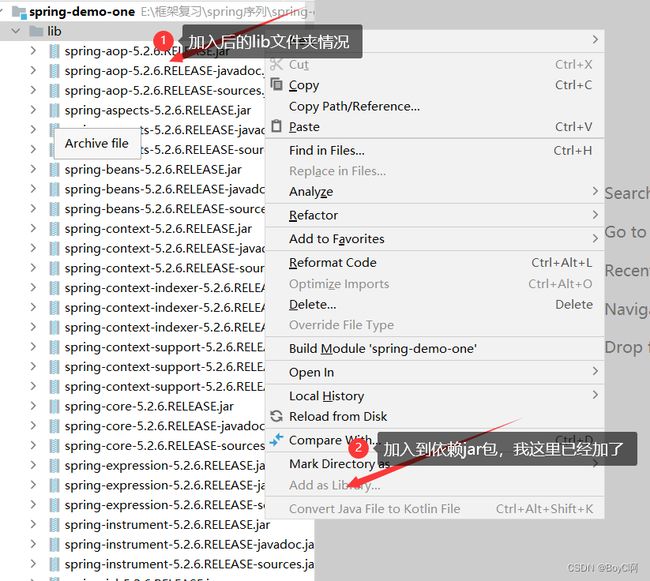
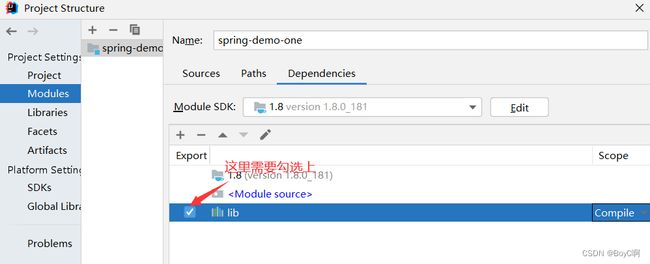
这里需要下载5个jar包,但我是一个比较随便的人,尽量减少不必要的麻烦,直接将整个spring 都加入lib中,如下所示
做到这里就基本已经完成spring 的导入了。下面开始实际的开发
创建一个HelloWorld类:
import org.springframework.beans.factory.BeanFactory;
import org.springframework.context.support.ClassPathXmlApplicationContext;

/**
 * Created by IntelliJ IDEA.
 *
 * @Author : zushiye
 * @create 2022/9/3 10:03
 */

public class HelloWorld {
    public String info;

    public void setInfo(String info) {
        this.info = info;
    }

    public String getInfo() {
        return info;
    }


}
创建一个Application类:
import org.springframework.beans.factory.BeanFactory;
import org.springframework.context.support.ClassPathXmlApplicationContext;

/**
 * Created by IntelliJ IDEA.
 *
 * @Author : zushiye
 * @create 2022/9/3 10:07
 */

public class Application {

    public static void main(String[] args) {
        BeanFactory beanFactory = new ClassPathXmlApplicationContext("./resource/beanDemo.xml");
        HelloWorld demo = beanFactory.getBean(HelloWorld.class,"helloWorld");
        System.out.println("info :"+demo.info);
    }
}
可以看见,这里的有一个ClassPathXmlApplicationContext(“”),这就是引入外部xml来定义bean的一个类,这里先不细究里面的实现,外边接受的是一个BeanFactory接口,一样,先挖坑,后面来填。==可以先说一下,beanFactory的实现,其实就是通这个Dom解析xml然后将xml中的bean标签加入到IOC容器里面,也就是一个hashMap,这里还是不细究。==我们继续往下开发。
在resource中创建一个beanDemo.xml文件
<beans xmlns="http://www.springframework.org/schema/beans"
       xmlns:xsi="http://www.w3.org/2001/XMLSchema-instance"
       xsi:schemaLocation="http://www.springframework.org/schema/beans http://www.springframework.org/schema/beans/spring-beans.xsd">
    <bean id = "helloWorld" class="HelloWorld">
        <property name="info" value="hello-world"/>
    bean>

beans>
之后就可以运行了:这里运行的是Application类,HelloWorld是作为被调用者测试控制反转的对象。
有的小伙伴可能会遇见一个问题:
其实就是一个文件没找到,那么就要仔细检查一下是不是xml路径有问题了,最简单的方法就是使用idea的ctrl键去点击文件了,如果可以跳转就是ok的。
使用maven搭建spring 项目
这里我们使用pom.xml将spring 导入到项目中
<project xmlns="http://maven.apache.org/POM/4.0.0" xmlns:xsi="http://www.w3.org/2001/XMLSchema-instance"
  xsi:schemaLocation="http://maven.apache.org/POM/4.0.0 http://maven.apache.org/xsd/maven-4.0.0.xsd">
  <modelVersion>4.0.0modelVersion>

  <groupId>com.zushiyegroupId>
  <artifactId>spring-demo-one-mavenartifactId>
  <version>1.0-SNAPSHOTversion>

  <name>spring-demo-one-mavenname>

  <url>http://www.example.comurl>

  <properties>
    <project.build.sourceEncoding>UTF-8project.build.sourceEncoding>
    <maven.compiler.source>1.8maven.compiler.source>
    <maven.compiler.target>1.8maven.compiler.target>
  properties>

  <dependencies>
    <dependency>
      <groupId>junitgroupId>
      <artifactId>junitartifactId>
      <version>4.12version>
      <scope>testscope>
    dependency>
    <dependency>
      <groupId>org.springframeworkgroupId>
      <artifactId>spring-contextartifactId>
      <version>5.3.15version>
    dependency>
  dependencies>
project>
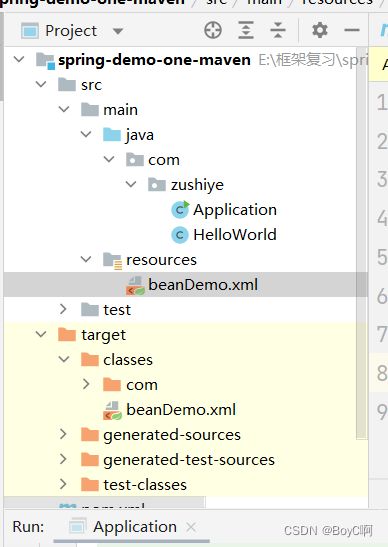
然后还是创建文件结构,和3个文件:
- Application.class
package com.zushiye;

import org.springframework.beans.factory.BeanFactory;
import org.springframework.context.support.ClassPathXmlApplicationContext;

/**
 * Created by IntelliJ IDEA.
 *
 * @Author : zushiye
 * @create 2022/9/3 10:36
 */

public class Application {

    public static void main(String[] args) {
        BeanFactory beanFactory = new ClassPathXmlApplicationContext("./beanDemo.xml");
        HelloWorld demo = beanFactory.getBean(HelloWorld.class,"helloWorld");
        System.out.println("info :"+demo.info);
    }
}
这里注意一下,路径是beanDemo.xml
- HelloWorld.class
package com.zushiye;

/**
 * Created by IntelliJ IDEA.
 *
 * @Author : zushiye
 * @create 2022/9/3 10:34
 */

public class HelloWorld {
    public String info;

    public String getInfo() {
        return info;
    }

    public void setInfo(String info) {
        this.info = info;
    }
}
<beans xmlns="http://www.springframework.org/schema/beans"
       xmlns:xsi="http://www.w3.org/2001/XMLSchema-instance"
       xsi:schemaLocation="http://www.springframework.org/schema/beans http://www.springframework.org/schema/beans/spring-beans.xsd">

    <bean id = "helloWorld" class="com.zushiye.HelloWorld">
        <property name="info" value="Hello-World"/>
    bean>
beans>
至此,spring的初始化使用就完成了,为了快速了解并使用spring ,后面一直都是使用spring - maven结构来继续开发的。
spring 的核心认识❤
IoC原理和IoC容器:
IoC(控制反转):可以理解未控制权反转,是什么的控制权反转呢,当然是对象的创建的控制权了,怎么理解这一说法,就拿我们自己来说,没有学习spring的时候,创建对象的方式有那么几种:
- new 一个对象
- 通过反射创建一个对象
- clone克隆一个对象
- 通过序列化操作创建一个对象
当然,用的最多的还是new 了。
所以,可以这样理解,我们需要什么的时候,我们先创建一个对象放进一个存储空间里面,这里可以指为堆空间中。然后我们用的时候去取。只是new 的时候创建和使用都是几乎同时发生的。这里可以学习一下这个模式,将创建权交给程序。也就是要用的时候就直接请求获取就好了。这就是IoC的基本雏形吧。
基本实现思路:
使用xml来定义对象实体,使用dom解析这个xml文件,在使用反射来生成对象,最后放入ioc容器,具体的细节就有很多要说的了,后话后话。毕竟怎么读取,怎么定义,怎么保存信息都是有必要详述的。
可以看一个版本的beanFactory接口的实现类 具体见参考文件一
ioc容器其实就是一个hashmap,通过id来索引对象,当然细节还是需要自己取探索
Aop面向切面编程
Spring 在运行期会为目标对象生成一个动态代理对象,并在代理对象中实现对目标对象的增强。
Spring AOP 的底层是通过以下 2 种动态代理机制,为目标对象(Target Bean)执行横向织入的。
这个方面我们后面细讲,埋坑埋坑。具体的化需要掌握设计模式中的代理模式,包括jdk的动态代理和CGLIB的动态代理。
DI依赖注入
依赖注入(Denpendency Injection,简写为 DI)是 Martin Fowler 在 2004 年在对“控制反转”进行解释时提出的。Martin Fowler 认为“控制反转”一词很晦涩,无法让人很直接的理解“到底是哪里反转了”,因此他建议使用“依赖注入”来代替“控制反转”。
依赖关系包括有组合和聚合,这里也不去细说,可以展示一个实例:
组合模式
public class A{
	B b;
}
聚合模式
public class A{
	public A(B b){
		String aInfo = b.getInfo();
	}
}
组合就是一损俱损的关系,聚合是脱离之后还可以存活的关系。
两者都是依赖关系,而且不难发现,A是依赖于B的,而这里的依赖注入就是,当我们需要创建一个A 的对象时,需要自动生成一个B并且注入到A中,保证A对象的可用
依赖注入可以说是Bean中属性注入的一种。代码中的自动注入和这里的注入方式是有些不同的,一个是Ioc注入,一个是通过需要是,程序员调用自动注入。
上述3点可以说是spring 主要的实现思路了,依赖注入可以泛化为属性注入。
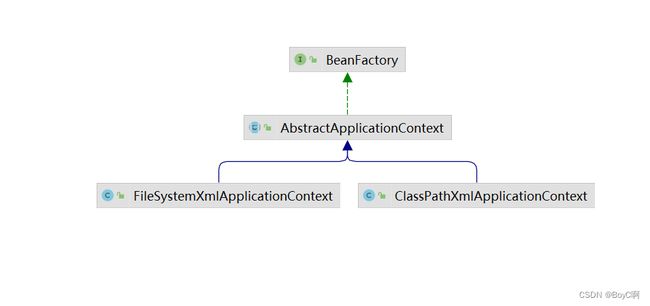
这里看一下beanFactory的继承图:
这里的话,就可以知道为什么是由classPathxmlApplication来获取bean了。
spring xml中的对象定义:
依赖关系的对象定义,注入(内部类,外部类)
这里的话,可以看一些视频,讲的一般都很细。
| 属性名称 | 描述 |
|---|---|
| id | Bean 的唯一标识符,Spring IoC 容器对 Bean 的配置和管理都通过该属性完成。id 的值必须以字母开始,可以使用字母、数字、下划线等符号。 |
| name | 该属性表示 Bean 的名称,我们可以通过 name 属性为同一个 Bean 同时指定多个名称,每个名称之间用逗号或分号隔开。Spring 容器可以通过 name 属性配置和管理容器中的 Bean。 |
| class | 该属性指定了 Bean 的具体实现类,它必须是一个完整的类名,即类的全限定名。 |
| scope | 表示 Bean 的作用域,属性值可以为 singleton(单例)、prototype(原型)、request、session 和 global Session。默认值是 singleton。 |
| constructor-arg | 元素的子元素,我们可以通过该元素,将构造参数传入,以实现 Bean 的实例化。该元素的 index 属性指定构造参数的序号(从 0 开始),type 属性指定构造参数的类型。 |
| property | 元素的子元素,用于调用 Bean 实例中的 setter 方法对属性进行赋值,从而完成属性的注入。该元素的 name 属性用于指定 Bean 实例中相应的属性名。 |
| ref | 和 等元素的子元索,用于指定对某个 Bean 实例的引用,即 元素中的 id 或 name 属性。 |
| value | 和 等元素的子元素,用于直接指定一个常量值。 |
| list | 用于封装 List 或数组类型的属性注入。 |
| set | 用于封装 Set 类型的属性注入。 |
| map | 用于封装 Map 类型的属性注入。 |
| entry | 元素的子元素,用于设置一个键值对。其 key 属性指定字符串类型的键值,ref 或 value 子元素指定其值。 |
| init-method | 容器加载 Bean 时调用该方法,类似于 Servlet 中的 init() 方法 |
| destroy-method | 容器删除 Bean 时调用该方法,类似于 Servlet 中的 destroy() 方法。该方法只在 scope=singleton 时有效 |
| lazy-init | 懒加载,值为 true,容器在首次请求时才会创建 Bean 实例;值为 false,容器在启动时创建 Bean 实例。该方法只在 scope=singleton 时有效 |
案例:下面代码都是加在上述的项目中
    <bean id = "driver" class = "com.zushiye.Driver">
        <property name="name" value="小张"/>
        <property name="age" value= "12" />
        <property name="home" ref="home"/>
    bean>

    <bean id = "home" class="com.zushiye.Home">
        <constructor-arg value="九江学院" index = "0" type="java.lang.String"/>
        <constructor-arg value= "7" index = "1"/>
    bean>
Driver.class
package com.zushiye;

/**
 * Created by IntelliJ IDEA.
 *
 * @Author : zushiye
 * @create 2022/9/3 12:37
 */

public class Driver {
    public String name;
    public int age;
    public Home home;

    public String getName() {
        return name;
    }

    public void setName(String name) {
        this.name = name;
    }

    public int getAge() {
        return age;
    }

    public void setAge(int age) {
        this.age = age;
    }

    public Home getHome() {
        return home;
    }

    public void setHome(Home home) {
        this.home = home;
    }

    @Override
    public String toString() {
        return "Driver{" +
                "name='" + name + '\'' +
                ", age=" + age +
                ", home=" + home.toString() +
                '}';
    }
}
Home.class
package com.zushiye;

/**
 * Created by IntelliJ IDEA.
 *
 * @Author : zushiye
 * @create 2022/9/3 12:38
 */

public class Home {
    public String addr;
    public Integer hight;

    public Home(String addr, int hight) {
        this.addr = addr;
        this.hight = hight;
    }

    public Home() {
    }

    @Override
    public String toString() {
        return "Home{" +
                "addr='" + addr + '\'' +
                ", hight=" + hight +
                '}';
    }
}
更新Application.class
package com.zushiye;

import org.springframework.beans.factory.BeanFactory;
import org.springframework.context.support.ClassPathXmlApplicationContext;

/**
 * Created by IntelliJ IDEA.
 *
 * @Author : zushiye
 * @create 2022/9/3 10:36
 */

public class Application {

    public static void main(String[] args) {
        BeanFactory beanFactory = new ClassPathXmlApplicationContext("./beanDemo.xml");
        HelloWorld demo = beanFactory.getBean(HelloWorld.class,"helloWorld");
        System.out.println("info :"+demo.info);
        Driver driver = beanFactory.getBean(Driver.class, "driver");
        System.out.println(driver);
    }
}
运行结果
具体的创建过程是先创建Home在创建Driver,具体思路可以参考递归。
后面的具体实现可以参考上面的表去做。
需要提醒的是,==通过set方法的话,set方法一定要是规范的,具体的实现是通过执行set拼接参数名来实现的,所以set方法一定要规范,如果是通过构造方式的话,需要与构造参数对应到,所以还是推荐要加入index参数。==最重要的一点,类中一定要有属性注入的方法,包括但不限与set,或者构造函数。对于注入内部类写法也是不唯一的。
继承关系的对象注入
    <bean id = "admin" class = "com.zushiye.Admin" parent="user">
        <property name="iden" value="管理员"/>
    bean>
    <bean id = "user" class="com.zushiye.User">
        <property name="id" value="用户"/>
        <property name="password" value="123456" />
    bean>
Admin.class
package com.zushiye;

/**
 * Created by IntelliJ IDEA.
 *
 * @Author : zushiye
 * @create 2022/9/3 13:07
 */

public class Admin extends User{
    public String iden;

    public String getIden() {
        return iden;
    }

    public void setIden(String iden) {
        this.iden = iden;
    }

    @Override
    public String toString() {
        return "Admin{" +
                "iden='" + iden + '\'' +
                ", id='" + id + '\'' +
                ", password='" + password + '\'' +
                '}';
    }
}
User.class
package com.zushiye;

/**
 * Created by IntelliJ IDEA.
 *
 * @Author : zushiye
 * @create 2022/9/3 13:07
 */

public class User {
    public String id;
    public String password;

    public String getId() {
        return id;
    }

    public void setId(String id) {
        this.id = id;
    }

    public String getPassword() {
        return password;
    }

    public void setPassword(String password) {
        this.password = password;
    }

    @Override
    public String toString() {
        return "User{" +
                "id='" + id + '\'' +
                ", password='" + password + '\'' +
                '}';
    }
}
更新Application.class
package com.zushiye;

import org.springframework.beans.factory.BeanFactory;
import org.springframework.context.support.ClassPathXmlApplicationContext;

/**
 * Created by IntelliJ IDEA.
 *
 * @Author : zushiye
 * @create 2022/9/3 10:36
 */

public class Application {

    public static void main(String[] args) {
        BeanFactory beanFactory = new ClassPathXmlApplicationContext("./beanDemo.xml");
        HelloWorld demo = beanFactory.getBean(HelloWorld.class,"helloWorld");
        System.out.println("info :"+demo.info);
        Driver driver = beanFactory.getBean(Driver.class, "driver");
        System.out.println(driver);
        Admin admin = beanFactory.getBean(Admin.class,"admin");
        System.out.println(admin);
    }
}
运行结果
spring 的作用域,生命周期
作用域:
| singleton | 默认值,单例模式,表示在 Spring 容器中只有一个 Bean 实例 |
|---|---|
| prototype | 原型模式,表示每次通过 Spring 容器获取 Bean 时,容器都会创建一个新的 Bean 实例。 |
| request | 每次 HTTP 请求,容器都会创建一个 Bean 实例。该作用域只在当前 HTTP Request 内有效。 |
| session | 同一个 HTTP Session 共享一个 Bean 实例,不同的 Session 使用不同的 Bean 实例。该作用域仅在当前 HTTP Session 内有效。 |
| application | 同一个 Web 应用共享一个 Bean 实例,该作用域在当前 ServletContext 内有效。 与 singleton 类似,但 singleton 表示每个 IoC 容器中仅有一个 Bean 实例,而一个 Web 应用中可能会存在多个 IoC 容器,但一个 Web 应用只会有一个 ServletContext,也可以说 application 才是 Web 应用中货真价实的单例模式。 |
| websocket | websocket 的作用域是 WebSocket ,即在整个 WebSocket 中有效。 |
大体的实现基本都是单例模式和原型模式,可以理解为(多例)
实现只需要加上scope参数
    <bean id = "person" class = "com.zushiye.Person" scope="prototype">
        <property name="name" value="ok"/>
        <property name="age" value="10"/>
    bean>
package com.zushiye;

/**
 * Created by IntelliJ IDEA.
 *
 * @Author : zushiye
 * @create 2022/9/3 13:21
 */

public class Person {
    public String name;
    public int age;

    public Person(String name, int age) {
        this.name = name;
        this.age = age;
    }

    public Person() {
    }

    public String getName() {
        return name;
    }

    public void setName(String name) {
        this.name = name;
    }

    public int getAge() {
        return age;
    }

    public void setAge(int age) {
        this.age = age;
    }

}
package com.zushiye;

import org.springframework.beans.factory.BeanFactory;
import org.springframework.context.support.ClassPathXmlApplicationContext;

/**
 * Created by IntelliJ IDEA.
 *
 * @Author : zushiye
 * @create 2022/9/3 10:36
 */

public class Application {

    public static void main(String[] args) {
        BeanFactory beanFactory = new ClassPathXmlApplicationContext("./beanDemo.xml");
        HelloWorld demo = beanFactory.getBean(HelloWorld.class,"helloWorld");
        System.out.println("info :"+demo.info);
        Driver driver = beanFactory.getBean(Driver.class, "driver");
        System.out.println(driver);
        Admin admin = beanFactory.getBean(Admin.class,"admin");
        System.out.println(admin);

        Person person1 = beanFactory.getBean("person",Person.class);
        Person person2 = beanFactory.getBean("person",Person.class);
        System.out.println(person1);
        System.out.println(person2);
    }
}
注意,Application写法改变了,遇见下面的异常可以参考一下这个
运行结果
单例模式就不演示了
生命周期:
包括有:
1.实例化对象
在设置好xml的时候,开始使用BeanDefinitionReader将xml文件读入内存,主要保留成为BeanDefinition类,用于存放对象的信息。在通过ApplicationContext进行第一步实例化。这里就会把配置信息放入容器里面,这里的容器不是IoC容器,而是BeanDefinitionMap中。
2.属性复制
通过属性注入将对象进行属性赋值。主要通过配置解析然后设置各个对象。
3.初始化
这里关于aware的都不会了解到,如果小伙伴们要了解的话,还得需要自己查找资料。因为初始化的第一步就是检查aware接口的状体,之后就正式开始做前处理,具体处理的类是BeanPostProcessor,包括有前置处理和后置处理。之后就是是否实现InitializingBean接口,是否配置自定义的init-method,在进行BeanPostProcessor中的后置处理。到此,初始化也就完成了。
4.销毁
很意外,在没开始用就想好了准备销毁,首先注册好Destruction的相关回调接口,然后就是使用,销毁实际过程是实现DisposableBean接口,检查是否配置有自定义的destory-method方法。至此,就可以销毁了,而这个生命周期也就结束了。
spring 自动装配,包括注解开发✨
自动装配:
| 属性值 | 说明 |
|---|---|
| byName | 按名称自动装配。 Spring 会根据的 Java 类中对象属性的名称,在整个应用的上下文 ApplicationContext(IoC 容器)中查找。若某个 Bean 的 id 或 name 属性值与这个对象属性的名称相同,则获取这个 Bean,并与当前的 Java 类 Bean 建立关联关系。 |
| byType | 按类型自动装配。 Spring 会根据 Java 类中的对象属性的类型,在整个应用的上下文 ApplicationContext(IoC 容器)中查找。若某个 Bean 的 class 属性值与这个对象属性的类型相匹配,则获取这个 Bean,并与当前的 Java 类的 Bean 建立关联关系。 |
| constructor | 与 byType 模式相似,不同之处在与它应用于构造器参数(依赖项),如果在容器中没有找到与构造器参数类型一致的 Bean,那么将抛出异常。 其实就是根据构造器参数的数据类型,进行 byType 模式的自动装配。 |
| default | 表示默认采用上一级元素 设置的自动装配规则(default-autowire)进行装配。 |
| no | 默认值,表示不使用自动装配,Bean 的依赖关系必须通过 和 元素的 ref 属性来定义。 |
已经接触过的装配方式包括set,和构造方法,对应上述的byName,constructor,
这里解释一下byType,Spring会扫描容器,然后把bean的类型与类型对应的建立关联,也就是装配到该对象。

上面图片就是具体的选择过程。
注解装配:
| 注解 | 说明 |
|---|---|
| @Component | 该注解用于描述 Spring 中的 Bean,它是一个泛化的概念,仅仅表示容器中的一个组件(Bean),并且可以作用在应用的任何层次,例如 Service 层、Dao 层等。 使用时只需将该注解标注在相应类上即可。 |
| @Repository | 该注解用于将数据访问层(Dao 层)的类标识为 Spring 中的 Bean,其功能与 @Component 相同。 |
| @Service | 该注解通常作用在业务层(Service 层),用于将业务层的类标识为 Spring 中的 Bean,其功能与 @Component 相同。 |
| @Controller | 该注解通常作用在控制层(如 Struts2 的 Action、SpringMVC 的 Controller),用于将控制层的类标识为 Spring 中的 Bean,其功能与 @Component 相同。 |
具体操作没有基于xml的繁琐,但也需要注意一些点。
更新beanDemo.xml
<beans xmlns="http://www.springframework.org/schema/beans"
       xmlns:xsi="http://www.w3.org/2001/XMLSchema-instance"
       xmlns:context="http://www.springframework.org/schema/context"
       xsi:schemaLocation="http://www.springframework.org/schema/beans http://www.springframework.org/schema/beans/spring-beans.xsd
            http://www.springframework.org/schema/context
            http://www.springframework.org/schema/context/spring-context.xsd">

    <bean id = "helloWorld" class="com.zushiye.HelloWorld">
        <property name="info" value="Hello-World"/>
    bean>


    <bean id = "driver" class = "com.zushiye.Driver">
        <property name="name" value="小张"/>
        <property name="age" value= "12" />
        <property name="home" ref="home"/>
    bean>

    <bean id = "home" class="com.zushiye.Home">
        <constructor-arg value="九江学院" index = "0" type="java.lang.String"/>
        <constructor-arg value= "7" index = "1"/>
    bean>

    <bean id = "admin" class = "com.zushiye.Admin" parent="user">
        <property name="iden" value="管理员"/>
    bean>
    <bean id = "user" class="com.zushiye.User">
        <property name="id" value="用户"/>
        <property name="password" value="123456" />
    bean>

    <bean id = "person" class = "com.zushiye.Person" scope="prototype" autowire="byName">
        <property name="name" value="ok"/>
        <property name="age" value="10"/>
    bean>

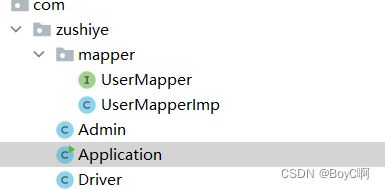
    <context:component-scan base-package="com.zushiye.mapper"/>
beans>
这里注意一点,命名空间要加上context,而且要开启组件扫描,指定扫描包
package com.zushiye.mapper;

public interface UserMapper {

    void showStr();
}
package com.zushiye.mapper;

import org.springframework.stereotype.Repository;

/**
 * Created by IntelliJ IDEA.
 *
 * @Author : zushiye
 * @create 2022/9/3 17:57
 */

@Repository("userMapper")
public class UserMapperImp implements UserMapper {
    @Override
    public void showStr() {
        System.out.println("userMapper...");
    }
}
在更新Application.class
package com.zushiye;

import com.zushiye.mapper.UserMapper;
import org.springframework.beans.factory.BeanFactory;
import org.springframework.context.support.ClassPathXmlApplicationContext;

/**
 * Created by IntelliJ IDEA.
 *
 * @Author : zushiye
 * @create 2022/9/3 10:36
 */

public class Application {

    public static void main(String[] args) {
        BeanFactory beanFactory = new ClassPathXmlApplicationContext("./beanDemo.xml");
        HelloWorld demo = beanFactory.getBean(HelloWorld.class,"helloWorld");
        System.out.println("info :"+demo.info);
        Driver driver = beanFactory.getBean(Driver.class, "driver");
        System.out.println(driver);
        Admin admin = beanFactory.getBean(Admin.class,"admin");
        System.out.println(admin);

        Person person1 = beanFactory.getBean("person",Person.class);
        Person person2 = beanFactory.getBean("person",Person.class);
        System.out.println(person1);
        System.out.println(person2);

        UserMapper mapper = beanFactory.getBean("userMapper",UserMapper.class);
        mapper.showStr();
    }
}
运行结果:
其他注解也可以这样使用。
有可能会有一个一疑问,就是我在一个没有main函数的类中怎么使用bean呢?
那么就需要@Autowired或者@Resource:
| 注解 | 说明 |
|---|---|
| @Autowired | 可以应用到 Bean 的属性变量、setter 方法、非 setter 方法及构造函数等,默认按照 Bean 的类型进行装配。 @Autowired 注解默认按照 Bean 的类型进行装配,默认情况下它要求依赖对象必须存在,如果允许 null 值,可以设置它的 required 属性为 false。如果我们想使用按照名称(byName)来装配,可以结合 @Qualifier 注解一起使用 |
| @Resource | 作用与 Autowired 相同,区别在于 @Autowired 默认按照 Bean 类型装配,而 @Resource 默认按照 Bean 的名称进行装配。 @Resource 中有两个重要属性:name 和 type。 Spring 将 name 属性解析为 Bean 的实例名称,type 属性解析为 Bean 的实例类型。如果指定 name 属性,则按实例名称进行装配;如果指定 type 属性,则按 Bean 类型进行装配;如果都不指定,则先按 Bean 实例名称装配,如果不能匹配,则再按照 Bean 类型进行装配;如果都无法匹配,则抛出 NoSuchBeanDefinitionException 异常。 |
| @Qualifier | 与 @Autowired 注解配合使用,会将默认的按 Bean 类型装配修改为按 Bean 的实例名称装配,Bean 的实例名称由 @Qualifier 注解的参数指定。 |
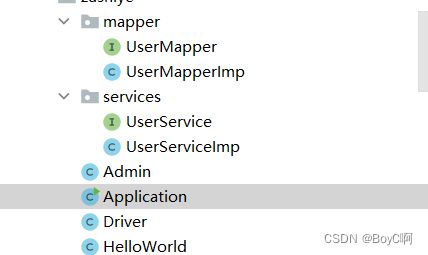
具体文件结构为:
具体代码为:
package com.zushiye.services;


public interface UserService {

    void showStr();
}
package com.zushiye.services;

import com.zushiye.mapper.UserMapper;
import org.springframework.beans.factory.annotation.Autowired;
import org.springframework.stereotype.Service;

/**
 * Created by IntelliJ IDEA.
 *
 * @Author : zushiye
 * @create 2022/9/3 18:09
 */

@Service("userService")
public class UserServiceImp implements UserService{

    @Autowired
    private UserMapper userMapper;


    @Override
    public void showStr() {
        userMapper.showStr();
        System.out.println("服务成功");
    }
}
package com.zushiye;

import com.zushiye.mapper.UserMapper;
import com.zushiye.services.UserService;
import org.springframework.beans.factory.BeanFactory;
import org.springframework.context.support.ClassPathXmlApplicationContext;

/**
 * Created by IntelliJ IDEA.
 *
 * @Author : zushiye
 * @create 2022/9/3 10:36
 */

public class Application {

    public static void main(String[] args) {
        BeanFactory beanFactory = new ClassPathXmlApplicationContext("./beanDemo.xml");
        HelloWorld demo = beanFactory.getBean(HelloWorld.class,"helloWorld");
        System.out.println("info :"+demo.info);
        Driver driver = beanFactory.getBean(Driver.class, "driver");
        System.out.println(driver);
        Admin admin = beanFactory.getBean(Admin.class,"admin");
        System.out.println(admin);

        Person person1 = beanFactory.getBean("person",Person.class);
        Person person2 = beanFactory.getBean("person",Person.class);
        System.out.println(person1);
        System.out.println(person2);

//        UserMapper mapper = beanFactory.getBean("userMapper",UserMapper.class);
//        mapper.showStr();
        UserService service = beanFactory.getBean("userService",UserService.class);
        service.showStr();
    }
}
作完上述更新一般都会有下面的异常:表示没有这个userService
原因就是我们指定的扫描包是mapper,改成com.zushiye.*就好了,*表示所有文件。
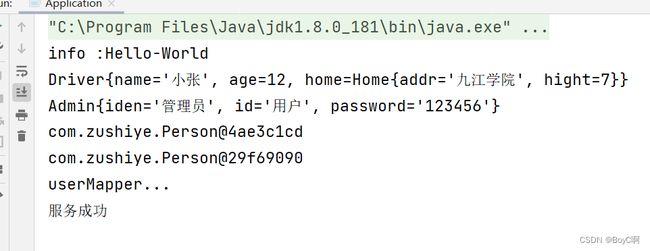
运行结果
spring 小结
现在,就已经回顾了spring 的基本使用了,后面就要开始Aop面向切面编程了。
这里从开始创建bean,Ioc,di,生命周期,作用域,注解开发。完成了sprin 的基本使用,具体的实现,可以阅读源码然后解析。也可以自己试着写一下。
参考文件一:手写ApplicationContext类
package com.zushiye.spring.framework.context;

import com.zushiye.spring.framework.annocation.ZSYAutowired;
import com.zushiye.spring.framework.annocation.ZSYController;
import com.zushiye.spring.framework.annocation.ZSYService;
import com.zushiye.spring.framework.beans.config.ZSYBeanDefinition;
import com.zushiye.spring.framework.beans.ZSYBeanWrapper;
import com.zushiye.spring.framework.beans.config.ZSYBeanPostProcessor;
import com.zushiye.spring.framework.context.support.ZSYDefaultListableBeanFactory;
import com.zushiye.spring.framework.core.ZSYBeanFactory;

import java.lang.reflect.Field;
import java.util.List;
import java.util.Map;
import java.util.Properties;
import java.util.concurrent.ConcurrentHashMap;

/**
 * Created by IntelliJ IDEA.
 *
 * @Author : zushiye
 * @create 2022/3/16 11:28
 */

/**
 * ioc的顶层接口
 */
public class ZSYApplicationContext extends ZSYDefaultListableBeanFactory implements ZSYBeanFactory {

    //配置文件地址信息
    private String[] configLocations;

    //bean信息阅读器
    private ZSYBeanDefinitionReader reader;

    //单例的ioc容器
    private Map<String,Object> factoryBeanObjectCache = new ConcurrentHashMap<String,Object>();

    //通用的ioc缓存
    private Map<String, ZSYBeanWrapper> factoryBeanInstanceCache = new ConcurrentHashMap<String,ZSYBeanWrapper>();

    public ZSYApplicationContext(String... configLocations) {
        this.configLocations = configLocations;
        try{
            refresh();
        } catch (Exception e) {
            e.printStackTrace();
        }
    }

    @Override
    public void refresh()throws Exception{
        //1.定位配置文件
        reader = new ZSYBeanDefinitionReader(this.configLocations);

        //2.加载配置文件
        List<ZSYBeanDefinition> beanDefinitions = reader.loadBeanDefinitions();

        //3.注册,把配置信息放到容器里面
        doRegisterBeanDefinition(beanDefinitions);

        //4.把不是延时加载的类提前初始化
        doAutowrited();
    }

    private void doAutowrited() {
        for(Map.Entry<String,ZSYBeanDefinition> beanDefinitionEntry:super.beanDefinitionMap.entrySet()){
            String beanName = beanDefinitionEntry.getKey();
            if(!beanDefinitionEntry.getValue().isLazyInit()){
                try {
                    getBean(beanName);
                } catch (Exception e) {
                    e.printStackTrace();
                }
            }
        }
    }

    private void doRegisterBeanDefinition(List<ZSYBeanDefinition> beanDefinitions)throws Exception{
        for(ZSYBeanDefinition beanDefinition:beanDefinitions){

            //如哦已经存储了就抛出已经存在的异常
            if(super.beanDefinitionMap.containsKey(beanDefinition.getFactoryBeanName())){
                throw new Exception("The“"+beanDefinition.getFactoryBeanName()+"” is exists!");
            }
            //否则将信息放入map中
            super.beanDefinitionMap.put(beanDefinition.getFactoryBeanName(),beanDefinition);
        }
        //这就是容器的初始化
    }

    @Override
    public Object getBean(String beanName) throws Exception {
        //实现getBean(DI)<依赖注入>
        //得到一个类的信息
        ZSYBeanDefinition beanDefinition = super.beanDefinitionMap.get(beanName);

        try{
            //生成通知事件
            ZSYBeanPostProcessor beanPostProcessor = new ZSYBeanPostProcessor();

            //解析一个beanDefinition
            Object instance = instantiateBean(beanDefinition);
            if(null == instance){
                return null;
            }

            //调用前置处理
            beanPostProcessor.postProcessBeforeInitialization(instance,beanName);

            //包装适配bean
            ZSYBeanWrapper beanWrapper = new ZSYBeanWrapper(instance);

            //放入通用的bean
            this.factoryBeanInstanceCache.put(beanName,beanWrapper);

            //调用后置处理函数
            beanPostProcessor.postProcessAfterInitialization(instance,beanName);

            //自动注入
            populateBean(beanName,instance);

        }catch(Exception e){
            e.printStackTrace();
        }

        return null;
    }

    //解析beanDefinition
    private Object instantiateBean(ZSYBeanDefinition beanDefinition){
        Object instance = null;
        String className = beanDefinition.getBeanClassName();
        try{

            //先查看是否有单例
            if(this.factoryBeanObjectCache.containsKey(className)){
                instance = this.factoryBeanObjectCache.get(className);
            }else{
                Class<?> clazz = Class.forName(className);
                instance = clazz.newInstance();

                //记住将实例放进单例里面呢
                this.factoryBeanObjectCache.put(beanDefinition.getFactoryBeanName(),instance);
            }
            return instance;
        } catch (Exception e) {
            e.printStackTrace();
        }
        return null;
    }

    //自动注入
    private void populateBean(String beanName ,Object instance){
        Class clazz = instance.getClass();

        //如果不是自动注入直接跳过
        if(!(clazz.isAnnotationPresent(ZSYController.class)||clazz.isAnnotationPresent(ZSYService.class))){
            return;
        }

        Field[] fields = clazz.getDeclaredFields();

        //解析属性
        for(Field field:fields){
            if(!field.isAnnotationPresent(ZSYAutowired.class)){
                continue;
            }
            ZSYAutowired autowired = field.getAnnotation(ZSYAutowired.class);

            String autowiredBeanName = autowired.value().trim();

            //默认小写参数明注入
            if("".equals(autowiredBeanName)){
                autowiredBeanName = field.getType().getName();
            }

            field.setAccessible(true);
            try{
                field.set(instance,this.factoryBeanInstanceCache.get(autowiredBeanName).getWrappedInstance());
            } catch (IllegalAccessException e) {
                e.printStackTrace();
            }
        }
    }

    @Override
    public Object getBean(Class<?> beanClass) throws Exception {
        return getBean(beanClass.getName());
    }

    public String[] getBeanDefinitionNames(){
        return this.beanDefinitionMap.keySet().toArray(new String[this.beanDefinitionMap.size()]);
    }

    public int getBeanDefinitionCount(){
        return this.beanDefinitionMap.size();
    }

    public Properties getConfig(){
        return this.reader.getConfig();
    }
}
参考文件二:手写ZSYBeanDefinitionReader类
package com.zushiye.spring.framework.context;

/**
 * Created by IntelliJ IDEA.
 *
 * @Author : zushiye
 * @create 2022/3/16 11:30
 */

import com.zushiye.spring.framework.beans.config.ZSYBeanDefinition;

import java.io.File;
import java.io.IOException;
import java.io.InputStream;
import java.net.URL;
import java.util.ArrayList;
import java.util.List;
import java.util.Properties;

/**
 * 配置信息解析器,读取,查找
 */
public class ZSYBeanDefinitionReader {

    //用来保存类的类全名信息
    private List<String> registyBeanClasses = new ArrayList<String>();

    private Properties config = new Properties();

    //固定配置文件的key,相当于xml的规范
    private final String SCAN_PACKAGE = "scanPackage";

    public ZSYBeanDefinitionReader(String... locations){
        //通过url找到与其对应的文件,然后转换为文件流
        InputStream is = this.getClass().getClassLoader().getResourceAsStream(locations[0].replace("calsspath:",""));

        try{
            config.load(is);
        }catch (IOException e ){
            e.printStackTrace();
        }finally {
            if(null!=is){
                try{
                    is.close();
                }catch (IOException e){
                    e.printStackTrace();
                }
            }
        }
        doScanner(config.getProperty(SCAN_PACKAGE));
    }

    private void doScanner(String scanPackage){
        //转换为文件路劲,实际就是把.替换成/
        URL url = this.getClass().getClassLoader().getResource("/"+scanPackage.replace("\\.","/"));
        File classPath = new File(url.getFile());
        for(File file : classPath.listFiles()){
            if(file.isDirectory()){
                //是文件夹的话就递归一直解析
                doScanner(scanPackage+"."+file.getName());
            }else{
                //不是类文件就不解析
                if(!file.getName().endsWith(".class")){
                    continue;
                }
                //把.class去除
                String className = (scanPackage+"."+file.getName().replace(".class",""));

                //加入注册信息
                registyBeanClasses.add(className);
            }
        }
    }

    public Properties getConfig(){
        return this.config;
    }

    //将加载信息转换成bean信息类
    public List<ZSYBeanDefinition> loadBeanDefinitions(){
        List<ZSYBeanDefinition> result = new ArrayList<ZSYBeanDefinition>();
        try{
            for(String className : registyBeanClasses){
                Class<?> beanClass = Class.forName(className);
                if(beanClass.isInterface()){
                    continue;
                }
                result.add(doCreateBeanDefinition(toLowerFirstCase(beanClass.getSimpleName()),beanClass.getName()));

                Class<?> [] interfaces = beanClass.getInterfaces();
                for(Class<?> i : interfaces){
                    result.add(doCreateBeanDefinition(i.getName(),beanClass.getName()));
                }
            }
        }catch (Exception e){
            e.printStackTrace();
        }
        return result;
    }

    //实际解析配置信息
    private ZSYBeanDefinition doCreateBeanDefinition(String factoryBeanName,String beanClassName){
        ZSYBeanDefinition beanDefinition = new ZSYBeanDefinition();
        beanDefinition.setBeanClassName(beanClassName);
        beanDefinition.setFactoryBeanName(factoryBeanName);
        return beanDefinition;
    }

    //大小写解析
    private String toLowerFirstCase(String simpleName){
        char[] chars = simpleName.toCharArray();
        chars[0]+=32;
        return String.valueOf(chars);
    }


}
