tensorflow 1.13 cpu win10 安装 + object_detection 环境搭建 + paddle OCR
1. 安装anaconda
自行官网下载安装,安装完成后进入anaconda的命令窗口。
为了下载快速,添加镜像源
conda config --add channels https://mirrors.tuna.tsinghua.edu.cn/anaconda/pkgs/free/
conda config --add channels https://mirrors.tuna.tsinghua.edu.cn/anaconda/pkgs/main/
conda config --set show_channel_urls yes
2.创建tensorflow的环境, 并安装python 3.6
conda create -n tensorflow python=3.63.激活环境
conda activate tensorflow4.在该环境中安装tensorflow CPU版: conda install tensorflow==1.13.2
5. 测试是否安装成功
备注:运行不是如上图所示,说明numpy的版本不对,需要安装对应的numpy版本。
pip install numpy==1.16.56.安装其它依赖包
(tensorflow) C:\> pip install lxml
(tensorflow) C:\> pip install Cython
(tensorflow) C:\> pip install matplotlib
(tensorflow) C:\> pip install pandas
(tensorflow) C:\> pip install opencv-python
这个过程中,如果numpy被再次升级导致tensorflow 会有兼容性问题。 因此需要降级回去
pip install numpy==1.16.4
安装paddle ocr: 基于AI的文字识别库
pip install paddlepaddle==2.2.2 -i https://mirror.baidu.com/pypi/simpl
pip install "paddleocr>=2.4"
如果安装six提示版本过低,但是想安装高版本时,卸载不了,可以通过以下手段直接安装
pip install six --upgrade --ignore-installed six

(因为之前安装tensorflow时会安装six 但是版本不对,所以忽略之前安装的six再进行安装一次)
如果提示
ERROR: pip's dependency resolver does not currently take into account all the packages that are installed. This behaviour is the source of the following dependency conflicts.
datasets 2.3.2 requires numpy>=1.17, but you have numpy 1.16.6 which is incompatible. numpy

目前用不到datasets,所以可以直接卸载了
pip uninstall datasets

ERROR: pip's dependency resolver does not currently take into account all the packages that are installed. This behaviour is the source of the following dependency conflicts.
tensorboard 1.13.1 requires markdown>=2.6.8, which is not installed.
pyarrow 6.0.1 requires numpy>=1.16.6, but you have numpy 1.16.5 which is incompatible.
datasets 2.3.2 requires numpy>=1.17, but you have numpy 1.16.5 which is incompatible.

按照提示:
pip install markdown==2.6.8
pip install numpy==1.16.5
-------------------------分割线------------以上-------Tensorflow的环境至此搭建完成----------------------------
-------------------------分割线-------------以下------搭建Object Dectective环境----------------------------
1. 从GitHub下载TensorFlow物体识别API库
这里需要根据你安装的tensorflow的版本下载对应的模型。比如当前我们安装的是tensorflow 1.13.0则下载分支r1.13.0
GitHub - tensorflow/models at r1.13.0
| TensorFlow version | GitHub Models Repository Commit |
|---|---|
| TF v1.7 | https://github.com/tensorflow/models/tree/adfd5a3aca41638aa9fb297c5095f33d64446d8f |
| TF v1.8 | https://github.com/tensorflow/models/tree/abd504235f3c2eed891571d62f0a424e54a2dabc |
| TF v1.9 | GitHub - tensorflow/models at d530ac540b0103caa194b4824af353f1b073553b |
| TF v1.10 | https://github.com/tensorflow/models/tree/b07b494e3514553633b132178b4c448f994d59df |
| TF v1.11 | GitHub - tensorflow/models at 23b5b4227dfa1b23d7c21f0dfaf0951b16671f43 |
| TF v1.12 | https://github.com/tensorflow/models/tree/r1.12.0 |
| TF v1.13 | https://github.com/tensorflow/models/tree/r1.13.0 |
| Latest version | GitHub - tensorflow/models: Models and examples built with TensorFlow |
下载完后,解压zip到你合适的文件夹
(一定要做)添加环境变量:
名:PYTHONPATH
D:\05_programe_files\anaconda\envs\tensorflow\models\research;D:\05_programe_files\anaconda\envs\tensorflow\models\research\slim;D:\05_programe_files\anaconda\envs\tensorflow\models
可以使用“echo %PYTHONPATH%”查看它是否被设置
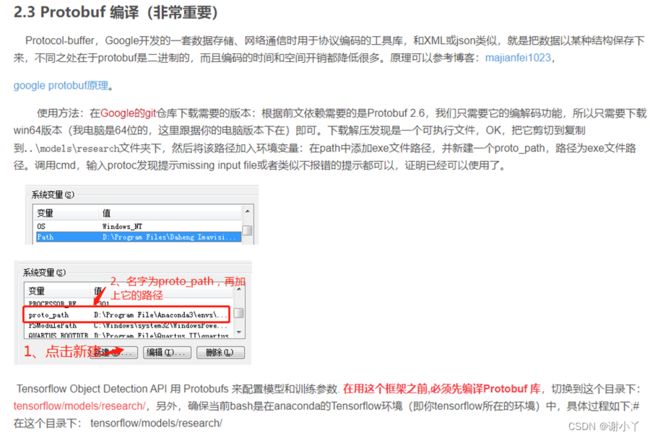
2.安装protobuf:
模型地址:从github上下载模型,下载地址:https://github.com/tensorflow/models
protobuf下载路径 Releases · protocolbuffers/protobuf · GitHub
切换到 tensorflow/models/research目录下后:
执行:
protoc object_detection/protos/*.proto --python_out=. 如果没有报错,则执行成功,检查一下object_detection/protos目录下是否存在对应的py文件。
3. build object detective 库
最终,在你的路径\tensorflow\models\research路径下运行如下命令:
(tensorflow) C:\tensorflow1\models\research> python setup.py build
(tensorflow) C:\tensorflow1\models\research> python setup.py install
4. 验证安装成功, 到你的路径\tensorflow\models\research路径下运行如下命令:
python object_detection/builders/model_builder_test.py

D:\10_program_files\anaconda3\envs\tensorflow1\lib\site-packages\numpy\lib\type_check.py:546: DeprecationWarning: np.asscalar(a) is deprecated since NumPy v1.16, use a.item() instead
  'a.item() instead', DeprecationWarning, stacklevel=1)
.WARNING:tensorflow:From D:\10_program_files\anaconda3\envs\tensorflow1\models\research\object_detection\anchor_generators\grid_anchor_generator.py:59: to_float (from tensorflow.python.ops.math_ops) is deprecated and will be removed in a future version.
Instructions for updating:
Use tf.cast instead.
....................s
----------------------------------------------------------------------
Ran 22 tests in 0.076s

OK (skipped=1)5.安装labelImg(标注图片的工具)
pip install labelImg
运行完成后,会在anaconda3\envs\tensorflow1\Scripts下生成一个labelImg.exe, 但是我不知道为啥我在其它目录下命令行直接输入labelImg会报, 但是可以在anaconda3\envs\tensorflow1\Scripts目录下是可以直接敲入labelImg进行打开
  File "D:\10_program_files\anaconda3\envs\tensorflow1\lib\runpy.py", line 193, in _run_module_as_main
    "__main__", mod_spec)
  File "D:\10_program_files\anaconda3\envs\tensorflow1\lib\runpy.py", line 85, in _run_code
    exec(code, run_globals)
  File "D:\10_program_files\anaconda3\envs\tensorflow1\Scripts\labelImg.exe\__main__.py", line 4, in
ModuleNotFoundError: No module named 'labelImg.labelImg'; 'labelImg' is not a package 可以在D:\projects\AI_study\labelImg-master\data\predefined_classes.txt 定义你新的类型
注意在安装这个的过程中,numpy会升级成1.19版本,需要pip uninstall numpy, 然后再
pip install numpy==1.16.0。 如果重装安装1.16版本有报错,需要重复该操作直到没有报错为止。
至此环境准备完成。 接下来的事情可以参照:
GitHub - holidayun/Tesorflow-Object-Detection-API-Training-Windows-Tutorial: tensorflow object detection api tools
参考文章:
https://github.com/EdjeElectronics/TensorFlow-Object-Detection-API-Tutorial-Train-Multiple-Objects-Windows-10
https://blog.csdn.net/qq_37764129/article/details/88863494
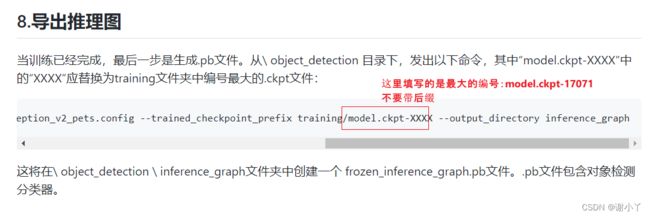
注意事项:
如果是根据:GitHub - holidayun/Tesorflow-Object-Detection-API-Training-Windows-Tutorial: tensorflow object detection api tools
来训练你的模型,最后一步注意:


