(病理图像读写)病理图像(whole slide images,WSI)的读写(.svs, .tiff),使用openslide,和pyvips以及matlab
今天对病理图像的读写进行一个小介绍。先说结论,如果不需要读很小倍率的图像,pyvips比openslide快很多,写SVS的话用matlab。
病理图像的存储有很多种格式,可以看如下图:

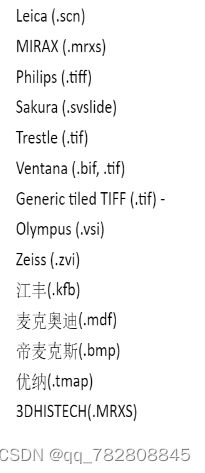
常见的是.svs, .tif,.mrxs。今天就只讲.svs和.tif。.mrxs手上没有数据。但依然可以用openslide读取,以后有机会再展开。
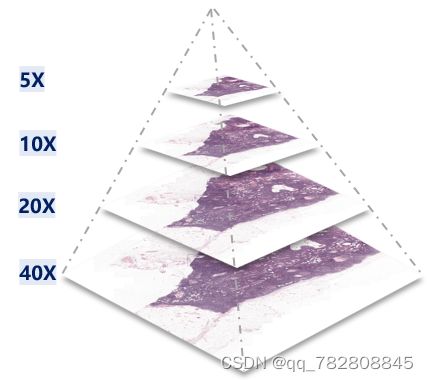
在python上读取.svs和.tif的方式是一样的,因为.svs本质上就是一个tif,采用的数据格式和压缩方式都是一样的。示意图图下:
简单的读取可以如下:
from openslide import OpenSlide
filePath = 'file.tif'
slide   = OpenSlide(filePath)
#查看文件的金字塔结构,从中选取需要读取的层。
print(slide.level_dimensions)
# 输出结果如下:
# ((90624, 214528), (45312, 107264), (22656, 53632), (11328, 26816), (5664, 13408), (2832, 6704), (1416, 3352), (708, 1676), (354, 838), (177, 419))
#假如说需要读取40X的层,那就是第0层,代码如下:

img_40X = np.array(location=slide.read_region((0,0),level=0,size=slide.level_dimensions[0]),dtype = np.uint8)[:,:,0:3]
# level表示要读的层数,我们可以从slide.level_dimensions查看需要的层
# location表示读取时图像的起始坐标,需要注意的是,不管我们读取哪个level的图像,这个点都填的是40X的坐标。
#比如说我们读取40X下起始点是(100,100)终点是(324,324)大小的patch,那location=(100,100),size=(224,224),level=0
img_40X_small = np.array(location=slide.read_region((100,100),level=0,size=(324,324)),dtype = np.uint8)[:,:,0:3]
#如果需要读取10X的一样视野的图像那个,size就应该是(224//4,224//4), level=2, 但location依然是(100,100)
img_10X_small = np.array(location=slide.read_region((100,100),level=2,size=(224//4,224//4)),dtype = np.uint8)[:,:,0:3]
location的好处是允许我们自定义读取的起始点,有时候我们需要排除wsi中的空白,就可以根据所画的ROI来决定起始点和size。
另一种方式是使用pyvips来读取,这个就简单很多:
import pyvips
svs_file = 'file.svs'
img = pyvips.Image.new_from_file(svs_file)
# crop(起始点x,起始点y,长,宽)
img2 = img.crop(x1, y1, h, w)
img2 = np.asarray(img2, dtype=np.uint8)
pyvips我没有找到如何读取其他level的方法,只能读取level=0,如果知道怎么读取其他层的朋友,请分享我一下代码,万分感谢。
pyvips的读取速度要比openslide快很多,如果不是需要读取level很高的图像,我都推荐用pyvips。我用工作站读取了一个(49821, 93298)大小的WSI,openslide花费162.94秒,pyvips花费42.79秒。越大的图像pyvips就会越快。
如果要写tif的话,我个人推荐用matlab。在python上写多层的tif文件我没有成功过,可能是因为python对tif的支持不好。写的代码如下:
function writesvs(imgdata, file_name)
    size2 = fix(size(imgdata));
    img_fist = imresize(imgdata, [size2(1) size2(2)]);

    size2 = fix(size(imgdata)/2);
    img_half = imresize(imgdata, [size2(1) size2(2)]);
    %
    size3 = fix(size(imgdata)/4);
    img_third = imresize(imgdata, [size3(1) size3(2)]);

    size4 = fix(size(imgdata)/8);
    img_four = imresize(imgdata, [size4(1) size4(2)]);
    %img_four = imgdata(1:64:end,1:64:end,:);

    t = Tiff(file_name,'w');
	%写40X的图像
	tagstruct.ImageDescription = "Aperio Image Library |AppMag = 40|MPP = 0.265018";
	tagstruct.ImageLength = size(img_fist ,1);
	tagstruct.ImageWidth = size(img_fist ,2);
	tagstruct.Photometric = Tiff.Photometric.RGB;
	tagstruct.BitsPerSample = 8;
	tagstruct.SamplesPerPixel = 3;
	tagstruct.RowsPerStrip = 16;
	tagstruct.PlanarConfiguration = Tiff.PlanarConfiguration.Chunky;
	tagstruct.Software = 'MATLAB';
	tagstruct.TileWidth = 240;
	tagstruct.TileLength = 240;
	tagstruct.Compression = 7;
	tagstruct.JPEGQuality = 80;
	setTag(t,tagstruct)

	write(t,img_fist );
	writeDirectory(t);

	%写20X的图像
    tagstruct2.ImageDescription = "Aperio Image Library |AppMag = 20|MPP = 0.51";
    tagstruct2.ImageLength = size(img_half,1);
    tagstruct2.ImageWidth = size(img_half,2);
    tagstruct2.Photometric = Tiff.Photometric.RGB;
    tagstruct2.BitsPerSample = 8;
    tagstruct2.SamplesPerPixel = 3;
    tagstruct2.RowsPerStrip = 16;
    tagstruct2.PlanarConfiguration = Tiff.PlanarConfiguration.Chunky;
    tagstruct2.Software = 'MATLAB';
    tagstruct2.TileWidth = 240;
    tagstruct2.TileLength = 240;
    tagstruct2.Compression = 7;
    tagstruct2.JPEGQuality = 80;
    setTag(t,tagstruct2)

    write(t,img_half);
    writeDirectory(t);

	%写10X的图像
    tagstruct3.ImageDescription = "Aperio Image Library";
    tagstruct3.ImageLength = size(img_third,1);
    tagstruct3.ImageWidth = size(img_third,2);
    tagstruct3.Photometric = Tiff.Photometric.RGB;
    tagstruct3.BitsPerSample = 8;
    tagstruct3.SamplesPerPixel = 3;
    tagstruct3.RowsPerStrip = 16;
    tagstruct3.PlanarConfiguration = Tiff.PlanarConfiguration.Chunky;
    tagstruct3.Software = 'MATLAB';
    tagstruct3.TileWidth = 240;
    tagstruct3.TileLength = 240;
    tagstruct3.Compression = 7;
    tagstruct3.JPEGQuality = 80;
    setTag(t,tagstruct3)

    write(t,img_third);
    writeDirectory(t);

	%写5X的图像
    tagstruct4.ImageDescription = "Aperio Image Library";
    tagstruct4.ImageLength = size(img_four,1);
    tagstruct4.ImageWidth = size(img_four,2);
    tagstruct4.Photometric = Tiff.Photometric.RGB;
    tagstruct4.BitsPerSample = 8;
    tagstruct4.SamplesPerPixel = 3;
    tagstruct4.RowsPerStrip = 16;
    tagstruct4.PlanarConfiguration = Tiff.PlanarConfiguration.Chunky;
    tagstruct4.Software = 'MATLAB';
    tagstruct4.TileWidth = 240;
    tagstruct4.TileLength = 240;
    tagstruct4.Compression = 7;
    tagstruct4.JPEGQuality = 80;
    setTag(t,tagstruct4)

    write(t,img_four);
    close(t);
end