Nginx实现本地http转https请求
目录
前言:
一、安装nginx
二、安装OpenSSL
1、下载OpenSSL:
2、配置环境变量:
2.1:配置环境变量,OpenSSL_HOME
2.2:配置path
三、生成https证书
1、创建ssl文件夹用于存放证书。创建私钥 (建议使用系统窗口,不要用gitBash 有涉及到选择的地方,gitBash无法选择)
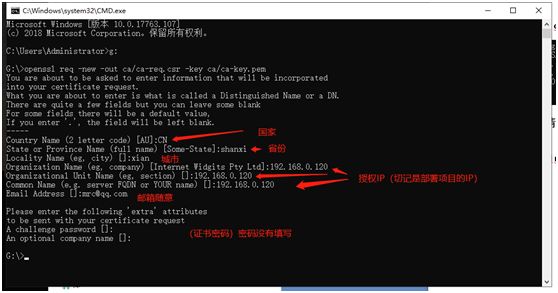
2、文件夹中生成shidian.key文件 创建csr证书。
3、复制 shidian.key 并重命名 shidian.key.org 执行命令
4、生成crt证书
四、修改nginx.conf配置,使用https请求
五、关于对https请求的理解
1、为什么要用https?
2、http存在的问题
3、什么是https?
1、https定义:
2、SSL证书:
3、SSL发展史:
4、浏览器在使用HTTPS传输数据的流程是什么?
5、HTTPS的缺点
6、HTTP与HTTPS的对比
前言:
项目中有需要做接口回调,测试和dev环境都是https方式请求调用没有问题,但是本地调试不通。因为本地启动后端服务都是http请求,所以使用nginx代理,将http请求转换为https请求,方便调试。
一、安装nginx
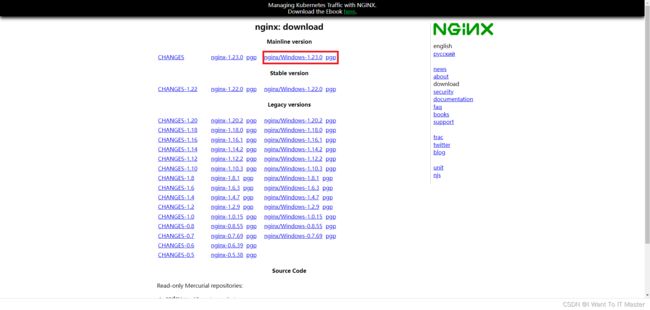
Nginx官网:nginx: download
安装到非中文目录下:
启动Nginx:点击nginx.exe文件,启动nginx
然后访问:
二、安装OpenSSL
OpenSSL官网:Win32/Win64 OpenSSL Installer for Windows - Shining Light Productions
1、下载OpenSSL:
放到一个非中文的目录下去:
2、配置环境变量:
2.1:配置环境变量,OpenSSL_HOME
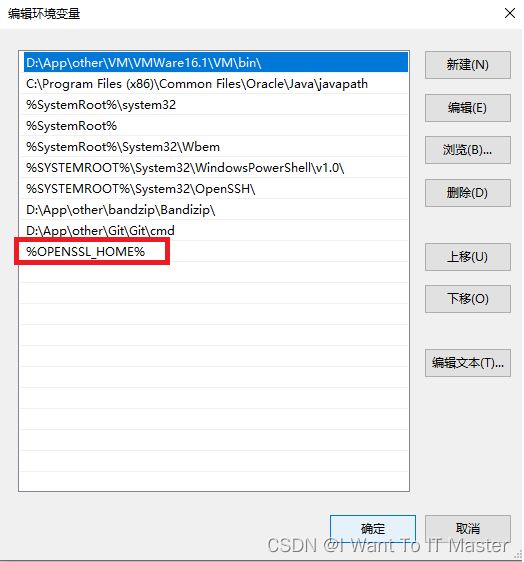
2.2:配置path
三、生成https证书
首先在Nginx得文件夹中新建一个ssl文件夹:
1、创建ssl文件夹用于存放证书。创建私钥 (建议使用系统窗口,不要用gitBash 有涉及到选择的地方,gitBash无法选择)
openssl genrsa -des3 -out shidian.key 1024 //shidian 自己取的名字
可以输入pass作为初始的密码,两次一致。
2、文件夹中生成shidian.key文件 创建csr证书。
openssl req -new -key shidian.key -out shidian.csr
此时应该有两个文件:
3、复制 shidian.key 并重命名 shidian.key.org 执行命令
openssl rsa -in shidian.key.org -out shidian.key
4、生成crt证书
openssl x509 -req -days 365 -in shidian.csr -signkey shidian.key -out shidian.crt
最终的文件夹里的内容为:
四、修改nginx.conf配置,使用https请求
整个nginx.conf文件配置:
#user nobody;
worker_processes 1;#error_log logs/error.log;
#error_log logs/error.log notice;
#error_log logs/error.log info;#pid logs/nginx.pid;
events {
worker_connections 1024;
}
http {
include mime.types;
default_type application/octet-stream;#log_format main '$remote_addr - $remote_user [$time_local] "$request" '
# '$status $body_bytes_sent "$http_referer" '
# '"$http_user_agent" "$http_x_forwarded_for"';#access_log logs/access.log main;
sendfile on;
#tcp_nopush on;#keepalive_timeout 0;
keepalive_timeout 65;#gzip on;
server {
listen 80;
server_name localhost;#charset koi8-r;
#access_log logs/host.access.log main;
location / {
root html;
index index.html index.htm;
}#error_page 404 /404.html;
# redirect server error pages to the static page /50x.html
#
error_page 500 502 503 504 /50x.html;
location = /50x.html {
root html;
}# proxy the PHP scripts to Apache listening on 127.0.0.1:80
#
#location ~ \.php$ {
# proxy_pass http://127.0.0.1;
#}# pass the PHP scripts to FastCGI server listening on 127.0.0.1:9000
#
#location ~ \.php$ {
# root html;
# fastcgi_pass 127.0.0.1:9000;
# fastcgi_index index.php;
# fastcgi_param SCRIPT_FILENAME /scripts$fastcgi_script_name;
# include fastcgi_params;
#}# deny access to .htaccess files, if Apache's document root
# concurs with nginx's one
#
#location ~ /\.ht {
# deny all;
#}
}
# another virtual host using mix of IP-, name-, and port-based configuration
#
#server {
# listen 8000;
# listen somename:8080;
# server_name somename alias another.alias;# location / {
# root html;
# index index.html index.htm;
# }
#}
# HTTPS server
#
server {
listen 443 ssl;
server_name localhost;# ssl_certificate cert.pem;
# ssl_certificate_key cert.key;
ssl_certificate ..//ssl//shidian.crt;
ssl_certificate_key ..//ssl//shidian.key;ssl_session_cache shared:SSL:1m;
ssl_session_timeout 5m;ssl_ciphers HIGH:!aNULL:!MD5;
ssl_prefer_server_ciphers on;location / {
root html;
index index.html index.htm;
}
}
}
关于ssl配置
server {
listen 443 ssl;
server_name localhost;# ssl_certificate cert.pem;
# ssl_certificate_key cert.key;
ssl_certificate ..//ssl//shidian.crt; 指的是ssl证书
ssl_certificate_key ..//ssl//shidian.key; 指的是ssl的密钥ssl_session_cache shared:SSL:1m;
ssl_session_timeout 5m;ssl_ciphers HIGH:!aNULL:!MD5;
ssl_prefer_server_ciphers on;location / {
root html;
index index.html index.htm;
}
}
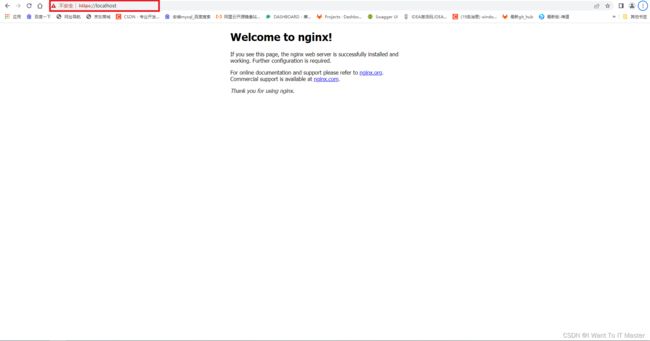
进行https请求访问:
给nginx配置https请求成功!
五、关于对https请求的理解
1、为什么要用https?
之前我们大部分的请求都是用的http的请求,现在为什么突然要用到https请求?
实际使用中,绝大多数的网站现在都采用的是https协议,这也是未来互联网发展的趋势。
在wireshark抓取的一个博客网站的登录请求过程中,访问的账号密码都是明文传输, 这样客户端发出的请求很容易被不法分子截取利用,因此,HTTP协议不适合传输一些敏感信息,比如:各种账号、密码等信息,使用http协议传输隐私信息非常不安全。
2、http存在的问题
- 请求信息明文传输,容易被窃听截取。
- 数据的完整性未校验,容易被篡改
- 没有验证对方身份,存在冒充危险
3、什么是https?
1、https定义:
HTTPS 协议(HyperText Transfer Protocol over Secure Socket Layer):一般理解为HTTP+SSL/TLS,通过 SSL证书来验证服务器的身份,并为浏览器和服务器之间的通信进行加密。
那么问题来了,什么是SSL证书?
2、SSL证书:
1、SSL(Secure Socket Layer,安全套接字层):1994年为 Netscape 所研发,SSL 协议位于 TCP/IP 协议与各种应用层协议之间,为数据通讯提供安全支持。
2、TLS(Transport Layer Security,传输层安全):其前身是 SSL,它最初的几个版本(SSL 1.0、SSL 2.0、SSL 3.0)由网景公司开发,1999年从 3.1 开始被 IETF 标准化并改名,发展至今已经有 TLS 1.0、TLS 1.1、TLS 1.2 三个版本。SSL3.0和TLS1.0由于存在安全漏洞,已经很少被使用到。TLS 1.3 改动会比较大,目前还在草案阶段,目前使用最广泛的是TLS 1.1、TLS 1.2。
3、SSL发展史:
- 1994年NetSpace公司设计SSL协议(Secure Sockets Layout)1.0版本,但未发布。
- 1995年NetSpace发布SSL/2.0版本,很快发现有严重漏洞
- 1996年发布SSL/3.0版本,得到大规模应用
- 1999年,发布了SSL升级版TLS/1.0版本,目前应用最广泛的版本
- 2006年和2008年,发布了TLS/1.1版本和TLS/1.2版本
4、浏览器在使用HTTPS传输数据的流程是什么?
- 首先客户端通过URL访问服务器建立SSL连接。
- 服务端收到客户端请求后,会将网站支持的证书信息(证书中包含公钥)传送一份给客户端。
- 客户端的服务器开始协商SSL连接的安全等级,也就是信息加密的等级。
- 客户端的浏览器根据双方同意的安全等级,建立会话密钥,然后利用网站的公钥将会话密钥加密,并传送给网站。
- 服务器利用自己的私钥解密出会话密钥。
- 服务器利用会话密钥加密与客户端之间的通信
5、HTTPS的缺点
- HTTPS协议多次握手,导致页面的加载时间延长近50%;
- HTTPS连接缓存不如HTTP高效,会增加数据开销和功耗;
- 申请SSL证书需要钱,功能越强大的证书费用越高。
- SSL涉及到的安全算法会消耗 CPU 资源,对服务器资源消耗较大。
6、HTTP与HTTPS的对比
- HTTPS是HTTP协议的安全版本,HTTP协议的数据传输是明文的,是不安全的,HTTPS使用了SSL/TLS协议进行了加密处理。
- http和https使用连接方式不同,默认端口也不一样,http是80,https是443。
今天的分享就到这了,希望能够帮助到你!


