windows安装anaconda tensorflow keras并在pycharm中使用
一、安装anaconda
- 集成环境anaconda,安装numpy、scipy、six、matplotlib等几十个扩展包方便,python的大部分扩展包,都集成在anaconda
- python3.8.6
- https://www.anaconda.com “download”

“next”-“I agree”-选择"all users"-“next”-更改目录-“next”-不勾选第一项(自己配环境变量),勾选第二项-install-next-next-取消两个勾选
安装目录:D:\software\anaconda
勾选解释:
1.不要勾选“Add Anaconda to my PATH environment variable.”(“添加Anaconda至我的环境变量。”)。因为如果勾选,则将会影响其他程序的使用。如果使用Anaconda,则通过打开Anaconda Navigator或者在开始菜单中的“Anaconda Prompt”(类似macOS中的“终端”)中进行使用。
2.选择Anaconda作为默认的Python编译器。这个选项会令诸如PyCharm、Wing等IDE开发环境自动检测Anaconda的存在。
除非你打算使用多个版本的Anaconda或者多个版本的Python,否则便勾选“Register Anaconda as my default Python 3.6”。 - 配置anaconda环境变量
系统变量-path中新建下面,配置好后重启。
D:\software\anaconda
D:\software\anaconda\Scripts
D:\software\anaconda\Library\bin
D:\software\anaconda\Library\mingw-w64\bin
- 测试
C:\Users\dulei>conda -V
conda 4.12.0
二、使用anaconda安装tensorflow
tensorflow cpu版本:https://pypi.tuna.tsinghua.edu.cn/simple/tensorflow-cpu/
- 安装tf2
tensorflow_cpu-2.2.2-cp38-cp38-win_amd64.whl
conda create -n tfpy38 pip python=3.8//创建名字为tfpy38的虚拟环境并安装python3.8
activate tfpy38//激活tfpy38环境 deactivate tfpy38//退出环境
(tfpy38) D:\software\tensorflow>pip install tensorflow_cpu-2.2.2-cp38-cp38-win_amd64.whl
//遇到报错: which is not on PATH.解决:https://zhuanlan.zhihu.com/p/454816609
- 验证
//tfpy38环境里python版本3.8.13
(tfpy38) C:\WINDOWS\system32>python
Python 3.8.13 (default, Mar 28 2022, 06:59:08) [MSC v.1916 64 bit (AMD64)] :: Anaconda, Inc. on win32
Type "help", "copyright", "credits" or "license" for more information.
>>> import os
>>> os.environ['TF_CPP_MIN_LOG_LEVEL'] = '2'
>>> import tensorflow as tf
>>> print(tf.__version__)
//2.2.2
- 安装tf1
tensorflow_cpu-1.15.0-cp37-cp37m-win_amd64.whl
conda create -n tf115py37 pip python=3.7

//报错InvalidArchiveError:原来安装过,可能是因为之前安装失败残留的文件。手动删除文件或文件夹是没有用的,需要改文件夹权限才可以解决。参考:https://blog.csdn.net/weixin_41693880/article/details/122310125
安装tf1:设置-Anaconda Prompt-python-cd到whl文件的目录位置
activate tf115py37
(tf115py37) D:\software\tensorflow>pip install tensorflow_cpu-1.15.0-cp37-cp37m-win_amd64.whl
- 验证
python
>>> import tensorflow as tf
>>> import os
>>> os.environ['TF_CPP_MIN_LOG_LEVEL'] = '2'
>>> hello = tf.constant('Hello, TensorFlow!')
>>> sess = tf.Session()
>>> print(sess.run(hello))
输出:b'Hello, TensorFlow!'
报错:TypeError: Descriptors cannot not be created directly.
If this call came from a _pb2.py file, your generated code is out of date and must be regenerated with protoc >= 3.19.0.
If you cannot immediately regenerate your protos, some other possible workarounds are:
 1. Downgrade the protobuf package to 3.20.x or lower.
 2. Set PROTOCOL_BUFFERS_PYTHON_IMPLEMENTATION=python (but this will use pure-Python parsing and will be much slower).
解决:https://blog.csdn.net/qq_41650747/article/details/124994674
三、pycharm中添加conda虚拟环境
- 添加conda环境
D:\software\anaconda\envs\tfpy38\python.exe
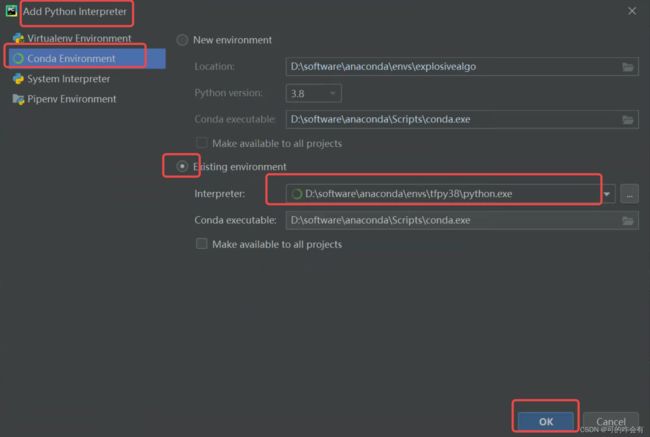
配置好后 run是灰色就重启pycharm - 测试
import tensorflow as tf
print(tf.__version__)
输出2.2.2
四 、安装keras、matplotlib
- tf在2.0之后完全集成了keras,直接使用就可以使用方式
- tf1版本安装keras
tf版本要与keras版本对应:https://blog.csdn.net/lijunyan5/article/details/119347804
//安装
activate tf115py37
pip install keras==2.3.1
//验证
python
import keras
显示Using TensorFlow backend.则说明安装成功,
3. tf1版本安装matplotlib
activate tf115py37
conda install matplotlib
//验证
python
import matplotlib
- tf1安装pandas
activate tf115py37//注意:一定要切换到你想要装的环境里
pip install -i https://pypi.douban.com/simple pandas
- tf1安装sklearn
activate tf115py37
conda install scikit-learn
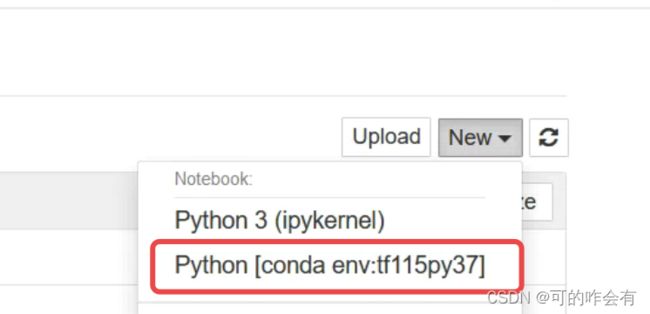
五、在Jupyter Notebook 使用虚拟环境
activate tf115py37
conda install ipykernel		# 安装jupyter内核
# 添加虚拟环境到jupyter中 将虚拟环境引用到Jupyter中
python -m ipykernel install --user --name tf115py37 --display-name "Python [conda env:tf115py37]"
添加成功。
上面是原生的python环境
六、安装h5py
Python3的str 默认不是bytes,所以不能decode,只能先encode转为bytes,再decode
>activate tf115py37
>pip install h5py==2.10 --user