浅谈装饰模式
要点
² 改变单个或者多种单个对象的行为,但不需要创建一个或者多个新的派生类;
² 也就是提取多种现有对象需要的某些共同行为,把这些行为作为一种装饰提取出来,建立装饰类;
² 或者说对于一个系统中的多个需要创建的类,通过提取共同行为称为一个或者多个装饰行为,从而建立很多装饰类来完成这些行为;
² 装饰类避免了系统中类型数量的成倍增长,也就是可以用来避免创建大量新的派生类;
² 运行时,在系统中需要创建大量的小对象,但是使得系统条例清晰,易于理解;
² “设计模式”建议,Decorator类应该是抽象类,要从这个抽象类派生出所有能实际工作的具体的Decorator;
² 使用了装饰模式的系统,原有的对象一定是具备共同的行为,或者需要新增共同行为;
² 装饰模式提供了给一个类添加职责的方式,它比继承更加灵活和简单,易于理解;
用途
例如,对于windows控件,要实现一个可拖动大小的外框。要是对每个控件都派生出一个可拖动大小的类,重新实现这个功能,那么工作量非常巨大,并且系统中地类型将成倍增加。但是如果我们实现一个这样功能的装饰类,这个类可以接管windows控件的边框拖动事件,那么实现就会被大大简化。这种例子已经有了,实际应用中指需要创建一个这样的对象,让它附着在当前控件上起作用。
再如,假设一个系统中有很多I/O类,它们负责各种数据流的传输。现在需要统计每个I/O的每分钟的流量,那么如果用派生方法,必须对每个I/O类型产生一个派生类,从而完成这个流量统计功能;但是如果可以构建一个具备流量统计功能的类,让它附着在每个I/O对象上起作用,那么不用建立那么多派生类,就可以完成这个工作。
实例

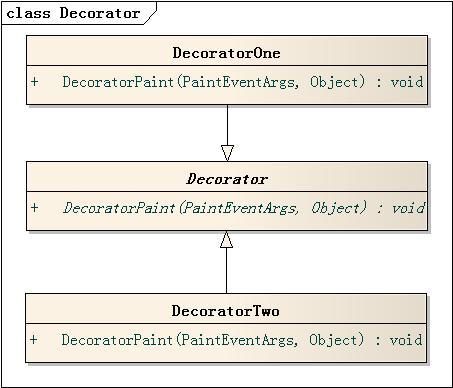
如图1所示,为了给Windows窗体控件添加一些特殊效果 --- 一个是左斜线,一个是右斜线,这里用装饰模式来实现这个功能。
Decorator是装饰的抽象层虚基类。它实现一个DecoratorPaint方法来完成各种装饰任务,这个方法的设计是依据windows控件Control类型的绘制事件的响应函数原型来实现的,这样就可以把装饰类的方法直接挂接到控件的绘制事件。这一点从抽象层上保证了扩展性,也就是可以方便地扩展很多不同的特殊装饰效果出来,应用到windows控件。

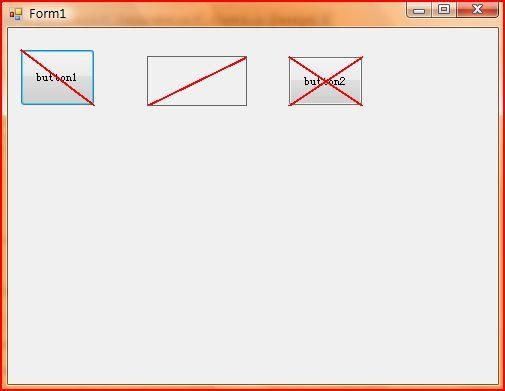
图2是这个程序的执行效果。第一个控件应用了第一个装饰对象,第二个用了第二个装饰对象,第三个控件应用了两个装饰对象。如此一来,我们可以用左斜线和右斜线来装饰许多windows控件,而没有必要从每个控件派生一个类出来,实现我们的需要。从而,装饰模式可以避免在一个系统里面类或者对象过多,降低设计的复杂性。
代码:
using System;
using System.Windows.Forms;
namespace DesignPattern.Decorator
{
public abstract class Decorator
{
public Decorator()
{
}
///<summary>
///绘制函数
///</summary>
///<param name="e"></param>
///<param name="sender"></param>
public abstract void DecoratorPaint(Object sender, PaintEventArgs e);
}//end Decorator
}//end namespace Decorator
using System;
using System.Drawing;
using System.Windows.Forms;
namespace DesignPattern.Decorator
{
public class DecoratorOne : Decorator
{
///<summary>
///装饰绘制函数,绘制左斜线“"”
///</summary>
///<param name="e"></param>
///<param name="sender"></param>
public override void DecoratorPaint(Object sender, PaintEventArgs e)
{
using (Pen pen = new Pen(Color.Red, 2))
{
e.Graphics.DrawLine(pen, e.ClipRectangle.X, e.ClipRectangle.Y, e.ClipRectangle.X + e.ClipRectangle.Width, e.ClipRectangle.Y + e.ClipRectangle.Height);
}
}
}//end DecoratorOne
}//end namespace Decorator
using System;
using System.Drawing;
using System.Windows.Forms;
namespace DesignPattern.Decorator {
public class DecoratorTwo : Decorator
{
///<summary>
///装饰绘制函数,绘制右斜线“/”
///</summary>
///<param name="e"></param>
///<param name="sender"></param>
public override void DecoratorPaint(Object sender, PaintEventArgs e)
{
using (Pen pen = new Pen(Color.Red, 2))
{
e.Graphics.DrawLine(pen, e.ClipRectangle.X, e.ClipRectangle.Bottom + e.ClipRectangle.Y, e.ClipRectangle.X + e.ClipRectangle.Right, e.ClipRectangle.Y);
}
}
}//end DecoratorTwo
}//end namespace Decorator
using System;
using System.Collections.Generic;
using System.ComponentModel;
using System.Data;
using System.Drawing;
using System.Linq;
using System.Text;
using System.Windows.Forms;
using DesignPattern.Decorator;
namespace decorator
{
public partial class Form1 : Form
{
public Form1()
{
InitializeComponent();
}
private void Form1_Load(object sender, EventArgs e)
{
DecoratorOne one = new DecoratorOne();
DecoratorTwo two = new DecoratorTwo();
this.button1.Paint += new PaintEventHandler(one.DecoratorPaint);
this.pictureBox1.Paint += new PaintEventHandler(two.DecoratorPaint);
this.button2.Paint += new PaintEventHandler(one.DecoratorPaint);
this.button2.Paint += new PaintEventHandler(two.DecoratorPaint);
}
}
}