Qt之超简单的TCP通信(自定义TCP通信类,含源码+注释)
文章目录
- 一、TCP通信示例图
- 二、TCP使用前的准备
- 三、自定义TCP通信类的两种方法
- 四、源码(含注释)
-
- TCP Server
-
- CTcpServer.h
- CTcpServer.cpp
- TCP Client
-
- CTcpSocket.h
- CTcpSocket.cpp
- CMainWindow类(自定义TCP通信类的调用)
-
- CMainWindow.h
- CMainWindow.cpp
- 总结
- 相关文档
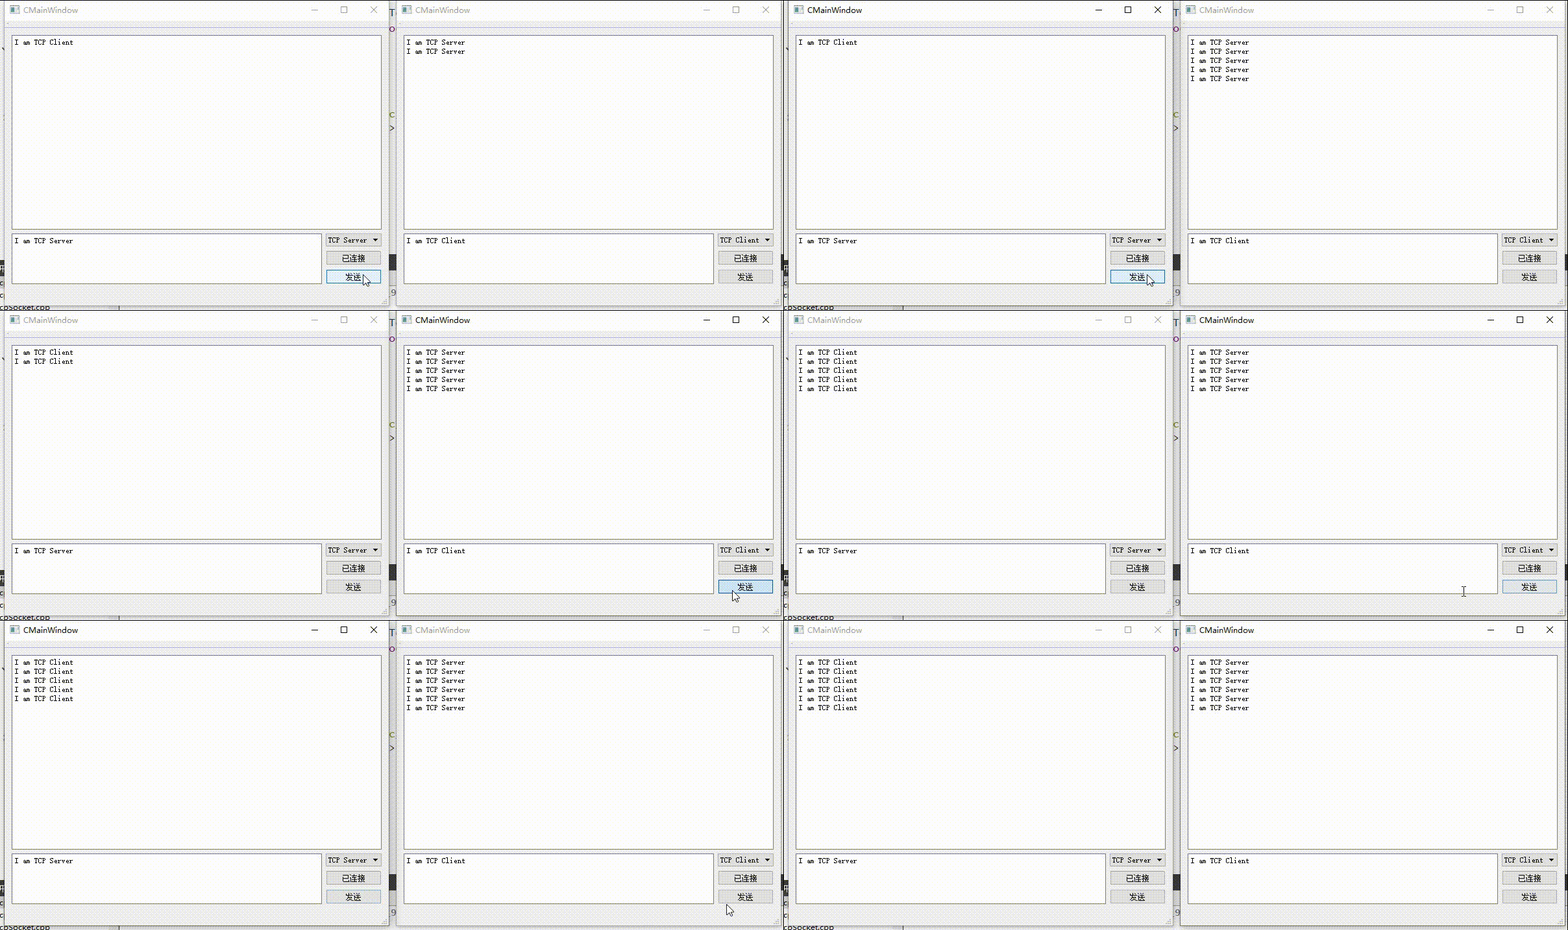
一、TCP通信示例图
下图为TCP通信的简单界面,能是实现简单的TCP连接和发送信息,源码在本文第四节(源码含详细注释)

提示:不会使用Qt设计师设计界面的小伙伴点击这里
二、TCP使用前的准备
- 在pro文件中添加 “QT += network”(需要添加后才能使用网络通信)
- TCP发送可以通过write函数
- TCP读取可以通过read函数
- TCP收到新信息时会发出readyRead信号
- TCP服务端有新连接时会发出newConnection信号
- TCP服务端需要保存连接进来的客户端指针(方便通信)
三、自定义TCP通信类的两种方法
- 类继承对应的TCP类,通过this指针实现TCP操作(本文使用该方法)
- 类中包含对应的TCP类对象,通过该对象实现TCP操作
注:以上两种方法最好不要合并使用,如果指针/对象使用不对有可能会出现如下类似的问题:QIODevice::write (QTcpSocket): device not open
四、源码(含注释)
TCP Server
CTcpServer.h
#ifndef CTCPSERVER_H
#define CTCPSERVER_H
#include CTcpServer.cpp
#include "CTcpServer.h"
#include TCP Client
CTcpSocket.h
#ifndef CTCPSOCKET_H
#define CTCPSOCKET_H
#include CTcpSocket.cpp
#include "CTcpSocket.h"
#include CMainWindow类(自定义TCP通信类的调用)
CMainWindow.h
#ifndef CMAINWINDOW_H
#define CMAINWINDOW_H
#include CMainWindow.cpp
#include "CMainWindow.h"
#include "ui_CMainWindow.h"

CMainWindow::CMainWindow(QWidget *parent)
    : QMainWindow(parent)
    , ui(new Ui::CMainWindow)
    , m_server(nullptr)
    , m_client(nullptr)

{
    ui->setupUi(this);
}

CMainWindow::~CMainWindow()
{
    if(nullptr != m_server)
    {
        delete m_server;
        m_server = nullptr;
    }

    if(nullptr != m_client)
    {
        delete m_client;
        m_client = nullptr;
    }

    delete ui;
}

void CMainWindow::on_connectBtn_clicked()
{
    //当连接后直接返回
    if("已连接" == ui->connectBtn->text())
        return;

    if(0 == ui->typeComboBox->currentIndex())
    {
        m_server = new CTcpServer;
        connect(m_server, &CTcpServer::recvDataSignal, this, &CMainWindow::on_appendData);
    }
    else
    {
        m_client = new CTcpSocket;
        connect(m_client, &CTcpSocket::recvDataSignal, this, &CMainWindow::on_appendData);
    }
    //设置按钮文本
    ui->connectBtn->setText("已连接");
}

void CMainWindow::on_sendBtn_clicked()
{
    if(0 == ui->typeComboBox->currentIndex())
    {
        m_server->sendData(ui->textEdit->toPlainText());
    }
    else
    {
        m_client->sendData(ui->textEdit->toPlainText());
    }
}

void CMainWindow::on_appendData(QString data)
{
    ui->textBrowser->append(data);
}
总结
TCP通信中不像UDP通信中两端都要绑定IP和端口号,并且TCP通信也更加安全。
在本文中不论时服务器还是客户端的IP和端口号都是代码写死的,若是需要能人性化的设置,在界面中添加两个QLineEdit且在自定义的通信类中添加设置IP和端口号的接的,调用该接口并将文本框中的对应值传入即可。若是有兴趣还可实现数据校验、重连、断开连接、指定客户端发送等功能。
相关文档
自定义UDP类
友情提示——哪里看不懂可私哦,让我们一起互相进步吧
(创作不易,请留下一个免费的赞叭 谢谢 ^o^/)
注:文章为作者编程过程中所遇到的问题和总结,内容仅供参考,若有错误欢迎指出。
注:如有侵权,请联系作者删除