opencv学习(四)numpy操作数组输出图片
1、读取一张照片,并对所有像素点取反
import cv2 as cv
import numpy as np


def access_pixels(image):
    print(image.shape)
    height = image.shape[0]	# 像素行数
    weight = image.shape[1]	#像素列数
    channels = image.shape[2]
    print("height:{}\tweight:{}\tchannels:{}".format(height, weight, channels))
    for hei in range(height):  # 遍历所有像素点,对所有像素点执行操作
        for wei in range(weight):
            for cha in range(channels):
                pv = image[hei, wei, cha]
                image[hei, wei, cha] = 255 - pv
    cv.imshow("pixels", image)

src = cv.imread("D://ophotos//out.png")
cv.namedWindow("input image", cv.WINDOW_AUTOSIZE)
cv.imshow("input image", src)
access_pixels(src)
cv.waitKey(0)
cv.destroyAllWindows()
在这里,认为每一张图片由二维像素点组成,分别表示像素的行、列数,而每一个像素点又是一个长度为三,取值为0-255的数组。
转换前:
转换后:
2、快捷方法,取反函数直接对数据取反
import cv2 as cv
import numpy as np


def inverst(image):
    rst = cv.bitwise_not(image)     # 实现access_pixels()这个函数的功能,即对图像数据取反
    cv.imshow("inverst demo", rst)


src = cv.imread("D://ophotos//out3.png")
cv.namedWindow("input image", cv.WINDOW_AUTOSIZE)
cv.imshow("input image", src)
inverst(src)
cv.waitKey(0)
cv.destroyAllWindows()
3、自定义多通道图片
使用函数ones()和zeros()
def create_image():
    img = np.zeros([400, 400, 3], np.uint8)  # blue green red
    img[:, :, 0] = np.ones([400, 400]) * 255	# 对第一维赋为蓝色
    cv.imshow("new image", img)
    cv.waitKey(500)
    img[:, :, 1] = np.ones([400, 400]) * 255	# 对第二维赋为绿色,由于与第一维组合故为蓝绿色
    cv.imshow("new image", img)
    cv.waitKey(500)
    img[:, :, 2] = np.ones([400, 400]) * 255	# 为第三维赋值,组合后为白色,要观察的话可把其他维去除只执行一个
    cv.imshow("new image", img)
    # img = np.zeros([400, 400, 1], np.uint8)  # 使用zeros()函数将第二维赋为0
    # img[:, :, 0] = np.ones([400, 400]) * 127
    # cv.imshow("new image", img)
    # cv.waitKey(500)
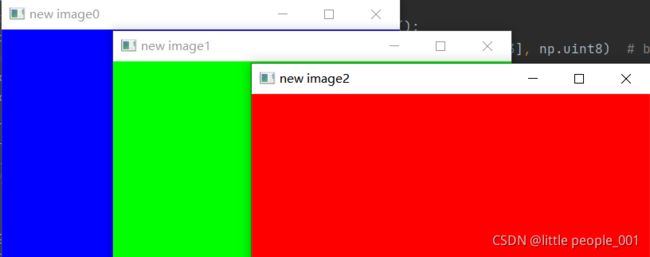
对其数组内容的改变也可使色彩不同
如果不清楚可先用这个看
def create_image():
    img = np.zeros([400, 400, 3], np.uint8)  # blue green red
    img[:, :, 0] = np.ones([400, 400]) * 255
    cv.imshow("new image0", img)
    cv.waitKey(500)
    img1 = np.zeros([400, 400, 3], np.uint8)
    img1[:, :, 1] = np.ones([400, 400]) * 255
    cv.imshow("new image1", img1)
    cv.waitKey(500)
    img2 = np.zeros([400, 400, 3], np.uint8)
    img2[:, :, 2] = np.ones([400, 400]) * 255
    cv.imshow("new image2", img2)
运行结果: