【python】【openCV】分水岭算法
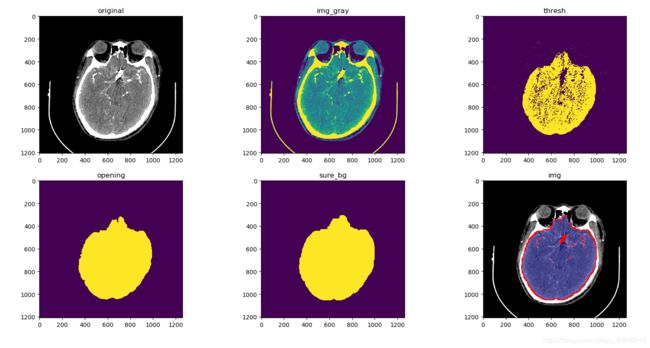
脑血管医学图像颅内分割尝试——分水岭算法
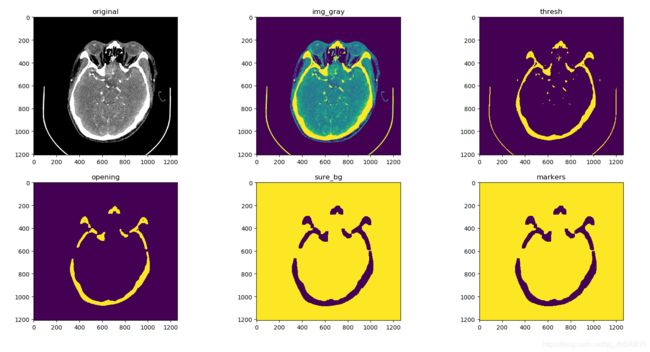
- code 1.2 不分割颅内直接分割
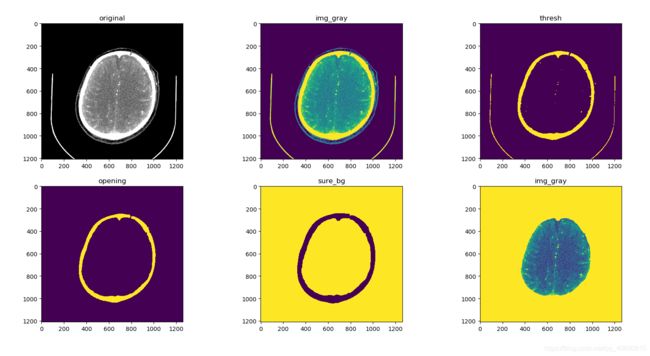
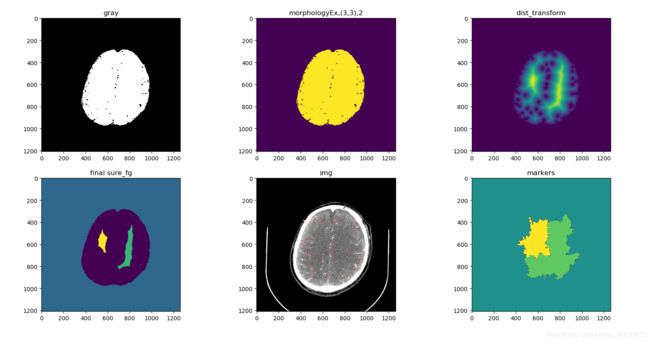
- code 2.0 实验版
- code 3.0 批量处理版
- code 3.1 加入孔洞填充
- 总结
本篇博客原目的同https://blog.csdn.net/qq_40690815/article/details/105377094,但早期代码不够规范,整理时间较晚。
参考博客https://segmentfault.com/a/1190000015690356
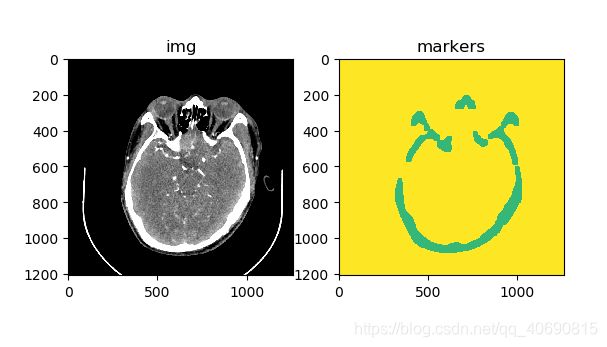
code 1.2 不分割颅内直接分割
import cv2 as cv
import numpy as np
from matplotlib import pyplot as plt
import string
import pylab


def pltImgShow(image):
    plt.title('pltImgShow')
    plt.imshow(image)
    plt.show()

img1 = "DE #PP DE_CarotidAngio 1.0 Q30f 3 A_80kV.0061.tif"
img2 = "DE #PP DE_CarotidAngio 1.0 Q30f 3 A_80kV.0073.tif"
img3 = "DE #PP DE_CarotidAngio 1.0 Q30f 3 A_80kV.0085.tif"
img4 = "DE #PP DE_CarotidAngio 1.0 Q30f 3 A_80kV.0097.tif"
img5 = "DE #PP DE_CarotidAngio 1.0 Q30f 3 A_80kV.0109.tif"
img6 = "DE #PP DE_CarotidAngio 1.0 Q30f 3 A_80kV.0121.tif"
img7 = "DE #PP DE_CarotidAngio 1.0 Q30f 3 A_80kV.0133.tif"
img8 = "DE #PP DE_CarotidAngio 1.0 Q30f 3 A_80kV.0145.tif"
img9 = "DE #PP DE_CarotidAngio 1.0 Q30f 3 A_80kV.0157.tif"
img10 = "DE #PP DE_CarotidAngio 1.0 Q30f 3 A_80kV.0169.tif"

img = cv.imread('D:/auxiliaryPlane/project/Python/medImgSegment/imgData/'+img5)
plt.subplot(2,3,1)
plt.title('original')
plt.imshow(img)

# 灰度图,但其实原来的图片的RGB通道的值都相同
img_gray = cv.cvtColor(img,cv.COLOR_RGB2GRAY)
plt.subplot(2,3,2)
plt.title('img_gray')
plt.imshow(img_gray)
# 二值图像
ret, thresh = cv.threshold(img_gray,254,255,cv.THRESH_BINARY)
# thresh = cv.bitwise_not(thresh, thresh)
plt.subplot(2,3,3)
plt.title('thresh')
plt.imshow(thresh)
# 形态学变换,opening用3x3先腐蚀再膨胀,去掉个别点
kernel = np.ones((5,5),np.uint8)
# 观察发现基本上3x3需要5次操作,5x5需要3次操作
opening = cv.morphologyEx(thresh,cv.MORPH_OPEN,kernel, iterations = 3)
# opening = cv.morphologyEx(opening,cv.MORPH_CLOSE,kernel, iterations = 3)

# kernel1 = np.ones((7,7),np.uint8)
# opening = cv.erode(opening,kernel1,iterations=7)

dist_transform = cv.distanceTransform(opening,cv.DIST_L2,5)
ret, sure_fg = cv.threshold(dist_transform,0.7*dist_transform.max(),255,cv.THRESH_BINARY)
sure_fg = np.uint8(sure_fg)
# unknown = cv.subtract(sure_bg,sure_fg)

# 我佛了,这个腐蚀倒是很清楚不要破坏连通性
print(opening.shape)
plt.subplot(2,3,4)
plt.title('opening')
plt.imshow(opening)

sure_bg = cv.dilate(opening,kernel,iterations=3)
sure_bg = cv.bitwise_not(sure_bg,sure_bg)       # 将二值图像的值反转
plt.subplot(2,3,5)
plt.title('sure_bg')
plt.imshow(sure_bg)
# 形态变换后基本上三次膨胀闭口就贴上了

nlabels, labels, stats, centroids = cv.connectedComponentsWithStats(sure_bg)
markers = labels
print(markers.shape)
markers = markers+1
img_gray[markers != 3] = 255
plt.subplot(2,3,6), plt.title('markers'), plt.imshow(markers)

plt.show()

markers = cv.watershed(img, markers)
img[markers == -1] = [255,0,0]
plt.subplot(1,2,1); plt.title('img'); plt.imshow(img)
plt.subplot(1,2,2); plt.title('markers'); plt.imshow(markers)
plt.show()
code 2.0 实验版
import cv2 as cv
import numpy as np
from matplotlib import pyplot as plt
import string
import pylab


def pltImgShow(image):
    plt.title('pltImgShow')
    plt.imshow(image)
    plt.show()

img1 = "DE #PP DE_CarotidAngio 1.0 Q30f 3 A_80kV.0061.tif"
img2 = "DE #PP DE_CarotidAngio 1.0 Q30f 3 A_80kV.0073.tif"
img3 = "DE #PP DE_CarotidAngio 1.0 Q30f 3 A_80kV.0085.tif"
img4 = "DE #PP DE_CarotidAngio 1.0 Q30f 3 A_80kV.0097.tif"
img5 = "DE #PP DE_CarotidAngio 1.0 Q30f 3 A_80kV.0109.tif"
img6 = "DE #PP DE_CarotidAngio 1.0 Q30f 3 A_80kV.0121.tif"
img7 = "DE #PP DE_CarotidAngio 1.0 Q30f 3 A_80kV.0133.tif"
img8 = "DE #PP DE_CarotidAngio 1.0 Q30f 3 A_80kV.0145.tif"
img9 = "DE #PP DE_CarotidAngio 1.0 Q30f 3 A_80kV.0157.tif"
img9 = "DE #PP DE_CarotidAngio 1.0 Q30f 3 A_80kV.0169.tif"

img = cv.imread('D:/auxiliaryPlane/project/Python/medImgSegment/imgData/'+img1)
plt.subplot(2,3,1)
plt.title('original')
plt.imshow(img)

# 灰度图,但其实原来的图片的RGB通道的值都相同
img_gray = cv.cvtColor(img,cv.COLOR_RGB2GRAY)
plt.subplot(2,3,2)
plt.title('img_gray')
plt.imshow(img_gray)
# 二值图像
ret, thresh = cv.threshold(img_gray,254,255,cv.THRESH_BINARY)
plt.subplot(2,3,3)
plt.title('thresh')
plt.imshow(thresh)
# 形态学变换,opening用3x3先腐蚀再膨胀,去掉个别点
kernel = np.ones((5,5),np.uint8)
# 观察发现基本上3x3需要5次操作,5x5需要3次操作
opening = cv.morphologyEx(thresh,cv.MORPH_OPEN,kernel, iterations = 3)
opening = cv.morphologyEx(opening,cv.MORPH_CLOSE,kernel, iterations = 3)
print(opening.shape)
plt.subplot(2,3,4)
plt.title('opening')
plt.imshow(opening)

sure_bg = cv.dilate(opening,kernel,iterations=3)
sure_bg = cv.bitwise_not(sure_bg,sure_bg)       # 将二值图像的值反转
plt.subplot(2,3,5)
plt.title('sure_bg')
plt.imshow(sure_bg)
# 形态变换后基本上三次膨胀闭口就贴上了

nlabels, labels, stats, centroids = cv.connectedComponentsWithStats(sure_bg)
markers = labels
print(markers.shape)
markers = markers+1

img_gray[markers != 3] = 255

plt.subplot(2,3,6)
plt.title('img_gray')
plt.imshow(img_gray)

plt.show()

################################# 此处脑内容分割完成 #################################
ret, thresh = cv.threshold(img_gray,0,255,cv.THRESH_BINARY_INV+cv.THRESH_OTSU)
# 将脑内容中的‘点’单独提取出来
# 不加这5行代码的效果很有意思

# thresh = cv.bitwise_not(thresh, thresh)
# ret, markers2 = cv.connectedComponents(thresh)
# markers2 = markers2 + 1
# thresh[markers2 == 2] = 0
# plt.imshow(markers2); plt.show()

# ------ 我现在甚至认为到这一步就已经结束了,分水岭似乎不太适合细小的血管的分割 ------

print(thresh.shape)
plt.subplot(2,3,1)
plt.title('gray')
plt.imshow(thresh,'gray')

# noise removal
kernel = np.ones((3,3),np.uint8)        # 3x3矩阵,所有元素为1
opening = cv.morphologyEx(thresh, cv.MORPH_OPEN, kernel, iterations = 1)      # OPEN形态学变换
# opening = cv.bitwise_not(opening, opening)
# 这种操作不得行,应该提取脑CT中的'点'

plt.subplot(2,3,2)
plt.title('morphologyEx,(3,3),2')
plt.imshow(opening)

# sure background area
sure_bg = cv.dilate(opening,kernel,iterations=3)

# Finding sure foreground area
dist_transform = cv.distanceTransform(opening,cv.DIST_L2,5)
# 计算图像中每一个非零点距离离自己最近的[0]的距离,即计算填水速度
ret, sure_fg = cv.threshold(dist_transform,0.7*dist_transform.max(),255,cv.THRESH_BINARY)
print(sure_fg.dtype)

# Finding unknown region
sure_fg = np.uint8(sure_fg)     # 数据类型转化
print(sure_fg.dtype)
unknown = cv.subtract(sure_bg,sure_fg)      # 计算数组间的元素差

plt.subplot(2,3,3)
plt.title('dist_transform')
plt.imshow(dist_transform)

# 现在我们可以确定哪些是硬币的区域,哪些是背景,哪些是背景.因此,我们创建标记
#  (它是一个与原始图像相同大小的数组,但使用int32数据类型)并对其内部的区域进行标记.
# 我们知道,如果背景是0,那么分水岭将会被认为是未知的区域, 所以我们用不同的整数来标记它,用0表示由未知定义的未知区域.

# Marker labelling 将图像的背景标记为0,然后其他对象从1开始标记为整数.
ret, markers = cv.connectedComponents(sure_fg)
print(markers.shape)
# Add one to all labels so that sure background is not 0, but 1
markers = markers+1

# Now, mark the region of unknown with zero
markers[unknown==255]=0
plt.subplot(2,3,4)
plt.title('final sure_fg')
plt.imshow(markers)

markers = cv.watershed(img,markers)
img[markers == -1] = [255,0,0]

plt.subplot(2,3,5); plt.title('img'); plt.imshow(img)

plt.subplot(2,3,6); plt.title('markers'); plt.imshow(markers)

plt.show()

# 初步感觉分水岭的效果不是太理想
code 3.0 批量处理版
import glob
import os
import cv2
from pylab import*
import numpy as np
from matplotlib import pyplot as plt
from PIL import Image
from itertools import chain

#获取指定目录下的所有图片
# print glob.glob(r"E:/Picture/*/*.jpg")
# print glob.glob(r'../*.py') #相对路径

def fillHole(im_in):
	im_floodfill = im_in.copy()
	# Mask used to flood filling.
	# Notice the size needs to be 2 pixels than the image.
	h, w = im_in.shape[:2]
	mask = np.zeros((h+2, w+2), np.uint8)
	# Floodfill from point (0, 0)
	cv2.floodFill(im_floodfill, mask, (0,0), 255)
	# Invert floodfilled image
	im_floodfill_inv = cv2.bitwise_not(im_floodfill)
	# Combine the two images to get the foreground.
	im_out = im_in | im_floodfill_inv
	return im_out

def inHead_seg(img):
    copyImg = img.copy()
    h, w = img.shape[:2]
    mask = np.zeros([h+2, w+2],np.uint8)   #mask必须行和列都加2,且必须为uint8单通道阵列
    # print (img[int(h/2), int(w/2)])
    cv2.floodFill(copyImg, mask, (int(h/2), int(w/2)), (5, 5, 5), (55, 55, 55), (55, 55 ,55), cv2.FLOODFILL_FIXED_RANGE)
    # plt.title('fill_color_demo'),plt.imshow(copyImg),plt.show()
    # plt.subplot(2,3,1); plt.title('original'); plt.imshow(img)
    img_gray = cv2.cvtColor(img,cv2.COLOR_RGB2GRAY)
    # plt.subplot(2,3,2); plt.title('img_gray'); plt.imshow(img_gray)
    ret, thresh = cv2.threshold(img_gray,254,255,cv2.THRESH_BINARY)
    thresh[:,:] = 0
    copyImg_gray = cv2.cvtColor(copyImg,cv2.COLOR_RGB2GRAY)
    thresh[ copyImg_gray==5 ] = 255
    # plt.subplot(2,3,3); plt.title('thresh'); plt.imshow(thresh)
    kernel = np.ones((5,5),np.uint8)
    thresh = fillHole(thresh)
    opening = cv2.morphologyEx(thresh,cv2.MORPH_OPEN,kernel, iterations = 3)
    # opening = cv2.morphologyEx(thresh,cv2.MORPH_CLOSE,kernel, iterations = 3)
    # opening = fillHole(opening)         # 加入孔洞填充, 得,这个位置还不太好,换到opening前面去

    # print(opening.shape)
    # plt.subplot(2,3,4); plt.title('opening'); plt.imshow(opening)
    sure_bg = cv2.dilate(opening,kernel,iterations=5)
    # sure_bg = cv2.bitwise_not(sure_bg,sure_bg)
    # plt.subplot(2,3,5); plt.title('sure_bg'); plt.imshow(sure_bg)
    nlabels, labels, stats, centroids = cv2.connectedComponentsWithStats(sure_bg)
    markers = labels
    # print(markers.shape)
    markers = markers+1
    # plt.subplot(2,3,6); plt.title('img'); plt.imshow(img)
    # plt.show()
    return img,markers,labels

def maxAreaFind(markers):
    markers = list(chain(*markers))
    # print (markers)
    mCnt = np.bincount(markers)		#这东西还只针对一维数据,注意要找的是出现次数第二多的元素
    resFind = np.argmax(mCnt)
    print (mCnt,resFind)
    markers2 = list(filter(lambda x: x != resFind, markers))
    mCnt2 = np.bincount(markers2)
    if(any(mCnt2) == False):
        return resFind
    resFind = np.argmax(mCnt2)
    # print (markers2,resFind)
    # print ('resFind: ',resFind)
    return resFind

# WSI_MASK_PATH = 'D:/auxiliaryPlane/project/Python/medImgSegment/imgData'    #存放图片的文件夹路径
WSI_MASK_PATH = "D:/MINE_FILE/dataSet/CTA/CTA1"
# WSI_MASK_PATH = "medImgSegment/imgData/test1Error"
# WSI_MASK_PATH = "medImgSegment/imgData/testTemp"
paths = glob.glob(os.path.join(WSI_MASK_PATH, '*.tif'))
paths.sort()

for ipath in paths:
    img= cv2.imread(ipath)
    img_gray = cv2.cvtColor(img,cv2.COLOR_RGB2GRAY)
    img,markers,labels = inHead_seg(img)
    resFind = maxAreaFind(markers)
    labels = labels + 1
    img[labels == resFind] = img[labels == resFind]*0.6+(0,0,70)
    img_gray[labels != resFind] = 0
    # img[img_gray == 255] = (255,0,0)
    img = Image.fromarray(img, mode='RGB')
    # img.show()
    # pre_savename = 'medImgSegment/Documents/test1.0/'
    pre_savename = 'medImgSegment/Documents/testTemp/'
    line = "inHead_t2"+ipath[-8:-4]+".png"
    print (pre_savename,line)
    img.save(os.path.join(pre_savename,line),'PNG')
效果实际上不是很理想
code 3.1 加入孔洞填充
###################################################################################
#
#       2019.7.27
#       医学脑血管图像分割--脑内容分割
#       -----------
#       孔洞填充--这样或许不需要借助形态学变换就可以填充孔洞
#       https://blog.csdn.net/dugudaibo/article/details/84447196
#
###################################################################################

from itertools import chain

import cv2
import numpy as np
from matplotlib import pyplot as plt


def fillHole(im_in):
	im_floodfill = im_in.copy()
	# Mask used to flood filling.
	# Notice the size needs to be 2 pixels than the image.
	h, w = im_in.shape[:2]
	mask = np.zeros((h+2, w+2), np.uint8)
	# Floodfill from point (0, 0)
	cv2.floodFill(im_floodfill, mask, (0,0), 255)
	# Invert floodfilled image
	im_floodfill_inv = cv2.bitwise_not(im_floodfill)
	# Combine the two images to get the foreground.
	im_out = im_in | im_floodfill_inv

	return im_out

img1 = "DE #PP DE_CarotidAngio 1.0 Q30f 3 A_80kV.0055.tif"
img2 = "DE #PP DE_CarotidAngio 1.0 Q30f 3 A_80kV.0068.tif"
img3 = "DE #PP DE_CarotidAngio 1.0 Q30f 3 A_80kV.0070.tif"
img4 = "DE #PP DE_CarotidAngio 1.0 Q30f 3 A_80kV.0071.tif"
img5 = "DE #PP DE_CarotidAngio 1.0 Q30f 3 A_80kV.0072.tif"
img6 = "DE #PP DE_CarotidAngio 1.0 Q30f 3 A_80kV.0091.tif"
img7 = "DE #PP DE_CarotidAngio 1.0 Q30f 3 A_80kV.0092.tif"
img8 = "DE #PP DE_CarotidAngio 1.0 Q30f 3 A_80kV.0095.tif"
img9 = "DE #PP DE_CarotidAngio 1.0 Q30f 3 A_80kV.0112.tif"
img10= "DE #PP DE_CarotidAngio 1.0 Q30f 3 A_80kV.0114.tif"
img11= "DE #PP DE_CarotidAngio 1.0 Q30f 3 A_80kV.0115.tif"

img = cv2.imread( 'D:/auxiliaryPlane/project/Python/medImgSegment/imgData/test1Error/'+img5 )
img = cv2.imread( 'D:/MINE_FILE/dataSet/CTA/CTA1/DE #PP DE_CarotidAngio 1.0 Q30f 3 A_80kV.0103.tif')

copyImg = img.copy()
h, w = img.shape[:2]
mask = np.zeros([h+2, w+2],np.uint8)   #mask必须行和列都加2,且必须为uint8单通道阵列
print (img[int(h/2), int(w/2)])
cv2.floodFill(copyImg, mask, (int(h/2), int(w/2)), (5, 5, 5), (55, 55, 55), (55, 55 ,55), cv2.FLOODFILL_FIXED_RANGE)
# plt.title('fill_color_demo'),plt.imshow(copyImg),plt.show()

plt.subplot(2,3,1); plt.title('original'); plt.imshow(img)

img_gray = cv2.cvtColor(img,cv2.COLOR_RGB2GRAY)
plt.subplot(2,3,2); plt.title('img_gray'); plt.imshow(img_gray)

ret, thresh = cv2.threshold(img_gray,254,255,cv2.THRESH_BINARY)
thresh[:,:] = 0
copyImg_gray = cv2.cvtColor(copyImg,cv2.COLOR_RGB2GRAY)
thresh[ copyImg_gray==5 ] = 255
plt.subplot(2,3,3); plt.title('thresh'); plt.imshow(thresh)

kernel = np.ones((5,5),np.uint8)

thresh = fillHole(thresh)
opening = cv2.morphologyEx(thresh,cv2.MORPH_OPEN,kernel, iterations = 3)
# opening = cv2.morphologyEx(thresh,cv2.MORPH_CLOSE,kernel, iterations = 3)
# 加入新的孔洞填充+判断连通分量面积大小的手段

# opening = fillHole(opening)

# _,contours, _ = cv2.findContours(thresh, cv2.RETR_EXTERNAL, cv2.CHAIN_APPROX_NONE)
# cnt = contours[np.argmax([cv2.contourArea(cnt) for cnt in contours])]
# print ('连通分量',cnt.shape)
# print (cnt)
# 不使用这个轮廓area了吧,比较麻烦,在markers时使用np的bincnt

print (opening.shape)
plt.subplot(2,3,4); plt.title('opening'); plt.imshow(opening)

sure_bg = cv2.dilate(opening,kernel,iterations=5)
# sure_bg = cv2.bitwise_not(sure_bg,sure_bg)
plt.subplot(2,3,5); plt.title('sure_bg'); plt.imshow(sure_bg)

nlabels, labels, stats, centroids = cv2.connectedComponentsWithStats(sure_bg)
markers = labels

print(markers.shape)
markers = markers + 1
# plt.subplot(2,3,6); plt.title('markers'); plt.imshow(markers)
# print (max(set(markers), key=markers.count))
markers = list(chain(*markers))
# print (markers)
mCnt = np.bincount(markers)		#这狗东西还只针对一维数据,注意要找的是出现次数第二多的元素
resFind = np.argmax(mCnt)
print (mCnt,resFind)
# markers2 = np.mat(filter(lambda x: x != resFind, markers))
markers2 = list(filter(lambda x: x != resFind, markers))

# markers3 = np.mat(filter(lambda x: x != 0, markers2))
mCnt2 = np.bincount(markers2)
resFind = np.argmax(mCnt2)
# print (markers2,resFind)
print ('resFind: ',resFind)
labels = labels + 1

img_gray[labels != resFind] = 0
print ('img_shape: ',img.shape)
img[labels == resFind] = img[labels == resFind]*0.6+(0,0,70)
img[img_gray == 255] = (255,0,0)

plt.subplot(2,3,6); plt.title('img'); plt.imshow(img)

plt.show()
总结
分水岭算法不适用于颅内血管分割这个数量多,面积不一,分布不均匀的实际医学图像,因此后来转变思路尝试用分水岭算法来分割颅内区域,但本实验展示的图像实际上是比较标准的一张,脑CT图从上到下扫描会出现很多种情况,在分水岭的腐蚀与膨胀函数中不一定适用于所有情况。
