微信小程序黑马优购遇到的问题和心得
案列学习
如果不想在consolo中输出
- Flex
align-items: center;
justify-content: center;
改为水平垂直居中
justify-content: space-around;
均匀分配周围的空间
完美居中
display: flex;
flex-wrap: wrap;
justify-content: space-around;
- 给类似这种css盒子每个都加边框线 但是又不重复
技巧
首先给外面大盒子加上 上和左边框线
然后给里面每一个小盒子加上一个右和下边框线这样就会每一个盒子都会有边框线
- 给view和文字设置好看的样式
text-shadow: 0 0 5px #fff;
box-shadow: 1rpx 1rpx 6rpx #aaa;
- 动态设置页面标题
wx.setNavigationBarTitle({
title:this.data.title
})
- 触发弹窗
wx.showToast({
title: 'count:'+this.data.count
// icon:"none" //可以设置是否有弹窗图标
})
- 直接在字符串中使用传过来的参数
"r,g,b":function(newr,newg,newb){
this.setData({
rgb:`${newr},${newg},${newb}` //注意这里是大括号 !!!
})
}
8.自定义tabBar
(1)配置文件 //从这以后代码自动渲染自定义tabBar
在 app.json 中的 tabBar 项指定 custom 字段,同时其余 tabBar 相关配置也补充完整。
所有 tab 页的 json 里需声明 usingComponents 项,也可以在 app.json 全局开启。
{
"tabBar": {
"custom": true, //添加这一行代 声明进行自定义tabBar
"color": "#000000",
"selectedColor": "#000000",
"backgroundColor": "#000000",
"list": [{
"pagePath": "page/component/index",
"text": "组件"
}, {
"pagePath": "page/API/index",
"text": "接口"
}]
},
"usingComponents": {}}
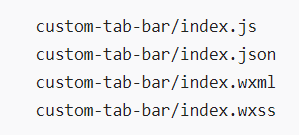
(2)添加 tabBar 代码文件
在代码根目录中创建一下文件
(3)去Vant Weapp寻找自定义样式
(4) 给自己定义页面设置跳转tabBar
onChange(event) {
console.log(event);
this.setData({ active: event.detail });
//跳转路由 在这里设置跳转tabBar的路由
wx.switchTab({
url: this.data.list[event.detail].pagePath,
})
},
9.设置全屏滚动窗高度
1.数据里面设置高度变量 wh:0
2.在页面刚加载的时候调用uniapi
onLoad(){
const sysInfo=uni.getSystemInfoSync()
this.wh=sysInfo.windowHeight
}
3.在对应的scroll-view 标签里面设置动态style
:style="{height: wh+'px'}"
10.返回数据结构+数据重命名
async getCateList(){
const {data:res}=await uni.$http.get("/api/public/v1/categories")
console.log(res);
}
11.动态定义选中的框
1.创建一个active 变量
2.在标签里面设置动态class
:class="['left-scroll-view-item',i==active?'active':'']"
- 通过点击事件方法来修改变量达到这种效果
12水平垂直居中样式
display: flex;
flex-direction: column;
justify-content: center;
align-items: center;
- scroll-view重置scroll-top 来增强用户体验感的方法
- 定义scrollTop数据
- 给标签添加动态属性
- 通过方法的动态给scrollTop设置值来使scroll-top属性重置
- 大坑 当scrollTop前后要改变的值是相同的时候 页面效果不变 所以进行小技巧 运用三元运算来使scrollTop的值动态改变 改变的值为1或者0这样就可以动态重置 1像素点改变用户是感觉不到的
this.scrollTop=this.scrollTop===0?1:0
- 设置吸顶样式
position: sticky;
top:0;
z-index: 999;
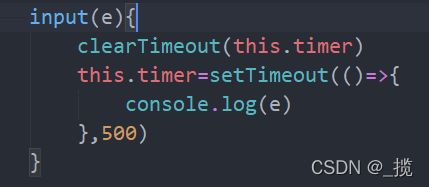
15.防抖处理
在data中定义一个数据timer:null
16.美化搜索结果内容及文本超出用...替代
.sugg-list{
padding: 0 5px;
.sugg-item{
display: flex;
// 弹性盒子纵向居中
align-items: center;
// 弹性盒子两端对齐
justify-content: space-between;
font-size: 12px;
padding: 13px 0;
border-bottom: 1px solid #efefef;
.goods-name{
// 文本不换行
white-space: nowrap;
// 超出隐藏
overflow: hidden;
// 超出的用...表示
text-overflow: ellipsis;
}
}
}
17.搜索栏历史记录的小细节 去除冗余项
通过set函数来使里面的 新增加的历史搜索记录放在最前面 且不会冗余
const set=new Set(this.historuList)
//删除冗余的历史记录
set.delete(this.kw)
//将set对象转换为数组
this.historuList=Array.from(set)
//将新增加的数据添加到数组中
this.historuList.unshift(this.kw)
- 数据持久化本地 //应用于历史搜索啦那种
存入
uni.setStorageSync(
"kw",JSON.stringify(this.historuList)
)
读取
this.historuList = JSON.parse(uni.getStorageSync("kw")||'[]')
- view里面的内容 上下两边排列
20.使用过滤器给数字加上两位小数点
与data平齐 设置toFixed过滤函数
调用的时候巨简单
21.通过展开运算符进行数据的拼接
获取更多数据的时候贼好使
22.下来获取更多数据
进行数据的拼接
23函数形参 默认值的方法
这是方法一
巨好使 而且如果不赋值的话就是默认的定义这种情况 如果赋值参数的话 那么这个默认值就会改变
uni.$showMsg=function(title="数据加载失败!",duration=1500){
uni.showToast({
title,
duration,
icon:"none"
})
}
方法二
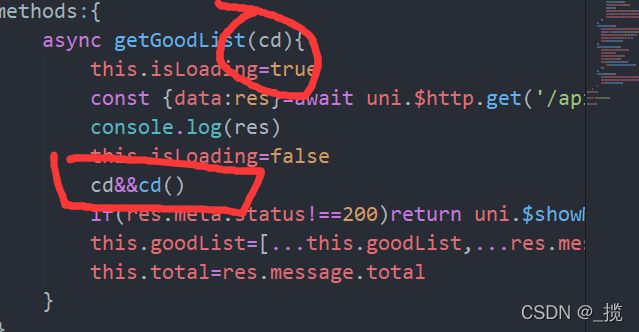
23.传递回调函数 并判断是否存在 如果存在就运行 不存在的话就过 最简单的方法
1.定义传参的函数
2.调用函数
关键语句贼好使
24.json数据的快速定义 es6语法
25.图片预览 类似于淘宝拼多多那种预览形式
uni.previewImage({
//预览时显示第几张图片
current:i,
//预览时显示的图片数组
urls:this.goods_info.pics.map(x=>x.pics_big)
})
26.给图片去除间隙
html里面是直接给图片加display:block 属性
小程序可以用 rich-text nodes 渲染html标签的时候可以直接在标签属性里面加 style设置
- replace 替换规则
replace(/ 需要将通过正则将webp改为ipg 给外面的view设置 v-if 属性 判断有没有这个数据 有的话显示 没有的话就隐藏 30.调用文件根目录 ./当前光标位置 @/跟目录 返回的是查找对象 const findResult=this.options.find(x=>x.text==='购物车') 这样查找数据而不是直接从数组下标拿去 可以增加代码可维护性 防止以后添加属性 数据不好更改 这种情况肯定是赋值错误 数据类型不对!!!! cart:JSON.parse(uni.getStorageSync('cart'))||[] //这里写错了 当查找JSON.parse(uni.getStorageSync('cart'))不存在时 就选择赋值为[] 这样是错的 会赋值失败的 正确的用法是 cart: JSON.parse(uni.getStorageSync('cart') || '[]'), 在变量前加一个加号+ 或者是减零-0 state.cart=state.cart.filter(x=>x.goods_id!==goods) 将不满足条件的都返回 直接一行代码解决 async chooseAddress() { // 1. 调用小程序提供的 chooseAddress() 方法,即可使用选择收货地址的功能 // 返回值是一个数组:第1项为错误对象;第2项为成功之后的收货地址对象 const [err, succ] = await uni.chooseAddress().catch(err => err) // 2. 用户成功的选择了收货地址 if (succ && succ.errMsg === 'chooseAddress:ok') { // 更新 vuex 中的收货地址 this.updateAddress(succ) } // 3. 用户没有授权 if (err && (err.errMsg === 'chooseAddress:fail auth deny' || err.errMsg === 'chooseAddress:fail authorize no response')) { this.reAuth() } // 调用此方法,重新发起收货地址的授权async reAuth() { // 3.1 提示用户对地址进行授权 const [err2, confirmResult] = await uni.showModal({ content: '检测到您没打开地址权限,是否去设置打开?', confirmText: "确认", cancelText: "取消", }) // 3.2 如果弹框异常,则直接退出 if (err2) return // 3.3 如果用户点击了 “取消” 按钮,则提示用户 “您取消了地址授权!” if (confirmResult.cancel) return uni.$showMsg('您取消了地址授权!') // 3.4 如果用户点击了 “确认” 按钮,则调用 uni.openSetting() 方法进入授权页面,让用户重新进行授权 if (confirmResult.confirm) return uni.openSetting({ // 3.4.1 授权结束,需要对授权的结果做进一步判断 success: (settingResult) => { // 3.4.2 地址授权的值等于 true,提示用户 “授权成功” if (settingResult.authSetting['scope.address']) return uni.$showMsg('授权成功!请选择地址') // 3.4.3 地址授权的值等于 false,提示用户 “您取消了地址授权” if (!settingResult.authSetting['scope.address']) return uni.$showMsg('您取消了地址授权!') } })} 筛选出符合条件的数据 然后用reduce进行统一操作 async getUserProfile() { const res = await uni.getUserProfile({desc: "登录"}) console.log(res[1]) if (res[1]=== undefined) return uni.$showMsg('您取消了登录授权!') }'
29.解决文本闪烁问题 通常是没有数据 后加载数据造成的这种情况
30.vue find函数
32.find函数来增加代码可维护性
33.watch数据监听器在页面刚加载的时候就调用一次的方法immdediate handler
34.设置tabBar数字角标
37.无法保证变量是数字类型的解决方法
38.filter函数的筛选骚操作
![]()
40.小程序api调用选择收货地址 chooseAddress()
43 获取用户的头像和基本信息


