【Causality】intervention计算必备|库包do why的初步认识
本系列为因果学习库包dowhy的使用辅导教程。包含理论知识,代码理解及方便理解的代码补充。
DO WHY
- 1 理论知识
-
- 1.1 往期博客&推荐博客
- 1.2 推荐文献
- 2 库包介绍
-
- 2.1 环境配置
- 2.1 quick start与理解
-
- 2.1.1 导入数据
- 2.1.2 创建因果模型
-
- 1.带图
- 2.不带图
- 2.1.3 识别因果关系
- 2.1.4 估计目标值
- 2.1.5 (Optional)鲁棒性检验
- 疑问
- 下期预告
1 理论知识
根据因果之梯模型,为了使我们对因果的理解达到更深的层次,我们需要对干预动作进行概率和数学层面的表达。,即我们需要量化估计改变当前输入值的效果,这样的问题,包括估计反事实数据,在决策场景中很常见。在决策场景中,我们往往在思考:这有效吗?为什么有效?我们应该怎么做?等问题。回答这些问题离不开因果推理。但目前的因果推理模型都基于不同的假设。
1.1 往期博客&推荐博客
- 【Causality】因果图入门
- 【Causality】do calculus原理
- Causality 基础概念汇总
- Causal inference in statistic - A prime 读书笔记[5]
1.2 推荐文献
Causal Diagrams for Empirical Research
A Survey on Causal Discovery: Theory and Practice
2 库包介绍
该库包贡献如下:
- 提供了将一个问题转化为因果图的标准方法,并且假设非常清晰;
- 为许多流行的因果推理方法提供了统一的接口,结合了图形模型和潜在结果的两大框架;
- 如果可能,自动测试假设的有效性,并评估对违规的估计的鲁棒性。
2.1 环境配置
在笔者使用的时候遇到了一些版本问题,这是笔者调配后的环境。终端用的是jupyter notebook
| 库包 | 版本 |
|---|---|
| Ananconda3 | 2021.05 |
| dowhy | 0.9.1 |
| numpy | 1.23.5 |
| mkl | 2022.2.1 |
| scipy | 1.10.0 |
| numba | 0.56.4 |
2.1 quick start与理解

看图中 D A G DAG DAG,可以看到最终目的是估算outcome的值。action变量(也称作treatment变量)也就是intervention变量, w w w是action的后门变量, v 1 , v 2 , v 3 , v 5 v1,v2,v3,v5 v1,v2,v3,v5是其他变量。
上图表示了做因果评估模型的四个主要步骤:
- 建模因果机制(得到因果图);
- 识别前门后门变量,并得到干预后的联合分布表达式;
- 计算 o u t c o m e outcome outcome变量的值
- 检验评估结果的鲁棒性
2.1.1 导入数据
from dowhy import CausalModel
import dowhy.datasets
# 导入数据:load some sample data
data = dowhy.datasets.linear_dataset(beta=10,
        num_common_causes=5,
        num_instruments = 2,
        num_effect_modifiers=1,
        num_samples=5000,
        treatment_is_binary=True,
        stddev_treatment_noise=10,
        num_discrete_common_causes=1)
该 example的数据是用dowhy生成的一个已知效应值的合成数据集,因果机制是线性的,也就是 o u t c o m e = a 1 i n p u t 1 + a 2 i n p u t 2 + . . . + ϵ outcome=a_1input_1+a_2input_2+...+\epsilon outcome=a1input1+a2input2+...+ϵ。其中,
- beta=10,共10个变量;
- num_common_causes=5,影响action和outcome的变量数有五个,他们也是满足后门准则的变量;
- num_effect_modifiers=1,只影响outcome的其他变量有1个;
- num_samples=5000,样本个数5000个
- treatment_is_binary=True,action变量的type,是否是二元,如果是否那么就是连续值。
- stddev_treatment_noise=10, f a c t i o n f_{action} faction中随机噪声的方差。
- num_discrete_common_causes=1,导致action变量的直接原因是离散变量的有1个。
工具变量2个,常规原因变量5个,样本量10000,treatment变量是否二元。
df = data["df"]
data除dataframe外的其他参数
data
2.1.2 创建因果模型
1.带图
# I. Create a causal model from the data and given graph.
model = CausalModel(
    data=data["df"],
    treatment=data["treatment_name"],
    outcome=data["outcome_name"],
    graph=data["gml_graph"])
CausalModel函数进行拟合因果图。如果data本身带了图,只需要输入treatment和outcome,如果选择不输入图,就需要另外输入common_causes和effect_modifiers。
model.view_model(layout='dot', size=(6, 4), file_name='output/quick_start')
from IPython.display import Image, display
display(Image(filename="output/quick_start.png"))
2.不带图
# I. Create a causal model from the data withno graph.
model_withnoG = CausalModel(
    data=data["df"],
    treatment=data["treatment_name"],
    outcome=data["outcome_name"],
    common_causes=data["common_causes_names"],
    effect_modifiers=data["effect_modifier_names"])

model.view_model(layout='dot', size=(6, 4), file_name='output/quick_start_withnoG')
from IPython.display import Image, display
display(Image(filename="output/quick_start_withnoG.png"))

可以看出不带图的情况下,拟合结果也是一样的。说明在线性情况下,dowhy的拟合效果很好。
2.1.3 识别因果关系
# II. Identify causal effect and return target estimands
identified_estimand = model.identify_effect()
#print(identified_estimand)

识别共分为三种:前门识别,后门识别,工具变量识别。
根据我们预设的data因果机制,没有满足前门规则的变量,满足后门的有5个,工具变量有两个。观察 E s t i m a n d 1 − 3 Estimand\ 1-3 Estimand 1−3,结果正确。
2.1.4 估计目标值
# III. Estimate the target estimand using a statistical method.
estimate = model.estimate_effect(identified_estimand,
                                 method_name="backdoor.propensity_score_matching")
#print(estimate)
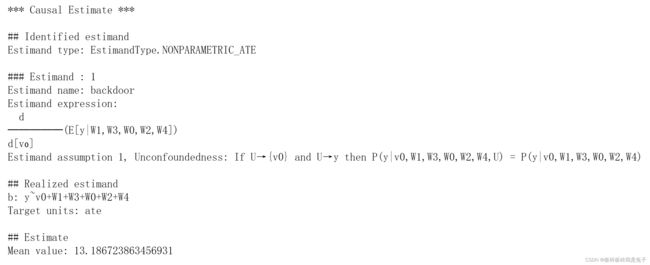
函数设置为用后门来计算因果效应,得到outcome的估计值。估计方法一共有下图几种。

后门和iv都有变量可以尝试。选择iv.instrumental_variable,得到如下结果。
estimate = model.estimate_effect(identified_estimand,
                                 method_name="iv.instrumental_variable")
print(estimate)
 可以看到估计结果略有不同。一般情况下,在treatment变量无法干预的时候,会考虑干预工具变量。
2.1.5 (Optional)鲁棒性检验
# IV. Refute the obtained estimate using multiple robustness checks.
refute_results = model.refute_estimate(identified_estimand, estimate,
                                       method_name="random_common_cause")

# IV. Refute the obtained estimate using multiple robustness checks.
refute_results = model.refute_estimate(identified_estimand, estimate,
                                       method_name="random_common_cause")
疑问
- 因果关系的鲁棒性指的是什么?目前还没有读到关于因果关系鲁棒性的文章。
下期预告
本文章的识别公式及估算部分可以再深入理解。
后续博客会更新案例学习(example notebook),库包评价(非线性的拟合效果对比)


