编程读取chap挑战值并生产应答包
编程读取chap挑战值并生产应答包
文章目录
- 编程读取chap挑战值并生产应答包
-
- 实验要求
- 实验步骤
-
- 一、读取pcap数据包
- 二、对得到的挑战值进行加密
- 三、将数据写入二进制包
- 四、查看二进制文件并比对
- 实验心得
实验要求
1、熟悉Chap协议流程,编程生成Chap应答
2、根据PPTP数据包,生产Chap应答,比较验证。
实验步骤
一、读取pcap数据包
1、先了解pcap数据包的格式及结构
Pcap数据包的前24字节是文件的包头,其中包含了数据包个数,数据包总长度,时间戳等信息,这24字节信息对我们没有太大用处,因此我们将其略过不读。使用fseek函数直接跳过该文件头即可。
接下来是每个数据包的pcap头,其中有该数据包的长度,时间戳等信息,一共8个字节,其中数据包的长度对我们用处最大,因此我们需要将其读取并存储起来。下为pcap包头结构体
typedef struct pcap_pktheader
{
    int tv_sec;
    int tv_usec;
    u_int8_t caplen[4];
    u_int8_t len[4];
}pcap_pktheader;
2、读取数据包内容
然后接下来就是数据包的内容,包含数据帧头,IP帧头,GRE协议帧头,PPP协议,以及PPP传输内容,由于我们要生成response响应数据包,因此这些数据内容我们均要读取并保存,因此我们使用如下结构体:
数据帧头结构体:
typedef struct FrameHeader_t
{
	u_int8_t DstMac[6];
	u_int8_t SrcMac[6];
	u_int16_t FrameType;
}FrameHeader_t;
IP数据报头结构体:
typedef struct IPHeader_t
{
	u_int8_t Ver_HLen;
	u_int8_t Tos;
	u_int8_t TotalLen[2];
	u_int16_t ID;
	u_int16_t flags_and_offset;
	u_int8_t TTL;
	u_int8_t Protocol;
	u_int16_t Checksum;
	u_int8_t SrcIP[4];
	u_int8_t DstIP[4];
}IPHeader_t;
GRE协议头结构体:
typedef struct GRE_header
{
	u_int16_t Flags_and_ver;
	u_int16_t Pro_type;
	u_int8_t Payload_len[2];
	u_int16_t Call_ID;
	u_int32_t Seq_num;
	u_int32_t Ack_num;
}GRE_header;
PPP协议结构体:
typedef struct PPP_pro
{
	u_int16_t Pro;
}PPP_pro;
PPP数据包头结构体:
typedef struct PPP_header
{
	u_int8_t code;
	u_int8_t identifier;
	u_int8_t len[2];
}PPP_header;
3、读取PPP数据包内容
根据PPP数据包的格式我们知道,包头后第一个字节为value_size,它代表着挑战值的长度,接着是value_size个字节的挑战值,然后是name,因此我们使用如下代码将挑战值读取出来:
读取value_size
u_int8_t value_size;
fread(&value_size,sizeof(u_int8_t),1,fp);
读取挑战值value
u_int8_t * value;
value=(u_int8_t*)malloc(sizeof(u_int8_t)*value_size);
fread(value,value_size,1,fp);
接着是name,name的长度为包头中的包长度-value_size-包头长度-1(value_size)
u_int8_t * name;
u_int16_t namelen;
namelen=PPPheader->len[0]*256+PPPheader->len[1]-value_size-sizeof(PPP_header)-1;
name=(u_int8_t*)malloc(sizeof(u_int8_t)*namelen);
fread(name,namelen,1,fp);
fclose(fp);
二、对得到的挑战值进行加密
1、首先输入该PPP传输时的用户名及密码
该数据包为(user_name: qq , user_passwd: qq)
要输入抓包时客户端登陆的用户名及密码
char user_name[15]={'\0'};
printf("input your user name:");
scanf("%s",user_name);

char user_passwd[15]={'\0'};
printf("input your password:");
scanf("%s",user_passwd);
2、将传回的response包中的对等挑战值放入文件中
unsigned char peer_challenge[16]={0xe4,0x17,0x0b,0x5e,0xab,0x7d,0xe3,0x71,
				0x32,0xf0,0x97,0x70,0x48,0x49,0xd3,0xf5};
我们也可以自行产生随机对等挑战值,但是如此以来就无法与我们抓到的数据包进行比对验证,因此我们使用抓到的对等挑战值
下为随机产生对等挑战值:
srand(time(0));
for(int i=0;i<16;i++)
		peer_challenge[i]=rand()%256;
3、根据RFC 2759进行加密
第一步
对(对等挑战值||挑战值||用户名)这三者的连接做SHA1的hash运算,得到的SHA1值的前8为作为挑战消息
下为SHA1代码
unsigned char *challenge_msg;
challenge_msg=(unsigned char*)malloc(sizeof(unsigned char)*(32+strlen(user_name)));
strncpy(challenge_msg,peer_challenge,16);
strncpy(challenge_msg+16,value,value_size);
strncpy(challenge_msg+16+value_size,user_name,strlen(user_name));
unsigned char challenge_hash[20]={0};
SHA1(challenge_msg,32+strlen(user_name),challenge_hash);
第二步
将用户密码转化成Unicode,并对其进行MD4的hash运算,得到16字节的hash值输出。
下为转化Unicode并进行MD4运算代码
unsigned char *unicode_user_passwd;
unicode_user_passwd=(unsigned char*)malloc(sizeof(unsigned char)*strlen(user_passwd)*2);
for(int i=0;i<strlen(user_name);i++){
	unicode_user_passwd[i*2]=user_passwd[i];
	unicode_user_passwd[i*2+1]=0;
}

unsigned char passwd_hash[21]={0x00};
MD4(unicode_user_passwd,strlen(user_passwd)*2,passwd_hash);
第三步
使用第二步得出的16字节MD4值,在其后面加入5个0,得到21字节的密钥,将其分成三段,作为三个密钥对第一步得到的8字节挑战消息进行DES加密。根据RFC 2759,我们还需要对这7字节的密钥进行密钥扩展,扩展后每段得到新的8字节密钥,使用新的8字节密钥对挑战消息进行DES加密
密钥扩展函数代码:
void expand(unsigned char *tmp_key, unsigned char* key)
{
	key[0]=tmp_key[0];
	for(int i=1;i<7;i++)
		key[i]=((tmp_key[i-1]<<(8-i))&0xff)|(tmp_key[i]>>i);
	key[7]=(tmp_key[6]<<1)&0xff;
	unsigned char b;
	for(int i=0;i<8;i++){
		b=1;
		for(int j=1;j<8;j++)
			b=((key[i]>>j)^b)&0x1;
		key[i]=(key[i]&0xfe)|b;
	}
	return ;
}
DES加密代码:
const_DES_cblock *input;
DES_cblock *output;
DES_key_schedule *ks;

input=(const_DES_cblock*)malloc(sizeof(const_DES_cblock));
output=(DES_cblock*)malloc(sizeof(DES_cblock));
ks=(DES_key_schedule*)malloc(sizeof(DES_key_schedule));
strncpy((unsigned char *)input,challenge_hash,8);

unsigned char response[24];
for(int i=0;i<3;i++){
	expand(passwd_hash+i*7,(unsigned char*)ks);
	DES_set_key_unchecked((DES_cblock*)ks,ks);
	DES_ecb_encrypt(input,output,ks,1);
	strncpy(response+8*i,(unsigned char*)output,8);
}
最终response中存储的即为挑战响应值
三、将数据写入二进制包
1、数据帧头的构建
数据帧头没有什么重要信息,我们只需要将其源Mac地址与目的Mac地址互换即可
以下是就交换函数代码:
void strswop(u_int8_t *dst, u_int8_t *src,int n)
{
	u_int8_t *temp;
	temp=(u_int8_t *)malloc(sizeof(u_int8_t)*n);
	for(int i=0;i<n;i++)
		temp[i]=src[i];
	for(int i=0;i<n;i++)
		src[i]=dst[i];
	for(int i=0;i<n;i++)
		dst[i]=temp[i];
	return ;
}
2、IP数据报头的构建
对于IP数据报头就需要一定的修改,其中ID号需要更改,还有IP数据包的长度,以及校验和,还有目的IP地址与源IP地址互换。
其中IP数据包的长度为原来的长度+用户名长度+33字节(多出来9个0字节+24个字节的挑战响应值)-读取到的服务器的名字长度namelen。
其中校验和我们发现在response包中为0,因此我们需要将其置0.
而ID号为系统赋予,我们使用+1(也可随机产生,或者使用抓到的包中的ID号)即可(但不可与原来的ID号相同)
IP_header->ID=IP_header->ID+1;
IP_header->TotalLen[1]=IP_header->TotalLen[1]+33-namelen+strlen(user_name);
IP_header->Checksum=0;
strswop(IP_header->SrcIP,IP_header->DstIP,4);
3、GRE协议头的构建
对于GRE协议头,我们需要更改载荷长度,ID号,确认号,以及队列号
载荷长度与数据报有一致,为原来的长度+用户名长度+33字节(多出来9个0字节+24个字节的挑战响应值)-读取到的服务器的名字长度namelen。
而ID号为系统赋予,我们使用+1(也可随机产生,或者使用抓到的包中的ID号)即可(但不可与原来的ID号相同)
确认号必须是前一个challenge包的队列号
队列号可以随机,我们+1即可。
GREheader->Payload_len[1]=GREheader->Payload_len[1]+33+strlen(user_name)-namelen;
GREheader->Call_ID=GREheader->Call_ID+1;
GREheader->Ack_num=GREheader->Seq_num;
GREheader->Seq_num=GREheader->Seq_num+1;
4、PPP协议头的构建
对于PPP协议头,我们需要更改长度及协议包类型,1为challenge,2为response,因此我们需要将协议头中的协议包类型改为2
PPPheader->code=2;
PPPheader->len[1]=PPPheader->len[1]+33+strlen(user_name)-namelen;
5、将以上构建的各种包头加上我们计算出的结果写入二进制文件
fp=fopen("file","wb");
fwrite(fra_header,sizeof(FrameHeader_t),1,fp); //写入数据帧头
fwrite(IP_header,sizeof(IPHeader_t),1,fp);//写入IP数据报头
fwrite(GREheader,sizeof(GRE_header),1,fp);//写入GRE协议头
fwrite(PPPpro,sizeof(PPP_pro),1,fp);//写入PPP协议类型
fwrite(PPPheader,sizeof(PPP_header),1,fp);//写入PPP协议头
unsigned char res_value_size=49;
fwrite(&res_value_size,1,1,fp);
//写入对等挑战值长度+9个0字节+挑战响应值长度
fwrite(peer_challenge,16,1,fp);//写入对等挑战值
res_value_size=0;
for(int i=0;i<8;i++)
	fwrite(&res_value_size,1,1,fp);//写入8个字节的0进行填充
fwrite(response,24,1,fp);//写入挑战响应值
fwrite(&res_value_size,1,1,fp);//写入flag,必须为0
fwrite(user_name,strlen(user_name),1,fp);//写入用户名
fclose(fp);
四、查看二进制文件并比对


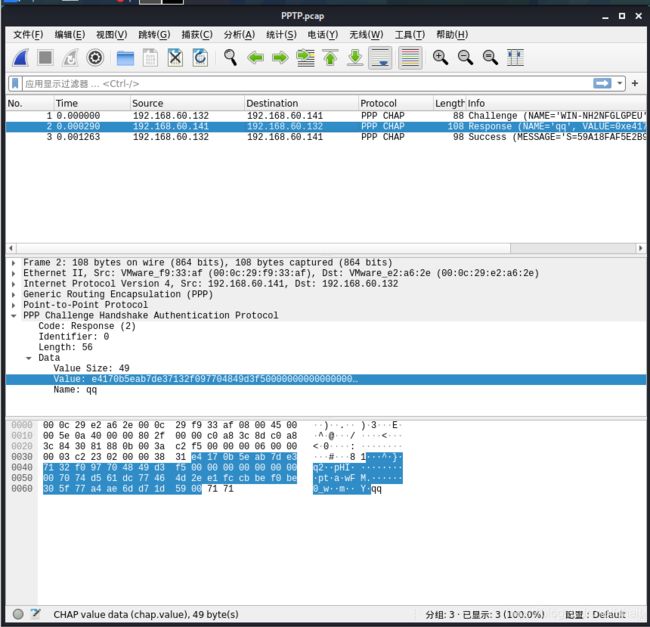
第一张图为我们写出来的二进制文件,第二张图为我们抓到的response包,可以看到,几乎一模一样,其中有一些ID号是我们自己生成的,因此不一样,说明我们正确生成了chap的应答包,达成要求
实验心得
通过本实验,对pcap包的结构以及格式有了一定了解,对于解析数据帧、IP数据报更加熟悉,同时对chap v2的加密协议以及过程有了更深的了解,同时对OpenSSL编程掌握更加深入,更加懂得了对标准文档研究的重要性。
总之一句话,受益匪浅。
资源就在下面啦
https://mp.csdn.net/mp_download/manage/download/UpDetailed