ALBEF图文检索代码运行
文章目录
- Flickr30k数据集
-
- 数据集构成
- 数据集下载
- 代码运行
-
- 报错解决方案
- 可视化
-
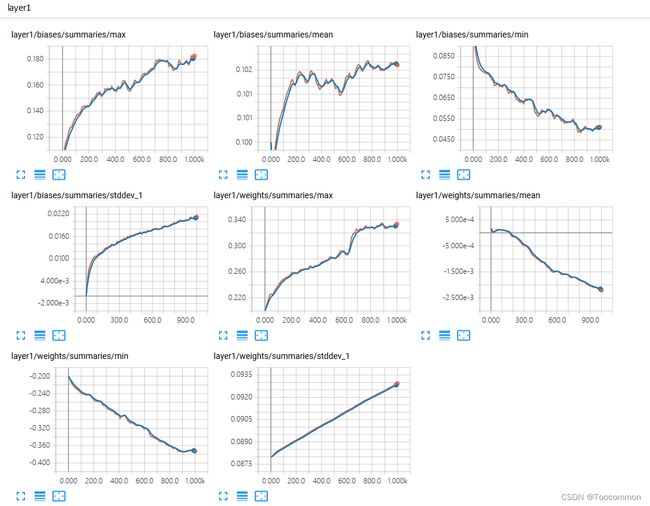
- TensorBoard可视化
- 代码语法
-
- python中的模块
- linear函数
Flickr30k数据集
数据集构成
测试集test.json的格式是:一张图片对应5个caption
验证集val.json也是这个格式。
{
        "image": "flickr30k-images/183647966.jpg",
        "caption": [
            "A man waring a polo shirt fixes a ticket machine while persons line up at an adjoining machine.",
            "A woman dressed in black with shopping bags is waiting on the sidewalk.",
            "A male worker with his tool box is kneeling next to two women.",
            "A man working on a ticket machine as two women stand near.",
            "A man working on a ticket box."
        ]
    },
训练集train.json的格式是:一张图片对应1个caption
{
    "image": "flickr30k-images/1000092795.jpg",
    "caption": "Two young guys with shaggy hair look at their hands while hanging out in the yard.",
    "image_id": 0
},
数据集下载
该链接提供百度云下载网址
链接:https://blog.csdn.net/gaoyueace/article/details/80564642
代码运行
执行手册:https://www.cnblogs.com/xuehuiping/p/16128518.html
参考手册:https://blog.csdn.net/m0_45314033/article/details/106723308
tips:
- 调代码的目的是跑通,可以将代码层数减少
batch_size_train: 4 #32
batch_size_test: 8 #64
- 更改dataset.py中的测试图像路径
报错解决方案
- 当出现报错信息,告诉你need干嘛时,按照提示说的来;
- 当出现一系列报错,一条一条地看,直到看到import来外界的包为止。首先我们假设外界的包没有问题,是我们自己代码的问题。然后print看看我们的接口和引入包的传参问题,先考虑是不是参数类型不对、长度不对、print看看啊等;
- 如果本地代码没有问题,再考虑是不是包版本的问题,这个问题靠搜索。
可视化
TensorBoard可视化
执行手册:https://zhuanlan.zhihu.com/p/33178205
代码链接:https://github.com/guoswang/TensorBoard/blob/master/README.md

代码语法
python中的模块
函数的优点之一是,使用它们可将代码块与主程序分离。通过给函数指定描述性名称,可让主程序容易理解得多。而我们还可以进一步优化代码,将函数存储在被称为 模块(模块是扩展名为 .py 的文件)的独立文件中,再将模块导入到主程序中。import 语句允许在当前运行的程序文件中使用模块中的代码。实际工作中也是如此,这样可以隐藏程序代码的细节,将重心放在程序的高层逻辑上。而且重用性也会提高,也能让其他程序员使用你的函数,只需要将这些文件共享给他就行了。
一、导入整个模块
如果你写了一个 utils.py 的文件里有一些通用的函数,然后你想在 test.py 里面使用这些函数,如何去做呢?如下:
utils.py

def print():
    print("hello world !")
    defgreet_user(username):print("hello" + username.title())

test.py
import utils

#注意使用函数前需要用模块名加 .(点)
utils.print()
这样就可以打印“hello world !”了。
解释:Python在读取test文件时,代码行import utils 打开文件utils.py,并将其中的所有函数都复制到这个程序中,你看不到复制的代码,因为这个程序运行时,Python在幕后已经完成了复制。你只需要知道在test.py中可以使用utils.py 中的所有函数(使用函数时语法是:模块名.函数名)。
二、导入特定的函数
如果你只想使用模块中的某一个函数,可以使用from 模块名 import 函数名,如下:
test.py

//导入特定的函数
from utils import importgreet_user

greet_user('joker')
如果使用这种方式,调用函数时则不需要模块名加点来调用函数。
三、给模块指定别名
可以给模块指定别名,便于我们去调用函数,如下:
test.py

importutils as u

#注意使用函数前需要用模块名加 .(点)
u.print()
在给模块指定别名之后则可以使用别名去调用函数,这样会使代码更加简洁且不需要去关注模块名,而专注于函数名。
函数命名:给函数命名时,最好是见名知意,且在函数定义后面,可以用注释简要阐述其主要功能
linear函数
原文链接:https://blog.csdn.net/qimo601/article/details/112648317
PyTorch的nn.Linear()是用于设置网络中的全连接层的,需要注意的是全连接层的输入与输出都是二维张量,一般形状为[batch_size, size],不同于卷积层要求输入输出是四维张量。其用法与形参说明如下:

in_features指的是输入的二维张量的大小,即输入的[batch_size, size]中的size。
out_features指的是输出的二维张量的大小,即输出的二维张量的形状为[batch_size,output_size],当然,它也代表了该全连接层的神经元个数。
从输入输出的张量的shape角度来理解,相当于一个输入为[batch_size, in_features]的张量变换成了[batch_size, out_features]的输出张量。
用法示例:
import torch as t
from torch import nn

# in_features由输入张量的形状决定,out_features则决定了输出张量的形状
connected_layer = nn.Linear(in_features = 64*64*3, out_features = 1)

# 假定输入的图像形状为[64,64,3]
input = t.randn(1,64,64,3)

# 将四维张量转换为二维张量之后,才能作为全连接层的输入
input = input.view(1,64*64*3)
print(input.shape)
output = connected_layer(input) # 调用全连接层
print(output.shape)
这段代码运行结果为:
input shape is %s torch.Size([1, 12288])
output shape is %s torch.Size([1, 1])
import torch

x = torch.randn(128, 20)  # 输入的维度是(128,20)
m = torch.nn.Linear(20, 30)  # 20,30是指维度
output = m(x)
print('m.weight.shape:\n ', m.weight.shape)
print('m.bias.shape:\n', m.bias.shape)
print('output.shape:\n', output.shape)

# ans = torch.mm(input,torch.t(m.weight))+m.bias 等价于下面的
ans = torch.mm(x, m.weight.t()) + m.bias
print('ans.shape:\n', ans.shape)

print(torch.equal(ans, output))


m.weight.shape:
  torch.Size([30, 20])
m.bias.shape:
 torch.Size([30])
output.shape:
 torch.Size([128, 30])
ans.shape:
 torch.Size([128, 30])
True
为什么 m.weight.shape = (30,20)?
答:因为公式的线性变换。
先生成一个(30,20)的weight,实际运算中再转置,这样就能和x做矩阵乘法了